
The Recycle Bin is your desktop trash basket. This is where you put files and folders when they've outlived their usefulness; it's the waiting room for data oblivion. There they stay, waiting to be rescued by being dragged out again, until you empty the Recycle Bin.
You can drag an icon on top of the Recycle Bin icon, or move highlighted folder or file icons into it using one of these techniques:
Press the Delete key.
Click the Delete icon on the Standard Buttons toolbar.
Choose File→Delete.
Right-click a highlighted icon and choose Delete from the shortcut menu.
You can put unwanted files or folders into the Recycle Bin from any folder window, from within Windows Explorer, or even inside the Open File dialog box of Windows applications.
Note
All of these methods put icons from your hard drive into the Recycle Bin. But deleting an icon from a removable drive (floppy, Jaz, or Zip drives, for example) or from other computers on the network, does not involve the Recycle Bin, and gives you no opportunity to retrieve them.
POWER USERS' CLINIC : Secrets of the Send To Command
If you find yourself copying or moving certain icons to certain folders or disks with certain regularity, it's time to exploit the File→Send To command that lurks in every folder window (and in the shortcut menu for almost every icon).
This command's submenus offer a quick way to copy and move highlighted icons to popular destinations. For example, you can teleport a copy of a highlighted file directly to a floppy disk by choosing File→Send To→3 1/2 Floppy. You're spared the tedium of choosing Copy, selecting the floppy drive, and choosing Paste. Another useful command is "Send To→Desktop (create shortcut)," which dumps a shortcut icon onto your desktop background. Then there's the Send To→Mail Recipient, which bundles the highlighted icon as an email attachment that's ready to send.

But the real power of the Send To command is its ability to accommodate your own favorite or frequently used folders. Lurking in your My Computer→C: drive→Documents and Settings→[Your Name] folder is a folder called SendTo. Any shortcut icon you place here shows up instantly in the File→Send To menus (and shortcut menus) of your desktop folders (and icons).
This folder, alas, is among those that Microsoft considers inappropriate for inspection by novices. As a result, the SendTo folder comes hidden in Windows. To make it appear, open any folder window; choose Tools→Folder Options; click the View menu; and turn on "Show hidden files and folders." Click OK. Now, when you open the My Computer→C: drive→Documents and Settings→[Your Name] folder, you'll see the SendTo folder.
Most people create shortcuts here for folders and disks (such as your favorite backup disk). When you highlight an icon and then choose Send To→My Documents, for example, Windows copies that icon to the My Documents folder. (If you press Shift while you do so, you move the icon to the other disk or folder.)
But you can even add shortcuts of applications (program files) to the SendTo folder. By adding WinZip to this Send To menu, for example, you'll be able to drop-kick a highlighted icon onto the WinZip icon (for decompressing) just by choosing Send To→WinZip. You can even create shortcuts of your printer or fax modem; thereafter, you can print or fax a document just by highlighting its icon and choosing File→Send To→[your printer or fax modem's name].
You'll be asked to confirm if you want to send the files to the Recycle Bin. After you click Yes, Windows moves the icons there (see Figure 5-6). Now the Recycle Bin icon changes: The container appears to be brimming over with paper.

Figure 5-6. It's easy to tell when a deletion is headed for the Recycle Bin—the confirming dialog box looks like the one shown here at top. If the deleted icon is being permanently and irrevocably deleted, the dialog box has a different icon (bottom), complete with an attention-getting exclamation point.
If you change your mind about sending something to the software graveyard, open the Recycle Bin by double-clicking. A window like the one in Figure 5-7 opens.
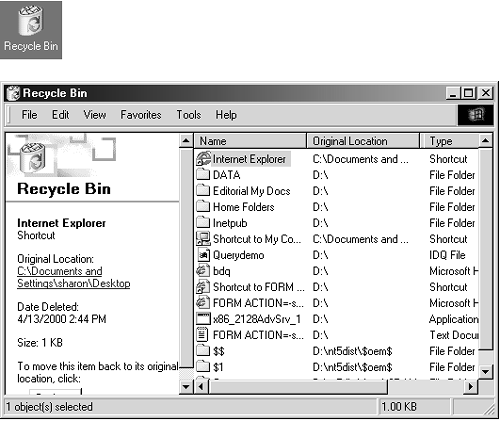
Figure 5-7. When you double-click the Recycle Bin (top), the Recycle Bin window (bottom) displays information about each folder and file it holds. You can sort the contents, making it easier to find a deleted icon, by clicking the gray column heading for the type of sort you need.
To restore a file or a folder, right-click its listing and choose Restore from the shortcut menu. To restore multiple files, select them using any of the techniques described on Section 5.3. Then right-click any one selected file and choose Restore from the shortcut menu. And to put everything back, of course, just click the Restore All button (at the bottom of the left-side Recycle Bin window pane).
Restored, in this case, means returned to the folder from whence it came, wherever on your hard drive it was when you deleted it. If you restore an icon whose original folder has been deleted in the meantime, Windows re-creates that folder to hold the restored file(s).
While there's an advantage in the Recycle Bin (you get to undo your mistakes), there's also a downside: The files in the Recycle Bin occupy as much disk space as they did when they were stored in folders. Deleting files doesn't gain you any additional disk space until you empty the Recycle Bin.
That's why most people, sooner or later, follow up an icon's journey to the Recycle Bin with one of these two cleanup operations:
Right-click the Recycle Bin icon and choose Empty Recycle Bin from the shortcut menu.
Choose File→Empty Recycle Bin, or click the Empty Recycle Bin button in the window.
Open the Recycle Bin window. Highlight only the icons you want to get rid of. Click the Delete button on the toolbar (if it's there), or press the Delete key. (This method lets you empty only part of the Recycle Bin.)
Wait. When the Recycle Bin accumulates so much stuff that it occupies a significant percentage of your hard drive space, Windows empties it automatically, as described in the next section.
All of these procedures produce "Are you sure?" messages.
You can make several useful changes to the behavior of the Recycle Bin. Right-click its icon and choose Properties from the shortcut menu. The Recycle Bin Properties dialog box appears (see Figure 5-8).

Figure 5-8. Use the Recycle Bin Properties dialog box to govern the way the Recycle Bin works, or even if it works at all. If you have multiple hard drives, the dialog box has a tab for each of them, so that you can configure a separate and independent Recycle Bin on each drive.
On the Global tab of the Recycle Bin Properties panel, a checkbox controls the confirmation notice that opens every time you delete a file or folder.
If you like the comfort of being consulted about every deletion, leave the checkmark in the box. If you clear the checkmark, files you delete will move to the Recycle Bin without asking for your confirmation. (Turning off this warning isn't much of a safety risk; after all, files aren't really being removed from your drive when you put them in the Recycle Bin.)
If you, a person of steely nerve and perfect judgment, never delete a file in error, you can make your files bypass the Recycle Bin entirely when you delete them. You'll reclaim disk space instantly when you press the Delete key to vaporize a highlighted file or folder.
To set this up, turn on the "Do not move files to the Recycle Bin" checkbox (Figure 5-8). And voilà: Your safety net is gone. (Especially if you also turn off the confirmation dialog box as described above. Then you're really living dangerously.)
If always skipping the Recycle Bin seems too extreme, consider this safety/convenience compromise: Leave the Recycle Bin safety net in place most of the time, but bypass the Recycle Bin only when it seems appropriate.
The trick to skipping the Recycle Bin on a one-shot basis is to press the Shift key while you delete a file. Doing so—and then clicking Yes in the confirmation box—deletes the file permanently, skipping its layover in the Recycle Bin. (The Shift-key trick works for every method of deleting a file: pressing the Delete key, choosing Delete from the shortcut menu, and so on.)
Warning
Some older programs (those not written specifically for Windows 95 or later) let you delete files right from within the program. Files deleted this way don't get sent to the Recycle Bin. Similarly, files you delete at the DOS prompt also disappear into never-never land rather than into the Recycle Bin. Therefore, for safety's sake, you should make all your deletions through the Windows Explorer or My Computer or on the desktop. The file goes to the Recycle Bin only if Windows 2000 Pro knows about the deletion.
Behind the scenes, the Recycle Bin is a reserved space on your hard drive. When you delete an icon or drag it to the Recycle Bin icon, Windows actually moves it to that reserved space. (If you have more than one hard drive, each drive has its own reserved space and its own Recycle Bin icon, although opening the Recycle Bin icon always shows you all the deleted files from all drives.)
To adjust the size of this reserved area, open the Recycle Bin's Properties dialog box, click "Configure drives independently," and then click each drive tab in turn. Click the sliding arrow to move the percentage up or down. The field below the slider shows the percentage of the drive that's reserved. (If your drives are different sizes, you might want to make things easier for yourself by just reserving the same percentage on each drive.)
Remember that the Recycle Bin works on a "first in, first out" basis, so if you make the reserved space very small, deleted files may pass into oblivion faster than you'd like.