
Moving folders and files from one disk or folder to another is a snap. Windows offers two different techniques: dragging icons and using the Copy and Paste commands.
No matter which method you use, however, you start by showing Windows which icons you want to copy or move. And you do that by highlighting them.
To highlight one icon, you just click it once. But you don't have to move or copy one icon at a time; you can select multiple icons in the same folder or disk window. For example, you can move a bunch of documents from one folder in your My Documents folder to another, or copy a group of them onto a backup disk.
Tip
It's easier to work with multiple icons in Details view (Section 4.2.1.2), where all the icons are displayed in a single column.
To highlight multiple files in preparation for moving or copying, use one of these techniques:
To select all the icons in a window, press Ctrl+A (the keyboard equivalent of the Edit→Select All command).
If you're looking at the contents of a window in Details view, you can drag vertically over the file and folder names to highlight a group of consecutive icons.
Alternatively, click the first icon you want to highlight, and then press Shift as you click the last file. All the files in between are automatically selected, along with the two icons you clicked.
If you're looking at the contents of a window in Large or Small icon view, you can highlight a group of neighboring icons just by dragging across them. Start with your cursor above and to one side of the icons; drag diagonally. As you drag, you create a temporary dotted-line rectangle. Any icon that falls within this rectangle darkens to show that it's selected.
If you want to highlight only, for example, the first, third, and seventh icons in the list, start by clicking icon No. 1. Then, while pressing the Ctrl key, click each of the others.
(If you click a selected icon again while pressing Ctrl, you deselect it. You can use this trick when you've just highlighted an icon by accident.)
You can drag icons from one folder to another, from one drive to another, from a drive to a folder on another drive, and so on. (When you've selected several icons, drag any one of them; the others go along for the ride.)
Here's what happens when you drag icons in the usual way (using the left mouse button):
Dragging to another folder on the same disk moves the icon.
Holding down the Ctrl key while dragging to another folder on the same disk copies the icon. (If you do so within a single window, you get a duplicate of the file called "Copy of [whatever its name was].")
Dragging an icon from one disk to another copies the folder or file.
Pressing Shift while dragging from one disk to another moves the folder or file (without leaving a copy behind).
Tip
You can move or copy icons by dragging them either into an open window or directly onto a disk or folder icon.
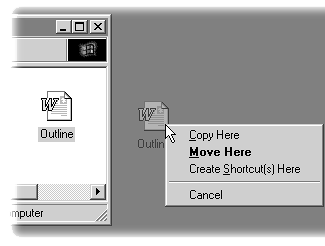
Instead of trying to remember all of those possibilities, consider using the right mouse button as you drag. When you release the button, the menu shown in Figure 5-4 appears.
You may find it easier to copy or move icons in Windows Explorer, because the two-pane display format makes easier to see where your files are and where they're going. (Remember, you can add the Explorer-like folder-list hierarchy to any window by choosing View→Explorer Bar→Folders.)
If necessary, click the + button next to the appropriate icon in the left pane to make the destination folder visible.
For example, if you want to copy an icon into a certain folder, expand the drive (by clicking the + button) so that you can see its list of folders. If the destination is a folder within that folder, expand its parent folder as necessary.
Click the icon (not the + button) of the disk or folder that contains the icon you want to manipulate.
Its contents appear in the right pane.
Locate the icon you want to move in the right pane; drag it to the appropriate -folder in the left pane (see Figure 5-5).
Figure 5-5. The file First Draft, located in My DocumentsThe Great Austrian Novel, is being dragged to the folder named Ready to Submit. As the mouse pointer moves over any folder in the left pane, that folder's name is highlighted automatically. When you arrive at the correct target folder, release the mouse button.

Dragging icons to copy or move them may feel good, because it's so direct: You actually see your arrow cursor pushing the icons into the new location.
But you pay a price for this satisfying illusion: You may have to spend a moment or two fiddling with your windows, or clicking buttons in the Explorer folder hierarchy, so that you have a clear "line of drag" between the icon to be moved and the destination folder.
Fortunately, there's a better way: You can use the Cut, Copy, and Paste commands to move icons from one window into another. The routine goes like this:
Highlight the icon or icons you want to move.
Right-click one of the icons. Choose Cut or Copy from the shortcut menu.
Alternatively, you can choose Edit→Cut or Edit→Copy, using the menu bar at the top of the window. (Eventually, you may want to learn the keyboard shortcuts for these commands: Ctrl+C for Copy, Ctrl+X for Cut.)
The Cut command makes the highlighted icons disappear from the window. You've stashed them on the invisible Windows Clipboard, as described in Chapter 7.
The Copy command also places copies of the files on the Clipboard, but doesn't disturb the originals.
Right-click the window, folder icon, or disk icon where you want to put the icons. Choose Paste from the shortcut menu.
Once again, you may prefer to use the menu bar: Choose Edit→Paste. Keyboard equivalent: Ctrl+V.
Either way, you've successfully transferred the icons. If you pasted into an open window, you'll see the icons appear there. If you pasted onto a closed folder or disk icon, you have to open the icon's window to see the results. And if you pasted right back into the same window, you get a duplicate of the file called "Copy of [whatever its name was]."