
Chapter 28. Maintaining Application State
Developers who are new to programming for the web always have difficulty understanding the problem of maintaining state. The HTTP protocol, the fundamental protocol of the World Wide Web, is a stateless protocol. What this means is that from a web server’s perspective, every request is from a new user. The HTTP protocol does not provide you with any method of determining whether any two requests are made by the same person.
However, maintaining state is important in just about any web application. The paradigmatic example is a shopping cart. If you want to associate a shopping cart with a user over multiple page requests, you need some method of maintaining state.
This chapter looks at three methods included in ASP.NET 4 Framework for associating data with a particular user over multiple page requests. In the first section, you learn how to create and manipulate browser cookies. A browser cookie enables you to associate a little bit of text with each website user.
Next, you learn how to take advantage of Session state, which enables you to associate an arbitrary object with any user. For example, you can store a shopping cart object in Session state.
You learn how take advantage of cookieless Session state so that you can use Session state even when a browser has cookies disabled. You also learn how to make Session state more robust by enabling out-of-process Session state.
Finally, we examine a feature introduced with ASP.NET 2.0 the Profile object. The Profile object provides you with a method of creating a strongly typed and persistent form of session state.
You learn different methods of defining a profile. You also learn how to use the Profile object from within a component. Finally, you learn how to implement a custom Profile provider.
Using Browser Cookies
Cookies were introduced into the world with the first version of the Netscape browser. The developers at Netscape invented cookies to solve a problem that plagued the Internet at the time. There was no way to make money because there was no way to create a shopping cart.
Here’s how cookies work. When a web server creates a cookie, an additional HTTP header is sent to the browser when a page is served to the browser. The HTTP header looks like this:
Set-Cookie: message=Hello
This Set-Cookie header causes the browser to create a cookie named message that has the value Hello.
After a cookie has been created on a browser, whenever the browser requests a page from the same application in the future, the browser sends a header that looks like this:
Cookie: message=Hello
The Cookie header contains all the cookies that have been set by the web server. The cookies are sent back to the web server each time a request is made from the browser. A cookie is nothing more than a little bit of text. You can store only string values when using a cookie.
You actually can create two types of cookies: session cookies and persistent cookies. A session cookie exists only in memory. If a user closes the web browser, the session cookie disappears forever.
A persistent cookie, on the other hand, can last for months or even years. When you create a persistent cookie, the cookie is stored permanently by the user’s browser on the user’s computer. Internet Explorer, for example, stores cookies in a set of text files contained in the following folder:
Documents and Settings[user]Cookies
The Mozilla Firefox browser, on the other hand, stores cookies in the following file:
![]()
Because different browsers store cookies in different locations, cookies are browser-relative. If you request a page that creates a cookie when using Internet Explorer, the cookie doesn’t exist when you open Firefox or Opera. Furthermore, both Internet Explorer and Firefox store cookies in clear text. You should never store sensitive information—such as Social Security numbers or credit card numbers in a cookie.
Note
Where does the name cookie come from? According to the original Netscape cookie specification, the term cookie was selected “for no compelling reason.” However, the name most likely derives from the UNIX world in which a “magic cookie” is an opaque token passed between programs.
Cookie Security Restrictions
Cookies raise security concerns. When you create a persistent cookie, you are modifying a file on a visitor’s computer. There are people who sit around all day dreaming up evil things that they can do to your computer. To prevent cookies from doing horrible things to people’s computers, browsers enforce a number of security restrictions on cookies.
First, all cookies are domain-relative. If the Amazon website sets a cookie, the Barnes & Noble website cannot read the cookie. When a browser creates a cookie, the browser records the domain associated with the cookie and doesn’t send the cookie to another domain.
Note
An image contained in a web page might be served from another domain than the web page itself. Therefore, when the browser makes a request for the image, a cookie can be set from the other domain. Companies, such as DoubleClick, that display and track advertisements on multiple websites take advantage of this loophole to track advertisement statistics across multiple websites. This type of cookie is called a third-party cookie.
The other important restriction that browsers place on cookies is a restriction on size. A single domain cannot store more than 4,096 bytes. This size restriction encompasses the size of both the cookie names and the cookie values.
Note
Internet Explorer supports a feature named the userData behavior, which enables you to persist far more data than a cookie (10,240KB for an intranet site and 1,024 for an Internet site). To learn more about the userData behavior, visit the Microsoft MSDN website (msdn.microsoft.com).
Finally, most browsers restrict the number of cookies that can be set by a single domain to no more than 20 cookies (but not Internet Explorer). If you attempt to set more than 20 cookies, the oldest cookies are automatically deleted.
Because of all the security concerns related to cookies, all modern browsers provide users with the option of disabling cookies. This means that unless you are building an Intranet application and you control every user’s browser, you should attempt to not rely on cookies. Strive to use cookies only when storing noncrucial information.
That said, many parts of ASP.NET Framework rely on cookies. For example, Web Parts, Forms Authentication, Session state, and anonymous Profiles all depend on cookies by default. If you depend on one of these features, there is no reason not to use cookies.
Furthermore, many websites rely on cookies. Many sections of the Yahoo! and MSDN websites you cannot visit without having cookies enabled. In other words, requiring visitors to have cookies enabled to use your website is not an entirely unreasonable requirement.
Creating Cookies
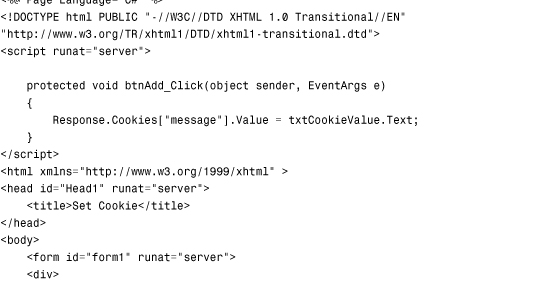
You create a new cookie by adding a cookie to the Response.Cookies collection, which contains all the cookies sent from the web server to the web browser. For example, the page in Listing 28.1 enables you to create a new cookie named Message. The page contains a form that enables you to enter the value of the Message cookie (see Figure 28.1).
Figure 28.1. Creating a new cookie.

Listing 28.1. SetCookie.aspx

Be warned that cookie names are case-sensitive. Setting a cookie named message is different from setting a cookie named Message.
If you want to modify the value of the cookie created by the page in Listing 28.1, you can open the page and enter a new value for the message cookie. When the web server sends its response to the browser, the modified value of the cookie is set on the browser.
The page in Listing 28.1 creates a session cookie. The cookie disappears when you close your web browser. If you want to create a persistent cookie, you need to specify an expiration date for the cookie.
The page in Listing 28.2 creates a persistent cookie.
Listing 28.2. SetPersistentCookie.aspx
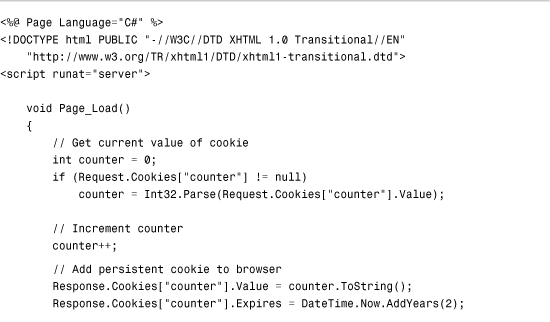

The page in Listing 28.2 tracks the number of times that you request the page. A persistent cookie named counter tracks page requests. The counter cookie’s Expires property is set to 2 years in the future. When you set a particular expiration date for a cookie, the cookie is stored as a persistent cookie.
Reading Cookies
You use the Response.Cookies collection to create and modify cookies. You use the Request.Cookies collection to retrieve a cookie’s value.
For example, the page in Listing 28.3 retrieves the message cookie’s value.
Listing 28.3. GetCookie.aspx
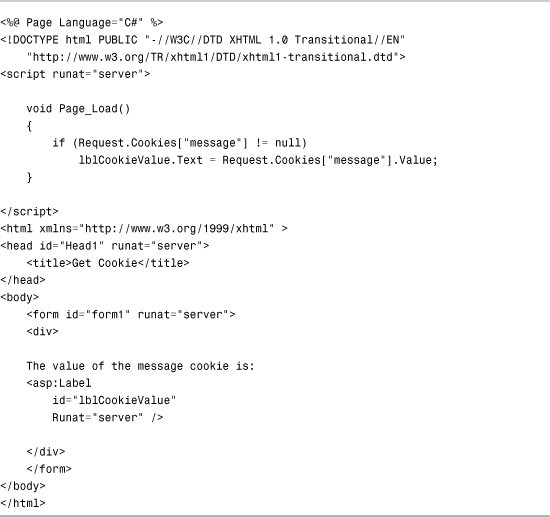
In Listing 28.3, the IsNothing() function checks whether the cookie exists before reading its value. If you don’t include this check, you might get a null reference exception. Also, don’t forget that cookie names are case-sensitive.
The page in Listing 28.4 lists all cookies contained in the Request.Cookies collection (see Figure 28.2).
Figure 28.2. Displaying a list of all cookies.

Listing 28.4. GetAllCookies.aspx

The only meaningful information that you get back from iterating through the Request.Cookies collection is the HasKeys, Name, and Value properties. The other columns show incorrect information. For example, the Expires column always displays a minimal date. Browsers don’t communicate these additional properties with page requests, so you can’t retrieve these property values.
When using the Request.Cookies collection, you need to understand that a For...Each loop returns different values than a For...Next loop. If you iterate through the Request.Cookies collection with a For...Each loop, you get the cookie names. If you iterate through the collection with a For...Next loop, you get instances of the HttpCookie class (described in the next section).
Setting Cookie Properties
Cookies are represented with the HttpCookie class. When you create or read a cookie, you can use any of the properties of this class:
• Domain—Enables you to specify the domain associated with the cookie. The default value is the current domain.
• Expires—Enables you to create a persistent cookie by specifying an expiration date.
• HasKeys—Enables you to determine whether a cookie is a multi-valued cookie (see the section “Working with Multivalued Cookies” later in this chapter).
• HttpOnly—Enables you to prevent a cookie from being accessed by JavaScript.
• Name—Enables you to specify a name for a cookie.
• Path—Enables you to specify the path associated with a cookie. The default value is /.
• Secure—Enables you to require a cookie to be transmitted across a Secure Sockets Layer (SSL) connection.
• Value—Enables you to get or set a cookie value.
• Values—Enables you to get or set a particular value when working with a multivalued cookie. (See the section “Working with Multivalued Cookies” later in this chapter.)
A couple of these properties require additional explanation. For example, you might find the Domain property confusing because you can’t change the domain associated with a cookie.
The Domain property is useful when your organization includes subdomains. If you want to set a cookie that can be read by the Sales.MyCompany.com, Managers.MyCompany.com, and Support.MyCompany.com domains, you can set the Domain property to the value .MyCompany.com. (Notice the leading period.) You can’t, however, use this property to associate a cookie with an entirely different domain.
The HttpOnly property enables you to specify whether a cookie can be accessed from JavaScript code. This property works only with Internet Explorer 6 (Service Pack 1) and above. The property was introduced to help prevent cross-site scripting attacks.
The Path property enables you to scope cookies to a particular path. For example, if you host multiple applications in the same domain, and you do not want the applications to share the same cookies, you can use the Path property to prevent one application from reading another application’s cookies.
The Path property sounds useful. Unfortunately, you should never use it. Internet Explorer performs a case-sensitive match against the path. If a user uses a different case when typing the path to a page into the address bar, the cookie isn’t sent. In other words, the following two paths don’t match:
http://localhost/original/GetAllCookies.aspx
http://localhost/ORIGINAL/GetAllCookies.aspx
Deleting Cookies
The method for deleting cookies is not intuitive. To delete an existing cookie, you must set its expiration date to a date in the past.
The page in Listing 28.5 illustrates how you can delete a single cookie. The page contains a form field for the cookie name. When you submit the form, the cookie with the specified name is deleted.
Listing 28.5. DeleteCookie.aspx
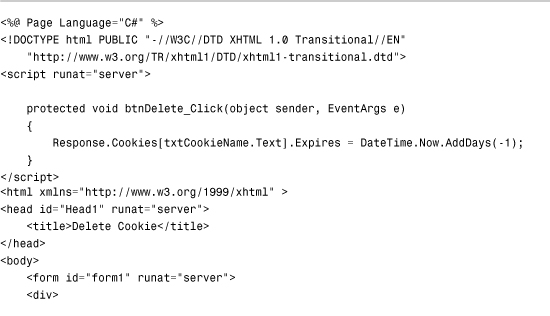

The particular date that you specify when deleting a cookie doesn’t matter as long as it is in the past. In Listing 28.5, the expiration date is set to one day ago.
The page in Listing 28.6 deletes all cookies sent from the browser to the current domain (and path).
Listing 28.6. DeleteAllCookies.aspx

The page in Listing 28.6 loops through all the cookie names from the Request.Cookies collection and deletes each cookie.
Working with Multivalued Cookies
According to the cookie specifications, browsers should not store more than 20 cookies from a single domain. You can work around this limitation by creating multivalued cookies.
A multivalued cookie is a single cookie that contains subkeys. You can create as many subkeys as you need.
For example, the page in Listing 28.7 creates a multivalued cookie named preferences. The preferences cookie stores a first name, last name, and favorite color (see Figure 28.3).
Figure 28.3. Creating a multivalued cookie.

Listing 28.7. SetCookieValues.aspx


When you submit the page in Listing 28.7, the following HTTP header is sent to the browser:
![]()
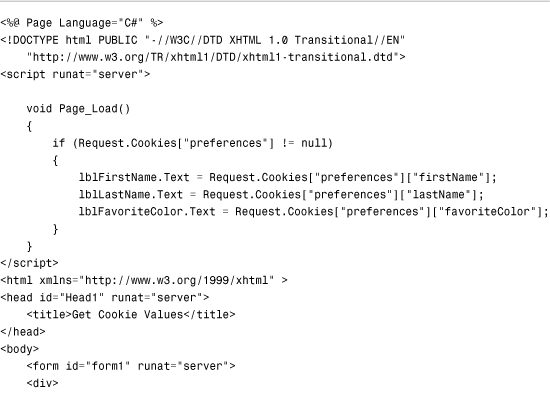
The page in Listing 28.8 reads the values from the preferences cookie.
Listing 28.8. GetCookieValues.aspx

You can use the HttpCookie.HasKeys property to detect whether a cookie is a normal cookie or a multivalued cookie.
Using Session State
You can’t use a cookie to store a shopping cart. A cookie is just too small and too simple. To enable you to work around the limitations of cookies, ASP.NET Framework supports a feature called Session state.
Like cookies, items stored in Session state are scoped to a particular user. You can use Session state to store user preferences or other user-specific data across multiple page requests.
Unlike cookies, Session state has no size limitations. If you had a compelling need, you could store gigabytes of data in Session state. Furthermore, unlike cookies, Session state can represent more complex objects than simple strings of text. You can store any object in Session state. For example, you can store a DataSet or a custom shopping cart object in Session state.
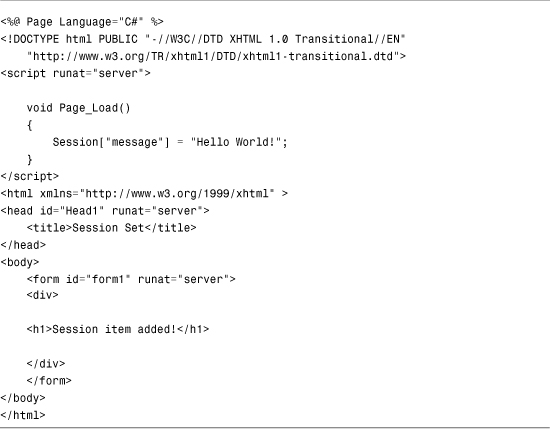
You add items to Session state by using the Session object. For example, the page in Listing 28.9 adds a new item named message to Session state that has the value Hello World!.
Listing 28.9. SessionSet.aspx
In the Page_Load() event handler in Listing 28.9, a new item is added to the Session object. You can use the Session object just as you would use a Hashtable collection.
The page in Listing 28.10 illustrates how you can retrieve the value of an item that you have stored in Session state.
Listing 28.10. SessionGet.aspx

When you use Session state, a session cookie named ASP.NET_SessionId is added to your browser automatically. This cookie contains a unique identifier. It is used to track you as you move from page to page.
When you add items to the Session object, the items are stored on the web server and not the web browser. The ASP.NET_SessionId cookie associates the correct data with the correct user.
By default, if cookies are disabled, Session state does not work. You don’t receive an error, but items that you add to Session state aren’t available when you attempt to retrieve them in later page requests. (You learn how to enable cookieless Session state later in this section.)
Warning
Be careful not to abuse Session state by overusing it. A separate copy of each item added to Session state is created for each user who requests the page. If you place a DataSet with 400 records into Session state in a page, and 500 users request the page, you have 500 copies of that DataSet in memory.
By default, ASP.NET Framework assumes that a user has left the website when the user has not requested a page for more than 20 minutes. At that point, any data stored in Session state for the user is discarded.
Storing Database Data in Session State
You can use Session state to create a user-relative cache. For example, you can load data for a user and enable the user to sort or filter the data.
The page in Listing 28.11 loads a DataView into Session state. The user can sort the contents of the DataView by using a GridView control (see Figure 28.4).
Figure 28.4. Sorting a DataView stored in Session state.

Listing 28.11. SessionDataView.aspx
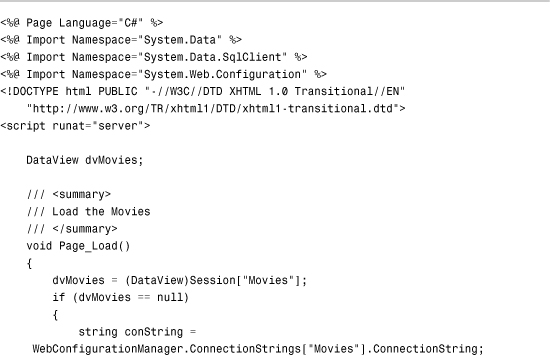


In Listing 28.11, a DataView object is stored in Session state. When you sort the GridView control, the DataView is sorted.
The page in Listing 28.11 includes a link that enables you to reload the page. The sort order of the records displayed by the GridView is remembered across page requests. The sort order is remembered even if you navigate to another page before returning to the page.
Using the Session Object
The main application programming interface for working with Session state is the HttpSessionState class. This object is exposed by the Page.Session, Context.Session, UserControl.Session, WebService.Session, and Application.Session properties. This means that you can access Session state from just about anywhere.
This HttpSessionState class supports the following properties (this is not a complete list):
• CookieMode—Enables you to specify whether cookieless sessions are enabled. Possible values are AutoDetect, UseCookies, UseDeviceProfile, and UseUri.
• Count—Enables you to retrieve the number of items in Session state.
• IsCookieless—Enables you to determine whether cookieless sessions are enabled.
• IsNewSession—Enables you to determine whether a new user session was created with the current request.
• IsReadOnly—Enables you to determine whether the Session state is read-only.
• Keys—Enables you to retrieve a list of item names stored in Session state.
• Mode—Enables you to determine the current Session state store provider. Possible values are Custom, InProc, Off, SqlServer, and StateServer.
• SessionID—Enables you to retrieve the unique session identifier.
• Timeout—Enables you to specify the amount of time in minutes before the web server assumes that the user has left and discards the session. The maximum value is 525,600 (1 year).
The HttpSessionState object also supports the following methods:
• Abandon—Enables you to end a user session.
• Clear—Enables you to clear all items from Session state.
• Remove—Enables you to remove a particular item from Session state.
The Abandon() method enables you to end a user session programmatically. For example, you might want to end a user session automatically when a user logs out from your application to clear away all of a user’s session state information.
Handling Session Events
There are two events related to Session state that you can handle in the Global.asax file: Session Start and Session End.
The Session Start event is raised whenever a new user session begins. You can handle this event to load user information from the database. For example, you can handle the Session Start event to load the user’s shopping cart.
The Session End event is raised when a session ends. A session comes to an end when it times out because of user inactivity or when it is explicitly ended with the Session.Abandon() method. You can handle the Session End event, for example, when you want to automatically save the user’s shopping cart to a database table.
The Global.asax file in Listing 28.12 demonstrates how you can handle both the Session Start and End events.
Listing 28.12. Global.asax

In Listing 28.12, the Global.asax file tracks the number of active sessions. Whenever a new session begins, the Session Start event is raised and the SessionCount variable is incremented by one. When a session ends, the Session End event is raised and the SessionCount variable is decremented by one.
The SessionCount variable is stored in Application state, which contains items shared among all users of a web application. The Application object is locked before it is modified. You must lock and unlock the Application object because multiple users could potentially access the same item in Application state at the same time.
Note
Application state is little used in ASP.NET applications. In most cases, you should use the Cache object instead of Application state because the Cache object is designed to manage memory automatically.
The page in Listing 28.13 displays the number of active sessions with a Label control (see Figure 28.5).
Figure 28.5. Displaying a count of user sessions.

Listing 28.13. ShowSessionCount.aspx

Warning
The Session End event is not raised by all session store providers. The event is raised by the InProc session store provider (the default provider), but it is not raised by the StateServer or SQLServer state providers.
Controlling When a Session Times Out
By default, ASP.NET Framework assumes that a user has left an application after 20 minutes have passed without the user requesting a page. In some situations, you want to modify the default timeout value.
For example, imagine that you are creating a college admissions website and the website includes a form that enables an applicant to enter a long essay. In that situation, you would not want the user session to timeout after 20 minutes. Please, give the poor college applicants at least 1 hour to write their essays. The disadvantage of increasing the Session timeout is that more memory is consumed by your application. The longer the Session timeout, the more server memory is potentially consumed.
You can specify the Session timeout in the web configuration file or you can set the Session timeout programmatically. For example, the web configuration file in Listing 28.14 changes the Session timeout value to 60 (1 hour).
Listing 28.14. Web.Config

You can modify the Session timeout value programmatically with the Timeout property of the Session object. For example, the following statement changes the timeout value from the default of 20 minutes to 60 minutes.
Session.Timeout = 60;
After you execute this statement, the timeout value is modified for the remainder of the user session. This is true even when the user visits other pages.
Using Cookieless Session State
By default, Session state depends on cookies. The ASP.NET Framework uses the ASP.NET_SessionId cookie to identity a user across page requests so that the correct data can be associated with the correct user. If a user disables cookies in the browser, Session state doesn’t work.
If you want Session state to work even when cookies are disabled, you can take advantage of cookieless sessions. When cookieless sessions are enabled, a user’s session ID is added to the page URL.
Here’s a sample of what a page URL looks like when cookieless sessions are enabled:
http://localhost:4945/Original/(S(5pnh11553sszre45oevthxnn))/SomePage.aspx
The strange-looking code in this URL is the current user’s Session ID. It is the same value as the one you get from the Session.SessionID property.
You enable cookieless sessions by modifying the sessionState element in the web configuration file. The sessionState element includes a cookieless attribute that accepts the following values:
• AutoDetect—The Session ID is stored in a cookie when a browser has cookies enabled. Otherwise, the cookie is added to the URL.
• UseCookies—The Session ID is always stored in a cookie (the default value).
• UseDeviceProfile—The Session ID is stored in a cookie when a browser supports cookies. Otherwise, the cookie is added to the URL.
• UseUri—The Session ID is always added to the URL.
When you set cookieless to the value UseDeviceProfile, ASP.NET Framework determines whether the browser supports cookies by looking up the browser’s capabilities from a set of files contained in the following folder:
WINDOWSMicrosoft.NETFramework[version]CONFIGBrowsers
If, according to these files, a browser supports cookies, the ASP.NET Framework uses a cookie to store the Session ID. The Framework attempts to add a cookie even when a user has disabled cookies in the browser.
When cookieless is set to the value AutoDetect, the framework checks for the existence of the HTTP Cookie header. If the Cookie header is detected, the framework stores the Session ID in a cookie. Otherwise, the framework falls back to storing the Session ID in the page URL.
The web configuration file in Listing 28.15 enables cookieless sessions by assigning the value AutoDetect to the cookieless attribute.
Listing 28.15. Web.Config

Note
The easiest way to test cookieless sessions is to use the Mozilla Firefox browser because this browser enables you to easily disable cookies. Select the menu option Tools, Options. Select the Privacy tab and uncheck Allow Sites to Set Cookies.
The configuration file in Listing 28.15 also includes a regenerateExpiredSessionId attribute. When you enable cookieless session state, you should also enable this attribute because it can help prevent users from inadvertently sharing session state.
For example, imagine that someone posts a link in a discussion forum to an ASP.NET website that has cookieless sessions enabled. The link includes the Session ID. If someone follows the link after the original session has timed out, a new Session is started automatically. However, if multiple people follow the link at the same time, all the people share the same Session ID and, therefore, they share the same Session state, which is a major security problem.
On the other hand, when regenerateExpiredSessionId is enabled and a session times out, the Session ID in the URL regenerates when a person requests the page. A redirect back to the same page is performed to change the Session ID in the URL. If a link is posted in a discussion forum, or sent to multiple users in an email, each user who follows the link is assigned a new Session ID.
When you enable cookieless sessions, you need to be careful to use relative URLs when linking between pages in your application. If you don’t use a relative URL, the Session ID cannot be added to the URL automatically.
For example, when linking to another page in your website, use a URL that looks like this (a relative URL):
/SomeFolder/SomePage.aspx
Do not use a URL that looks like this (an absolute URL):
http://SomeSite.com/SomeFolder/SomePage.aspx
If, for some reason, you need to use an absolute URL, you can add the Session ID to the URL by using the Response.ApplyAppPathModifier() method. This method takes an absolute URL and returns the URL with a Session ID embedded in it.
Configuring a Session State Store
By default, Session state is stored in memory in the same process as the ASP.NET process. There are two significant disadvantages to storing Session state in the ASP.NET process.
First, in-process Session state is fragile. If your application restarts, all Session state is lost. A number of different events can cause an application restart. For example, modifying the web configuration file or errors in your application both can cause an application restart.
Second, in-process Session state is not scalable. When Session state is stored in-process, it is stored on a particular web server. In other words, you can’t use in-process Session state with a web farm.
If you need to implement a more robust version of Session state, ASP.NET Framework supplies you with a number of options. You can configure ASP.NET Framework to store Session state in an alternative location by modifying the Session state mode.
You can set the Session state mode to any of the following values:
• Off—Disables Session state.
• InProc—Stores Session state in the same process as the ASP.NET process.
• StateServer—Stores Session state in a Windows NT process, which is distinct from the ASP.NET process.
• SQLServer—Stores Session state in a SQL Server database.
• Custom—Stores Session state in a custom location.
By default, the Session state mode is set to the value InProc. This is done for performance reasons. In-process Session state results in the best performance. However, it sacrifices robustness and scalability.
When you set the Session state mode to either StateServer or SQLServer, you get robustness and scalability at the price of performance. Storing Session state out-of-process results in worse performance because Session state information must be passed back and forth over your network.
Finally, you can create a custom Session state store provider by inheriting a new class from the SessionStateStoreProviderBase class. In that case, you can store Session state any place that you want. For example, you can create a Session state store provider that stores Session state in an Oracle or FoxPro database.
Configuring State Server Session State
When you enable State Server Session state, Session state information is stored in a separate Windows NT Service. The Windows NT Service can be located on the same server as your web server, or it can be located on another server in your network.
If you store Session state in the memory of a separate Windows NT Service, Session state information survives even when your ASP.NET application doesn’t. For example, if your ASP.NET application crashes, your Session state information is not lost because it is stored in a separate process.
Furthermore, you can create a web farm when you store state information by using a Windows NT Service. You can designate one server in your network as your state server. All the web servers in your web farm can use the central state server to store Session state.
You must complete the following two steps to use State Server Session state:
You can start the ASP.NET State Service by opening the Services applet located at Start, Administrative Tools (see Figure 28.6). After you open the Services applet, double-click the ASP.NET State Service and click Start to run the service. You also should change the Startup type of the service to the value Automatic so that the service starts automatically every time that you reboot your machine.
Figure 28.6. Starting the ASP.NET State service.

If you want to run the ASP.NET State Service on a separate server on your network, you must edit a Registry setting on the server that hosts the ASP.NET State Service. By default, the ASP.NET State Service does not accept remote connections. To allow remote connections, execute RegEdit from a command prompt and set the following Registry key to the value 1:
![]()
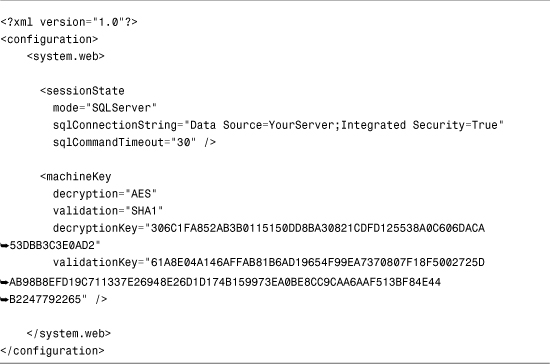
After you start the ASP.NET State Service, you need to configure your ASP.NET application to use it. The web configuration file in Listing 28.16 enables State Server Session State.
Listing 28.16. Web.Config

The web configuration file in Listing 28.16 modifies three attributes of the sessionState element. First, the mode attribute is set to the value StateServer. Next, the stateConnectionString attribute is used to specify the location of the ASP.NET State Server. In Listing 28.16, a connection is created to the local server on port 42428. Finally, the stateNetworkTimeout attribute specifies a connection timeout in seconds.
Note
You can configure the ASP.NET State Server to use a different port by modifying the following Registry value:
![]()
You need to stop and restart the ASP.NET State Service with the Services applet after making this modification.
The web configuration in Listing 28.16 includes a machineKey element. If you are setting up a web farm, and you need to use the same State Server to store Session state for multiple servers, you are required to specify explicit encryption and validation keys. On the other hand, you don’t need to include a machineKey element when the ASP.NET State Server is hosted on the same machine as your ASP.NET application.
Warning
Don’t use the web configuration file in Listing 28.16 without modifying the values of both the decryptionKey and validationKey attributes. Those values must be secret. You can use the GenerateKeys.aspx page discussed in Chapter 27, “Using ASP.NET Membership,” to generate new values for these attributes.
After you complete these configuration steps, Session state information is stored in the ASP.NET State Server automatically. You don’t need to modify any of your application code when you switch to out-of-process Session state.
Configuring SQL Server Session State
If you want to store Session state in the most reliable way possible, you can store Session state in a Microsoft SQL Server database. Because you can set up failover SQL Server clusters, Session state stored in SQL Server should survive just about anything, including a major nuclear war.
You must complete the following two steps to enable SQL Server Session state:
- Configure your database to support SQL Server
Sessionstate. - Configure your application to use SQL Server
Sessionstate.
You can use the aspnet_regsql tool to add the necessary tables and stored procedures to your database to support SQL Server Session state. The aspnet_regsql tool is located in the following path:
WINDOWSMicrosoft.NETFramework[version]aspnet_regsql.exe
Note
If you open the Visual Studio Command Prompt, you don’t need to navigate to the Microsoft.NET folder to use the aspnet_regsql tool.
Executing the following command enables SQL Server Session state for a database server named YourServer.
aspnet_regsql -C "Data Source=YourServer;Integrated Security=True" -ssadd
When you execute this command, a new database is created on your database server named ASPState. The ASPState database contains all the stored procedures used by Session state. However, by default, Session state information is stored in the TempDB database. When your database server restarts, the TempDB database is cleared automatically.
If you want to use SQL Server Session state with a failover cluster of SQL Servers, you can’t store Session state in the TempDB database. Also, if you want Session state to survive database restarts, you can’t store the state information in the TempDB database.
If you execute the following command, Session state is stored in the ASPState database instead of the TempDB database:
![]()
This command includes a -sstype p switch. The p stands for persistent. Session state stored in the ASPState database is called persistent Session state because it survives database server restarts.
Finally, you can store Session state in a custom database. The following command stores Session state in a database named MySessionDB:
![]()
Executing this command creates a new database named MySessionDB that contains both the tables and stored procedures for storing Session state. The -sstype switch has the value c for custom. The command also includes a -d switch that enables you to specify the name of the new database.
If you want to remove the Session state tables and stored procedures from a server, you can execute the following command:
![]()
Executing this command removes the ASPState database. It does not remove a custom Session state database. You must remove a custom database manually.
After you configure your database server to support Session state, you must configure your ASP.NET application to connect to your database. You can use the web configuration file in Listing 28.17 to connect to a database named YourServer.
Listing 28.17. Web.Config
The sessionState element includes three attributes. The mode attribute is set to the value SQLServer to enable SQL Server Session state. The second attribute, sqlConnectionString, contains the connection string to the Session state database. Finally, the sqlCommandTimeout specifies the maximum amount of time in seconds before a command that retrieves or stores Session state times out.
The configuration file in Listing 28.17 includes a machineKey element. If your Session state database is located on a different machine than your ASP.NET application, you are required to include a machineKey element that contains explicit encryption and validation keys.
Warning
Don’t use the web configuration file in Listing 28.16 or 28.17 without modifying the values of both the decryptionKey and validationKey attributes. Those values must be secret. You can use the GenerateKeys.aspx page discussed in Chapter 27 to generate new values for these attributes.
If you select the option to store Session state in a custom database when executing the aspnet_regsql tool, you need to specify the name of the custom database in your configuration file. You can use the web configuration file in Listing 28.18.
Listing 28.18. Web.config

The sessionState element in the configuration file in Listing 28.18 includes an allowCustomSqlDatabase attribute. Furthermore, the sqlConnectionString attribute contains the name of the custom database.
Enabling SQL Server session state has no effect on how you write your application code. You can initially build your application using in-process Session state and, when you have the need, you can switch to SQL Server Session state.
Note
ASP.NET 4 introduced a new option to compress session state for the out-of-process providers (SQL Server and State Server). You can enable compression when using these providers by setting the compressionEnabled option to true.

This compresses the session state before storing it, which can substantially improve performance.
Using Profiles
The ASP.NET Framework provides you with an alternative to using cookies or Session state to store user information: the Profile object. The Profile object provides you with a strongly typed, persistent form of session state.
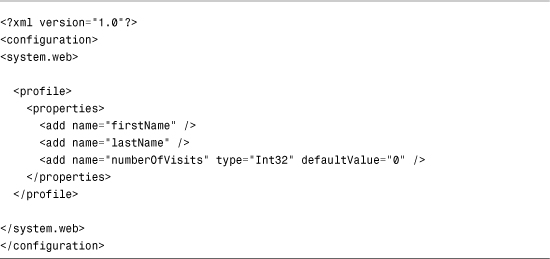
You create a Profile by defining a list of Profile properties in your application root web configuration file. The ASP.NET Framework dynamically compiles a class that contains these properties in the background. For example, the web configuration file in Listing 28.19 defines a Profile that contains three properties: firstName, lastName, and numberOfVisits.
Listing 28.19. Web.Config
When you define a Profile property, you can use any of the following attributes:
• name—Enables you to specify the name of the property.
• type—Enables you to specify the type of the property. The type can be any custom type, including a custom component that you define in the App_Code folder. (The default type is string.)
• defaultValue—Enables you to specify a default value for the property.
• readOnly—Enables you to create a read-only property. (The default value is false.)
• serializeAs—Enables you to specify how a property is persisted into a static representation. Possible values are Binary, ProviderSpecific, String, and Xml. (The default value is ProviderSpecific.)
• allowAnonymous—Enables you to allow anonymous users to read and set the property. (The default value is false.)
• provider—Enables you to associate the property with a particular Profile provider.
• customProviderData—Enables you to pass custom data to a Profile provider.
After you define a Profile in the web configuration file, you can use the Profile object to modify the Profile properties. For example, the page in Listing 28.20 enables you to modify the firstName and lastName properties with a form. Furthermore, the page automatically updates the numberOfVisits property each time the page is requested (see Figure 28.7).
Figure 28.7. Displaying Profile information.

Listing 28.20. ShowProfile.aspx


Profile properties are exposed as strongly typed properties. The numberOfVisits property, for example, is exposed as an integer property because you defined it as an integer property.
It is important to understand that Profile properties are persistent. If you set a Profile property for a user, and that user does not return to your website for 500 years, the property retains its value. Unlike Session state, when you assign a value to a Profile property, the value does not evaporate after a user leaves your website.
The Profile object uses the Provider model. The default Profile provider is the SqlProfileProvider. By default, this provider stores the Profile data in a Microsoft SQL Server 2008 Express database named ASPNETDB.mdf, located in your application’s App_Data folder. If the database does not exist, it is created automatically the first time that you use the Profile object.
By default, you cannot store Profile information for an anonymous user. The ASP.NET Framework uses your authenticated identity to associate Profile information with you. You can use the Profile object with any of the standard types of authentication supported by ASP.NET Framework, including both Forms and Windows authentication. (Windows authentication is enabled by default.)
Creating Profile Groups
If you need to define a lot of Profile properties, you can make the properties more manageable by organizing the properties into groups. For example, the web configuration file in Listing 28.21 defines two groups named Preferences and ContactInfo.
Listing 28.21. Web.Config

The page in Listing 28.22 illustrates how you can set and read properties in different groups.
Listing 28.22. ShowProfileGroups.aspx

Supporting Anonymous Users
By default, anonymous users cannot modify Profile properties. The problem is that ASP.NET Framework has no method of associating Profile data with a particular user unless the user is authenticated.
If you want to enable anonymous users to modify Profile properties, you must enable a feature of ASP.NET Framework called Anonymous Identification. When Anonymous Identification is enabled, a unique identifier (a GUID) is assigned to anonymous users and stored in a persistent browser cookie.
Note
You can enable cookieless anonymous identifiers. Cookieless anonymous identifiers work just like cookieless sessions: The anonymous identifier is added to the page URL instead of a cookie. You enable cookieless anonymous identifiers by setting the cookieless attribute of the anonymousIdentification element in the web configuration file to the value UseURI or AutoDetect.
Furthermore, you must mark all Profile properties that you want anonymous users to modify with the allowAnonymous attribute. For example, the web configuration file in Listing 28.23 enables Anonymous Identification and defines a Profile property that can be modified by anonymous users.
Listing 28.23. Web.Config
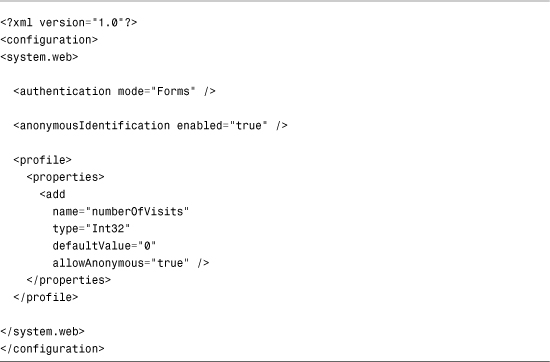
The numberOfVisits property defined in Listing 28.23 includes the allowAnonymous attribute. The web configuration file also enables Forms authentication. When Forms authentication is enabled, and you don’t log in, you are an anonymous user.
The page in Listing 28.24 illustrates how you modify a Profile property when Anonymous Identification is enabled.
Listing 28.24. ShowAnonymousIdentification.aspx
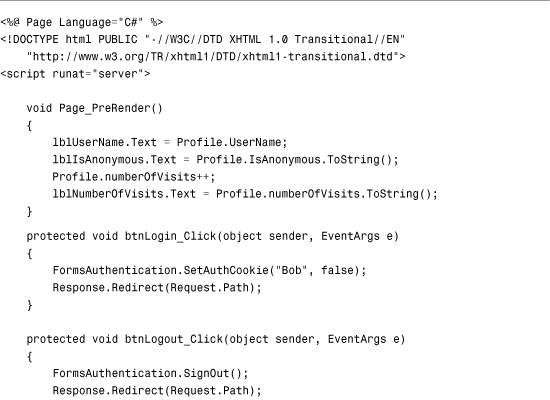


Each time that you request the page in Listing 28.24, the numberOfVisits Profile property is incremented and displayed. The page includes three buttons: Reload, Login, and Logout (see Figure 28.8).
Figure 28.8. Creating an anonymous profile.
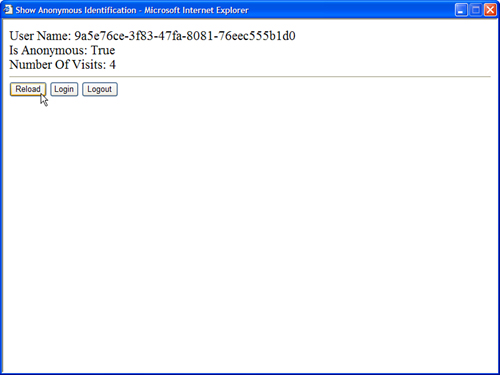
The page also displays the value of the Profile.UserName property. This property represents either the current username or the anonymous identifier. The value of the numberOfVisits Profile property is tied to the value of the Profile.UserName property.
You can click the Reload button to quickly reload the page and increment the value of the numberOfVisits property. If you click the Login button, the Profile.UserName property changes to the value Bob. The numberOfVisits property is reset.
If you click the Logout button, the Profile.UserName property switches back to your anonymous identifier. The numberOfVisits property reverts to its previous value.
Migrating Anonymous Profiles
In the previous section, you saw that all profile information is lost when a user transitions from anonymous to authenticated. For example, if you store a shopping cart in the Profile object and a user logs in, all the shopping cart items are lost.
You can preserve the value of Profile properties when a user transitions from anonymous to authenticated by handling the MigrateAnonymous event in the Global.asax file. This event is raised when an anonymous user that has a profile logs in.
For example, the MigrateAnonymous event handler in Listing 28.25 automatically copies the values of all anonymous Profile properties to the user’s current authenticated profile.
Listing 28.25. Global.asax

The anonymous Profile associated with the user is retrieved when the user’s anonymous identifier is passed to the Profile.GetProfile() method. Next, each Profile property is copied from the anonymous Profile to the current Profile. Finally, the anonymous Profile is deleted and the anonymous identifier is destroyed. (If you don’t destroy the anonymous identifier, the MigrateAnonymous event continues to be raised with each page request after the user authenticates.)
Inheriting a Profile from a Custom Class
Instead of defining a list of Profile properties in the web configuration file, you can define Profile properties in a separate class. For example, the class in Listing 28.26 contains two properties named FirstName and LastName.
Listing 28.26. App_CodeSiteProfile.cs

The class in Listing 28.26 inherits from the BaseProfile class.
After you declare a class, you can use it to define a profile by inheriting the Profile object from the class in the web configuration file. The web configuration file in Listing 28.27 uses the inherits attribute to inherit the Profile from the SiteProfile class.
Listing 28.27. Web.Config

After you inherit a Profile in the web configuration file, you can use the Profile in the normal way. You can set or read any of the properties that you defined in the SiteProfile class by accessing the properties through the Profile object.
Note
The downloadable code from the website that accompanies this book includes a page named ShowSiteProfile.aspx, which displays the Profile properties defined in Listing 28.27.
Note
If you inherit Profile properties from a class and define Profile properties in the web configuration file, the two sets of Profile properties are merged.
When you define Profile properties in a class, you can decorate the properties with the following attributes:
• SettingsAllowAnonymous—Enables you to allow anonymous users to read and set the property.
• ProfileProvider—Enables you to associate the property with a particular Profile provider.
• CustomProviderData—Enables you to pass custom data to a Profile provider.
For example, both properties declared in the SiteProfile class in Listing 28.27 include the SettingsAllowAnonymous attribute, which allows anonymous users to read and modify the properties.
Creating Complex Profile Properties
To this point, we used the Profile properties to represent simple types such as strings and integers. You can use Profile properties to represent more complex types such as a custom ShoppingCart class.
For example, the class in Listing 28.28 represents a simple shopping cart.
Listing 28.28. App_CodeShoppingCart.cs


The file in Listing 28.28 actually contains two classes: ShoppingCart and CartItem. The ShoppingCart class exposes a collection of CartItem objects.
The web configuration file in Listing 28.29 defines a Profile property named ShoppingCart that represents the ShoppingCart class. The type attribute is set to the fully qualified name of the ShoppingCart class.
Listing 28.29. Web.Config

Finally, the page in Listing 28.30 uses the Profile.ShoppingCart property. The contents of the ShoppingCart are bound and displayed in a GridView control. The page also contains a form that enables you to add new items to the ShoppingCart (see Figure 28.9).
Figure 28.9. Storing a shopping cart in a profile.
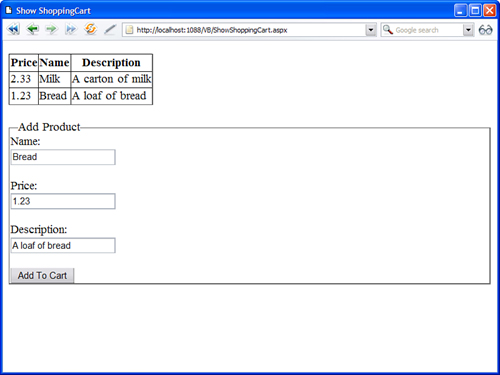
Listing 28.30. ShowShoppingCart.aspx


If you want to take control over how complex properties are stored, you can modify the value of the serializeAs attribute associated with a Profile property. The serializeAs attribute accepts the following four values:
• Binary
• ProviderSpecific
• String
• Xml
The default value, when using the SqlProfileProvider, is ProviderSpecific. In other words, the SqlProfileProvider decides on the best method for storing properties. In general, simple types are serialized as strings and complex types are serialized with the XML Serializer.
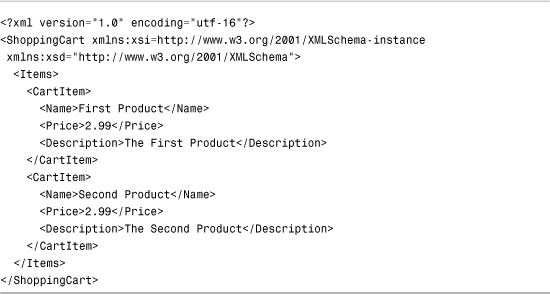
One disadvantage of the XML Serializer is that it produces a more bloated representation of a property than the Binary Serializer. For example, the results of serializing the ShoppingCart class with the XML Serializer are contained in Listing 28.31:
Listing 28.31. Serialized Shopping Cart
If you want to serialize a Profile property with the Binary Serializer (and save some database space), you need to do two things. First, you need to indicate in the web configuration file that the Profile property should be serialized with the Binary Serializer. Furthermore, you need to mark the class that the Profile property represents as serializable.
The modified ShoppingClass (named BinaryShoppingCart) in Listing 28.32 includes a Serializable attribute. Both the BinaryShoppingCart and BinaryCartItem classes are decorated with the Serializable attribute.
Listing 28.32. App_CodeBinaryShoppingCart.cs


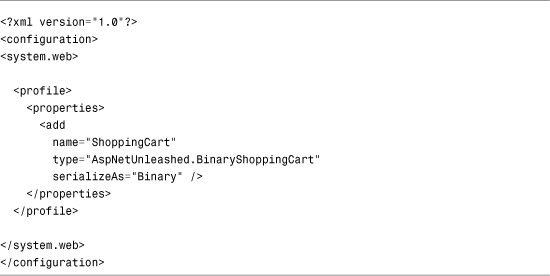
The Profile in the web configuration file in Listing 28.33 includes a property that represents the BinaryShoppingCart class. The property includes a serializeAs attribute that has the value Binary. If you don’t include this attribute, the BinaryShoppingCart will be serialized as XML.
Listing 28.33. Web.Config
Note
The code download from the website that accompanies this book includes a page named ShowBinaryShoppingCart.aspx that displays the BinaryShoppingCart.
Saving Profiles Automatically
A profile is loaded from its profile provider the first time that a property from the profile is accessed. For example, if you use a Profile property in a Page_Load() handler, the profile is loaded during the Page Load event. If you use a Profile property in a Page_PreRender() handler, the Profile is loaded during the page PreRender event.
If a Profile property is modified, the Profile is saved automatically at the end of page execution. The ASP.NET Framework can detect automatically when certain types of properties are changed but not others. In general, ASP.NET Framework can detect changes made to simple types but not to complex types.
For example, if you access a property that exposes a simple type such as a string, integer, or Datetime, ASP.NET Framework can detect when the property has been changed. In that case, the framework sets the Profile.IsDirty property to the value true. At the end of page execution, if a profile is marked as dirty, the profile is saved automatically.
The ASP.NET Framework cannot detect when a Profile property that represents a complex type has been modified. For example, if your profile includes a property that represents a custom ShoppingCart class, the ASP.NET Framework has no way of determining when the contents of the ShoppingCart class have been changed.
The ASP.NET Framework errs on the side of caution. If you access a complex Profile property at all—even if you simply read the property—ASP.NET Framework sets the Profile.IsDirty property to the value true. In other words, if you read a complex property, the profile is always saved at the end of page execution.
Because storing a profile at the end of each page execution can be an expensive operation, ASP.NET Framework provides you with two methods of controlling when a profile is saved.
First, you can take the responsibility of determining when a profile is saved. The web configuration file in Listing 28.34 disables the automatic saving of profiles by setting the autoSaveEnabled property to the value false.
Listing 28.34. Web.Config

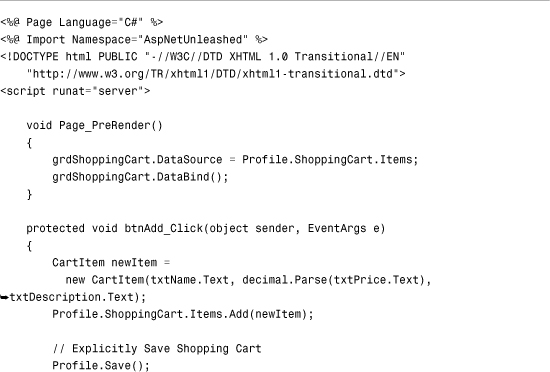
After you disable the automatic saving of profiles, you must explicitly call the Profile.Save() method to save a profile after you modify it. For example, the btnAdd_Click() method in Listing 28.35 explicitly calls the Profile.Save() method when a new item has been added to the shopping cart.
Listing 28.35. ShowExplicitSave.aspx


As an alternative to disabling the automatic saving of profiles, you can write custom logic to control when a profile is saved by handling the ProfileAutoSaving event in the Global.asax file. For example, the Global.asax file in Listing 28.36 saves a profile only when the Profile.ShoppingCart.HasChanged property has been assigned the value True.
Listing 28.36. Global.asax

Note
The code download from the website that accompanies this book includes the shopping cart class and ASP.NET page that accompany the Global.asax file in Listing 28.36. The class is named ShoppingCartHasChanged.cs and the page is named ShowShoppingCartHasChanged.aspx. You need to modify the web configuration file so that the profile inherits from the ShoppingCartHasChanged class.
Accessing Profiles from Components
You can access the Profile object from within a component by referring to the HttpContext.Profile property. However, you must cast the value of this property to an instance of the ProfileCommon object before you access its properties.
For example, the web configuration file in Listing 28.37 defines a Profile property named firstName.
Listing 28.37. Web.Config

The component in Listing 28.38 grabs the value of the firstName Profile property. The Profile object retrieved from the current HttpContext object must be typecast to a ProfileCommon object.
Listing 28.38. App_CodeProfileComponent.cs
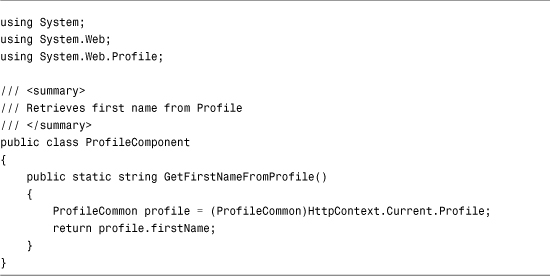
Warning
To avoid conflicts with other code samples in this chapter, the component in Listing 28.38 is named ProfileComponent.cs_listing38 in the code download from the website that accompanies this book. You need to rename the file to ProfileComponent.cs before you use the component.
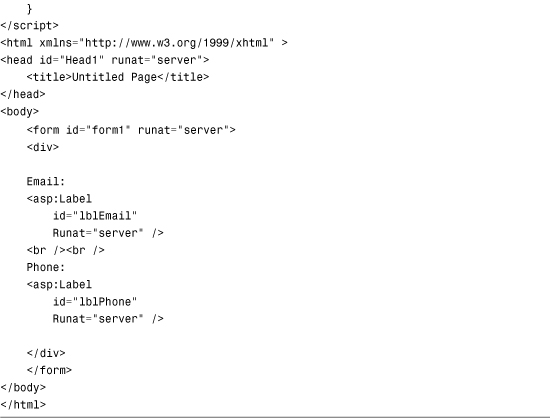
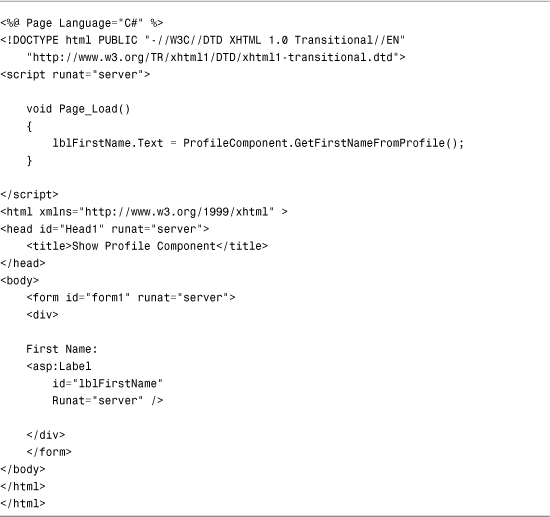
Finally, the page in Listing 28.39 illustrates how you can call the ProfileComponent from within an ASP.NET page to retrieve and display the firstName attribute.
Listing 28.39. ShowProfileComponent.aspx
Using the Profile Manager
Unlike Session state, profile data does not evaporate when a user leaves your application. Over time, as more users visit your application, the amount of data stored by the Profile object can become huge. If you allow anonymous profiles, the situation becomes even worse.
The ASP.NET Framework includes a class named the ProfileManager class that enables you to delete old profiles. This class supports the following methods:
• DeleteInactiveProfiles—Enables you to delete profiles that have not been used since a specified date.
• DeleteProfile—Enables you to delete a profile associated with a specified username.
• DeleteProfiles—Enables you to delete profiles that match an array of usernames or collection of ProfileInfo objects.
• FindInactiveProfilesByUserName—Enables you to retrieve all profiles associated with a specified username that have been inactive since a specified date.
• FindProfilesByUserName—Enables you to retrieve all profiles associated with a specified user.
• GetAllInactiveProfiles—Enables you to retrieve all profiles that have been inactive since a specified date.
• GetAllProfiles—Enables you to retrieve every profile.
• GetNumberOfInactiveProfiles—Enables you to retrieve a count of profiles that have been inactive since a specified date.
• GetNumberOfProfiles—Enables you to retrieve a count of the total number of profiles.
You can use the ProfileManager class from within a console application and execute the DeleteInactiveProfiles() method on a periodic basis to delete inactive profiles. Alternatively, you can create an administrative page in your web application that enables you to manage profile data.
The page in Listing 28.40 illustrates how you can use the ProfileManager class to remove inactive profiles (see Figure 28.10).
Figure 28.10. Deleting inactive profiles.

Listing 28.40. ManageProfiles.aspx


The page in Listing 28.40 displays the total number of profiles and the total number of inactive profiles. An inactive profile is a profile that has not been accessed for more than 3 months. The page also includes a Delete Inactive Profiles button that enables you to remove the old profiles.
Configuring the Profile Provider
By default, profile data is stored in a Microsoft SQL Server Express database named ASPNETDB.mdf, located in your application’s root App_Data folder. If you want to store profile data in another database in your network, you need to perform the following two tasks:
- Add the necessary database objects required by the profile object to the database.
- Configure your application to connect to the database.
You can add the necessary database tables and stored procedures required by the Profile object to a database by executing the aspnet_regsql command-line tool. The aspnet_regsql tool is located at the following path:
WINDOWSMicrosoft.NETFramework[version]aspnet_regsql.exe
Note
If you open the Visual Studio Command Prompt, you do not need to navigate to the Microsoft.NET directory to execute the aspnet_regsql tool.
If you execute this tool without supplying any parameters, the ASP.NET SQL Server Setup Wizard launches. This wizard guides you through the process of connecting to a database and adding the necessary database objects.
As an alternative to using the aspnet_regsql tool, you can install the necessary database objects by executing the following two SQL batch files:
WINDOWSMicrosoft.NETFramework[version]InstallCommon.sql
WINDOWSMicrosoft.NETFramework[version]InstallProfile.sql
After you set up your database, you need to configure the default profile provider to connect to the database. The web configuration file in Listing 28.41 connects to a database named MyDatabase on a server named MyServer
Listing 28.41. Web.Config

After you complete these configuration steps, all profile data is stored in a custom database.
Creating a Custom Profile Provider
The Profile object uses the Provider Model. The ASP.NET Framework includes a single profile provider, the SqlProfileProvider, that stores profile data in a Microsoft SQL Server database. In this section, you learn how to build a custom profile provider.
One problem with the default SqlProfileProvider is that it serializes an entire profile into a single blob and stores the blob in a database table column. This means that you can’t execute SQL queries against the properties in a profile. In other words, the default SqlProfileProvider makes it extremely difficult to generate reports off the properties stored in a profile.
In this section, we create a new profile provider that is modestly named the BetterProfileProvider. The BetterProfileProvider stores each Profile property in a separate database column.
Unfortunately, the code for the BetterProfileProvider is too long to place in this book. However, the entire source code is included on the website that accompanies this book.
The BetterProfileProvider inherits from the base ProfileProvider class. The two most important methods that must be overridden in the base ProfileProvider class are the GetPropertyValues() and SetPropertyValues() methods. These methods are responsible for loading and saving a profile for a particular user.
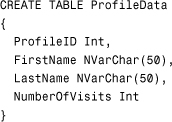
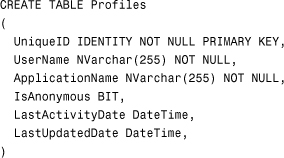
Imagine that you want to use the BetterProfileProvider to represent a profile that contains the following three properties: FirstName, LastName, and NumberOfVisits. Before you can use the BetterProfileProvider, you must create a database table that contains three columns that correspond to these Profile properties. In addition, the database table must contain an int column named ProfileID.
You can create the necessary database table with the following SQL command:
Next, you need to create a database table named Profiles. This table is used to describe the properties of each profile. You can create the Profiles table with the following SQL command:
After you create these two database tables, you are ready to use the BetterProfileProvider. The web configuration file in Listing 28.42 configures the BetterProfileProvider as the default profile provider.
Listing 28.42. Web.Config

The BetterProfileProvider is configured with both a connectionStringName and profileTableName attribute. The connectionStringName points to the database that contains the two database tables that were created earlier. The profileTableName property contains the name of the table that contains the profile data. (This attribute defaults to the value ProfileData, so it isn’t necessary here.)
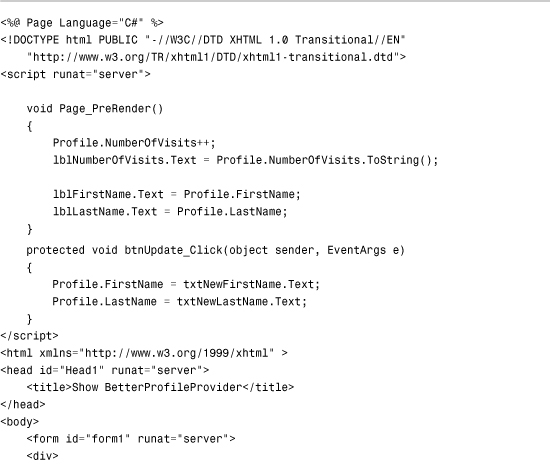
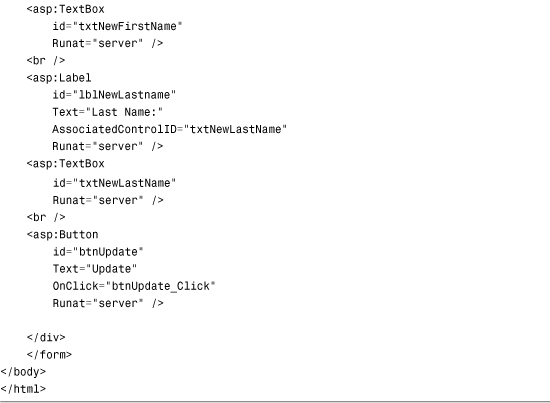
After you configure the BetterProfileProvider, you can use it in a similar manner to the default SqlProfileProvider. For example, the page in Listing 28.43 displays the values of the FirstName, LastName, and NumberOfVisits profile properties and enables you to modify the FirstName and LastName properties.
Warning
The BetterProfileProvider has several important limitations. It does not support serialization, so you cannot use it with complex types such as a custom shopping cart class. It also does not support default values for Profile properties.
Listing 28.43. ShowBetterProfileProvider.aspx

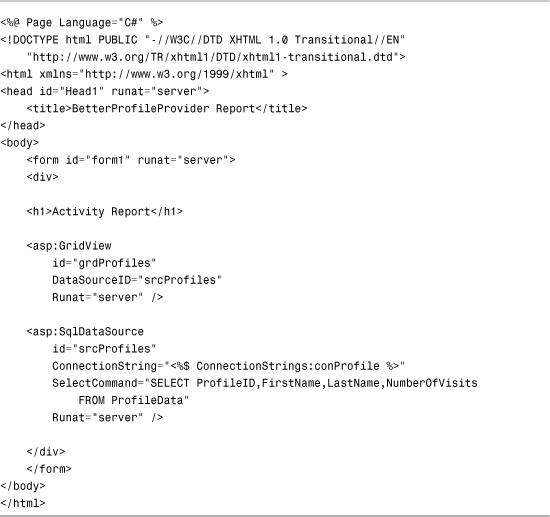
The main advantage of the BetterProfileProvider is that you can perform SQL queries against the data stored in the ProfileData table. For example, the page in Listing 28.44 displays the contents of the ProfileData table in a GridView control (see Figure 28.11). You can’t do this when using the default SqlProfileProvider because the SqlProfileProvider stores profile data in a blob.
Figure 28.11. Displaying a profile report.

Listing 28.44. BetterProfileProviderReport.aspx
Summary
In this chapter, you learned how to maintain state in your ASP.NET applications. In the first section, you learned how to create, modify, and delete browser cookies. You learned how you can take advantage of cookies when you need to add a small amount of data to a browser. You also learned how to preserve precious cookie space by creating multivalued cookies.
Next, we examined the topic of Session state. You learned how to take advantage of Session state to store larger amounts of data than can be stored in a cookie. You also learned how to configure cookieless Session state so that Session state works even when a browser has cookies disabled. We also discussed how to make Session state more robust by storing Session state data in a Windows NT Service or a Microsoft SQL Server database table.
Finally, you learned how to use the Profile object to create a typed and persistent form of Session state. You learned how to enable anonymous profiles. In the final section of this chapter, we built a custom Profile provider that enables you to store Profile properties in separate database table columns.