
Chapter 20. Data Access with LINQ to SQL
In This Chapter
• New C# and VB.NET Language Features
• Creating LINQ to SQL Entities
• Performing Standard Database Commands with LINQ to SQL
• Creating a Custom LINQ Entity Base Class
• Summary
A vast chasm separates the way developers work with transient application data and the way developers work with persistent database data. In our applications, we work with objects and properties (created with either C# or VB.NET). In most databases, on the other hand, we work with tables and columns.
This is true even though our applications and our databases represent the very same data. For example, you might have both a class and a database table named Product that represents a list of products you sell through your website. However, the languages we use to interact with these entities are different. The C# and VB.NET languages are different from the SQL language. Larger companies typically have different developers who specialize in C# or VB.NET, on the one hand, or SQL, on the other hand.
A huge amount of developer time is spent performing brain-dead, tedious translations between the object and relational universes. I cringe when I think of the number of hours I’ve spent declaring classes that contain a one-to-one mapping between properties and database columns. This is time I could have devoted to going to the park with my children, seeing a movie, walking my dog, and so on.
LINQ to SQL promises to finally enable us to put SQL to a well-deserved death. Or more accurately, it promises to make SQL a subterranean language that we never need to interact with again. (SQL is plumbing, and I am not a plumber.) This is a good thing. Death to SQL!
This is a hard chapter. LINQ to SQL is not easy to understand because it relies on several mind-bending features introduced into C#, VB.NET, and .NET Framework. So please, have patience. Take a deep breath. Everything will make sense in the end.
This chapter is divided into four parts. In the first part, I discuss the features introduced in C#, VB.NET, and .NET Framework that support LINQ. Next, you learn how to represent database tables with LINQ to SQL entities. In the following part, I explain how to perform standard SQL commands—such as SELECT, INSERT, UPDATE, and DELETE—with LINQ to SQL. In the final part of this chapter, I demonstrate how you can create a custom entity base class (and integrate form validation into your LINQ entities).
New C# and VB.NET Language Features
To get LINQ to SQL to work, Microsoft had to introduce several new language features to both C# and VB.NET. Many of these features make C# and VB.NET behave more like a dynamic language (think JavaScript). Although the primary motivation for introducing these new features was to support LINQ, the new features are also interesting in their own right.
Note
LINQ was introduced in ASP.NET 3.5. These language features will not work on websites targeting .NET Framework 1.1, 2.0, or 3.0.
Understanding Automatic Properties
The first of these language features we explore is automatic properties, which unfortunately is supported only by C# and not VB.NET. Automatic properties provide you with a shorthand method for defining a new property. For example, Listing 20.1 contains a class named Product that contains Id, Description, and Price properties.
Listing 20.1. LanguageChangesApp_CodeAutomaticProperties.cs

The first two properties, Id and Description, unlike the last property, Price, do not include getters or setters. The C# compiler creates the getters and setters—and the secret, private, backing fields—for you automatically.
You can’t add any logic to the getters and setters for an automatic property. You also can’t create read-only automatic properties.
Why are automatic properties relevant to LINQ to SQL? When working with LINQ to SQL, you often use classes to represent nothing more than the list of columns you want to retrieve from the database (the shape of the data) like the select list in a SQL query. In those cases, you just want to do the minimum amount of work possible to create a list of properties, and automatic properties enable you to do this.
Note
You can quickly add an automatic property to a class or page when using Visual Web Developer/Visual Studio by typing prop and pressing the Tab key twice.
Understanding Initializers
You can use initializers to reduce the amount of work it takes to create a new instance of a class. For example, assume that you have a class that looks like Listing 20.2 (in C#) or like Listing 20.3 (in VB.NET).
Listing 20.2. LanguageChangesApp_CodeProduct.cs

Listing 20.3. LanguageChangesApp_CodeProduct.vb
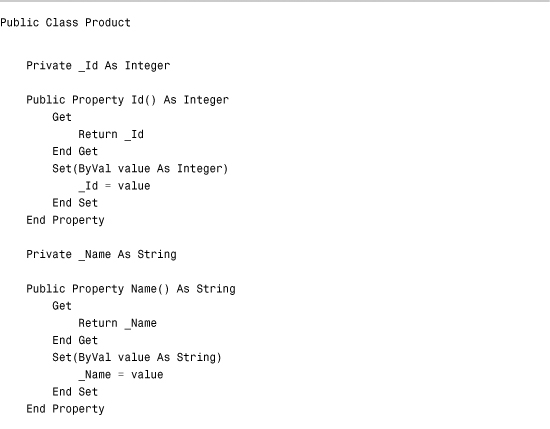

The Product class has three public properties (declared by taking advantage of automatic properties in the case of C#—sorry VB.NET).
Now, let’s say you want to create an instance of the Product class. Here’s how you would do it in .NET Framework 2.0 (with C#):
Product product1 = new Product();
product1.Id = 1;
product1.Name = "Laptop Computer";
product1.Price = 800.00m;
And here is how you would do it in .NET Framework 2 (with VB.NET):
Dim product1 As New Product()
product1.Id = 1
product1.Name = "Laptop Computer"
product1.Price = 800.0
It takes four lines of code to initialize this trivial little Product class. That’s too much work. By taking advantage of initializers, you can do everything in a single line of code. Here’s how you use initializers in C#:
Product product2 = new Product {Id=1, Name="Laptop Computer", Price=800.00m};
Here’s how you use initializers in VB.NET:
Dim product2 As New Product() With {.Id = 1, .Name = "Laptop Computer", .Price = 800.0}
Now, clearly, you could do something similar by declaring a constructor on the Product class that accepts Id, Name, and Price parameters. However, then your class would become more bloated with code because you would need to assign the constructor parameter values to the class properties. Initializers are useful because, by taking advantage of this feature, you can declare agile, little classes and initialize these svelte classes with a minimum of code.
Understanding Type Inference
Here’s a feature that makes C# and VB.NET look much more like a dynamic language such as JavaScript: local variable type inference. When you take advantage of type inference, you allow the C# or VB.NET compiler to determine the type of a variable at compile time.
Here’s an example of how you use type inference with C#:
var message = "Hello World!";
And here is how you would use type inference with VB.NET:
Dim message = "Hello World!"
The message variable is declared without specifying a type. The C# and VB.NET compilers can infer the type of the variable (it’s a String) from the value you use to initialize the variable. No performance impact results from using type inference. (The variable is not late bound.) The compiler does all the work of figuring out the data type at compile time.
A new keyword was introduced in ASP.NET 3.5 to support type inference: the var keyword. You declare a variable as type var when you want the compiler to figure out the variable’s data type all by itself. You can take advantage of type inference only when you provide a local variable with an initial value. For example, this won’t work (C#):
var message;
message = "Hello World!";
The C# compiler will refuse to compile this code because the message variable is not initialized when it is declared.
The following code will work in VB.NET (but it won’t do what you want):
Dim message
message = "Hello World!"
In this case, VB.NET will treat the message variable as type Object. At runtime, it will cast the value of the variable to a string when you assign the string to the variable. This is not good from a performance perspective.
Note
VB.NET includes an Option Infer option that must be enabled for the implicit typing feature to work. You can enable it for a particular class file by adding the line Option Infer On at the top of a code file.
The relevance of type inference to LINQ to SQL will be apparent after you read the next section. In many circumstances when using LINQ to SQL, you won’t actually know the name of the type of a variable, so you have to let the compiler infer the type.
Understanding Anonymous Types
Anonymous types is another idea that might be familiar to you from dynamic languages. Anonymous types are useful when you need a transient, fleeting type and you don’t want to do the work to create a class.
Here’s an example of creating an anonymous type in C#:
var customer = new {FirstName = "Stephen", LastName = "Walther"};
Here’s how you would create the same anonymous type in VB.NET:
Dim customer = New With {.FirstName = "Stephen", .LastName = "Walther"}
The customer variable is used without specifying a type, which looks very much like JavaScript or VBScript. However, you need to understand that customer does have a type; you just don’t know its name: It’s anonymous.
In a single line of code, we’ve managed to both create a new class and initialize its properties. The terseness brings tears to my eyes.
Anonymous types are useful when working with LINQ to SQL because you’ll discover that you often need to create new types on-the-fly. For example, you might want to return a class that represents a limited set of database columns when performing a particular query. You need to create a transient class that represents the columns.
Understanding Generics
Generics are not a new feature; however, they are such an important aspect of LINQ to SQL that it is worth using a little space to review this feature.
I most often use generics by taking advantage of generic collections. For example, if you want to represent a list of strings, you can declare a list of strings like this (in C#):
List<string> stuffToBuy = new List<string>();
stuffToBuy.Add("socks");
stuffToBuy.Add("beer");
stuffToBuy.Add("cigars");
Here’s how you would declare the list of strings in VB.NET:
Dim stuffToBuy As New List(Of String)
stuffToBuy.Add("socks")
stuffToBuy.Add("beer")
stuffToBuy.Add("cigars")
And, by taking advantage of collection initializers, you can now declare a strongly typed list of strings in a single line like this (in C#):
List<string> stuffToBuy2 = new List<string> {"socks", "beer", "cigars"};
The List class is an example of a generic because you specify the type of object that the class will contain when you declare the List class. In C#, you specify the type in between the alligator mouths (< >), and in VB.NET you use the Of keyword. In the preceding examples, we created a List class that contains strings. Alternatively, we could have created a List class that contains integers or a custom type such as products or customers represented by a Product or Customer class.
A generic collection such as a List is superior to a nongeneric collection such as an ArrayList because a generic is strongly typed. An ArrayList stores everything as an object. A generic stores everything as a particular type. When you pull an item out of an ArrayList, you must cast it to a particular type before you use it. An item pulled from a generic, on the other hand, does not need to be cast to a type.
Generics are not limited solely to collections. You can create generic methods, generic classes, and generic interfaces. For example, when working with ADO.NET classes, I like to convert my data readers into strongly typed List collections. The method GetListFromCommand(), shown in Listing 20.4, takes a command object, executes it, and generates a typed List automatically.
Listing 20.4. LanguageChangesApp_CodeGenericMethods.cs
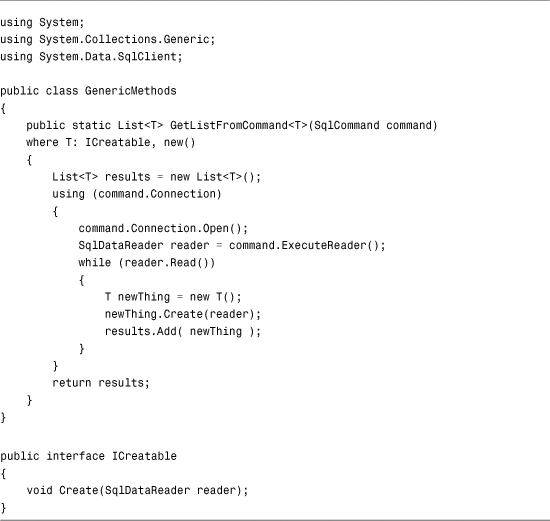
The GetListFromCommand() method in Listing 20.4 accepts a SqlCommand object and returns a generic List<T>. The generic type is constrained by the where clause. The generic constraint restricts the types that can be used for T to types that implement the ICreatable interface and types that can be instantiated with new.
The ICreatable interface is also defined in Listing 20.4. The interface requires a class to implement a single method named Create().
Now that we have created a generic method for converting data readers into strongly typed lists, we can use it with any class that implements the ICreatable interface, such as the Movie class in Listing 20.5.
Listing 20.5. Movie.cs

You can call the generic GetListFromCommand() method with the Movie type like this (the page named ShowGenericMethods.aspx on the book’s website uses this code):

The beautiful thing about generics here is that you don’t have to write the same code to convert a data reader to a generic List for each type. You write the GetListFromCommand() method as a generic method once, and you can use the method with any type that meets the generic constraints in the future.
The right way to think of generics is to think of a code template. You can use generics to define a certain pattern of code into which you can plug a particular type.
Understanding Lambda Expressions
Lambda expressions, another language feature introduced with .NET Framework 3.5, provide you with an extremely terse way of defining methods.
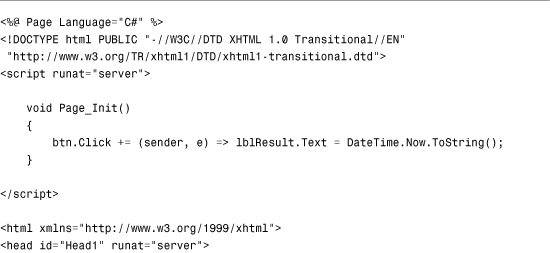
Imagine, for example, that you want to programmatically wire up a Click event handler to a button control. Listing 20.6 is an example of one way of doing this.
Listing 20.6. LanguageChangesNormalMethod.aspx


In Listing 20.6, the Page_Init() method associates the Button Click event with the btn_Click() method. When you click the button, the btn_Click() method executes and displays the current date and time. Nothing special here.
In .NET Framework 2.0, the notion of anonymous methods for C# was introduced. The advantage of an anonymous method is that you can declare it inline. For example, Listing 20.7 does the same thing as the previous page, except for that it uses an anonymous method to handle the Button Click event.
Listing 20.7. LanguageChangesAnonymousMethod.aspx


In Listing 20.7, the Click event is handled with a function declared within the Page_Init() method.
Note
Anonymous methods are not supported by VB.NET, but VB.NET does support lambda expressions—so don’t stop reading if you use VB.NET.
Lambda expressions take the notion of the anonymous method one step further. Lambda expressions reduce the amount of syntax required to define a method to its semantic minimum. Listing 20.8 does the same thing as the previous two listings, except that the page uses a lambda expression.
Listing 20.8. LanguageChangesLambdaExpression.aspx

The lambda expression in Listing 20.8 is the one that looks like this:
(sender, e) => lblResult.Text = DateTime.Now.ToString();
This is just a terse way of writing a method. A lambda expression uses the => operator (the “goes into” operator) to separate a list of method parameters from the method body. The compiler (usually) can infer the data types of the parameters. However, if you want, you can be explicit about the parameter types, like this:
(object sender, EventArgs e) => lblResult.Text = DateTime.Now.ToString();
It is also worth mentioning that the parentheses around the parameters are optional when there is a single parameter. So, a lambda expression can be terse.
Visual Basic also supports lambda expressions, but in a more limited way. A lambda expression in Visual Basic cannot contain statements; it can only contain expressions.
Here’s the syntax in VB for creating a lambda expression:
Dim AddNumbers = Function(x, y) x + y
Response.Write(AddNumbers(5, 6))
The first statement creates a variable named AddNumbers that represents a lambda expression. The VB syntax Function(x,y) x + y is equivalent to the C# syntax (x,y) => x + y. Next, the lambda function is called with two arguments.
Understanding Extension Methods
The idea behind extension methods should also be familiar to anyone who has worked with JavaScript (think prototype). By taking advantage of extension methods, you can add new methods to existing classes. For example, you can make up any method you want and add the method to the String class.
I’m constantly HTML-encoding strings because I am paranoid about JavaScript injection attacks. In .NET Framework 2.0, you HTML-encode a string by calling the Server.HtmlEncode() static method, like this:
string evilString = "<script>alert('boom!')<" + "/script>";
ltlMessage.Text = Server.HtmlEncode(evilString);
In this statement, the static HtmlEncode() method is called on the Server class. Wouldn’t it be nice if we could just call HtmlEncode() on a string directly like this:
string evilString = "<script>alert('boom!')<" + "/script>";
ltlMessage.Text = evilString.HtmlEncode();
Using extension methods, we can do exactly that. We can add any methods to a class that we feel like. You create an extension method by creating a static class and declaring a static method that has a special first parameter. Listing 20.9 demonstrates how you create an extension method to add the HtmlEncode() method to the String class.
Listing 20.9. LanguageChangesMyExtensions.cs

The one and only parameter for the HtmlEncode() method is preceded by the keyword this. The parameter indicates the type that the extension method applies to.
Creating extension methods in VB.NET is similar to creating extension methods in C#. Listing 20.10 contains the same HtmlEncode() method as the previous listing.
Listing 20.10. LanguageChangesMyExtensions.cs

When working with VB.NET, you must declare an extension method in a module. Furthermore, you mark the extension methods with the System.Runtime.CompilerServices.Extension attribute.
Understanding LINQ
Finally, we get to the topic of LINQ—the last topic we need to examine before we can dive into the true subject of this chapter: LINQ to SQL.
LINQ stands for Language Integrated Query and consists of a set of new language features added to both the C# and VB.NET languages that enable you to perform queries. LINQ enables you to use SQL query-like syntax within C# or VB.NET.
Here’s a simple example of a LINQ query:
var words = new List<string> {"zephyr", "apple", "azure"};
var results = from w in words
where w.Contains("z")
select w;
The first statement creates a generic List of three strings named “words.” The second statement is the LINQ query. The LINQ query resembles a backward SQL statement. It retrieves all the words from the List that contain the letter z. After you execute the query, the results variable contains the following list of two words:
zephyr
azure
You can perform a standard LINQ query against any object that implements the IEnumerable<T> interface interface>. An object that implements this interface is called a sequence. Notable examples of sequences are both the generic List class and the standard Array class. (So anything you can dump into an array, you can query with LINQ.)
The C# language supports the following clauses that you can use in a query:
• from—Enables you to specify the data source and a variable for iterating over the data source (a range variable).
• where—Enables you to filter the results of a query.
• select—Enables you to specify the items included in the results of the query.
• group—Enables you to group related values by a common key.
• into—Enables you to store the results of a group or join into a temporary variable.
• orderby—Enables you to order query results in ascending or descending order.
• join—Enables you to join two data sources using a common key.
• let—Enables you to create a temporary variable to represent subquery results.
Building a LINQ query is like building a backward SQL query. You start by specifying a from clause that indicates where you want to get your data. Next, optionally, you specify a where clause that filters your data. Finally, you specify a select clause that gives shape to your data (determines the objects and properties you want to return).
Under the covers, standard LINQ queries are translated into method calls on the System.LINQ.Enumerable class. The Enumerable class contains extension methods applied to any class that implements the IEnumerable<T> interface interface>.
So, the query
var results = from w in words
where w.Contains("z")
select w;
is translated into this query by the C# compiler:
var results = words.Where( w => w.Contains("z") ).Select( w => w );
The first query uses query syntax, and the second query uses method syntax. The two queries are otherwise identical.
The query using method syntax accepts lambda expressions for its Where() and Select() methods. The lambda expression used with the Where() method filters the results so that only words that contain the letter z are returned. The Select() method indicates the object and property to return. If we had passed the lambda expression w => w.Length to the Select() method, the query would return the length of each word instead of the word itself.
The choice of whether to use query or method syntax when building LINQ queries is purely a matter of preference. Query syntax uses language-specific syntax (C# or VB.NET). Method syntax is language-independent.
I find that I use method syntax more than query syntax because query syntax is a subset of method syntax. In other words, you can do more with method syntax. That said, in some cases, writing a query in method syntax is just too verbose. For example, writing left outer joins with LINQ to SQL is much easier using query syntax than method syntax.
At the end of the day, the choice of whether to use method or query syntax doesn’t actually matter because all the query syntax statements get translated by the compiler into method syntax. In the case of standard LINQ, those method calls are calls on methods of the Enumerable class.
Look up the System.Linq.Enumerable class in the SDK documentation to view the full list of methods that the Enumerable class supports. Here is a list of some of the more interesting and useful methods:
• Aggregate()—Enables you to apply a function to every item in a sequence.
• Average()—Returns the average value of every item in a sequence.
• Count()—Returns the count of items from a sequence.
• Distinct()—Returns distinct items from a sequence.
• Max()—Returns the maximum value from a sequence.
• Min()—Returns the minimum value from a sequence.
• Select()—Returns certain items or properties from a sequence.
• Single()—Returns a single value from a sequence.
• Skip()—Enables you to skip a certain number of items in a sequence and return the remaining elements.
• Take()—Enables you to return a certain number of elements from a sequence.
• Where()—Enables you to filter the elements in a sequence.
In this section, we’ve been discussing standard LINQ (also called LINQ to Objects). LINQ uses the provider model. There are many different implementations of LINQ, including LINQ to SQL, LINQ to XML, LINQ over DataSets, and LINQ to Entities. There are also third-party implementations of LINQ, including LINQ to NHibernate and LINQ to SharePoint. You can use each of these different flavors of LINQ to query different types of data sources, such as XML files, SharePoint lists, and so on.
In this chapter, we are interested in LINQ to SQL because this is the Microsoft version of LINQ designed exclusively for working with database data. So LINQ to SQL is the subject to which we turn now.
Creating LINQ to SQL Entities
LINQ to SQL enables you to perform LINQ queries against database data. Currently, you can use LINQ to SQL with Microsoft SQL Server 2000, Microsoft SQL Server 2005, or Microsoft SQL Server 2008 (including the SQL Server Express editions). Other databases—such as Oracle, DB2, and Access databases—might be supported in the future, but they are not right now.
Note
To use LINQ to SQL, you need to add a reference to the System.Data.Linq.dll assembly. Select Website, Add Reference and, beneath the .NET tab, select System.Data.Linq. Performing this action adds a new assembly reference to the <assemblies> section of your web.config file. If you use the LINQ to SQL Designer, this reference is added automatically.
In this section, you learn how to create LINQ to SQL entities. An entity is a C# or VB.NET class that represents a database table (or view). You can use a set of standard custom attributes to map classes and properties to tables and columns. You learn how to create entities both by hand and by using the LINQ to SQL Designer.
Building Entities by Hand
Before you can start performing queries using LINQ to SQL, you need to create one or more entity classes that represent the data you are querying. In this section, you learn how to code these classes by hand.
Imagine that you have the following database table named Movie that you want to perform queries against:
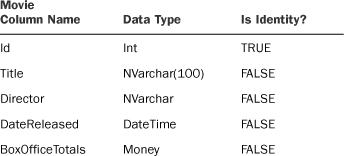
You can use the class in Listing 20.11 to represent this table.
Listing 20.11. EntitiesApp_CodeMovie.cs

The class in Listing 20.11 contains a property that corresponds to each column in the Movie database table. Each property is decorated with a custom attribute named Column. This attribute marks the property as one that represents a database column.
Furthermore, the class itself is decorated with a Table attribute. This attribute marks the class as representing a database table.
The Column attribute supports the following properties:
• AutoSync—Indicates whether the value of the property is synchronized with the value of the database column automatically. Possible values are OnInsert, Always, and None.
• CanBeNull—Indicates whether the property can represent a null value.
• DbType—Indicates the database column data type.
• Expression—Indicates the expression used by a computed database column.
• IsDbGenerated—Indicates that the value of the property is generated in the database (for example, an identity column).
• IsDiscriminator—Indicates whether the property holds the discriminator value for an inheritance hierarchy.
• IsPrimaryKey—Indicates whether the property represents a primary key column.
• IsVersion—Indicates whether the property represents a column that represents a row version (for example, a timestamp column).
• Name—Indicates the name of the database column that corresponds to the property.
• Storage—Indicates a field where the value of the property is stored.
• UpdateCheck—Indicates whether the property participates in optimistic concurrency comparisons.
The Table attribute supports the following single property:
• Name—Indicates the name of the database table that corresponds to the class.
Some comments about these attributes are needed. First, you don’t need to specify a Name property when your property or class name corresponds to your database column or table name. If, on the other hand, your database table were named Movies and your class were named Movie, you would need to supply the Name property for the Table attribute to map the correct table to the class.
Second, you always want to specify the primary key column by using the IsPrimaryKey property. For example, if you don’t specify a primary key column, you can’t do updates against your database using LINQ.
Finally, even though we didn’t do this in our Movie class, you almost always want to include a timestamp column in your database table and indicate the timestamp column by using the IsVersion property. If you don’t do this, LINQ to SQL checks whether the values of all the properties match the values of all the columns before performing an update command to prevent concurrency conflicts. If you specify a version property, LINQ to SQL can check the value of this single property against the database rather than all the columns.
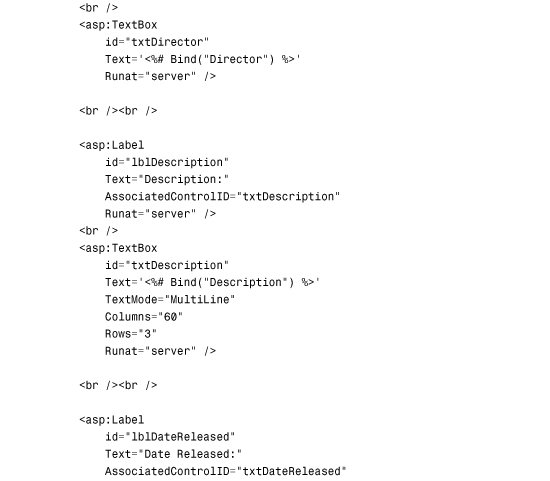
Now that we’ve created an entity, we can start performing queries against the database using LINQ to SQL. For example, the page in Listing 20.12 contains a form that enables you to search for movies by a particular director.
Listing 20.12. EntitiesSearchMovies.aspx

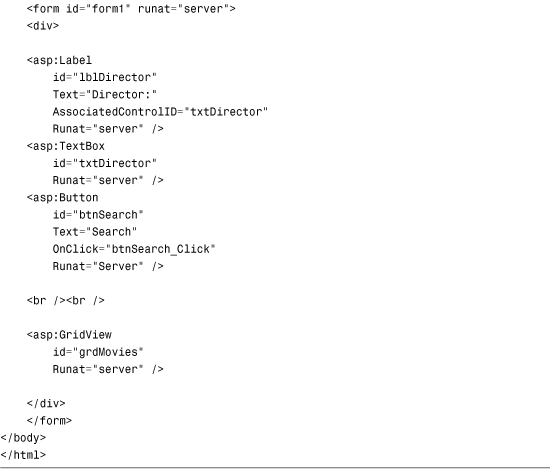
When you click the Search button, the btnSearch_Click() method executes the LINQ to SQL query.
First, a DataContext is created by passing a database connection string to the class’s constructor. The DataContext is responsible for tracking all the LINQ to SQL entities and representing the database connection.
Next, a variable named tMovie is instantiated that represents a particular database table from the DataContext. Because we pass the Movie entity to the GetTable<T>() method() method>, the method returns a Table<T> object that represents the Movie database table. The Table<T> object implements the IQueryable interface and can, therefore, be queried with a LINQ to SQL query.
Finally, the following LINQ to SQL query is executed:
tMovie.Where( m => m.Director.Contains(txtDirector.Text)
The lambda expression m => m.Director.Contains(txtDirector.Text) passed to the Where() method returns every movie record from the database in which the Director column contains the text entered into the TextBox control.
We had to import two namespaces to use the LINQ to SQL query: System.Linq and System.Data.Linq.
Note
To keep things simple, I use the LINQ to SQL query directly within the ASP.NET page in Listing 20.12. In real life, to avoid mixing user interface and Data Access layers, I would perform the LINQ to SQL query in a separate class and use an ObjectDataSource to represent the class.
Building Entities with the LINQ to SQL Designer
As an alternative to building entities by hand, you can use the LINQ to SQL Designer. You can simply drag database tables from the Database Explorer (Server Explorer) onto the Designer. The Designer generates the entity classes with the correct attributes automatically.
Follow these steps to use the LINQ to SQL Designer:
- Select Website, Add New Item to open the Add New Item dialog box.
- Select the LINQ to SQL Classes template, give it the name MyDatabase, and click the Add button.
- When prompted to create the LINQ to SQL classes in the App_Code folder, click the Yes button.
- After the LINQ to SQL Designer opens, drag one or more database tables from the Database Explorer/Server Explorer window onto the Designer surface.
You can view the code that the Designer generates by expanding the MyDatabase.dbml node in the App_Code folder and double-clicking the MyDatabase.designer.cs file.
The Designer generates a strongly typed DataContext class named MyDatabaseContext. Each database table that you drag onto the Designer surface gets exposed by the DataContext class as a strongly typed property.
The Designer, furthermore, generates a distinct class for each database table you drag onto the Designer. For example, after you drag the Movie table onto the Designer, a new class named Movie is created in the MyDatabase.designer.cs file.
Note
The LINQ to SQL Designer attempts to pluralize table names automatically when you add them to the Designer. So, when you drag the Movie table onto the Designer, the Designer generates a DataContext property named Movies. Most of the time, but not all of the time, it gets the pluralization right. You can turn off this feature by selecting Tools, Options and selecting the Database Tools, O/R Designer tab.
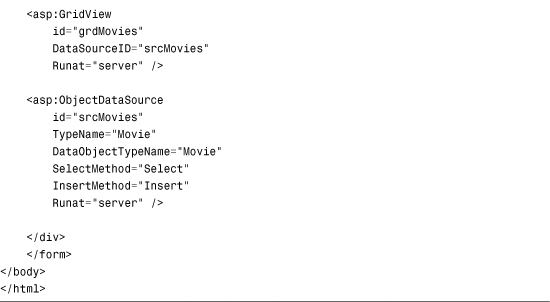
The page in Listing 20.13 demonstrates how you can use the MyDatabaseContext class when performing a LINQ to SQL query (after dragging the Movies database table onto the LINQ to SQL Designer).
Listing 20.13. EntitiesListMoviesByBoxOffice.aspx

The page in Listing 20.13 displays a list of all movies in order of the movie’s box office totals.
The LINQ to SQL Designer creates partial classes for each table you drag onto the Designer surface. This means that you extend the functionality of each entity by creating a new partial class. For example, the class in Listing 20.14 extends the Movie class that the LINQ to SQL Designer generates.
Listing 20.14. EntitiesApp_CodeMovie.cs

The Movie class in Listing 20.14 is declared as a partial class. It extends the partial class in the MyDatabase.designer.cs file by adding both a Select() method and a SelectByBoxOfficeTotals() method.
Note
The SelectByBoxOfficeTotals() method calls the Select() method. It is important to understand that this does not cause two SQL SELECT commands to be executed against the database. Until the GridView control starts iterating through the results of the LINQ to SQL query, you are just building an expression.
The page in Listing 20.15 demonstrates how you represent the Movie class with an ObjectDataSource control.
Listing 20.15. EntitiesPartialMovie.aspx

There is no code in the page in Listing 20.15. All the code is where it should be, in the Data Access layer implemented by the Movie class.
Building Entity Associations
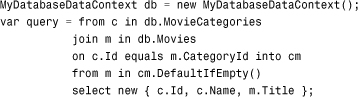
One entity can be associated with another entity. For example, a MovieCategory entity might be associated with one or more Movie entities.
If you have defined foreign key relationships between your database tables, these relationships are preserved when you drag your tables onto the LINQ to SQL Designer. The LINQ to SQL Designer generates entity associations based on the foreign key relationships automatically.
For example, the MovieCategory entity is related to the Movie entity through the Movie entity’s CategoryId property. As long as you have defined a foreign key relationship between Movie.CategoryId and MovieCategory.Id, you can use a query like this following:
![]()
The second statement grabs the Drama movie category. The third statement returns all movies associated with the Drama movie category. In this case, we’ve followed a one-to-many relationship and got a list of movies that match a movie category. You can also go the opposite direction and retrieve the only movie category that matches a particular movie:
string categoryName = db.Movies.Single(m=>m.Id==1).MovieCategory.Name;
This query retrieves the name of the movie category associated with the movie that has an ID of 1.
Note
Under the covers, the LINQ to SQL Designer creates the entity relationships by adding association attributes to entity properties. The LINQ to SQL Designer also adds some tricky synchronization logic to keep the properties of associated entities synchronized.
Although I wish that I could code all my entities by hand, adding all the logic necessary to get the entity associations to work correctly is too much work. For that reason, I use the LINQ to SQL Designer.
Using the LinqDataSource Control
I want to briefly describe the LinqDataSource control. You can use this control to represent LINQ queries. For example, the page in Listing 20.16 contains a simple search form for searching movies by director. The page uses a LinqDataSource to represent the LINQ query.
Listing 20.16. EntitiesShowLinqDataSource.aspx


The LinqDataSource in Listing 20.16 represents the following LINQ query:

You also can use the LinqDataSource to generate Update, Insert, and Delete LINQ queries automatically. Simply set the EnableInsert, EnableUpdate, or EnableDelete property to the value True. For example, the page in Listing 20.17 contains a DetailsView control and a GridView control that you can use to insert, edit, and delete movie records. The inserting, editing, and deleting is performed by the LinqDataSource control.
Listing 20.17. EntitiesEditLinqDataSource.aspx


One other thing that you should notice about the LinqDataSource control in Listing 20.17: the LinqDataSource control has an AutoPage attribute set to the value True. When this property has the value True, the LinqDataSource performs data source paging automatically.
I don’t use the LinqDataSource control in production applications. Instead, I wrap up all my LINQ queries in a separate class and use the ObjectDataSource control to represent the class. The LinqDataSource control is similar to the SqlDataSource control in that both controls are great for prototyping and doing demos, but they are not appropriate controls to use in production applications.
Performing Standard Database Commands with LINQ to SQL
In this section, you learn how to use LINQ to SQL as a replacement for working directly with SQL. We start by discussing how LINQ to SQL queries differ from standard LINQ queries. Next, we examine how you can perform standard database queries and commands using LINQ to SQL such as Select, Update, Insert, and Delete commands. We’ll also discuss how you can create dynamic queries with LINQ. Finally, we investigate the important topic of how you can debug LINQ to SQL queries.
LINQ to Objects Versus LINQ to SQL
You can use standard LINQ (LINQ to Objects) with any object that implements the IEnumerable<T> interface interface>. You can use LINQ to SQL, on the other hand, with any object that implements the IQueryable<T> interface. Standard LINQ is implemented with the extension methods exposed by the System.Linq.Enumerable class. LINQ to SQL, on the other hand, uses the extension methods exposed by the System.Linq.Queryable class. Why the difference?
When you build a query using standard LINQ, the query executes immediately. When you build a query using LINQ to SQL, on the hand, the query does not execute until you start enumerating the results. In other words, the query doesn’t execute until you use a foreach loop to walk through the query results.
Consider the following valid LINQ to SQL query:
![]()
This query returns a list of movies directed by Steven Spielberg in order of the movie box office totals. You want LINQ to SQL to execute this query against the database in the most efficient way possible. In particular, you don’t want LINQ to SQL to execute each method independently; you want LINQ to SQL to execute one smart database query.
When executing this query, it would be bad if LINQ to SQL (1) grabbed all the Movie records that were directed by Steven Spielberg; (2) sorted the records; and then (3) discarded all the columns except the Title column. You want LINQ to SQL to perform one smart database query that looks like this:
![]()
This SQL query is the exact query that LINQ to SQL performs. LINQ to SQL defers execution of a query until you start iterating through the results of the query. When you build a query, you are in reality building a representation of the query. Technically, you are building an expression tree. That way, LINQ to SQL can translate the query into one efficient SQL statement when it comes time to actually execute it.
To summarize, when you build a query using standard LINQ, the query executes as you build it. When you build a query using LINQ to SQL, you are building a representation of a query that doesn’t actually execute until you start iterating through the query’s results.
Note
When people first start using LINQ, they always worry about how they can build the equivalent of dynamic SQL commands. Later in this section, you learn how to create dynamic LINQ to SQL queries by dynamically building expression trees.
Selecting with LINQ to SQL
If you want to perform a simple, unordered select, you can use the following query (assuming that you have an entity named Movie that represents the Movies database table):
![]()
No LINQ extension methods are used in this query. All the items are retrieved from the Movies table. If you prefer, you can use query syntax instead of method syntax, like this:
![]()
Selecting Particular Columns
If you want to select only particular columns, and not all the columns, from a database table, you can create an anonymous type on-the-fly, like this:
![]()
The expression new {m.Id, m.Title} creates an anonymous type that has two properties: Id and Title. The names of the properties of the anonymous type are inferred. If you want to be more explicit, or if you want to change the names of the anonymous type’s properties, you can construct your query like this:
![]()
Selecting Particular Rows
If you want to select only particular rows from a database table and not all the rows, you can take advantage of the Where() method. The following LINQ to SQL query retrieves all the movies directed by George Lucas with box office totals greater than $100,000:

Remember to always call the Where() method before the Select() method. You need to filter your data with Where() before you shape it with Select().
Selecting Rows in a Particular Order
You can use the following methods to control the order in which rows are returned from a LINQ to SQL query:
• OrderBy()—Returns query results in a particular ascending order.
• OrderByDescending()—Returns query results in a particular descending order.
• ThenBy()—Returns query results using in an additional ascending order.
• ThenByDescending()—Returns query results using an additional descending order.
The OrderBy() and OrderBy() methods return an IOrderedQueryable<T> collection instead of the normal IQueryable<T> collection type collection type>. If you want to perform additional sorting, you need to call either the ThenBy() or ThenByDescending() method.
The following query returns movies in order of release date and then in order of box office totals:
![]()
Executing this LINQ to SQL query executes the following SQL query:

Selecting a Single Row
If you want to select a single row from the database, you can use one of the following two query methods:
• Single()—Selects a single record.
• SingleOrDefault()—Selects a single record or a default instance.
The first method assumes there is at least one element to be returned. (If not, you get an exception.) The second method returns null (for a reference type) when no matching element is found.
Here’s a sample query that retrieves the only record where the movie Id has the value 1:

This query returns a single object of type Movie. If there is no movie record that matches the query, result is null, and the value of the Movie Title property is not written.
Note
When you execute a query that returns a single result, there is no deferred query execution. The LINQ query is translated into a SQL command and executed immediately.
Performing a LIKE Select
You can perform the equivalent of a LIKE Select with LINQ to SQL in several ways. First, you can use String methods such as Length, Substring, Contains, StartsWith, EndsWith, IndexOf, Insert, Remove, Replace, Trim, ToLower, ToUpper, LastIndexOf, PadRight, and PadLeft with LINQ to SQL queries. For example, the following query returns all movies that start with the letter t:
![]()
Behind the scenes, this query is translated into a SQL query that uses the LIKE operator:

An alternative, more flexible way to make LIKE queries is to use the System.Data.Linq.SqlClient.SqlMethods.Like() method:
![]()
Using the SqlMethods.Like() method is more flexible than using the standard String methods because you can add as many wildcards to the match pattern as you need.
Note
The SqlMethods class also contains a number of useful methods for expressing the SQL DateDiff() function in a LINQ to SQL Query.
Paging Through Records
Doing database paging right when working with ADO.NET is difficult. The SQL language is not designed to make it easy to retrieve a range of records. Doing database paging using LINQ to SQL queries, on the other hand, is trivial.
You can take advantage of the following two query methods to perform database paging:
• Skip()—Enables you to skip a certain number of records.
• Take()—Enables you to take a certain number of records.
For example, the class in Listing 20.18 contains a method named SelectedPaged() that gets a particular page of movie records from the Movie database table.
Listing 20.18. StandardApp_CodeMovie.cs
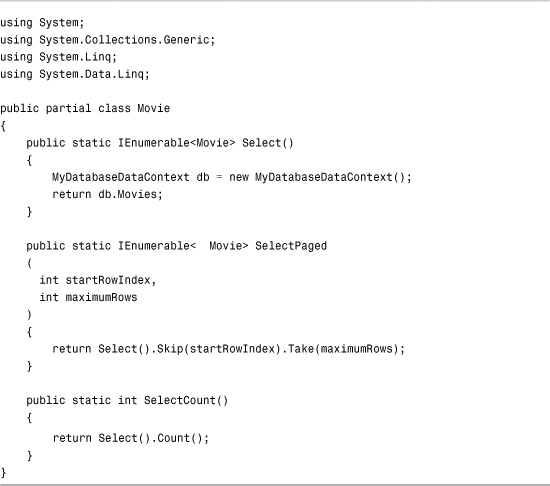
I’m assuming, in the case of Listing 20.18, that you have already created a Movie entity by using the LINQ to SQL Designer. The Movie class in Listing 20.18 is a partial class that extends the existing Movie class generated by the Designer.
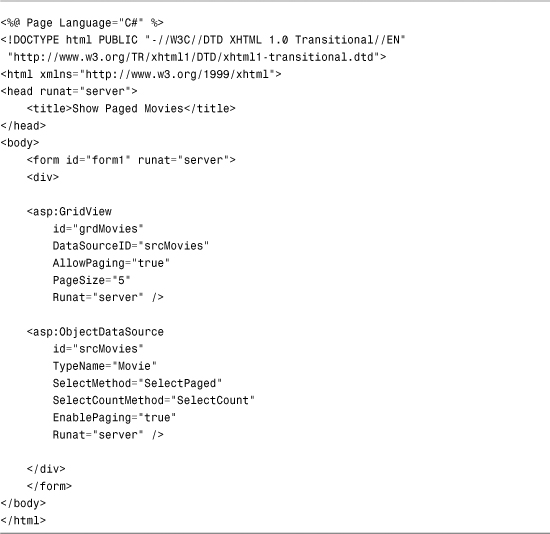
The ASP.NET page in Listing 20.19 illustrates how you can use the Movie class with the ObjectDataSource control to page through movie records.
Listing 20.19. StandardShowPagedMovies.aspx
Joining Records from Different Tables
You can perform joins when selecting entities just like you can when joining database tables. For example, imagine that you want to join the Movie and MovieCategory tables on the CategoryId key. Assuming that you have both a Movie and MovieCategory entity, you can use the following query:
![]()
This LINQ query gets translated into the following SQL command:
![]()
This query performs an inner join. If you want to perform an outer join, the syntax is a little more complicated. Here’s how you do a left outer join using query syntax:
This LINQ query gets translated into the following SQL SELECT:
![]()
As an alternative to using joins, consider taking advantage of the associations between entities. Remember that the following type of query is perfectly valid:
![]()
Caching Records
Getting caching to work with LINQ to SQL is a little tricky. Remember that a LINQ to SQL query represents a query expression and not the actual query results. The SQL command is not executed, and the results are not retrieved until you start iterating through the query results.
For example, imagine that you declare the following ObjectDataSource control in a page and that this ObjectDataSource control represents a class that returns a LINQ to SQL query:

This ObjectDataSource has been set up to cache its results. Its EnableCaching and CacheDuration properties are set. However, what gets cached here is the query expression and not that actual query results. The SQL select statement that corresponds to the LINQ to SQL query executes every time the page is requested.
To get caching to work, we need to force the query results and not the query into the cache. The Movie class in Listing 20.20 contains a SelectCached() method that successfully caches database data with a LINQ to SQL query.
Listing 20.20. StandardApp_CodeMovie.cs

The SelectCached() method attempts to retrieve movie records from the cache. If the records can’t be retrieved from the cache, the movies are retrieved from the database. The vast majority of the time, the movies are retrieved from the cache.
The trick here is to use the ToList() method to convert the IEnumerable<Movie> into a List<Movie>. When the List<Movie> is created, the SQL query associated with the LINQ to SQL query is executed and the actual data is returned.
You can use the class in Listing 20.20 with the ASP.NET page in Listing 20.21.
Listing 20.21. StandardShowCachedMovies.aspx

The ObjectDataSource in Listing 20.21 does not have caching enabled. All the caching happens in the Data Access layer (the Movie class).
Inserting with LINQ to SQL
There are two steps to adding and inserting a new record with LINQ to SQL. First, you need to use the InsertOnSubmit() method to add an entity to an existing table. Next, you call SubmitChanges() on the DataContext to execute the SQL INSERT statement against the database.
The class in Listing 20.22 illustrates how you can write a method to add a new record into the Movie database table.
Listing 20.22. StandardApp_CodeMovie.cs

The Movie class includes an Insert() method that inserts a new movie into the database. The Insert() method returns an integer that represents the identity value of the new record. As soon as SubmitChanges() is called, the Id property is updated with the new identity value from the database.
Note
I’m assuming in this section that you have used the LINQ to SQL Designer to create entities for the Movie and MovieCategories database tables.
The page in Listing 20.23 contains a FormView control and a GridView control. You can use FormView to insert new movie records into the database. The FormView control is bound to an ObjectDataSource control that represents the Movie class.
Listing 20.23. StandardInsertMovie.aspx


The ObjectDataSource control in Listing 20.23 includes a DataObjectTypeName attribute that is set to the value Movie. ObjectDataSource instantiates a new Movie object automatically when calling the Movie.Insert() method.
Updating with LINQ to SQL
You can update a LINQ to SQL entity and the underlying database table by modifying the entity’s properties and calling the DataContext's SubmitChanges() method, like this:

This code first grabs the movie that has an Id value of 1. Next, the movie Title and Director properties are modified. Finally, these changes are submitted to the database by calling the SubmitChanges() method.
This code works, but it is not the best code to use when building an ASP.NET page. Typically, when performing an update in ASP.NET, you already have information about the entity in view state. You don’t want or need to grab the entity from the database to modify it.
For example, if you use a FormView control to update the database, the FormView control will do a select automatically and store the entity information in view state. You don’t want to grab the entity information a second time after the user clicks the Insert button.
Instead, what you want to do is reattach the entity back into the DataContext from view state. You already have the entity; you just want to make the DataContext aware of the entity again.
This approach is illustrated in the class in Listing 20.24.
Listing 20.24. StandardApp_CodeMovie.cs

The Update() method in Listing 20.24 receives both the original and new version of the Movie entity. First, the old version of the Movie entity is attached to the DataContext. Next, the old entity is updated with changes from the new entity. Finally, SubmitChanges() is called to perform the SQL UPDATE command against the database.
You can use the page in Listing 20.25 with the Update() method.
Listing 20.25. StandardUpdateMovie.aspx

The ObjectDataSource control has both its ConflictDetection and OldValuesParameterFormatString attributes set. The ConflictDetection attribute is set to the value CompareAllValues. This value causes the ObjectDataSource to store the original movie property values in view state. The OldValuesParameterFormatString attribute determines the name of the parameter that represents the old Movie entity.
When you update a movie by using the page in Listing 20.25, the following SQL command is sent to the database:

LINQ to SQL compares all the new column values against the old column values. This is done to prevent concurrency conflicts. If someone else makes a change to a record before you have a chance to submit your changes, the record won’t be updated with your changes. However, all this comparing of column values seems wasteful and silly.
If you don’t want LINQ to SQL to compare all the column values when it does an update, you need to add a version property to your entity. The easiest way to do this is to add a timestamp column to the database table that corresponds to the entity (and re-create the entity in the LINQ to SQL Designer so that it has the new timestamp column property). So, our modified Movie table looks like this:

You also need to ensure that the Version property gets saved into view state. You can do this by adding the Version property to a DataBound control’s DataKeyNames property. This approach is illustrated by the page in Listing 20.26.
Listing 20.26. StandardUpdateMovieVersion.aspx
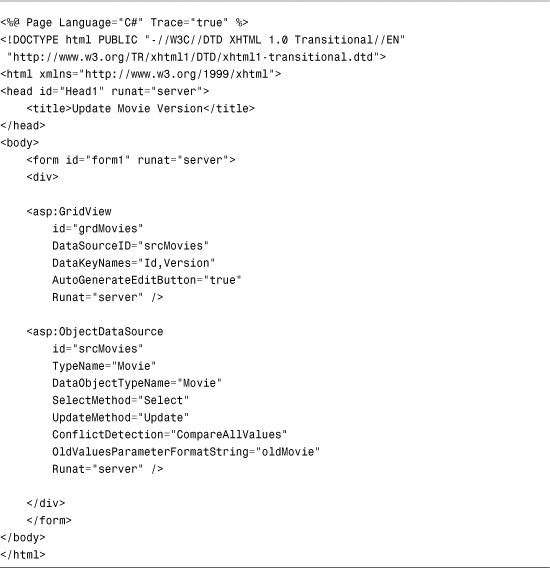
Both the Id and Version properties are assigned to the GridView control’s DataKeyNames attribute.
After you make these changes, the update SQL command looks like this:
![]()
Deleting with LINQ to SQL
You can delete an entity with LINQ to SQL by using code like the following:

This code starts by retrieving the record with an Id of 1 from the Movie database table. Next, the Movie entity is removed from the Movies collection. Finally, this change is submitted to the database and the following SQL command executes:
![]()
Note
I’m assuming in this section that you have added a Version property to your Movie database table. If not, see the previous section, because you should add a Version property when deleting for the same reasons you should add a Version property when updating.
It seems silly to retrieve a record from the database just so that you can delete it—and it is silly. What you need to do is reattach the Movie entity so that you can delete it. Thus, you can avoid making two calls to the database.
The modified Movie class in Listing 20.27 includes a Delete() method that removes a movie without retrieving it first.
Listing 20.27. StandardApp_CodeMovie.cs

You can use the class in Listing 20.27 with the ASP.NET page in Listing 20.28.
Listing 20.28. StandardDeleteMovie.aspx
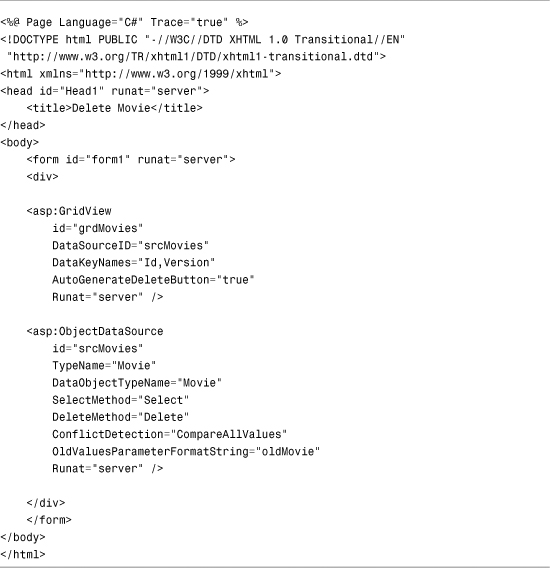
The ObjectDataSource control in Listing 20.28 has both its ConflictDetection and OldValuesParameterFormatString attributes set. The ObjectDataSource remembers a Movie entity across postbacks. It passes the original Movie entity to the Delete() method so that the entity and be reattached and deleted.
Dynamic Queries
One concern that everyone has when they start working with LINQ to SQL is the problem of representing dynamic queries. When you create a query by using ADO.NET and SQL, you can dynamically modify the SQL query simply by modifying the string that represents the SQL command. When working with LINQ to SQL, on the other hand, you can’t do this because you are not working with strings.
In this section, we explore two methods of executing dynamic queries. You learn how to pass normal SQL commands while using LINQ to SQL. You also learn how to dynamically build LINQ to SQL query expressions.
Executing Dynamic SQL Statements
If you simply want to execute a SQL statement or query, and you don’t want to use ADO.NET directly, you can take advantage of the DataContext ExecuteCommand() and ExecuteQuery() methods. The ExecuteCommand() method executes a SQL command against a database. The ExecuteQuery() method executes a SQL query against a database and returns the results as entities.
The following code illustrates how to use both of these methods:

Here, the ExecuteCommand() method is used to insert a new record into the Movie database table. The ExecuteQuery() method is used to grab all the records from the Movie table where the CategoryId column has the value 2.
You indicate parameters by using parameter names like @p0, @p1, @p2, and so on. You do not use named parameters like you would in the case of an ADO.NET command. Parameters are identified by their ordinal position.
Building Query Expressions Dynamically
Resorting to executing SQL statements against the database feels like a type of cheating. The whole point of LINQ to SQL is to get away from working with SQL directly. What we actually want to do is build LINQ to SQL queries dynamically in the same way we can build a SQL command dynamically.
You can build LINQ to SQL query expressions dynamically by taking advantage of the System.Linq.Expressions.Expression class. This class contains all the methods for building query expressions dynamically. Here is a (very partial) list of methods supported by this class:
• Add()—Creates an expression that represents addition.
• And()—Creates an expression that represents a logical AND.
• Condition()—Creates an expression that represents a condition.
• Constant()—Creates an expression that represents a constant value.
• Convert()—Creates an expression that represents a conversion from one type to another.
• Divide()—Creates an expression that represents division.
• Equal()—Creates an expression that represents whether two expressions are equal.
• Field()—Creates an expression that represents a field.
• Lambda()—Creates a lambda expression.
• Multiply()—Creates an expression that represents multiplication.
• Or()—Creates an expression that represents a logical OR.
• Parameter()—Creates an expression that represents a function parameter.
• Property()—Creates an expression that represents accessing a property.
• PropertyOrField()—Creates an expression that represents accessing a property or field.
• Subtract()—Creates an expression that represents subtraction.
Again, this is not a complete list of methods supported by the Expression class. However, it should give you some idea of how you can go about building expressions.
Let’s discuss a real-world situation in which you need dynamic LINQ to SQL expressions: sorting. If you want to enable sorting when using a GridView control with LINQ to SQL, you have a choice. You can create a switch (SELECT CASE) block to sort by every possible column that a user can click, or you can create a dynamic LINQ to SQL expression.
The class in Listing 20.29 contains a method called GetDynamicSort() that returns a dynamic lambda expression that can be used with either the OrderBy() or OrderByDescending()method.
Listing 20.29. StandardApp_CodeMovie.cs
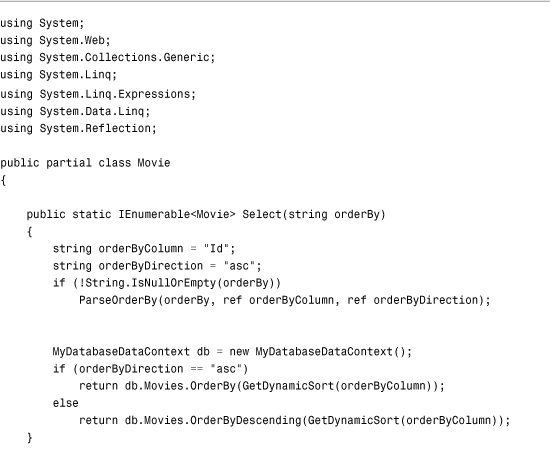
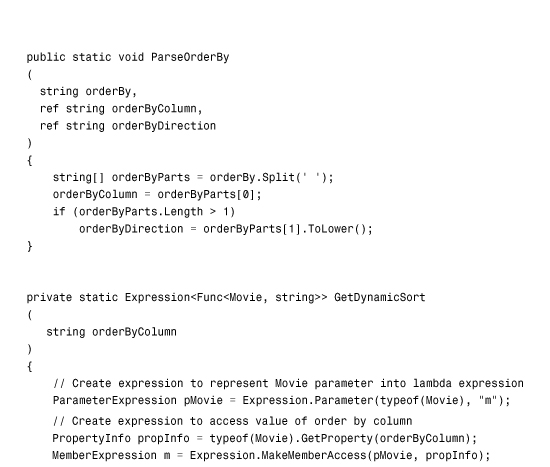
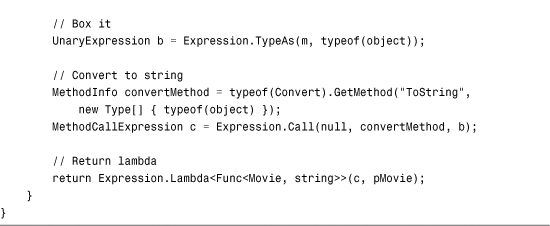
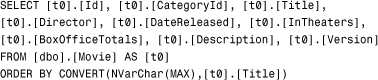
The GetDynamicSort() method builds a lambda expression dynamically and creates an expression that looks like this:
m => Convert.ToString(m.Id As Object)
When the LINQ to SQL query gets translated to SQL, the following SQL command is executed:
You can use the class in Listing 20.29 with the ASP.NET page in Listing 20.30. When you click a header column in GridView, it is sorted by the column.
Listing 20.30. StandardShowDynamicSort.aspx

The GridView control has its AllowSorting attribute set to the value true and the ObjectDataSource control has its SortParameterName attribute set to the value orderBy. The page is set up to enable data source paging.
Note
The GetDynamicSort() method described in this section does a sort after converting the values of a column to strings. For nonstring data types such as dates and integers, doing string sorts produces the wrong results. For example, after sorting, the id column is ordered as 10, 2, 22, 29, 3, 30, 31, and so on.
In the final part of this chapter, you learn how to create a custom entity base class that implements a more sophisticated version of a dynamic sort that sorts different column types correctly.
Debugging LINQ to SQL
For the sake of performance, you had better know what is going on beneath the covers when you execute LINQ to SQL queries. In particular, it is useful to know how your LINQ to SQL queries get translated into SQL and when your LINQ to SQL queries execute. In this section, I describe three methods of debugging LINQ to SQL.
Using the LINQ to SQL Debug Visualizer
The LINQ to SQL Debug Visualizer is a useful tool for viewing how a LINQ to SQL query translates into SQL. The LINQ to SQL Debug Visualizer is not included with .NET Framework. You need to download it from the following address: http://www.scottgu.com/blogposts/linqquery/SqlServerQueryVisualizer.zip.
After you download the LINQ to SQL Visualizer, you can use it like other Visualizers in Visual Web Developer and Visual Studio by compiling it and placing the resulting DLL in the My DocumentsVisual Studio 2010Visualizers folder. Then, If you set a breakpoint after a LINQ to SQL query and hover your mouse over the query, you can click the magnifying glass to see the full SQL command into which the query gets translated (see Figure 20.1). You also have the option of executing the SQL query directly from the Visualizer.
Figure 20.1. Using the LINQ to SQL Debug Visualizer.

Logging LINQ to SQL Queries
My favorite method of debugging LINQ to SQL queries is to log all the DataContext output to ASP.NET trace. That way, I can see all the LINQ to SQL queries that execute at the bottom of each of my ASP.NET pages (see Figure 20.2).
Figure 20.2. Logging LINQ to Trace.

The DataContext class includes a Log property. You can assign a TextWriter to the Log property, and DataContext writes to this TextWriter whenever it executes a query.
Unfortunately, the .NET Framework does not include a TextWriter that writes to ASP.NET Trace. Fortunately, it is not that difficult to write one, and I’ve included the code for a Trace TextWriter in Listing 20.31.
Listing 20.31. StandardTraceWriter.cs

After you drop the class in Listing 20.31 in your App_Code folder, you can set the DataContext class to write to the TraceWriter like this:

After you set up the TraceWriter, you can enable Trace (by adding the Trace="true" attribute to the <%@ Page %> directive) on any page that uses a LINQ query and view the output.
Note
The LINQ entity base class we create in the last part of this chapter automatically logs all output to the TraceWriter.
Using the GetCommand Method
Finally, you can use the DataContext.GetCommand() method to get the ADO.NET command object that executes when a LINQ to SQL query executes. After you grab the command object, you can examine its parameters or its command text.
The following code assigns the command text of a command associated with a LINQ to SQL query to a Label control:

The following SELECT command is displayed in the Label control:

Creating a Custom LINQ Entity Base Class
In this final part of this chapter, we build a custom LINQ to SQL base class. Our base class contains standard methods for selecting records, inserting records, updating records, and deleting records. It also supports paging and caching. Finally, our base class contains methods for performing validation.
The files for the custom classes can be found on the website that accompanies this book in the folder EntityBaseClasses. This folder contains the following files:
• EntityBase—A custom base class for LINQ to SQL entities.
• EntityDataSource—A custom data source control derived from the ObjectDataSource control for representing LINQ to SQL entities.
• EntityValidator—A custom validation control.
• EntityCallOutValidator—A custom validation control that displays a call-out validation error message.
• ValidationError—A class that represents a validation error.
• ValidationErrorCollection—A collection of validation errors.
• ValidationException—An exception thrown when there is a validation error.
• TraceWriter—A class for logging LINQ to SQL queries to ASP.NET trace.
The motivation for writing these classes was to make standard database operations easier when using LINQ to SQL. I discovered that I was writing the exact same queries and commands over and over again whenever I created a new entity. Writing a standard base class made my life easier because it freed me from writing the same repetitive code.
Using the Entity Base Class
Follow these steps to use the custom entity base classes:
- Create a new website.
- Add an App_Code folder to your website, and copy the EntityBaseClasses folder to the App_Code folder.
- Create one or more LINQ to SQL entities with the help of the LINQ to SQL Designer.
- Add a connection string named
conto your database in the web.config file. - Create a separate partial class for each LINQ to SQL entity and derive the class from the
EntityBaseclass. - Create an empty
Validate()method for each entity class.
For example, imagine that you have used the LINQ to SQL Designer to create an entity named Movie. You created the Movie entity by dragging the Movie database table from the Database Explorer (Server Explorer) window onto the LINQ to SQL Designer surface. At this point, you are ready to inherit your new Movie entity from the EntityBase class.
Listing 20.32 contains the file that you add to your website to create a Movie entity that inherits from the EntityBase class.
Listing 20.32. ShowEntityBaseApp_CodeMovie.cs

Now that you have derived the Movie entity from EntityBase, the Movie class inherits methods for selecting, inserting, updating, and deleting records.
Performing Standard Data-Access Operations with the EntityBase Class
Any entity that you inherit from the EntityBase class inherits the following methods automatically:
• Select()—Selects all entities.
• Select(string orderBy)—Selects all entities in a certain order.
• SelectCached()—Selects all entities from the cache.
• SelectCached(string orderBy)—Selects all entities from the cache in a certain order.
• Select(int startRowIndex, int maximumRows)—Selects a page of entities.
• Select(int startRowIndex, int maximumRows, orderBy)—Selects a page of entities in a certain order.
• SelectCount()—Returns a count of entities.
• SelectCount(string orderBy)—Returns a count of entities.
• SelectCountCached()—Returns a count of entities from the cache.
• Get(int? Id)—Gets a single entity using the entity’s identity value.
• Save(T oldEntity, T newEntity)—Either performs an insert or update depending on whether the identity value is 0.
• Insert(T entityToInsert)—Inserts a new entity.
• Update(T oldEntity, T newEntity)—Updates an existing entity.
• Delete(T entityToDelete)—Deletes an entity.
Two of these methods—Get() and Save()—require that the database table an entity represents include an identity column. The other methods do not make this assumption.
The page in Listing 20.33 illustrates how you can use these methods.
Listing 20.33. ShowEntityBaseSelectPagedSortedMovies.aspx
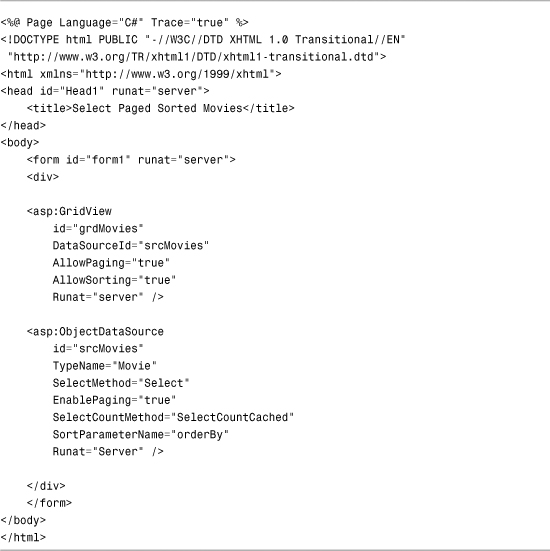
The page in Listing 20.33 contains a GridView control bound to an ObjectDataSource control. The ObjectDataSource control represents the Movie entity. The ObjectDataSource is configured to support data source paging and sorting. You get both the Select() and SelectCountCached() methods for free from the EntityBase class.
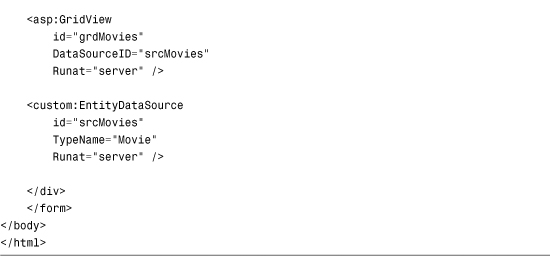
The EntityBaseClasses folder also contains a control named EntityDataSource, which can be used instead of the normal ObjectDataSource. The EntityDataSource control inherits from the ObjectDataSource control and provides default values for several ObjectDataSource control properties.
For example, you could swap the ObjectDataSource control in Listing 20.33 with the following EntityDataSource control:

Why use the EntityDataSource control? Less typing. I don’t want to program all day; I want to see a movie.
Performing Validation with the EntityBase Class
One complaint I’ve always had about ASP.NET Framework is that validation happens at the wrong place. When building ASP.NET pages, you write the vast majority of your validation code in the user interface layer instead of your business logic layer where your validation code properly belongs.
Performing validation in your user interface layer is bad for two main reasons. First, it means that if you switch user interfaces for your application, you must rewrite all your validation logic. For example, you might want to create a cool Silverlight interface for your application. In that case, you have to write all your validation logic again from scratch. Validation logic should be user interface-independent.
Also, placing your validation logic in your user interface layer means that you have to rewrite the exact same validation logic on each page that you use an entity. This is an extraordinary time waster. I want to write my validation logic for an entity once and use the same logic everywhere.
The EntityBase class includes a Validate() method that you can use to incorporate validation logic into your entities (and thus, your business logic layer). Listing 20.34 illustrates how you can write the Movie class so that it validates the Title, Director, and DateReleased properties.
Listing 20.34. ShowEntityBaseApp_CodeMovie.cs

The Validate() method validates the properties of the Movie entity. The method takes advantage of the ValidationUtility class. The ValidationUtility class contains a set of methods to make it easier to perform standard types of validation:
• SatisfiesRequired()—Enables you to check whether an expression has a value.
• SatisfiesType()—Enables you to validate against a regular expression defined in the Web.config file.
• SatisfiesExpression()—Enables you to validate against a regular expression.
• IsInRole()—Enables you to check whether the current user is in a particular role.
• IsUserName()—Enables you to check whether the current user has a particular username.
• ShowValidationErrors()—Displays validation errors on a page.
The ASP.NET page in Listing 20.35 demonstrates how you take advantage of entity validation when inserting new movie records into the database (see Figure 20.3).
Figure 20.3. Performing entity validation.

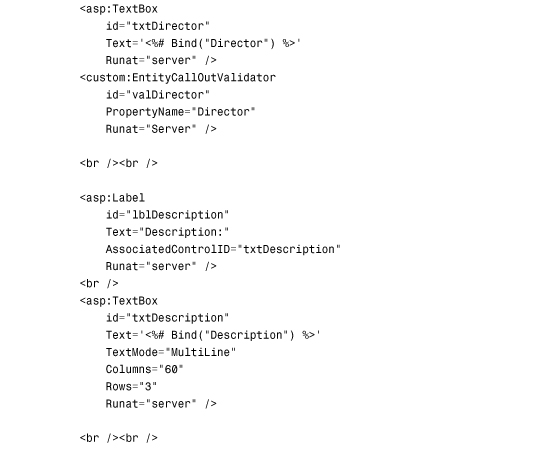
Listing 20.35. ShowEntityBaseInsertMovie.aspx
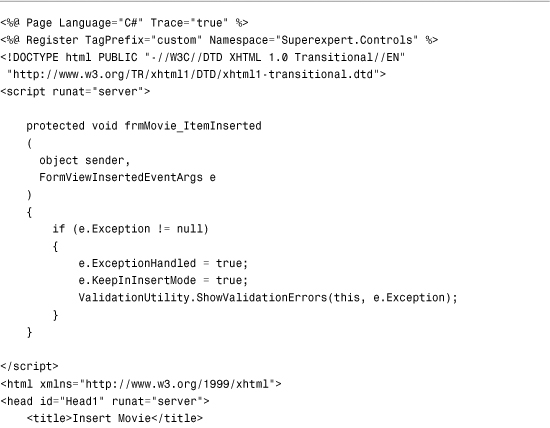


You should notice several things about the page in Listing 20.35. First, the page includes a method for handling the FormView control’s ItemInserted event. This handler checks for an exception. If Movie.Validate() creates one or more validation errors, the Movie entity throws a ValidationException when inserting or updating automatically.
If there is an exception, the exception is passed to the ValidationUtility.ShowValidationErrors() method. The ShowValidationErrors() method finds the EntityCallOutValidator that corresponds to each validation error and displays the correct error message.
The Validate() method executes only if a Movie entity can be created. If someone enters the wrong type of value into a field, the ObjectDataSource can’t even create the entity and the Validate() method never executes. The EntityCallOutValidator associated with the DateReleased property includes ControlToValidate and TypeName properties. This validation control checks whether the value entered into the DateReleased TextBox is a valid date even before the Movie entity is created.
Summary
We covered a lot of material over the course of this chapter. In the first part, we discussed all the features of C# and VB.NET used to support LINQ, such as anonymous types, extension methods, and lambda expressions.
Next, we discussed LINQ to SQL entities. You learned how to build entities that represent your database objects both by hand and by using the LINQ to SQL Designer. We also briefly examined the LinqDataSource control.
In the following part, we discussed how you can perform basic database operations with LINQ to SQL. For example, you learned how to select records, page through records, and cache records. You also learned how to insert, update, and delete database records with LINQ to SQL.
In the final part of this chapter, you learned how to build a custom LINQ to SQL base class. You learned how to use this class to support selecting, inserting, deleting, and updating entities without writing any code. You also learned how to add validation logic to your entities.