
Chapter 35. Deploying ASP.NET Web Applications
In This Chapter
• Using Web.config Transformations
• One-Click Publishing Web Applications
• Summary
Many developers have been in the situation in which they have spent a tremendous amount of effort building a web application but when it comes time to deploy it, things fall apart. Some teams don’t spend enough time planning for deployment, other times the deployment is just hindered by poor or inadequate technology.
This chapter shows you how new features in ASP.NET 4 ease the burden of web application deployment. After reading this chapter, you should quickly and easily deploy ASP.NET 4 applications to your development, testing, staging, and production environments—hopefully without any of the pain and suffering this process caused with previous versions.
Packaging Web Applications
When ASP.NET was first released, one of its most lauded features was Xcopy deployment. This basically referred to the ability of a developer to copy files from one location to the other, and the application should work. This was a response to the often complicated web deployment process of legacy ASP applications.
Copying files to deploy a web application is still a benefit, but today’s web applications have become far more than just a collection of .aspx files and the site’s compiled DLL file. Modern web applications carry a tremendous amount of “baggage” and modern developers need a way of bundling all that baggage with an application to deploy it smoothly and quickly.
Today’s web applications can consist of any or all of the following:
• Content (aspx, ascx, images, compiled binaries, media, XML files, and so on)
• Databases
• Assemblies that need to be in the Global Assembly Cache (GAC)
• Registry and Configuration Settings
• Security settings (certificates, CAS policy, and such)
• IIS Configuration (security, custom error pages, and more)
This is just the tip of the iceberg. Any web application of sufficient complexity requires a large amount of ancillary “stuff.” Up until now, developers have had no real good way of packaging this stuff in a single, simplified way.
Some developers reading this book might have had experience with building web applications in Java. And Java web application developers have long had a facility known as WAR (Web Archive) files. These files are basically ZIP archives that contain (usually) everything that a particular web site needs to function, including security policy, configuration files, and bundled content and media.
Visual Studio 2010 now gives developers the ability to create such single file bundles directly from within the IDE. (Although it can be done from the command line and from within MSBuild as well!)
Before you deploy a web application, you’re actually going to need a web application—so if you want to follow along you can simply create a new ASP.NET Web Application in Visual Studio 2010. Make sure it uses IIS as the web host server and not Visual Studio; this can help demonstrate the capability to deploy IIS configuration settings later.
After you create the application, right-click the project in Solution Explorer and choose properties. Click the Package/Publish Web vertical tab . This displays the screen that enables you to configure how your application is going to be packaged. Figure 35.1 shows a sample of this screen.
Figure 35.1. The Package/Publish Web Properties screen.

A bunch of options are on this screen, but some of the more important ones are listed here:
• Items to Deploy—This enables you to choose whether you just want items necessary to run the application or whether you want source code and debug symbols deployed as well.
• Include All Databases—We discuss this option later in the chapter.
• Include all IIS Settings—Because the application runs under IIS (remember we mentioned you should configure your app to run under IIS?) the deployment bundler can actually grab the IIS settings for your application during the packaging process. These settings will be preserved by the target IIS server upon deployment.
• Create Deployment Package as a ZIP File—You can choose to build a deployment package as a single file or as a folder hierarchy. In general you probably always want to use the ZIP file because it is easier to move around between servers. A folder hierarchy enables you to perform file- and folder-level diff comparisons, however.
• IIS Site/Application Name—You can prespecify the name of the application (or site) that will be deployed and the physical path for deployment. As you see shortly, the administrator importing this package can override this values if they choose.
To actually build the deployment package, right-click the project in Solution Explorer and choose the Build Deployment Package option. This runs a build step, and you should see Publish Succeeded at the bottom of your build log. Open up the folder you chose as the package destination, and you should see the ZIP file you built.
If you crack open that ZIP file with your favorite ZIP tool or with Windows Explorer, you can see there’s a Content folder and a few XML files, notably archive.xml (used for the archive itself), parameters.xml (used for IIS settings, and so on), and systeminfo.xml (contains a list of installed components).
Next, let’s move to the destination machine (you can do this from your development workstation as well if you don’t have a staging server handy) and import the application.
To do that, open up the IIS Management console (Under Administrative Tools, Internet Information Services (IIS) Manager), right-click the Default Web Site node, and select Deploy; then select Import Application. After you browse to the location of the ZIP file, you see an information dialog showing the contents of the deployment package, including the content and IIS settings. You now have the ability to ignore individual bits of content or IIS settings. Under Advanced Settings you also have the option of setting the WhatIf flag, which enable you to do a mock import (shown in Figure 35.2). The WhatIf flag is extremely handy when doing new application imports on production servers.
Figure 35.2. Preview dialog of Application Import.

When you’re satisfied with what’s on this screen, click Next to continue. This brings up the final confirmation screen shown in Figure 35.3, which enables you to specify the name of the application, the physical location of the files, and so on. After clicking Next, you see a progress bar; then the application appears configured and ready to run in the IIS Management console.
Figure 35.3. Confirming details of Web Deployment Package Import.

This is an absolutely priceless utility to have. Now developers can create deployment packages and give them to the administrators who have secured control over QA, Staging, and Production environments. All these people have to do is import the deployment package and all the files, content, prerequisites, and configuration necessary for that application will be put where they belong.
Using Web.config Transformations
So far we’ve seen that with Visual Studio 2010 we can create new web deployment packages that drastically simplify the deployment of applications to interim environments such as QA and Staging, but what about the configuration? Application settings, connection strings, web service endpoints, and hundreds of other pieces of configuration all typically vary depending on whether the application is running on a developer workstation, in QA, in Staging, or in Production. So how do we take advantage of the great web deployment tools but still have varying configuration files?
Before Visual Studio 2010, we would write custom build scripts that would replace our Web.config files with custom files specific to certain environments. Now, having a Web.config file specialized for specific build targets is actually built into Visual Studio.
For each of your build configurations (by default VS2010 comes with Debug and Release, but you can create as many as you like), you can have a Web.config file. This file isn’t a complete copy of the file but is actually a list of transformations you want to make to the original. This is actually a smart strategy because the bulk of the config file typically stays the same across environments with small changes to things such as service endpoints, connection strings, and app settings.
To see this in action, let’s add a build configuration to the empty ASP.NET project we deployed in the previous section. To do this, right-click the solution in Solution Explorer and bring up the Configuration Manager (see Figure 35.4). Click the drop-down arrow next to the configuration for the web application (probably says Debug at the moment) and select New.... Call the new configuration Staging, and base it on the Release configuration.
Figure 35.4. Creating a Staging configuration.

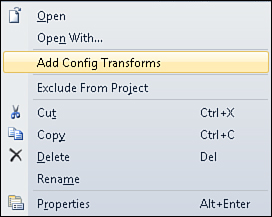
After you have a staging configuration created, you can right-click the Web.config file and select Add config transforms, as shown in Figure 35.5. This is the only way to create the Web.config transformation files. If you manually create a Web.staging.config file without going through this menu item, it won’t compile properly and will not properly transform your Web.config file.
Figure 35.5. Adding configuration transforms.
Open up the main Web.config file and add a new app setting as shown here:
![]()
Now for the fun part—creating the transformation. Double-click the Web.staging.config file to bring it up in the IDE. Add the following code below the commented out sample involving a connection string:

The full syntax of the transformation language would be too much to include in this chapter; however, a link to detailed MSDN documentation directly is in the sample config file, http://go.microsoft.com/fwlink/?LinkId=125889. The code we just put into the file searches the root Web.config for a key matching the string “Environment” and replace the value with the one from the staging file. If we then create a web deployment package with Staging being our active configuration, we end up with an appSettings element in the deployed Web.config that looks like this:
![]()
The power we get from the combination of transformable configuration files on a per-build-configuration basis and the web deployment packages is incredible. We can now create individual package files that are targeted at a specific environment and have confidence that the app will contain all its content, binaries, prerequisites, and configuration suited for that environment.
Deploying Databases
Although it’s certainly a huge productivity increase and a time and stress saver, it sure would be great if we could correlate our database migrations with our application deployments.
The folks at Microsoft have thought of this as well. There is a Package/Publish SQL tab on the project properties page now. This enables you to create a list of database deployments in a grid. For each of those deployments, you can define a source database and a destination database. You can also choose whether the deployment includes schema only, data only, or both. Also keep in mind that all this information is also on a per-configuration basis, so the list of databases and their source/target pairs will be different depending on whether you create a production deployment or staging deployment.
Figure 35.6 shows a screenshot of this new Publish/Package SQL screen.
Figure 35.6. The Publish/Package SQL screen.

In this scenario, we have a web application that we built called Zombie Killa, a social network for zombie killers. At the top of the figure you can see a grid where we can define all the databases that we want to include in the deployment, so we’re not limited to just one database. Also, keep in mind that these databases are independent of any database projects you might have in your solution.
For each of the databases in the grid, we can then configure the options shown in the lower half of Figure 35.6. We can define the connection string for the source database and the connection string for the destination database. We can also configure what is copied from one to the other: schema, data, or both. Finally, we can also add custom SQL scripts that do specific migration-related tasks because even the best databases have thorns in them that create bumps or stalls for migration processes.
Now when we build a deployment package, it contain all the information necessary to ensure that when the web application is fully deployed in the target environment; all its required databases will be available as well, containing exactly the data and schema that we want them to have.
One-Click Publishing Web Applications
In the previous section, we gave you an overview of how to create portable, self-contained web deployment packages. These packages can be copied to servers and installed on those servers by developers or administrators and can contain all an application’s prerequisites, even database migration scripts.
Microsoft actually took this facility one step further. Through Visual Studio 2010, we can actually create publishing profiles that we can use to publish a web application directly from the IDE. This comes in extremely handy when we use VS2010 to work on a web application that we’re deploying to a hosting company.
Note
When we talk about hosting company here, we’re specifically talking about web hosting companies that provide a remote IIS with the MSDeploy service available for secure deployment. The type of deployment we’re talking about in this chapter is unrelated to Windows Azure and deployment in the cloud.
Visual Studio 2010 enables us to have up to 50 different publishing profiles, which is more than enough room to allow for one-clicking publishing to a local IIS, a development environment, staging, QA, production, remotely hosted sites, and everything in between.
One-Click publication is just a layer on top of the web deployment configuration you saw in the previous section. It takes all the information from the Package/Publish Web and the Package/Publish SQL property pages and performs the packaging process and the remote deployment in one step.
To trigger the one-click publish process, you can right-click the project and choose Publish (yes, we know that’s actually two clicks), or you can push up a single button in the Publish toolbar that defaults to a position at the top of your IDE. Figure 35.7 shows what happens when you click this button.
Figure 35.7. Creating a publish profile.
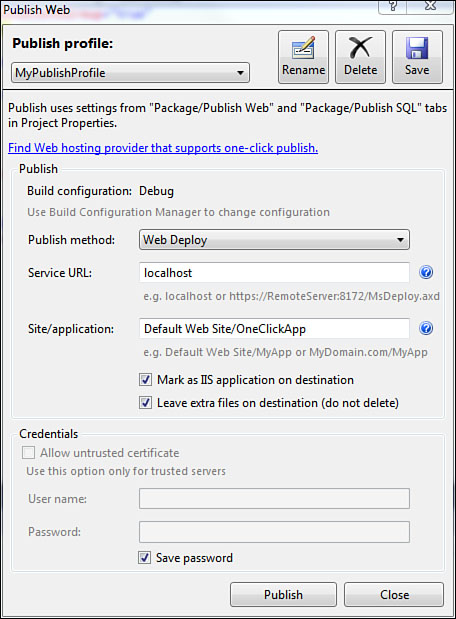
As mentioned, you can deploy to a local IIS or a remote one within your own organization or a remote one hosted by a third party. The only requirement is that the web deployment tool be installed on the destination server. If you install Visual Studio 2010 on top of a machine with IIS7, you already have the web deployment tool installed. If you don’t have it installed (version 1.1, at the time this book was written), you can get it from http://www.iis.net/expand/WebDeploy. This site has a link that you can use to install the tool using the Web Platform Installer and a wealth of documentation and videos to give you more information on the web deployment tool than is in scope for this book.
If you have nightmarish flashbacks of deployment using FrontPage Extensions and twitch at the memory of the difficulties and heartburn caused by those days, you can rest easy—deployment with MSDeploy is, nothing like deployment using FrontPage extensions.
Summary
ASP.NET 4 brings with it quite a few new features to make the act of developing websites easier, more reliable, even faster and more scalable. However, as an added bonus, we now also have the ability to create web deployment packages that bundle up our web applications along with all their configuration, dependencies, and prerequisites. These packages can be deployed to IIS servers by developers, administrators, or command-line scripts and dramatically ease the burden of deploying web applications.
In addition, we also have the ability to create one-click publication profiles that enable us to take these web packages and deploy them on-demand just by clicking a button inside Visual Studio.
When you have gotten over the joy of building your new ASP.NET 4 application, it’s going to get even more fun when you see how easy it is to deploy and manage these applications.