
Chapter 34. Configuring Applications
In This Chapter
• Overview of Website Configuration
• Creating Custom Configuration Sections
• Creating Encrypted Configuration Sections
• Summary
In this chapter, you learn how to configure your ASP.NET applications. In the first section, you are provided with an overview of the different sections contained in a web configuration file. You also learn how to modify web configuration files by using both the Web Site Administration Tool and the ASP.NET Microsoft Management Console Snap-In.
Next, you learn how to manipulate configuration settings programmatically with the Configuration API. We discuss how you can both retrieve and modify configuration settings. You also learn how to work with configuration settings located at a remote website.
You also learn how to add custom configuration sections to the web configuration file. You learn how to register custom configuration sections and interact with custom configuration sections with the Configuration API.
Finally, we discuss the important topic of protecting your configuration files. You learn how to encrypt different sections of a configuration file so that they cannot be read by human eyes. You also learn how you can deploy an encrypted configuration file from one server to another.
Overview of Website Configuration
ASP.NET uses a hierarchical system of configuration. At the top of the hierarchy is the Machine.config file. This file contains all the default configuration settings for ASP.NET applications and all other types of applications built with the .NET Framework.
The Machine.config file is located at the following path:
WINDOWSMicrosoft.NETFramework[version]CONFIGMachine.config
This same folder also contains a Web.config file. The Web.config file contains settings that serve as defaults for all ASP.NET applications running on the machine. The Web.config file overrides particular settings in the Machine.config file.
Note
The CONFIG folder includes the following six files:
• Machine.config—Contains the actual configuration settings.
• Machine.config.default—Contains the default values for all configuration settings.
• Machine.config.comments—Contains comments on each configuration setting.
• Web.config—Contains the actual configuration settings.
• Web.config.default—Contains the default values for all configuration settings.
• Web.config.comments—Contains comments on each configuration setting.
Only the Machine.config and Web.config files are actually used. The other files are for the purpose of documentation.
You can place a Web.config file in the root folder of a website, such as the wwwroot folder. A Web.config file located in the root folder of a website contains settings that apply to all applications contained in the website.
You also can place a Web.config file in the root of a particular application. In that case, the Web.config file has application scope.
Finally, you can place a Web.config file in an application subfolder. In that case, the Web.config file applies to all pages in that folder and below.
When an ASP.NET application starts, this hierarchy of configuration files merges and caches in memory. A file dependency is created between the cached configuration settings and the file system. If you make a change to any of the configuration files in the hierarchy, the new configuration settings are loaded into memory automatically.
When an ASP.NET page reads a configuration setting, the setting is read from memory. This means that the ASP.NET Framework can read configuration settings, such as connection strings, efficiently.
Furthermore, when you make a change to a configuration setting, you don’t need to stop and restart an application manually for the new setting to take effect. The ASP.NET Framework reloads the cached configuration settings automatically when the configuration settings are changed on the file system. (The one exception to this is modifications to the processModel section.)
Warning
Modifying most configuration settings results in an application restart. Any data stored using the cache or in-process Session state is lost and must be reloaded. You can get around this issue by using external configuration files. See the section “Placing Configuration Settings in an External File” later in this chapter. Additionally, this rarely poses a problem in production environments because developers are typically not modifying these files directly on production servers.
The configuration files are XML files. You can modify configuration settings by opening the Machine.config file or a Web.config file and modifying a setting in Notepad. Alternatively, you can change many of the configuration settings (but not all) by using either the Web Site Administration Tool or the ASP.NET Microsoft Management Console Snap-In.
Using the Web Site Administration Tool
If you use Visual Web Developer (or Visual Studio .NET), you can modify certain configuration settings with the Web Site Administration Tool. This tool provides you with a form interface for making configuration changes (see Figure 34.1).
Figure 34.1. Opening the Web Site Administration Tool.

You open the Web Site Administration Tool by selecting Project and then clicking ASP.NET Configuration. Selecting this option opens a browser window that contains the tool.
The Web Site Administration Tool has the following four tabs:
• Home—Contains links to the other tabs.
• Security—Enables you to configure authentication, authorization, and the Role Manager.
• Application—Enables you to create and manage application settings, configure SMTP settings, and enable application tracing, debugging, and error pages. You also can use this tab to take your application offline.
• Provider—Enables you to select a provider for Membership and the Role Manager.
Under the Application tab, you can click the link to take your application offline. When you click this link, the following httpRuntime element is added to your web configuration file:
<httpRuntime enable="false" />
This setting causes the Application Domain associated with the ASP.NET application to refuse any requests. When an application is offline, all requests result in a 404—Not Found error message. You might want to take your application offline, for example, to prevent people from requesting pages while you perform updates to your application.
Note
You also can take an ASP.NET application offline by adding a file with the name app_offline.htm to the root of your application.
The Web Site Administration Tool is implemented as an ASP.NET application. Behind the scenes, it uses the Configuration API discussed later in this chapter. You can view the entire source code for the Web Site Administration Tool by navigating to the following folder:
WINDOWSMicrosoft.NETFramework[version]ASP.NETWebAdminFiles
Using the ASP.NET Microsoft Management Console Snap-In
You also can make configuration changes with IIS directly. The latest versions of Internet Information Services (IIS) have ASP.NET configuration options directly in the console. Previous versions of IIS had snap-in property sheets that provided limited configuration. When you click either a website or an application in the left-side browser, the following ASP.NET options are available for that selection:
• .NET Authorization Rules
• .NET Compilation
• .NET Error Pages
• .NET Globalization
• .NET Trust Levels
• Application Settings
• Connection Strings
• Machine Key
• Pages and Controls
• Session State
• SMTP E-mail
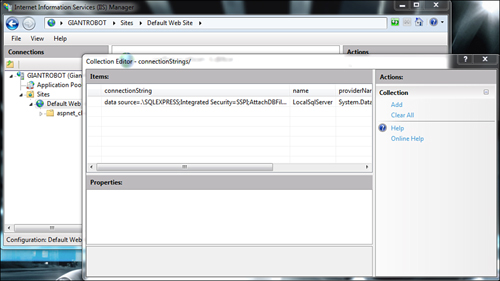
Behind the scenes, IIS is directly manipulating the Web.config files for sites and applications. If you ever had to manually tweak some difficult settings in these files, then you can certainly appreciate that IIS now lets you make these changes directly within IIS (see Figure 34.2).
Figure 34.2. Configuration options available within IIS.
ASP.NET Configuration Sections
All the configuration sections in the Machine.config or Web.config file related to ASP.NET are contained in the <system.web> section group. Here is a complete list of the 36 ASP.NET configuration sections and a brief explanation of the purpose of each section:
• anonymousIdentification—Enables you to configure anonymous user identification, which is used, for example, by the Profile object.
• authentication—Enables you to configure authentication.
• authorization—Enables you to configure authorization.
• browserCaps—Enables you to configure the lookup of browser capabilities.
• caching—Enables you to configure caching policies.
• clientTarget—Enables you to configure aliases for different clients (browsers).
• compilation—Enables you to configure how ASP.NET applications are compiled. For example, you can specify whether an application is compiled in debug mode.
• customErrors—Enables you to configure custom error pages.
• deployment—Enables you to specify whether an ASP.NET application is deployed in retail mode.
• deviceFilters—Enables you to configure device filters.
• globalization—Enables you to configure the Culture, UICulture, and other attributes related to building multilingual web applications.
• healthMonitoring—Enables you to configure Health Monitoring. See the final section of this chapter.
• hostingEnvironment—Enables you to configure ASP.NET application properties such as the application idle timeout.
• httpCookies—Enables you to configure how cookies are sent to the browser.
• httpHandlers—Enables you to configure HTTP Handlers.
• httpRuntime—Enables you to configure properties of the HTTP Runtime, such as the number of threads maintained in the thread pool.
• httpModules—Enables you to configure HTTP Modules.
• identity—Enables you to configure the identity of the ASP.NET application account.
• machineKey—Enables you to configure encryption keys used by Membership and Session state.
• membership—Enables you to configure ASP.NET Membership.
• mobileControls—Enables you to configure adapters used with ASP.NET mobile controls.
• pages—Enables you to configure page properties such as the website Master Page and Theme. See Chapter 5, “Designing Websites with Master Pages,” and Chapter 6, “Designing Websites with Themes.”
• processModel—Enables you to configure the ASP.NET process.
• profile—Enables you to configure the Profile object.
• roleManager—Enables you to configure the Role Manager.
• securityPolicy—Enables you to map security policy files to trust levels.
• sessionPageState—Enables you to configure how mobile devices store Session state.
• sessionState—Enables you to configure Session state.
• siteMap—Enables you to configure Site Maps.
• trace—Enables you to configure page and application tracing.
• trust—Enables you to configure Code Access Security (CAS) for an ASP.NET application.
• urlMappings—Enables you to remap page requests to new pages.
• webControls—Enables you to specify the location of client-script files used by web controls.
• webParts—Enables you to configure Web Parts.
• webServices—Enables you to configure web services.
• xhtmlConformance—Enables you to configure the level of XHTML conformance of the XHTML rendered by web controls.
Applying Configuration Settings to a Particular Path
By default, the settings in a Machine.config or Web.config file are applied to all pages in the same folder and below. However, if you have the need, you can also apply configuration settings to a particular path. For example, you can apply configuration settings to a particular subfolder or even a particular page.
You apply configuration settings to a particular path by using the <location> element. For example, the web configuration file in Listing 34.1 enables password-protection for a single file named Secret.aspx.
Listing 34.1. Web.config

If you attempt to request the Secret.aspx page, you are redirected to the Login.aspx page. However, none of the other files in the same application are password protected by the configuration file.
The <location> element must be added as an immediate child of the <configuration> element. You can’t, for example, add the <location> element within a <system.web> element. You must surround the <system.web> element with the <location> element.
Note
You can create the web configuration file in Listing 34.1 by right-clicking the project in Solution Explorer, choosing Add New Item, and selecting the Web Configuration File template. Alternatively, you can add the appSettings section by using either the Web Site Administration Tool or IIS. Both tools enable you to enter values for the appSettings section through a user-friendly interface.
Locking Configuration Settings
You can lock configuration settings so that they cannot be overridden at a lower level in the configuration hierarchy. For example, you might want to require that no application running on your production server executes in debug mode. In that case, you can lock the debug configuration setting in a website Web.config file, the root Web.config file, or the Machine.config file.
Tip
As an alternative to locking the compilation section to prevent a production website being deployed in debug mode, you can take advantage of the deployment element. Adding the following element to the system.web section of the machine.config disables debug mode, enables remote custom errors, and disables trace:
<deployment retail="true" />
You can lock a configuration setting in multiple ways. The Web.config file in Listing 34.2 illustrates how you can lock a setting by using the allowOverride="false" attribute of the <location> element.
Listing 34.2. Web.config

The configuration file in Listing 34.2 locks the compilation element. If you attempt to add a configuration file that sets the debug attribute to the value true, and the configuration file is located below the configuration file in Listing 34.2, an exception is raised (see Figure 34.3).
Figure 34.3. Attempting to override a locked configuration section.

One problem with the configuration file in Listing 34.2 is that it locks the entire compilation element. If you attempt to change any attribute of the compilation element at a lower level in the configuration hierarchy, an exception is raised.
You can add any of the following attributes to a particular configuration element to lock either the entire element or one or more of its attributes:
• lockAllAttributesExcept—Enables you to lock all attributes except those listed as the value of this attribute. You can specify multiple attributes to exclude in a comma-delimited list.
• lockAllElementsExcept—Enables you to lock all child elements of the current element except those listed as the value of this attribute. You can specify multiple elements to exclude in a comma-delimited list.
• lockAttributes—Enables you to lock multiple attributes. You can specify the attributes to lock in a comma-delimited list.
• lockElements—Enables you to lock multiple child elements. You can specify the child elements to lock in a comma-delimited list.
• lockItem—Enables you to lock the current element.
For example, the web configuration file in Listing 34.3 locks the debug attribute, and only the debug attribute, of the <compilation> element.
Listing 34.3. Web.config

Adding Custom Application Settings
You can easily add custom configuration settings to the web configuration file by taking advantage of the appSettings section, which section contains a list of key and value pairs. For example, the web configuration file in Listing 34.4 contains a welcome message and a copyright notice.
Listing 34.4. Web.config

You can retrieve values from the appSettings section either programmatically or declaratively. The page in Listing 34.5 illustrates both approaches (see Figure 34.4).
Figure 34.4. Displaying values from the appSettings configuration section.

Listing 34.5. ShowAppSettings.aspx


In Listing 34.5, the welcome message is retrieved programmatically from the WebConfigurationManager.AppSettings property. The value retrieved is assigned to a Label control. The System.Web.Configuration namespace must be imported before you can use the WebConfigurationManager class.
You retrieve the copyright notice declaratively by using the AppSettingsExpressionBuilder. The following expression retrieves the value of the copyright key:
<%$ AppSettings: copyright %>
Placing Configuration Settings in an External File
You can place particular configuration sections in an external file. You might want to do this for a couple of reasons. First, you can make a configuration file more manageable by dividing it into multiple files. Also, when you place configuration information in a separate file, you can prevent application restarts when you change a configuration setting.
Every configuration element includes a configSource attribute. You can assign a path to a file as the value of the configSource attribute. For example, the web configuration file in Listing 34.6 uses the configSource attribute in its <appSettings> element.
Listing 34.6. Web.config

The appSettings are stored in the external file, as shown in Listing 34.7.
Listing 34.7. appSettings.config

Normally, modifying a web configuration file results in your ASP.NET application restarting. Any data stored in Session State or the Cache object is lost. However, the appSettings section is declared in the Machine.config file with a restartOnExternalChanges="false" attribute. This attribute prevents your application from restarting when a change is made to the appSettings section in an external configuration file. If you modify the file in Listing 34.6, for example, your application won’t restart.
Note
The book’s website includes a page named ShowAppStartTime.aspx, which displays the time that the current ASP.NET application started. You can use this file to detect when a modification made to a web configuration file caused an application restart. (The application start time is retrieved in the Application_Start() event handler in the Global.asax file.)
Using the Configuration API
The Configuration API enables you to retrieve and modify configuration settings. You can use the Configuration API to modify web configuration files on the local machine or a remote machine.
If you are responsible for maintaining a large number of websites, the Configuration API can make your life much easier. You can build administrative tools that enable you to quickly make configuration changes to multiple applications. You can use the Configuration API in an ASP.NET page, or you can build command-line tools or Windows Forms applications that use the Configuration API.
The Configuration API is exposed by the WebConfigurationManager class (located in the System.Web.Configuration namespace). This class supports the following properties:
• AppSettings—Exposes all the settings from the appSettings section.
• ConnectionStrings—Exposes all the settings from the connectionStrings section.
The WebConfigurationManager also supports the following methods:
• GetSection—Retrieves a configuration section relative to the current page or a supplied virtual path.
• GetWebApplicationSection—Retrieves a configuration section from the current web application root web configuration file.
• OpenMachineConfiguration—Retrieves a Machine.config file on either the local machine or a remote server.
• OpenMappedMachineConfiguration—Retrieves a Machine.config file by using a particular file mapping.
• OpenMappedWebConfiguration—Retrieves a web configuration file by using a particular file mapping.
• OpenWebConfiguration—Retrieves a Web.config file on either the local machine or a remote server.
Almost every configuration section in the web configuration file has a corresponding class in .NET Framework that represents the configuration section. These classes provide you with a strongly typed representation of each configuration section.
For example, corresponding to the <authentication> section in the web configuration file, there is a System.Web.Configuration.AuthenticationSection class. Corresponding to the <pages> section in the web configuration file, there is a System.Web.Configuration.PagesSection class. Each of these classes expose properties that correspond to all the attributes you can set in the web configuration file.
Reading Configuration Sections from the Current Application
When an ASP.NET application starts, the application merges all the configuration settings in the configuration hierarchy to create one representation of the configuration settings. A particular configuration setting might have different values at different levels in the hierarchy. You can use the methods of the WebConfigurationManager class to get the value of a configuration setting at any level in the hierarchy.
The WebConfigurationManager.GetWebApplicationSection() method always retrieves a configuration setting from the application root Web.config file. For example, the page in Listing 34.8 displays whether debugging is enabled.
Listing 34.8. ShowConfigApp.aspx

The GetWebApplication() method returns an object. You must cast the value returned by this method to a particular configuration section type. In Listing 34.8, the value returned by this method is cast to an instance of the CompilationSection type.
Realize that you can get the same result when the page in Listing 34.8 is located in different subfolders. For example, debugging might not be enabled in a root configuration file, but it might be enabled in a configuration file in a particular subfolder. However, if you call the GetWebApplicationSection() method, the method always returns the configuration setting for the application root Web.config file.
If you want to get the value of a configuration setting relative to the folder in which the page executes, you can use the GetSection() method instead of the GetWebApplicationSection() method. The page in Listing 34.9 is located in a subfolder. The page displays the value of the debug setting retrieved from both the GetWebApplicationSection() method and the GetSection() method (see Figure 34.5).
Figure 34.5. Retrieving a configuration setting with the GetSection() and GetWebApplicationSection() methods.
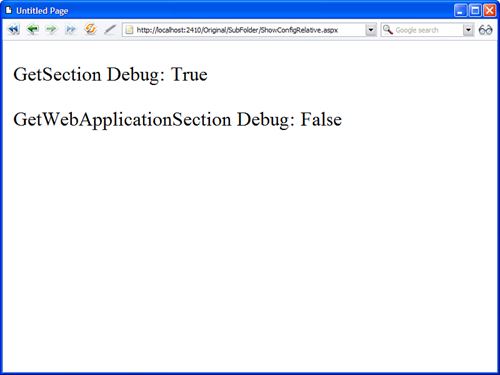
Listing 34.9. SubFolderShowConfigRelative.aspx


When you request the page in Listing 34.9, different values display by the GetSection() method and GetWebApplicationSection() method. The method displays the configuration setting relative to the current directory. The second method displays the configuration setting from the application root Web.config file.
If you want to retrieve the value of a configuration setting for a particular path, you can use the overload of the GetSection() method that accepts a path parameter. The page in Listing 34.10 iterates through all the immediate subfolders contained in the current application and displays whether debugging is enabled (see Figure 34.6).
Figure 34.6. Displaying configuration settings for each subfolder in an application.
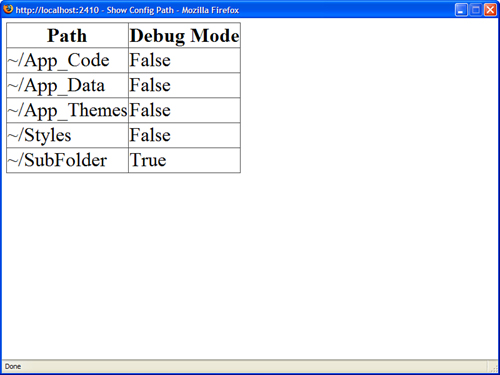
Listing 34.10. ShowConfigPath.aspx


Opening a Configuration File
If you want to open a particular configuration file, you can use one of the Open methods exposed by the WebConfigurationManager class. For example, the page in Listing 34.11 uses the OpenMachineConfiguration() method to open the Machine.config file and display the default value for the authentication mode setting.
Listing 34.11. ShowConfigMachine.aspx

You can use the WebConfigurationManager class to display configuration information for other websites located on the same server. For example, the page in Listing 34.12 displays a list of all the virtual directories contained in the default website. You can select a virtual directory and view the authentication mode associated with the virtual directory (see Figure 34.7).
Figure 34.7. Displaying configuration information for any application hosted on a server.

Listing 34.12. ShowConfigSites.aspx


The list of virtual directories is retrieved with the classes from the System.DirectoryServices namespace. When you select a virtual directory, the OpenWebConfiguration() method is called with the path to the virtual directory to get the configuration information.
Warning
Before you can use the classes from the System.DirectoryServices namespace, you must add a reference to the System.DirectoryServices.dll assembly. In Visual Web Developer, select Website, Add Reference. Also, depending on the security settings for the site and code running the directory services code, it might fail to connect to the domain controller. Make sure your code runs under a properly authorized identity.
Opening a Configuration File on a Remote Server
You can use the WebConfigurationManager class to open Machine.config or Web.config files located on remote web servers. However, before you can do this, you must perform one configuration step. You must enable the remote server to accept remote configuration connections by executing the following command from a command prompt:
aspnet_regiis -config+
To disable remove configuration connections, execute the following command:
aspnet_regiis -config-
The aspnet_regiis tool is located in the following path:
WINDOWSMicrosoft.NETFramework[version]aspnet_regiis.exe
Note
If you open the SDK Command Prompt or the Visual Studio Command Prompt, you don’t need to navigate to the Microsoft.NET folder to execute the aspnet_regiis tool.
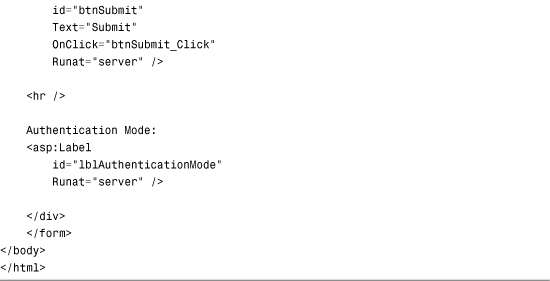
After you make this modification to a remote server, you can retrieve (and modify) configuration settings on the remote server by using one of the Open methods exposed by the WebConfigurationManager class. For example, the page in Listing 34.13 contains a form that enables you to enter a server, username, and password. When you submit the form, the page connects to the remote server and retrieves its Machine.config file. The page displays the current value of the remote server’s authentication mode (see Figure 34.8).
Figure 34.8. Changing configuration settings for a remote server.

Listing 34.13. ShowConfigRemote.aspx


You can use the page in Listing 34.13 even when the web server is located in some distant part of the Internet. You can enter a domain name or IP address in the server field.
Using the Configuration Class
When you use one of the WebConfigurationManager Open methods—such as the OpenMachineConfiguration() or OpenWebConfiguration() methods—the method returns an instance of the Configuration class. This class supports the following properties:
• AppSettings—Returns the appSettings configuration section.
• ConnectionStrings—Returns the connectionStrings configuration section.
• EvaluationContext—Returns an instance of the ContextInformation class that enables you to determine the context of the configuration information.
• FilePath—Returns the physical file path to the configuration file.
• HasFile—Returns True when there is a file that corresponds to the configuration information.
• Locations—Returns a list of locations defined by the configuration.
• NamespaceDeclared—Returns True when the configuration file includes a namespace declaration.
• RootSectionGroup—Returns the root section group.
• SectionGroups—Returns the child section groups contained by this configuration.
• Sections—Returns the child sections contained by this configuration.
The Configuration class also supports the following methods:
• GetSection—Enables you to return the specified configuration section.
• GetSectionGroup—Enables you to return the specified configuration section group.
• Save—Enables you to save any configuration changes.
• SaveAs—Enables you to save the configuration as a new file.
A configuration file contains two basic types of entities: section groups and sections. For example, the <system.web> element in a configuration file represents a section group. The <system.web> section group contains child sections such as the <authentication> and <httpRuntime> sections.
You can use the Configuration.RootSectionGroup property to get the primary section group in a configuration file. You can use the SectionGroups property to return all of a section group’s child section groups and the Sections property to return all of a section group’s child sections.
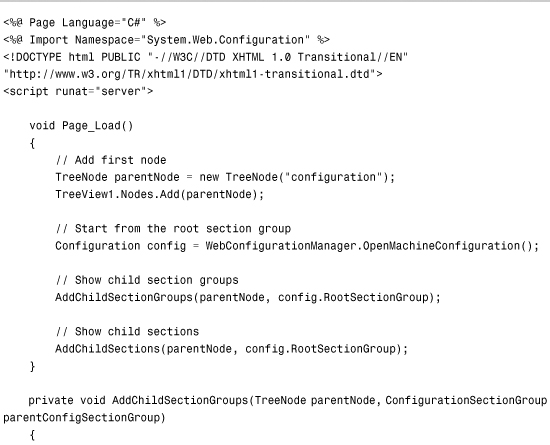
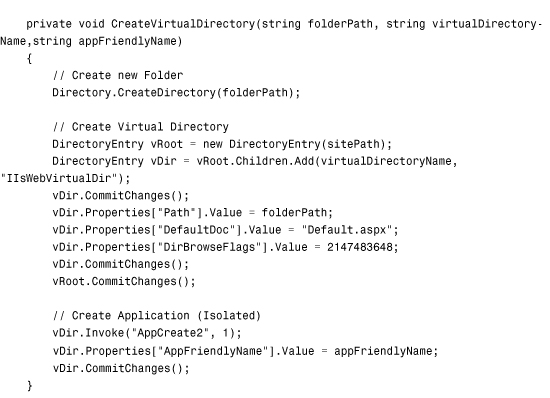
For example, the page in Listing 34.14 recursively displays the contents of the Machine.config file in a TreeView control (see Figure 34.9).
Figure 34.9. Displaying all configuration sections from the system.web configuration section group.

Listing 34.14. ShowConfigContents.aspx

Modifying Configuration Sections
You can use the WebConfigurationManager class not only when opening a configuration file to read the values of various configuration settings, but you also can use the WebConfigurationManager class to modify existing configuration settings or add new ones.
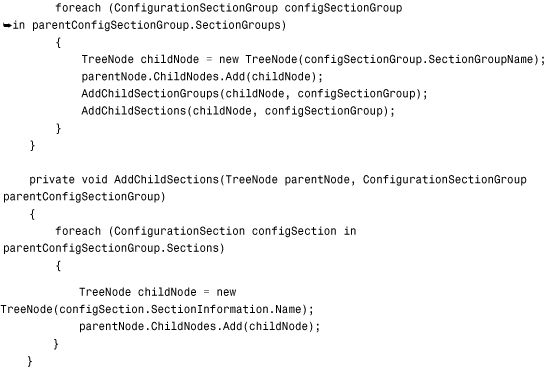
The Configuration class supports two methods for saving configuration information: the Save() and SaveAs() methods. For example, the page in Listing 34.15 enables you to turn on and off debugging for an application (see Figure 34.10).
Figure 34.10. Modifying the value of the Debug configuration setting.

Listing 34.15. ShowConfigModify.aspx

The page in Listing 34.15 loads the application root Web.config file with the help of the OpenWebConfiguration() method. (The Nothing parameter causes the root Web.config file to be loaded.) Next, the value of the Compilation.Debug property is modified. Finally, the Save() method is called to save this change.
When you call the Save() method, you can pass a ConfigurationSaveMode parameter to the method. This parameter can have the following values:
• Full—Saves all configuration settings, regardless of whether they have been modified.
• Minimal—Saves only those configuration settings that are different from their inherited value.
• Modified—Saves only those configuration settings that have been modified.
To use the Save() or SaveAs() methods, the account associated with the page must have Write permissions for the folder in which the configuration file is saved. By default, when pages are served from Internet Information Server, ASP.NET pages execute in the security context of the NETWORK SERVICE account (for Windows Server 2003) or the ASPNET account (for other operating systems). By default, neither of these accounts have permissions to save configuration changes.
Note
To make things more confusing, when pages are served from the web server included with Visual Web Developer, the pages are always served in the security context of the current user.
There are multiple ways that you can get around this permission problem. First, remember that you can use many of the methods of the WebConfigurationManager class from a console application or a Windows Forms application. If you build this type of application, you can sidestep these security issues.
Another option is to enable per-request impersonation for your ASP.NET application. When impersonation is enabled, an ASP.NET page executes within the security context of the user making the page request. If the user account has permissions to write to the file system, the page has permissions to write to the file system.
The web configuration file in Listing 34.16 enables impersonation.
Listing 34.16. Web.config

If you add the configuration file in Listing 34.16 to the same folder that contains the file in Listing 34.15, you can make modifications to configuration files.
Warning
Most changes to a configuration file result in an application restart. When an ASP.NET application restarts, all data stored in memory is blown away. For example, all data cached in the Cache object or Session state is lost. Also keep in mind that allowing remote configuration changes on a production server can result in a big security hole, so this type of arrangement is only advisable for development and testing environments.
Provisioning a New Website
When you provision new websites, you often need to create a new virtual directory. The Configuration API doesn’t provide you with any help here; however, you can create new virtual directories (and applications) by taking advantage of the classes in the System.DirectoryServices namespace. These classes enable you to use Active Directory Services Interface (ADSI) to modify properties of Internet Information Server.
Note
You can also manipulate Internet Information Server properties by using Windows Management Instrumentation (WMI). For more information, see the topic “Using WMI to Configure IIS” at the Microsoft MSDN website (msdn.microsoft.com).
Before you can use the classes from the System.DirectoryServices namespace, you need to add a reference to the System.DirectoryServices.dll assembly. In Visual Web Developer, select Website, Add Reference, and select System.DirectoryServices.dll.
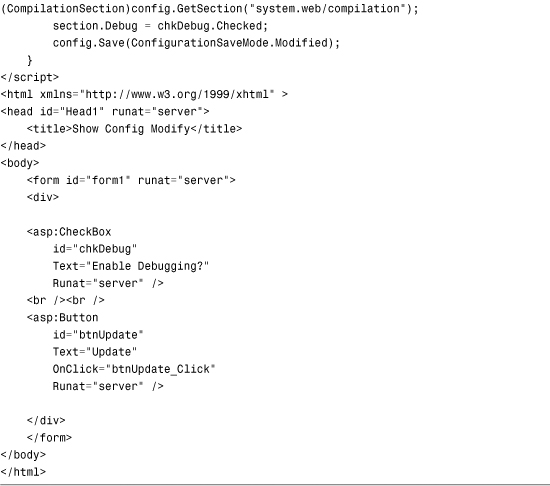
For example, the page in Listing 34.17 enables you to provision a new ASP.NET application (see Figure 34.11). The page creates a new virtual directory and a new application. The page also creates a new web configuration file in the virtual directory that contains the default language and debug settings you specify.
Figure 34.11. Creating a new ASP.NET application.

Listing 34.17. ProvisionSite.aspx


To use the page in Listing 34.17, you need adequate permissions. You can enable per-request impersonation by adding the file in Listing 34.16 to the same folder as the page in Listing 34.17.
Note
Internet Information Server includes several sample ADSI scripts. Look in your InetpubAdminScripts folder.
Creating Custom Configuration Sections
You can add custom configuration sections to a web configuration file. You can use a custom configuration section to store whatever information you want.
For example, if you need to manage a large number of database connection strings, you might want to create a custom database connection string configuration section. Or if you want to follow the Provider Model and implement a custom provider, you need to create a custom configuration section for your provider.
You create a custom configuration section by inheriting a new class from the base ConfigurationSection class. For example, the class in Listing 34.18 represents a simple custom configuration section.
Listing 34.18. App_CodeDesignSection.cs

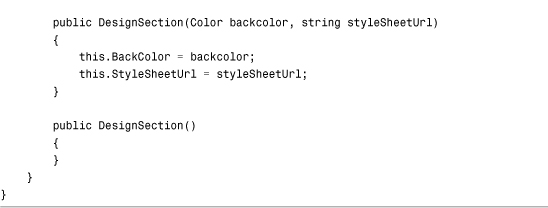
The class in Listing 34.18 represents a Design configuration section. This section has two properties: BackColor and StyleSheetUrl. Both properties are decorated with ConfigurationProperty attributes. The ConfigurationProperty attribute maps the property to an element attribute in the configuration file. When you declare the ConfigurationProperty attribute, you can use the following parameters:
• Name—Enables you to specify the name of the attribute in the configuration file that corresponds to the property.
• DefaultValue—Enables you to specify the default value of the property.
• IsDefaultCollection—Enables you to specify whether the property represents the default collection of an element.
• IsKey—Enables you to specify whether the property represents a key for a collection of configuration elements.
• IsRequired—Enables you to specify whether this property must have a value.
• Options—Enables you to use flags to specify the values of the above options.
You also can use validators when defining configuration properties. For example, in Listing 34.18, RegexStringValidator checks whether the value of the StyleSheetUrl property ends with a .css extension.
You can use the following validators with configuration properties:
• CallbackValidator—Enables you to specify a custom method to use to validate a property value.
• IntegerValidator—Enables you to validate whether a property value is an integer value (System.Int32).
• LongValidator—Enables you to validate whether a property value is a long value (System.Int64).
• PositiveTimeSpanValidator—Enables you to validate whether a property value is a valid time span.
• RegexStringValidator—Enables you to validate a property value against a regular expression pattern.
• StringValidator—Enables you to validate a property value that represents a string against a minimum length, maximum length, and list of invalid characters.
• SubClassTypeValidator—Enables you to validate whether the value of a property is inherited from a particular class.
• TimeSpanValidator—Enables you to validate a property value that represents a time span against a minimum and maximum value.
Warning
When you use validators such as the RegexStringValidator, make sure that you provide a property with a default value by using the DefaultValue parameter with the ConfigurationProperty attribute.
After you create a custom configuration section, you need to register it in a configuration file before you can use it. The web configuration file in Listing 34.19 adds the DesignSection configuration section to the system.web section.
Listing 34.19. Web.config

You are not required to add a custom configuration section to any particular configuration section group. For that matter, you are not required to add a custom configuration section to any configuration section group at all.
After you register a custom configuration section, you can use it just like any of the standard configuration sections. You can use the methods of the WebConfigurationManager class to retrieve and modify the custom section.
For example, the page in Listing 34.20 uses the custom configuration section just created to retrieve the page background color and style sheet (see Figure 34.12).
Figure 34.12. Using the custom configuration section to modify the page style and background color.

Listing 34.20. ShowDesignSection.aspx


Creating a Configuration Element Collection
A configuration element can contain a collection of child elements. For example, if you need to create a custom configuration section to configure a provider, you use child elements to represent the list of providers.
The class in Listing 34.21 represents a configuration section for a ShoppingCart. The configuration section includes three properties: MaximumItems, DefaultProvider, and Providers. The Providers property represents a collection of shopping cart providers.
Listing 34.21. App_CodeShoppingCartSection.cs


The Providers property returns an instance of the ProviderSettingsCollection class. This class is contained in the System.Configuration namespace.
The web configuration file in Listing 34.22 illustrates how you can use the ShoppingCartSection.
Listing 34.22. Web.config

The ShoppingCartSection class takes advantage of an existing class in the .NET Framework: the ProviderSettingsCollection class. If you have the need, you can create a custom configuration element collection class.
The AdminUsersSection class in Listing 34.23 enables you to represent a list of users. The class includes a property named Users that exposes an instance of the AdminUsersCollection class. The AdminUsersCollection represents a collection of configuration elements. The AdminUsersCollection class is also defined in Listing 34.23.
Listing 34.23. App_CodeAdminUsersSection.cs


The ConfigurationProperty attribute that decorates the Users property sets the name of the configuration attribute to an empty string. It also marks the property as representing the section’s default collection. These options enable you to avoid having to create a subtag for the user collection. The user collection appears immediately below the main <adminUsers> section tag.
The web configuration file in Listing 34.24 illustrates how you can use the AdminUsersSection class.
Listing 34.24. Web.config

The ASP.NET page in Listing 34.25 displays all the users from the adminUsers section in a BulletedList control (see Figure 34.13).
Figure 34.13. Displaying the contents of the adminUsers section in a BulletedList control.

Listing 34.25. ShowAdminUsersSection.aspx


Creating Encrypted Configuration Sections
If you need to protect sensitive information stored in a configuration file, you can encrypt the information. For example, you should always encrypt the connectionStrings section of a configuration file to prevent your database connection strings from being stolen by unauthorized intruders.
You can encrypt just about any section in the web configuration file. You can encrypt any of the sections in the system.web section group with the sole exception of the processModel section. You also can encrypt a custom configuration section.
The .NET Framework uses the Provider Model for encrypting configuration sections. The Framework ships with two ProtectedConfigurationProviders: the RsaProtectedConfigurationProvider and the DpapiProtectedConfigurationProvider.
RsaProtectedConfigurationProvider protects sensitive information stored in a configuration file. It uses the RSA algorithm to protect a configuration section. The RSA algorithm uses public key cryptography. It depends on that no one has discovered an efficient method to factor large prime numbers.
The second provider, the DpapiProtectedConfigurationProvider, uses the Data Protection API (DPAPI) to encrypt a configuration section. The DPAPI is built into the Windows operating system (Microsoft Windows 2000 and later). It uses either Triple-DES or AES (the United States Government-standard encryption algorithm) to encrypt data.
RsaProtectedConfigurationProvider is the default provider and is the one that you should almost always use. The advantage of RsaProtectedConfigurationProvider is that this provider supports exporting and importing encryption keys. This means that you can move an application that contains an encrypted configuration file from one web server to a new web server. For example, you can encrypt a configuration section on your development web server and deploy the application to a production server.
If you use the DpapiProtectedConfigurationProvider to encrypt a configuration section, on the other hand, you cannot decrypt the configuration section on another web server. If you need to move the configuration file from one server to another, you need to first decrypt the configuration file on the source server and re-encrypt the configuration file on the destination server.
Web Standards Note
The .NET Framework uses the World Wide Web Consortium (W3C) recommendation for encrypting XML files. This recommendation is located at www.w3.org/TR/2002/REC-xmlenc-core-20021210.
You can use encryption not only with configuration files, but also with other XML files. To learn more about encrypting XML files, look up the EncryptedXml class in the Microsoft .NET Framework SDK Documentation.
Encrypting Sections with the aspnet_regiis Tool
The easiest way to encrypt a section in the web configuration file is to use the aspnet_regiis command-line tool located at the following path:
WINDOWSMicrosoft.NETFramework[version]aspnet_regiis.exe
If you want to encrypt a particular section of a configuration file, you can use the -pef option when executing the aspnet_regiis tool. For example, the following command encrypts the connectionStrings section of a configuration file located in a folder named MyWebApp:
aspnet_regiis -pef connectionStrings c:WebsitesMyWebApp
If you prefer, rather than specify the location of a web application by its file system path, you can use its virtual path. The following command encrypts the connectionStrings section of a configuration file located in a virtual directory named /MyApp:
aspnet_regiis -pe connectionStrings -app /MyApp
The -app option is used to specify the application’s virtual path.
You can decrypt a configuration section by using the -pdf option. The following command decrypts a configuration file located in a folder named MyWebApp:
aspnet_regiis -pdf connectionStrings c:WebsitesMyWebApp
You also can decrypt a configuration section by specifying a virtual directory. The following command uses the -pd option with the -app option:
aspnet_regiis -pd connectionStrings -app /MyApp
When you encrypt a configuration section, you can specify ProtectedConfigurationProvider to use to encrypt the section. The Machine.config file configures two providers: RsaProtectedConfigurationProvider and DataProtectionConfigurationProvider. The RsaProtectedConfigurationProvider provider is used by default.
If you execute the following command, the connectionStrings section is encrypted with DataProtectionConfigurationProvider:
aspnet_regiis -pe connectionStrings -app /MyApp -prov ProtectedConfigurationProvider
This command includes a -prov option that enables you to specify the ProtectedConfigurationProvider.
Encrypting Sections Programmatically
Instead of using the aspnet_regiis tool to encrypt configuration sections, you can use the Configuration API. Specifically, you can encrypt a configuration section by calling the SectionInformation.ProtectSection() method.
For example, the ASP.NET page in Listing 34.26 displays all the sections contained in the system.web section group in a GridView control. You can click Protect to encrypt a section and UnProtect to decrypt a section (see Figure 34.14).
Figure 34.14. Encrypting and decrypting configuration sections.
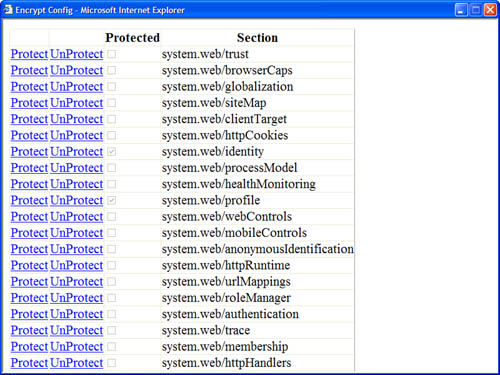
Listing 34.26. EncryptConfig.aspx


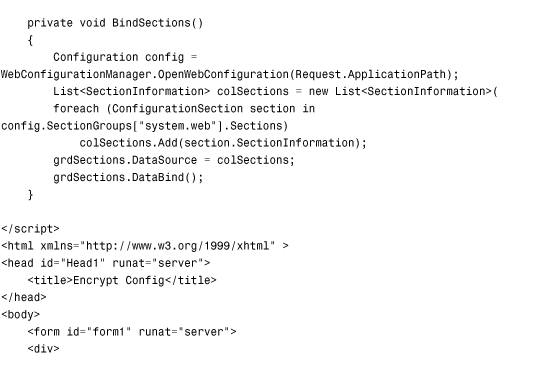

When you click the Protect link, the grdSection_RowCommand() event handler executes and calls the ProtectSection() method. This method calls the SectionInformation.ProtectSection() method to encrypt the selected section. The name of ProtectedConfigurationProvider is passed to the ProtectSection() method.
Warning
The page in Listing 34.26 saves the configuration file. By default, the ASPNET and NETWORK SERVICE accounts do not have permission to write to the file system. If you want the page in Listing 34.26 to execute within the security context of the user requesting the page, you can enable per-request impersonation by adding the configuration file in Listing 34.26 to the root of your application.
Deploying Encrypted Web Configuration Files
If you need to copy an encrypted configuration file from one server to a new server, you must copy the keys used to encrypt the configuration file to the new server. Otherwise, your application can’t read encrypted sections of the configuration file on the new server.
Warning
You can’t copy an encrypted configuration file from one server to another when you use the DpapiProtectedConfigurationProvider. This section assumes that you use the RsaProtectedConfigurationProvider.
By default, the RsaProtectedConfigurationProvider uses a public/private key pair stored in a key container named NetFrameworkConfigurationKey. This key container is located at the following path:
Documents and SettingsAll UsersApplication DataMicrosoftCryptoRSAMachineKeys
If you want to deploy an application that contains an encrypted configuration file to a new server, you must configure a new key container and import the key container to the new server. You must complete five configuration steps:
- Create a new key container.
- Configure your application to use the new key container.
- Export the keys from the origin server.
- Import the keys on the destination server.
- Grant access to the key container to your ASP.NET application.
You need to perform this sequence of configuration steps only once. After you set up both servers to use the same encryption keys, you can copy ASP.NET applications back and forth between the two servers and read the encrypted configuration sections. Let’s examine each of these steps.
First, you need to create a new key container because the default key container, the NetFrameworkConfigurationKey key container, does not support exporting both the public and private encryption keys. Execute the following command from a command prompt:
aspnet_regiis -pc "SharedKeys" -exp
This command creates a new key container named SharedKeys. The -exp option makes any keys added to the container exportable.
After you create the new key container, you must configure your application to use it. The web configuration file in Listing 34.27 configures RsaProtectedConfigurationProvider to use the SharedKeys key container.
Listing 34.27. Web.config

The configuration file in Listing 34.27 includes a configProtectedData section. This section is used to configure a new ProtectedConfigurationProvider named MyProtectedConfigurationProvider. This provider includes a keyContainerName attribute that points to the SharedKeys key container.
The next step is to export the keys contained in the SharedKeys key container to an XML file. You can export the contents of the SharedKeys key container by executing the following command:
aspnet_regiis -px "SharedKeys" keys.xml -pri
Executing this command creates a new XML file named keys.xml. The -pri option causes both the private and public key—and not only the public key—to be exported to the XML file.
Warning
The XML key file contains secret information (the keys to the kingdom). After importing the XML file, you should immediately destroy the XML file (or stick the XML file on a CD and lock the CD away in a safe location).
After you create keys.xml file on the origin server, you need to copy the file to the destination server and import the encryption keys. Execute the following command on the destination server to create a new key container and import the encryption keys:
aspnet_regiis -pi "SharedKeys" keys.xml
The final step is to grant access to the key container to your ASP.NET application. By default, a page served from Internet Information Server executes within the security context of either the NETWORK SERVICE account (Windows 2003 Server) or the ASPNET account (other operating systems). You can grant access to the SharedKeys key container to the ASPNET account by executing the following command:
aspnet_regiis -pa "SharedKeys" "ASPNET"
Executing this command modifies the ACLs for the SharedKeys key container so that the ASPNET account has access to the encryption keys.
After you complete this final step, you can transfer ASP.NET applications with encrypted configuration files back and forth between the two servers. An application on one server can read configuration files that were encrypted on the other server.
Note
As an alternative to using the aspnet_regiis tool, you can transfer encryption keys with the help of the RsaProtectedConfigurationProvider class. The RsaProtectedConfigurationProvider class contains methods for exporting and importing keys to and from XML files programmatically.
Summary
This chapter was devoted to the topic of configuration. In the first section, you were provided with an overview of the configuration sections used by ASP.NET Framework. You learned how to lock configuration sections to prevent sections from being modified. You also learned how to place configuration sections in external files.
Next, we tackled the topic of the Configuration API. You learned how to read and modify configuration files programmatically. You also learned how to provision new ASP.NET applications by creating new virtual directories and configuration files.
You learned how to create custom configuration sections and how to create both simple custom configuration sections and custom configuration sections that contain custom collections of configuration elements.
Finally, we discussed the topic of encryption. You learned how to encrypt a configuration section by using the aspnet_regiis command-line tool. You also learned how to encrypt configuration sections programmatically. In the final section, you also learned how to deploy encrypted configuration files from a development server to a production server.