
Chapter 5. Designing Websites with Master Pages
A Master Page enables you to share the same content among multiple content pages in a website. You can use a Master Page to create a common page layout. For example, if you want all the pages in your website to share a three-column layout, you can create the layout once in a Master Page and apply the layout to multiple content pages.
You also can use Master Pages to display common content in multiple pages. For example, if you want to display a standard header and footer in each page in your website, you can create the standard header and footer in a Master Page.
By taking advantage of Master Pages, you can make your website easier to maintain, extend, and modify. If you need to add a new page to your website that looks just like the other pages in your website, you simply need to apply the same Master Page to the new content page. If you decide to completely modify the design of your website, you do not need to change every content page. You can modify just a single Master Page to dramatically change the appearance of all the pages in your application.
In this chapter, you learn how to create Master Pages and apply them to content pages. It describes how you can apply a Master Page to an entire application by registering the Master Page in the web configuration file.
It also explores different methods of modifying content in a Master Page from individual content pages. For example, you learn how to change the title displayed by a Master Page for each content page.
Finally, you learn how to load Master Pages dynamically. Loading Master Pages dynamically is useful when you need to co-brand one website with another website, or when you want to enable individual website users to customize the appearance of your website.
Creating Master Pages
You create a Master Page by creating a file that ends with the .master extension. You can locate a Master Page file any place within an application. Furthermore, you can add multiple Master Pages to the same application.
For example, Listing 5.1 contains a simple Master Page.
Listing 5.1. SimpleMaster.master


The Master Page in Listing 5.1 looks similar to a normal ASP.NET page. You can place almost all the same elements in a Master Page that you can place in an ASP.NET page, including HTML, server-side scripts, and ASP.NET controls.
Visual Web Developer Note
You create a Master Page in Visual Web Developer by selecting the Website menu option, Add New Item, and the Master Page item.
You can see two special things about the Master Page in Listing 5.1. First, the file contains a <%@ Master %> directive instead of the normal <%@ Page %> directive. Second, the Master Page includes two ContentPlaceHolder controls.
When the Master Page merges with a particular content page, the content from the content page appears in the areas marked by ContentPlaceHolder controls. You can add as many ContentPlaceHolders to a Master Page as you need.
Warning
You can’t do some things in a Master Page that you can do in a content page. For example, you cannot cache a Master Page with the OutputCache directive. You also cannot apply a theme to a Master Page.
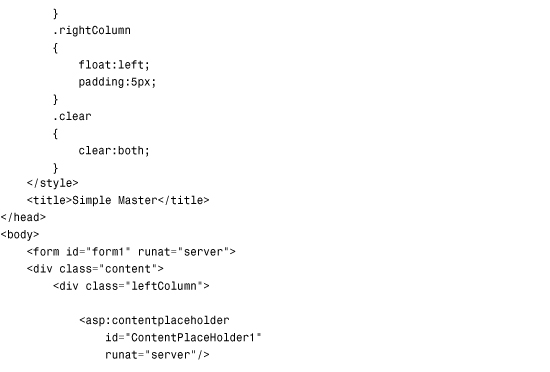
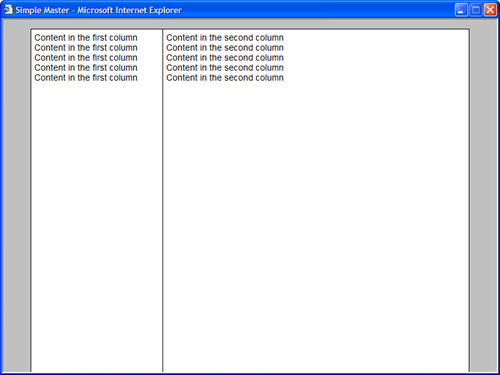
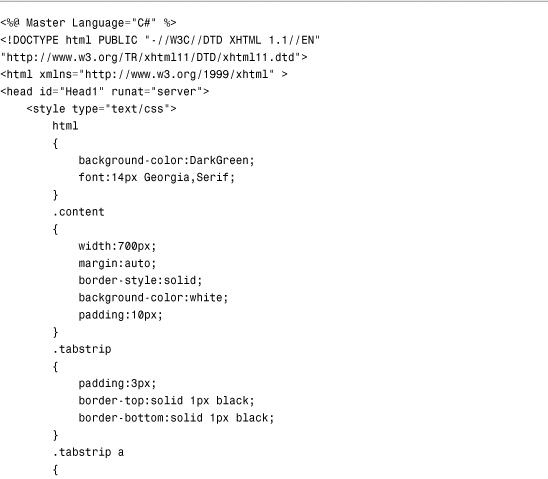
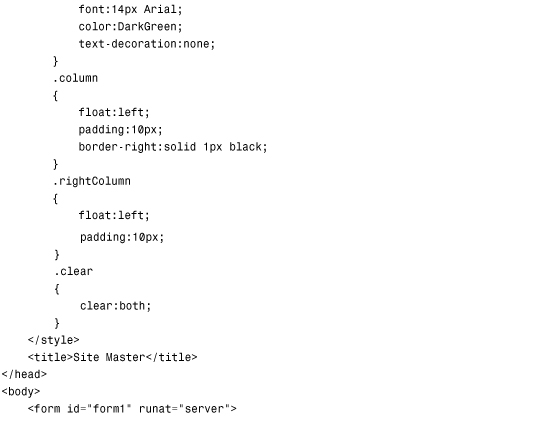
The Master Page in Listing 5.1 creates a two-column page layout. Each ContentPlaceHolder control is contained in a separate <div> tag. Cascading Style Sheet rules position the two <div> tags into a two-column page layout (see Figure 5.1).
Figure 5.1. Creating a two-column Master Page.
Web Standards Note
The Master Page uses Cascading Style Sheets (CSS) to create the page layout. You should strive to avoid using HTML tables for layout. Use HTML tables to display only tabular information.
The content page in Listing 5.2 uses the Master Page that was just created.
Listing 5.2. SimpleContent.aspx

When you open the page in Listing 5.2 in a web browser, the contents of the page merge with the Master Page.
Visual Web Developer Note
In Visual Web Developer, you create an ASP.NET page associated with a particular Master Page by selecting Website, Add New Item, and Web Form. Next, check the check box labeled Select Master Page. When you click Add, a dialog box appears that enables you to select a Master Page.
The Master Page is associated with the content page through the MasterPageFile attribute included in the <%@ Page %> directive. This attribute contains the virtual path to a Master Page.
The content page does not contain any of the standard opening and closing XHTML tags. All these tags are contained in the Master Page. All the content contained in the content page must be added with Content controls.
You must place all the content contained in a content page within the Content controls. If you attempt to place any content outside these controls, you get an exception.
The Content control includes a ContentPlaceHolderID property. This property points to the ID of a ContentPlaceHolder control contained in the Master Page.
Within a Content control, you can place anything that you would normally add to an ASP.NET page, including XHTML tags and ASP.NET controls.
Creating Default Content
You don’t need to associate a Content control with every ContentPlaceHolder control contained in a Master Page. You can provide default content in a ContentPlaceHolder control, and the default content appears unless it is overridden in a particular content page.
For example, the Master Page in Listing 5.3 includes an additional column, which displays a banner advertisement (see Figure 5.2). The banner advertisement is contained in a ContentPlaceHolder control named contentAd.
Figure 5.2. Displaying default content in a Master Page.

Listing 5.3. DefaultMaster.master


The content page in Listing 5.4 uses the Master Page in Listing 5.3. It does not include a Content control that corresponds to the contentAd control in the Master Page. When you open the page in a browser, the default banner advertisement displays.
Listing 5.4. DefaultContent.aspx

Of course, you do have the option of adding a Content control that overrides the default content contained in the contentAd control in the Master Page. For example, you might want to display different banner advertisements in different sections of your website.
Note
You can nest ContentPlaceHolder controls in a Master Page. If you do this, you have the option of overriding greater or smaller areas of content in the Master Page.
Nesting Master Pages
When building a large website, you might need to create multiple levels of Master Pages. For example, you might want to create a single sitewide Master Page that applies to all the content pages in your website. In addition, you might need to create multiple sectionwide Master Pages that apply to only the pages contained in a particular section.
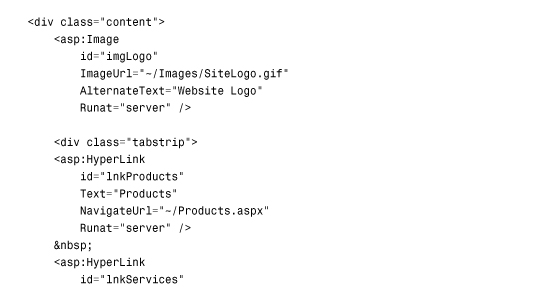
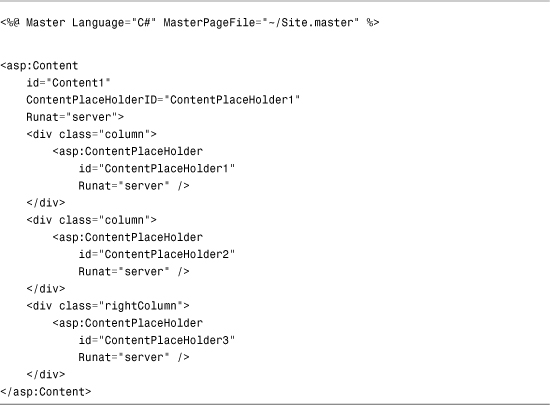
You can nest Master Pages as many levels as you need. For example, Listing 5.5 contains a Master Page named Site.master, which displays a logo image and contains a single content area. It also contains sitewide navigation links.
Listing 5.5. Site.master
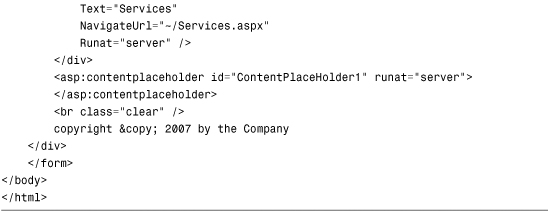
The Master Pages in Listing 5.6 and Listing 5.7 are nested Master Pages. Both Master Pages include a MasterPageFile attribute that points to the Site.master Master Page.
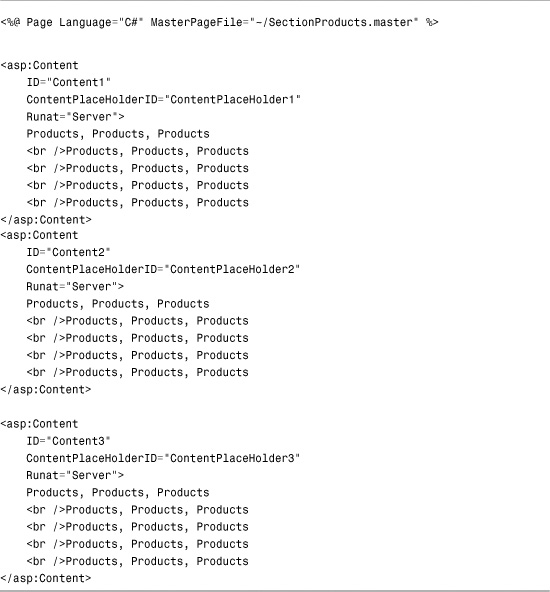
Listing 5.6. SectionProducts.master
Listing 5.7. SectionServices.master

The Master Page in Listing 5.6 creates a three-column page layout, and the Master Page in Listing 5.7 creates a two-column page layout.
The Products.aspx page in Listing 5.8 uses the SectionProducts.master Master Page. When you request the Products.aspx page, the contents of Site.master, SectionProducts.master, and Products.aspx are combined to generate the rendered output (see Figure 5.3).
Figure 5.3. Nesting Master Pages to display the Products.aspx page.

Listing 5.8. Products.aspx
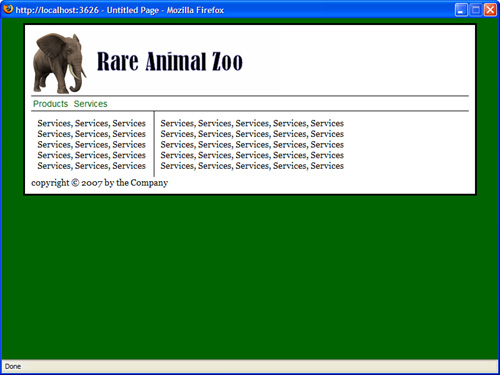
The Services.aspx page in Listing 5.9 uses the SectionService.master Master Page. When this page is opened in a browser, the contents of Site.master, SectionServices.master, and Services.aspx combine to generate the rendered output (see Figure 5.4).
Figure 5.4. Nesting Master Pages to display the Services.aspx pages.
Listing 5.9. Services.aspx

Using Images and Hyperlinks in Master Pages
You must be careful when using relative URLs in a Master Page. For example, you must be careful when adding images and links to a Master Page. Relative URLs are interpreted in different ways, depending on whether they are used with HTML tags or ASP.NET controls.
If you use a relative URL with an ASP.NET control, the URL is interpreted relative to the Master Page. For example, suppose that you add the following ASP.NET Image control to a Master Page:
<asp:Image ImageUrl="Picture.gif" Runat="Server" />
The ImageUrl property contains a relative URL. If the Master Page is in a folder named MasterPages, the URL is interpreted like this:
/MasterPages/Picture.gif
Even if a content page is in a completely different folder, the ImageUrl is interpreted relative to the folder that contains the Master Page and not relative to the content page.
The situation is completely different in the case of HTML elements. If an HTML element such as an <img> or <a> tag includes a relative URL, the relative URL is interpreted relative to the content page. For example, suppose you add the following <img> tag to a Master Page:
<img src="Picture.gif" />
The src attribute contains a relative URL, which is interpreted relative to a particular content page. For example, if you request a content page in a folder named ContentPages, the relative URL is interpreted like this:
/ContentPages/Picture.gif
Using relative URLs with HTML elements is especially tricky because the URL keeps changing with each content page. If you request content pages from different folders, the relative URL changes. You can solve this problem in three ways.
First, you can replace all the HTML elements that use relative URLs with ASP.NET controls. An ASP.NET control automatically reinterprets a relative URL as relative to the Master Page.
Note
Relative URLs used by ASP.NET controls in a Master Page are automatically reinterpreted relative to the Master Page. This process of reinterpretation is called rebasing. Only ASP.NET control properties decorated with the UrlProperty attribute are rebased.
Second, you can avoid relative URLs and use absolute URLs. For example, if your application is named MyApp, you can use the following <img> tag to display an image file located in the MasterPages folder:
<img src="/MyApp/MasterPages/Picture.gif" />
The disadvantage of using absolute URLs is that they make it difficult to change the location of a web application. If the name of your application changes, the absolute URLs no longer work and you end up with a bunch of broken images and links.
The final option is to use the Page.ResolveUrl() method to translate an application-relative URL into an absolute URL. This approach is illustrated with the page in Listing 5.10. The Page.ResolveUrl() method is used with the <img> tag in the body of the Master Page, which displays the website logo.
Listing 5.10. MasterPagesImageMaster.master
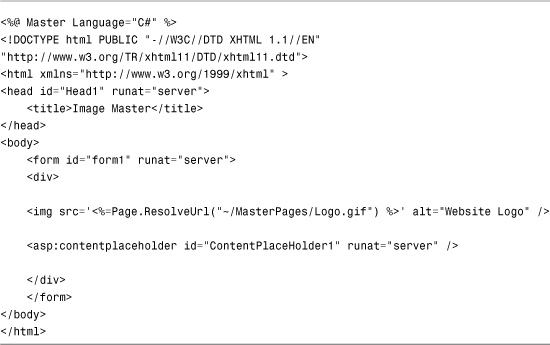
The Master Page in Listing 5.10 is in a folder named MasterPages. This folder also includes an image named Logo.gif. This image displays with the following HTML tag:
<img src='<%=Page.ResolveUrl("~/MasterPages/Logo.gif") %>' alt="Website Logo" />
The Page.ResolveUrl() method converts the tilde into the correct path for the current application directory.
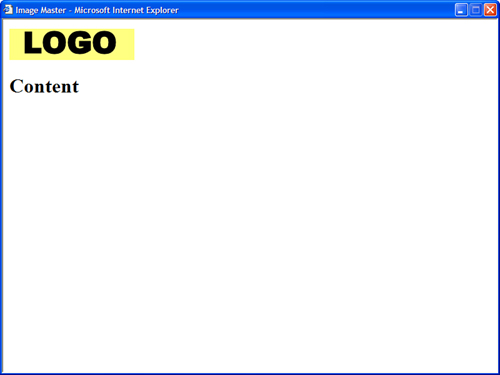
The content page in Listing 5.11 uses the Master Page and correctly displays the website logo (see Figure 5.5):
Listing 5.11. ImageContent.aspx
Figure 5.5. Displaying a Master Page relative image.
Registering Master Pages in Web Configuration
You can apply a Master Page to every content page in a particular folder or every content page in an entire application. Rather than add a MasterPageFile attribute to individual content pages, you can add a configuration option to the web configuration file.
For example, the web configuration file in Listing 5.12 applies the SimpleMaster.master Master Page to every page contained in the same folder (or subfolder) as the web configuration file.
Listing 5.12. FolderAWeb.Config

The Master Page is applied only to content pages. If a page does not contain any Content controls—it is a normal ASP.NET page—the Master Page is ignored.
You can override the Master Page configured in the web configuration file in the case of a particular content page. In other words, a MasterPageFile attribute in a content page takes precedence over a Master Page specified in the web configuration file.
Modifying Master Page Content
Master Pages enable you to display the same content in multiple content pages. You quickly discover that you need to override the content displayed by a Master Page in the case of particular content pages.
For example, normally the Master Page contains the opening and closing HTML tags, including the <title> tag. This means that every content page displays the same title. Normally, you want each page to display a unique title.
In this section, you learn multiple techniques of modifying Master Page content from a content page.
Using the Title Attribute
If you need to modify only the title displayed in each content page, you can take advantage of the <%@ Page %> directive’s Title attribute. This attribute accepts any string value.
For example, the page in Listing 5.13 includes a Title attribute, which sets the title of the current content page to the value Content Page Title.
Listing 5.13. TitleContent.aspx

There is one requirement for the Title attribute to work. The HTML <head> tag in the Master Page must be a server-side Head tag. In other words, the <head> tag must include the runat="server" attribute. When you create a new Web Form or Master Page in Visual Web Developer, a server-side <head> tag is automatically created.
Using the Page Header Property
If you need to programmatically change the Title or CSS rules included in a Master Page, you can use the Page.Header property. This property returns an object that implements the IPageHeader interface. This interface has the following two properties:
• StyleSheet
• Title
For example, the content page in Listing 5.14 uses the SimpleMaster.master Master Page. It changes the Title and background color of the Master Page.
Listing 5.14. HeaderContent.aspx


The Page.Header property returns the server-side <head> tag contained in the Master Page. You can cast the object returned by this property to an HTMLHead control.
You can modify other header tags by using page properties. For example, the page in Listing 5.15 modifies the Master Page <meta> tags (the tags used by search engines when indexing a page).
Listing 5.15. MetaContent.aspx
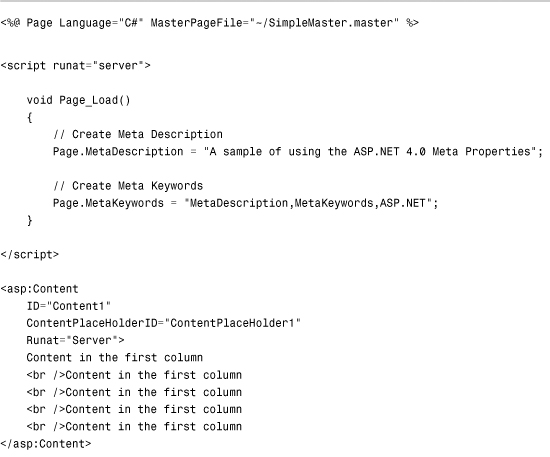

The Page_Load() method in Listing 5.15 uses two page-level properties. The first represents a Meta Description tag, and the second represents a Meta Keywords tag. When the page is rendered, the following tags are added to the <head> tag:
![]()
Exposing Master Page Properties
You can expose properties and methods from a Master Page and modify the properties and methods from a particular content page. For example, the Master Page in Listing 5.16 includes a public property named BodyTitle.
Listing 5.16. PropertyMaster.master


The BodyTitle property enables you to assign a title rendered in a header tag in the body of the page (see Figure 5.6).
Figure 5.6. Displaying a body title.
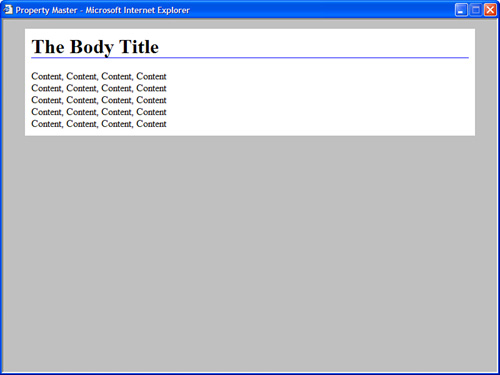
Because the BodyTitle property is exposed as a public property, you can modify it from a particular content page. The page in Listing 5.17 assigns the value "The Body Title" to the BodyTitle property.
Listing 5.17. PropertyContent.aspx

You should notice several things about the page in Listing 5.17. First, you can refer to the Master Page by using the Master property. In the Page_Load() method in Listing 5.17, the BodyTitle property of the Master Page is assigned a value with the following line of code:
Master.BodyTitle = "The Body Title";
The page in Listing 5.17 includes a <%@ MasterType %> directive. This directive automatically casts the value of the Master property to the type of the Master Page. In other words, it casts the Master Page to the PropertyMaster type instead of the generic MasterPage type.
If you want to refer to a custom property in a Master Page, such as the BodyTitle property, the value of the Master property must be cast to the right type. The BodyTitle property is not a property of the generic MasterPage class, but it is a property of the PropertyMaster class.
Using FindControl with Master Pages
In the previous section, you learned how to modify a property of a control located in a Master Page from a content page by exposing a property from the Master Page. You have an alternative here. If you need to modify a control in a Master Page, you can use the FindControl() method in a content page.
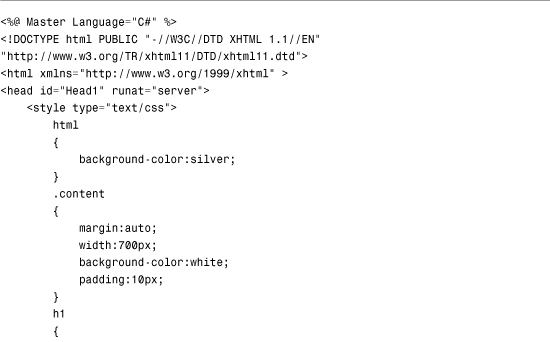
For example, the Master Page in Listing 5.18 includes a Literal control named BodyTitle. This Master Page does not include any custom properties.
Listing 5.18. FindMaster.master
The content page in Listing 5.19 modifies the Text property of the Literal control located in the Master Page. The content page uses the FindControl() method to retrieve the Literal control from the Master Page.
Listing 5.19. FindContent.aspx

The FindControl() method enables you to search a naming container for a control with a particular ID. The method returns a reference to the control.
Loading Master Pages Dynamically
You can associate different Master Pages dynamically with a content page. This is useful in two situations.
First, you can enable the users of your website to customize the appearance of the website by loading different Master Pages. You can display a menu of Master Pages and allow your users to pick their favorite layout.
Another situation in which loading Master Pages dynamically is useful concerns co-branding. Imagine that your company needs to make its website look like a partner website. When users link to your website from the partner website, you don’t want users to know that they are traveling to a new website. You can maintain this illusion by dynamically loading different Master Pages based on a query string passed from a partner website.
A Master Page is merged with a content page early in the page execution life cycle. This means that you cannot dynamically load a Master Page during the Page Load event. The only event during which you can load a Master Page is during the Page PreInit event. This is the first event raised during the page execution life cycle.
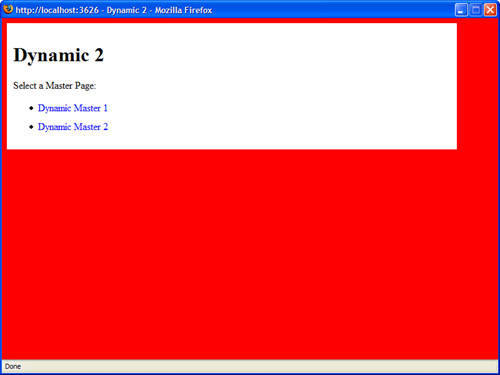
For example, the content page in Listing 5.20 dynamically loads one of two Master Pages named Dynamic1.master and Dynamic2.master.
Listing 5.20. DynamicContent.aspx


The page in Listing 5.20 contains two links. Both links include a query string parameter named master, which represents the name of a Master Page. When you click the first link, the Dynamic1.master Master Page loads (see Figure 5.7) and when you click the second link, the Dynamic2.master Master Page loads (see Figure 5.8).
Figure 5.7. Displaying the Dynamic1 Master Page.

Figure 5.8. Displaying the Dynamic2 Master Page.
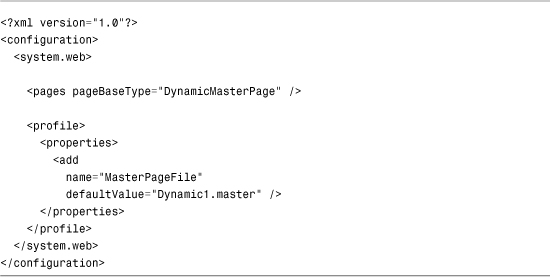
The page in Listing 5.20 includes a Page_PreInit() event handler. This handler grabs the value of the master query string parameter and assigns the value of this parameter to a Profile property. Next, the value of the Profile property is assigned to the page’s MasterPageFile property. Assigning a value to the MasterPageFile property causes a Master Page to be dynamically loaded.
Because the name of the Master Page is assigned to a Profile property, the selected Master Page loads for a user even if the user returns to the website many years in the future. The Profile object automatically persists the values of its properties for a user across multiple visits to a website. The Profile is defined in the web configuration file contained in Listing 5.21.
Listing 5.21. Web.Config

Loading Master Pages Dynamically for Multiple Content Pages
In the previous section, you learned how to load a Master Page dynamically for a single page in a website. However, what if you need to load a Master Page dynamically for every content page in a website?
The easiest way to apply the same logic to multiple content pages is to create a new base Page class. The file in Listing 5.22 contains a new base Page class named DynamicMasterPage.
Listing 5.22. DynamicMasterPage.cs

The class in Listing 5.22 inherits from the Page class. However, it overrides the base Page class’s OnPreInit() method and adds the logic for loading a Master Page dynamically.
After you create a new base Page class, you need to register it in the web configuration file. The web configuration file in Listing 5.23 contains the necessary settings.
Listing 5.23. Web.config
After you register the DynamicMasterPage class as the base Page class, every page in your application automatically inherits from the new base class. Every page inherits the new OnPreInit() method, and every page loads a Master Page dynamically.
Summary
In this chapter, you learned how to share the same content among multiple pages in an application by taking advantage of Master Pages. In the first section, you learned how to create a Master Page and apply it to multiple content pages. You also learned how to nest Master Pages and how to register a Master Page in the web configuration file.
The next section explored various techniques of modifying a Master Page from a particular content page. You learned how to use the Title attribute, use the Page.Header property, expose properties in a Master Page, and use the FindControl() method.
Finally, you learned how you can dynamically load different Master Pages and associate a particular Master Page with a particular content page at runtime. You learned how you can save a user’s Master Page preference by using the Profile object.