
Chapter 27. Using ASP.NET Membership
In This Chapter
• Summary
In the previous chapter, you learned how to use the Login controls to create an entire user registration system. This chapter looks under the covers and examines the security frameworks on which the Login controls are built.
The ASP.NET Framework includes four frameworks related to security:
• ASP.NET Authentication—Enables you to identify users.
• ASP.NET Authorization—Enables you to authorize users to request particular resources.
• ASP.NET Membership—Enables you to represent users and modify their properties.
• Role Manager—Enables you to represent user roles and modify their properties.
In this chapter, you learn how to configure authentication, authorization, ASP.NET Membership, and the Role Manager. You learn how to enable Forms authentication and configure advanced Forms authentication features such as cookieless authentication and cross-application authentication.
You learn how to configure authorization to control access to resources. We explore several advanced features of authorization. For example, you learn how to password-protect images and other files and pages.
You also learn how to configure different Membership providers, create custom Membership providers, and work with the properties and methods of the Membership class.
For example, you learn how to build a custom XmlMembershipProvider that stores membership information in an XML file.
Finally, we examine the Role Manager. You learn how to create user roles and add and remove users from a particular role. You also learn how to configure the different Role providers included in ASP.NET Framework.
Configuring Authentication
Authentication refers to the process of identifying who you are. The ASP.NET Framework supports three types of authentication:
• Windows
• .NET Passport
• Forms
A particular application can have only one type of authentication enabled. You can’t, for example, enable both Windows and Forms authentication at the same time.
Windows authentication is enabled by default. When Windows authentication is enabled, users are identified by their Microsoft Windows account names. Roles correspond to Microsoft Windows groups. Windows authentication delegates the responsibility of identifying users to Internet Information Server. Internet Information Server can be configured to use Basic, Integrated Windows, or Digest authentication.
.NET Passport authentication is the same type of authentication used at Microsoft websites such as MSN and Hotmail. If you want to allow users to log in to your application by using their existing Hotmail usernames and passwords, you can enable .NET Passport authentication.
Note
You must download and install the Microsoft .NET Passport SDK, register with Microsoft, and pay Microsoft a fee before you can use .NET Passport authentication. For more information, see the MSDN website (msdn.microsoft.com).
The final type of authentication is Forms authentication. When Forms authentication is enabled, users are typically identified by a cookie (but see the next section). When a user is authenticated, an encrypted cookie is added to the user’s browser. As the user moves from page to page, the user is identified by the cookie.
When Forms authentication is enabled, user and role information is stored in a custom data store. You can store user information anywhere that you want. For example, you can store usernames and passwords in a database, an XML file, or even a plain text file.
In ASP.NET 1.x, after enabling Forms authentication, you had to write all the code for storing and retrieving user information. When building an ASP.NET 4 application, on the other hand, you can let ASP.NET Membership do all this work for you. ASP.NET Membership can handle all the details of storing and retrieving user and role information.
You enable a particular type of authentication for an application in an application’s root web configuration file. The file in Listing 27.1 enables Forms authentication.
Listing 27.1. Web.Config
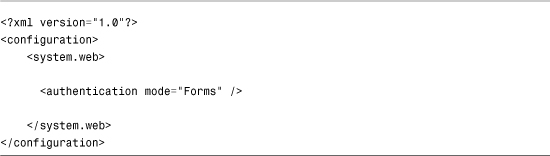
In Listing 27.1, the authentication element’s mode attribute is set to the value Forms. The possible values for the mode attribute are None, Windows, Forms, and Passport.
Note
Windows, Forms, and Passport authentication are implemented with HTTP Modules. If you need to implement a custom authentication scheme, you can create a custom HTTP Module. For more information on HTTP Modules, see Chapter 31, “Working with the HTTP Runtime.”
Visual Web Developer Note
If you prefer, you can enable a particular type of authentication by using the Web Site Administration Tool. This tool provides you with a form interface for modifying the web configuration file. You can open the Web Site Administration Tool by selecting Website, ASP.NET Configuration.
Configuring Forms Authentication
Several configuration options are specific to Forms authentication:
• cookieless—Enables you to use Forms authentication even when a browser does not support cookies. Possible values are UseCookies, UseUri, AutoDetect, and UseDeviceProfile. The default value is UseDeviceProfile.
• defaultUrl—Enables you to specify the page to which a user is redirected after being authenticated. The default value is Default.aspx.
• domain—Enables you to specify the domain associated with the authentication cookie. The default value is an empty string.
• enableCrossAppRedirects—Enables you to authenticate users across applications by passing an authentication ticket in a query string. The default value is false.
• loginUrl—Enables you to specify the path to the Login page. The default value is Login.aspx.
• name—Enables you to specify the name of the authentication cookie. The default value is .ASPXAUTH.
• path—Enables you to specify the path associated with the authentication cookie. The default value is /.
• protection—Enables you to specify how the authentication cookie is encrypted. Possible values are All, Encryption, None, and Validation. The default value is All.
• requiresSSL—Enables you to require an SSL (Secure Sockets Layer) connection when transmitting the authentication cookie. The default value is false.
• slidingExpiration—Enables you to prevent the authentication cookie from expiring as long as a user continues to make requests within an interval of time. Possible values are True and False. The default value is True.
• timeout—Enables you to specify the amount of time in minutes before the authentication cookie expires. The default value is 30.
Several of these configuration settings are related to the authentication cookie. For example, you can use the web configuration file in Listing 27.2 to change the name of the authentication cookie.
Listing 27.2. Web.Config

Several of these options require additional explanation. In the following sections, you learn how to enable cookieless authentication, modify the cookie expiration policy, and enable authentication across applications.
Using Cookieless Forms Authentication
Normally, Forms authentication uses a cookie to identify a user. However, Forms authentication also supports a feature named cookieless authentication. When cookieless authentication is enabled, a user can be identified without a browser cookie.
By taking advantage of cookieless authentication, you can use Forms Authentication and ASP.NET Membership to authenticate users even when someone uses a browser that does not support cookies or a browser with cookies disabled.
When cookieless authentication is enabled, a user can be identified by a unique token added to a page’s URL. If a user uses relative URLs to link from one page to another, the token is passed from page to page automatically and the user can be identified across multiple page requests.
When you request a page that requires authentication and cookieless authentication is enabled, the URL in the browser address bar looks like this:
![]()
That long, ugly code in the URL is the user’s encoded authentication ticket.
You configure cookieless authentication by assigning a value to the cookieless attribute of the forms element in the web configuration file. The cookieless attribute accepts any of the following four values:
• UseCookies—Always use an authentication cookie.
• UseUri—Never use an authentication cookie.
• AutoDetect—Automatically detect when to use an authentication cookie.
• UseDeviceProfile—Use the device profile to determine when to use an authentication cookie.
The default value is UseDeviceProfile. By default, ASP.NET Framework issues a cookie only when a particular type of device supports cookies. The ASP.NET Framework maintains a database of device capabilities in a set of files contained in the following folder:
WINDOWSMicrosoft.NETFrameworkv2.0.50727CONFIGBrowsers
By default, ASP.NET Framework never uses cookieless authentication with a browser such as Microsoft Internet Explorer. According to the device profile for Internet Explorer, Internet Explorer supports cookies, so cookieless authentication is not used. The Framework doesn’t use cookieless authentication even when cookies are disabled in a browser.
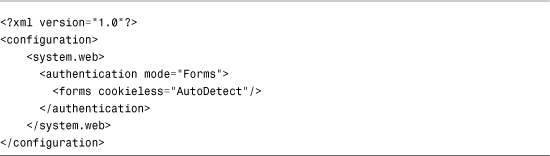
If you want ASP.NET Framework to automatically detect whether a browser supports cookies, you need to set the cookieless attribute to the value AutoDetect. When AutoDetect is enabled, ASP.NET Framework checks whether a browser sends an HTTP COOKIE header. If the COOKIE header is present, an authentication cookie is assigned to the browser. Otherwise, ASP.NET Framework uses cookieless authentication.
The web configuration file in Listing 27.3 enables AutoDetect.
Listing 27.3. Web.Config
Using Sliding Expiration with Forms Authentication
By default, Forms authentication uses a sliding expiration policy. As long as a user lets no more than 30 minutes pass without requesting a page, the user continues to be authenticated. However, if the user does not request a page for 30 minutes, the user is logged out automatically.
If you have strict security requirements, you can use an absolute expiration policy rather than a sliding expiration policy. In other words, you can force a user to log in again after a particular interval of time.
The web configuration file in Listing 27.4 forces a user to log in again every minute.
Listing 27.4. Web.Config

Using Forms Authentication Across Applications
By default, Forms authentication is application relative. In other words, if you log in to one application, you aren’t logged in to any other application—even when the other application is located on the same web server.
This creates problems in two situations. First, you don’t want to require the employees of your company to log in multiple times as they move between different applications hosted by your company. An employee should log in once and use any application provided by your company automatically.
Second, if you host a web farm, you don’t want to force a user to log in whenever a request is served by a different web server. From the perspective of a user, a web farm should seem just like a single server.
By default, the Forms authentication cookie is encrypted and signed. Furthermore, by default, each application generates a unique decryption and validation key. Therefore, by default, you can’t share the same authentication cookie across applications.
You specify encryption and validation options with the machineKey element in the web configuration file. Here are the default settings for this element:
<machineKey
decryption="Auto"
validation="SHA1"
decryptionKey="AutoGenerate,IsolateApps"
validationKey="AutoGenerate,IsolateApps" />
The decryption attribute specifies the algorithm used to encrypt and decrypt the forms authentication cookie. Possible values are Auto, AES (the government standard encryption algorithm), and 3DES (Triple DES). By default, the decryption attribute is set to Auto, which causes the ASP.NET Framework to select the encryption algorithm based on the capabilities of the web server.
The validation attribute specifies the hash or encryption algorithm used when an authentication cookie is signed. Possible values are AES, MD5, SHA1, and TripleDES.
The decryptionKey attribute represents the key used to encrypt and decrypt the authentication cookie. The validationKey represents the key used when the authentication cookie is signed. By default, both attributes are set to the value AutoGenerate, which causes ASP.NET Framework to generate a random key and store it in the LSA (your web server’s Local Security Authority).
Notice that both the decryptionKey and validationKey attributes include an IsolateApps modifier. When the IsolateApps modifier is present, a unique key is created for each application on the same web server.
If you want to share the same authentication cookie across every application hosted on the same web server, you can override the default machineKey element in the machine root web configuration file and remove the IsolateApps attribute from both the decryptionKey and validationKey attributes. You can add the following machineKey element anywhere within the system.web section in the web configuration file:

The root web configuration file is located at the following path:
C:WINDOWSMicrosoft.NETFramework[version]CONFIGWeb.Config
On the other hand, if you need to share the same authentication cookie across separate web servers, you need to specify the decryptionKey and validationKey manually. You cannot allow ASP.NET Framework to generate these keys automatically because you need to share the keys across the different web servers.
For example, the following machineKey element contains explicit decryption and validation keys:

When using AES, you need to set the decryption key to a random sequence of 64 hex characters. When using SHA1, you need to set the decryption key to a random sequence of 128 hex characters. You can use the page in Listing 27.5 to generate these random character sequences for you (see Figure 27.1).
Figure 27.1. Generating cryptographically strong keys.

Listing 27.5. GenerateKeys.aspx


The page in Listing 27.5 uses the RNGCryptoServiceProvider to generate the random sequence of characters. The GetBytes() method returns a cryptographically strong sequence of random values.
Note
The GenerateKeys.aspx page is based on a code sample from an article titled “How To: Configure MachineKey in ASP.NET 2.0,” located at the Microsoft MSDN website (msdn.microsoft.com).
You can add a machineKey element with explicit keys to either the machine root web configuration file or to particular application web configuration files. If you don’t want to share the same keys across all the applications on a web server, you should add the machineKey element only to the applications that you need to share.
Using Forms Authentication Across Domains
In the previous section, you learned how to share the same authentication cookie across applications located on the same server or a different server. But how do you share the same authentication cookie across domains?
A browser cookie is always domain relative. For example, the Amazon website cannot read cookies set by the Barnes & Noble website, which is a good thing. However, you might discover that you need to share authentication information across websites with different domains.
You can work around this problem by passing an authentication ticket in a query string parameter rather than in a cookie. There is nothing to prevent you from passing query strings between domains.
To enable this scenario, you must configure your applications to accept authentication tickets passed in a query string. The web configuration file in Listing 27.6 includes an enableCrossAppRedirects attribute that enables sharing authentication tickets across domains.
Listing 27.6. Web.config

If you add the web configuration file in Listing 27.6 to two applications located in different domains, the two applications can share the same authentication ticket.
Warning
Make sure that you change the validation and encryption keys in Listing 27.6. You can use the GenerateKeys.aspx page discussed in the previous section to generate new random keys.
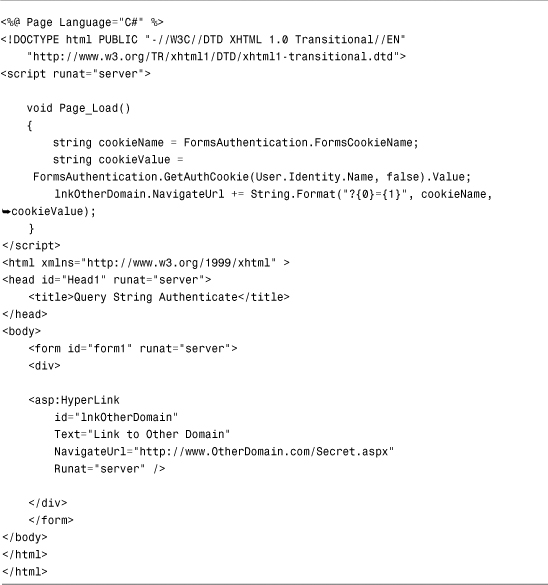
When you link or redirect from one application to another, you must pass the authentication ticket in a query string parameter. The page in Listing 27.7 adds the necessary query string parameter to a hyperlink.
Listing 27.7. QueryStringAuthenticate.aspx
Using the FormsAuthentication Class
The main application programming interface for interacting with Forms authentication is the FormsAuthentication class. This class supports the following properties:
• CookieDomain—Returns the domain associated with the authentication cookie.
• CookieMode—Returns the cookieless authentication mode. Possible values are AutoDetect, UseCookies, UseDeviceProfile, and UseUri.
• CookiesSupported—Returns True when a browser supports cookies and Forms authentication is configured to use cookies.
• DefaultUrl—Returns the URL of the page to which a user is redirected after being authenticated.
• EnableCrossAppRedirects—Returns True when an authentication ticket can be removed from a query string.
• FormsCookieName—Returns the name of the authentication cookie.
• FormsCookiePath—Returns the path associated with the authentication cookie.
• LoginUrl—Returns the URL of the page to which a user is redirected when being authenticated.
• RequireSSL—Returns True when the authentication cookie must be transmitted with SSL (the Secure Sockets Layer).
• SlidingExpiration—Returns True when the authentication cookie uses a sliding expiration policy.
These properties return the configuration settings for Forms authentication from the web configuration file.
The FormsAuthentication class supports the following methods:
• Authenticate—Enables you to validate a username and password against a list of usernames and passwords stored in the web configuration file.
• Decrypt—Enables you to decrypt an authentication cookie.
• GetAuthCookie—Enables you to retrieve an authentication cookie.
• GetRedirectUrl—Enables you to retrieve the path to the original page that caused the redirect to the Login page.
• HashPasswordForStoringInConfigFile—Enables you to hash a password so that it can be stored in the web configuration file.
• RedirectFromLoginPage—Enables you to redirect a user back to the original page requested before the user was redirected to the Login page.
• RedirectToLoginPage—Enables you to redirect the user to the Login page.
• RenewTicketIfOld—Enables you to update the expiration time of an authentication cookie.
• SetAuthCookie—Enables you to create and issue an authentication cookie.
• SignOut—Enables you to remove an authentication cookie and log out a user.
You can use the methods and properties of the FormsAuthentication class to build a user registration and authentication system without using ASP.NET Membership. For example, the web configuration file in Listing 27.8 contains a list of usernames and passwords.
Listing 27.8. Web.Config

The web configuration file in Listing 27.8 contains a forms element that contains a credentials element. The credentials element includes a list of usernames and passwords.
Notice that the credentials element includes a passwordFormat attribute that is set to the value Clear. If you prefer, rather than store passwords in clear text, you can store password hash values. That way, anyone working on the web server can’t see everyone else’s passwords. The other two possible values for the passwordFormat attribute are MD5 and SHA1.
Note
If you need to hash a password so you can store it in the web configuration file, you can use the (appropriately named) FormsAuthentication.HashPasswordForStoring InConfigFile() method. This method accepts a clear text password and the name of a hash algorithm, and it returns a hashed version of the password.
The Login page in Listing 27.9 contains a User Name and a Password text box (see Figure 27.2).
Figure 27.2. Authenticating against web configuration credentials.

Listing 27.9. FormsLogin.aspx


When you click the Login button, the btnLogin_Click() handler executes and the FormsAuthentication.Authenticate() method checks whether the username and password entered into the TextBox controls match a username and password in the web configuration file. If the user successfully authenticates, the FormsAuthentication.RedirectFromLoginPage() method is called.
The RedirectFromLoginPage() method does two things. The method adds an authentication cookie to the user’s browser. The method also redirects the user back to whatever page the user originally requested. If the user requests the Login page directly, the user is redirected to the Default.aspx page.
The second parameter passed to the RedirectFromLoginPage() method indicates whether you want to create a session or persistent cookie. If you create a persistent cookie, a user does not need to log in when the user returns to the website in the future.
Using the User Class
You can use the Page.User or the HttpContext.User property to retrieve information about the current user. The Page.User property exposes a Principal object that supports the following method:
• IsInRole—Enables you to check whether a user is a member of a particular role.
For example, when Windows authentication is enabled, you can use the IsInRole() method to check whether a user is a member of a particular Microsoft Windows group such as the BUILTINAdministrators group:
if (User.IsInRole("BUILTINAdministrators"))
{
// Do some Administrator only operation
}
Note
If the Role Manager is enabled, you must configure the Role Manager to use the WindowsTokenRoleProvider before you can use the User.IsInRole() method with Windows groups.
The Principal object also includes an Identity property that enables you to get information about the current user’s identity. The Identity object supports the following three properties:
• AuthenticationType—Enables you to determine how the user was authenticated. Examples of possible values are Forms, Basic, and NTLM.
• IsAuthenticated—Enables you to determine whether a user is authenticated.
• Name—Enables you to retrieve the user’s name.
If you want to get the name of the current user, you can use logic that looks like this:
Dim name As String = User.Identity.Name
If a user is not authenticated, the User.Identity.Name property returns an empty string.
Configuring Authorization
Authorization refers to the process of identifying the resources that you are allowed to access. You control authorization by adding an authorization element to a web configuration file.
Authorization works the same way regardless of the type of authentication that is enabled. In other words, you configure authorization in the same way when using Forms, Windows, and .NET Passport authentication.
Typically, you place all the pages that you want to password-protect in a separate folder. If you add a web configuration file to the folder, the settings in the web configuration file apply to all pages in the folder and all subfolders.
For example, if you add the web configuration file in Listing 27.10 to a folder, then unauthenticated users are blocked from accessing pages in the folder.
Listing 27.10. SecretFilesWeb.Config

If you add the file in Listing 27.10 to a folder, unauthenticated users cannot access any pages in the folder. When Forms authentication is enabled, unauthenticated users are automatically redirected to the Login page.
The web configuration file in Listing 27.10 contains an authorization element that contains a single authorization rule. The configuration file denies access to anonymous users. The ? symbol represents anonymous (unauthenticated) users.
You can use the following two special symbols with the users attribute:
• ?—Represents unauthenticated users.
• *—Represents all users (unauthenticated or authenticated).
You also can assign a particular username, or comma-delimited list of usernames, to the deny element. For example, the authorization element in Listing 27.11 enables access for a user named Jane, but denies access to anyone else (even authenticated users).
Listing 27.11. SecretFilesWeb.Config

The order of the authorization rules is important. The ASP.NET Framework uses a first-match algorithm. If you switched the allow and deny rules in Listing 27.11, no one, not even Jane, would be allowed to access the pages in the folder.
Note
You can prevent anonymous users from accessing any page in an application by adding an authorization element to the application root web configuration file. In that case, anonymous users are still allowed to access the Login page. (Otherwise, no one could log in when using Forms authentication.)
Visual Web Developer Note
If you prefer, you can configure authorization rules by using the Web Site Administration Tool. This tool provides you with a form interface for configuring authorization rules for different folders. You can open the Web Site Administration Tool by selecting Website, ASP.NET Configuration.
Authorizing by Role
When creating authorization rules, you can authorize by user role. For example, the web configuration file in Listing 27.12 prevents access to any pages in a folder by anyone except members of the Administrators role.
Listing 27.12. SecretFilesWeb.Config

When Forms authentication is enabled, the role refers to a custom role. In the final section of this chapter, “Using the Role Manager,” you learn how to configure and create custom roles. When Windows authentication is enabled, the role refers to a Microsoft Windows group.
Authorizing Files by Location
By default, authorization rules are applied to all pages in a folder and all subfolders. However, you also have the option of using the location element with the authorization element. The location element enables you to apply a set of authorization rules to a folder or page at a particular path.
For example, imagine that you want to password-protect one, and only one, page in a folder. In that case, you can use the location element to specify the path of the single page. The web configuration file in Listing 27.13 password-protects a page named Secret.aspx.
Listing 27.13. Web.Config Protecting a File

You also can use the location element to apply configuration settings to a particular subfolder. For example, the web configuration file in Listing 27.14 password-protects a folder named SecretFiles.
Listing 27.14. Web.Config Protecting a Folder

Using Authorization with Images and Other File Types
Authorization rules are applied only to files mapped into the ASP.NET Framework. The Visual Web Developer web server maps all file types to ASP.NET Framework. Internet Information Server, on the other hand, maps only particular file types to ASP.NET Framework.
If you use Internet Information Services, and you add an image to a password-protected folder, users aren’t blocked from requesting the image. By default, authorization rules apply only to ASP.NET file types such as ASP.NET pages. Files such as images, Microsoft Word documents, and classic ASP pages are ignored by ASP.NET Framework.
If you need to password-protect a particular type of static file, such as an image or Microsoft Word document, you need to map the file’s extension to the ASP.NET ISAPI extension.
For example, follow these steps to enable authorization for .gif image files:
- Open Internet Information Services by selecting Start, Control Panel, Administrative Tools, Internet Information Services (IIS) Manager.
- In the tree on the left, click a particular website or virtual directory. A list of configuration icons appears in the main content area.
- Open the Mappings page by double-clicking the Handler Mappings icon located under the IIS configuration group. The Handler Mappings dialog window appears (see Figure 27.3).
Figure 27.3. The Mappings configuration in Internet Information Services (Windows 7).

- Click the Add Script Map button to open the Add Script Map dialog box.
- In the Request Path field, enter
*.gif. - In the Executable field, enter the path to the ASP.NET ISAPI DLL. (You can copy and paste this path from the Application Mapping for the
.aspxextension.) - In the Name field, enter a mapping name such as GIF-ISAPI-4.0.
After you complete these steps, requests for .gif images are passed to ASP.NET Framework. You can then use authentication and authorization rules with .gif images.
You can complete the same sequence of steps to password-protect other static file types, such as Microsoft Word documents, Excel spreadsheets, or video files.
Using ASP.NET Membership
ASP.NET Membership enables you to create new users, delete users, and edit user properties. It’s the framework used behind the scenes by the Login controls.
ASP.NET Membership picks up where Forms authentication leaves off. Forms authentication provides you with a way of identifying users. ASP.NET Membership is responsible for representing the user information.
ASP.NET Membership uses the provider model. The ASP.NET Framework includes two Membership providers:
• SqlMembershipProvider—Stores user information in a Microsoft SQL Server database.
• ActiveDirectoryMembershipProvider—Stores user information in the Active Directory or an Active Directory Application Mode server.
In this section, you learn how to use the ASP.NET Membership application programming interface. You learn how to use the Membership class to modify membership information programmatically.
You also learn how to configure both the SqlMembershipProvider and the ActiveDirectoryMembershipProvider. For example, you learn how to modify the requirements for a valid membership password.
Finally, we build a custom Membership provider. It is an XmlMembershipProvider that stores membership information in an XML file.
Using the Membership Application Programming Interface
The main application programming interface for ASP.NET Membership is the Membership class. This class supports the following methods:
• CreateUser—Enables you to create a new user.
• DeleteUser—Enables you to delete an existing user.
• FindUsersByEmail—Enables you to retrieve all users who have a particular email address.
• FindUsersByName—Enables you to retrieve all users who have a particular username.
• GeneratePassword—Enables you to generate a random password.
• GetAllUsers—Enables you to retrieve all users.
• GetNumberOfUsersOnline—Enables you to retrieve a count of all users online.
• GetUser—Enables you to retrieve a user by username.
• GetUserNameByEmail—Enables you to retrieve the username for a user with a particular email address.
• UpdateUser—Enables you to update a user.
• ValidateUser—Enables you to validate a username and password.
This class also supports the following event:
• ValidatingPassword—Raised when a user password is validated. You can handle this event to implement a custom validation algorithm.
You can use the methods of the Membership class to administer the users of your website. For example, the page in Listing 27.15 displays a list of every registered user (see Figure 27.4).
Figure 27.4. Displaying registered users.

Listing 27.15. ListUsers.aspx

In Listing 27.15, an ObjectDataSource control represents the Membership class. The GetAllUsers() method is called to get the list of users.
You also can use the methods of the Membership class to create custom Login controls. For example, you can retrieve the number of users currently online by calling the GetNumberOfUsersOnline() method. The custom control in Listing 27.16 displays the value returned by this method.
Listing 27.16. UsersOnline.cs
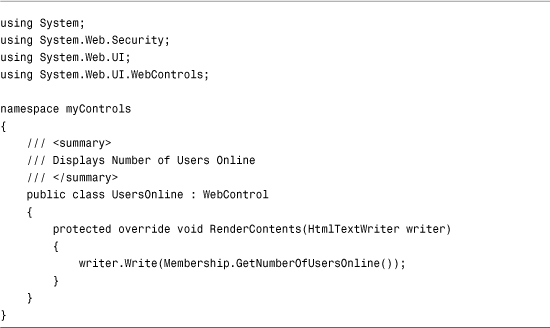
The page in Listing 27.17 uses the UsersOnline control to display the number of users currently online (see Figure 27.5).
Figure 27.5. Display number of users online.

Listing 27.17. ShowUsersOnline.aspx

Note
A user is considered online if his username was used in a call to the ValidateUser(), UpdateUser(), or GetUser() method in the last 15 minutes. You can modify the default time interval of 15 minutes by modifying the userIsOnlineTimeWindow attribute of the membership element in the web configuration file.
Several of the methods of the Membership class return one or more MembershipUser objects. The MembershipUser object represents a particular website member. This class supports the following properties:
• Comment—Enables you to associate a comment with the user.
• CreationDate—Enables you to get the date when the user was created.
• Email—Enables you to get or set the user’s email address.
• IsApproved—Enables you to get or set whether the user is approved and her account is active.
• IsLockedOut—Enables you to get the user’s lockout status.
• IsOnline—Enables you to determine whether the user is online.
• LastActivityDate—Enables you to get or set the date of the user’s last activity. This date is updated automatically with a call to CreateUser(), ValidateUser(), or GetUser().
• LastLockoutDate—Enables you to get the date that the user was last locked out.
• LastLoginDate—Enables you to get the date that the user last logged in.
• LastPasswordChangedDate—Enables you to get the date that the user last changed her password.
• PasswordQuestion—Enables you to get the user’s password question.
• ProviderName—Enables you to retrieve the name of the Membership provider associated with this user.
• ProviderUserKey—Enables you to retrieve a unique key associated with the user. In the case of the SqlMembershipProvider, this is the value of a GUID column.
• UserName—Enables you to get the name of the user.
Notice that the MembershipUser class does not contain a property for the user’s password or password answer. This is intentional. If you need to change a user’s password, you need to call a method.
The MembershipUser class supports the following methods:
• ChangePassword—Enables you to change a user’s password.
• ChangePasswordQuestionAndAnswer—Enables you to change a user’s password question and answer.
• GetPassword—Enables you to get a user’s password.
• ResetPassword—Enables you to reset a user’s password to a randomly generated password.
• UnlockUser—Enables you to unlock a user account that has been locked out.
Encrypting and Hashing User Passwords
Both of the default Membership providers included in the ASP.NET Framework enable you to store user passwords in three ways:
• Clear—Passwords are stored in clear text.
• Encrypted—Passwords are encrypted before they are stored.
• Hashed—Passwords are not stored. Only the hash values of passwords are stored. (This is the default value.)
You configure how passwords are stored by setting the passwordFormat attribute in the web configuration file. For example, the web configuration file in Listing 27.18 configures the SqlMembershipProvider to store passwords in plain text.
Listing 27.18. Web.Config

The default value of the passwordFormat attribute is Hashed. By default, actual passwords are not stored anywhere. A hash value is generated for a password and the hash value is stored.
Note
A hash algorithm generates a unique value for each input. The distinctive thing about a hash algorithm is that it works in only one direction. You can easily generate a hash value from any value. However, you cannot easily determine the original value from a hash value.
The advantage of storing hash values is that even if your website is compromised by a hacker, the hacker cannot steal anyone’s passwords. The disadvantage of using hash values is that you also cannot retrieve user passwords. For example, you cannot use the PasswordRecovery control to email a user his original password.
Instead of hashing passwords, you can encrypt the passwords. The disadvantage of encrypting passwords is that it is more processor-intensive than hashing passwords. The advantage of encrypting passwords is that you can retrieve user passwords.
The web configuration file in Listing 27.19 configures the SqlMembershipProvider to encrypt passwords. The web configuration file includes a machineKey element. You must supply an explicit decryptionKey when encrypting passwords.
Note
For more information on the machineKey element, see the “Using Forms Authentication Across Applications” section, earlier in this chapter.
Listing 27.19. Web.Config
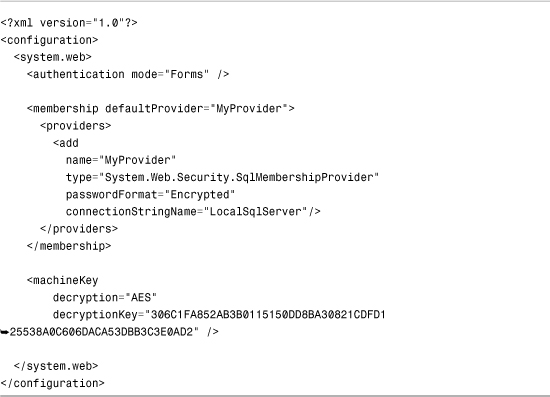
Warning
Make sure that you change the value of the decryptionKey attribute before using the web configuration file in Listing 27.19. You can generate a new decryptionKey with the GenerateKeys.aspx page described in the “Using Forms Authentication Across Applications” section, earlier in this chapter.
Modifying User Password Requirements
By default, passwords are required to contain at least 7 characters and 1 nonalphanumeric character (a character that is not a letter or a number such as *,_, or !). You can set three Membership provider attributes that determine password policy:
• minRequiredPasswordLength—The minimum required password length. (The default value is 7.)
• minRequiredNonalphanumericCharacters—The minimum number of non-alphanumeric characters (The default value is 1.)
• passwordStrengthRegularExpression—The regular expression pattern that a valid password must match (The default value is an empty string.)
The minRequiredNonAlphanumericCharacters attribute confuses everyone. Website users are not familiar with the requirement that they must enter a nonalphanumeric character. The web configuration file in Listing 27.20 illustrates how you can disable this requirement when using the SqlMembershipProvider.
Listing 27.20. Web.Config

Locking Out Bad Users
By default, if you enter a bad password more than five times within 10 minutes, your account is automatically locked out. In other words, it is disabled.
Also, if you enter the wrong answer for the password answer more than five times in a 10-minute interval, your account is locked out. You get five attempts at your password and five attempts at your password answer. (These two things are tracked independently.)
Two configuration settings control when an account gets locked out:
• maxInvalidPasswordAttempts—The maximum number of bad passwords or bad password answers that you are allowed to enter (The default value is 5.)
• passwordAttemptWindow—The time interval in minutes in which entering bad passwords or bad password answers results in being locked out.
For example, the web configuration file in Listing 27.21 modifies the default settings to enable you to enter a maximum of three bad passwords or bad password answers in 1 hour.
Listing 27.21. Web.Config

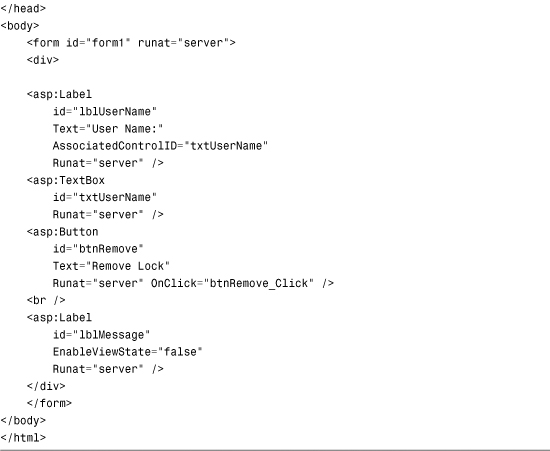
After a user has been locked out, you must call the MembershipUser.UnlockUser() method to reenable the user account. The page in Listing 27.22 enables you to enter a username and remove a lock (see Figure 27.6).
Figure 27.6. Removing a user lock.

Listing 27.22. RemoveLock.aspx

Configuring the SQLMembershipProvider
The SqlMembershipProvider is the default Membership provider. Unless otherwise configured, it stores membership information in the local ASPNETDB.mdf Microsoft SQL Server Express database located in your application’s App_Data folder. This database is created for you automatically the first time that you use Membership.
If you want to store membership information in some other Microsoft SQL Server database, you need to perform the following two tasks:
• Add the necessary database objects to the Microsoft SQL Server database.
• Configure your application to use the new database.
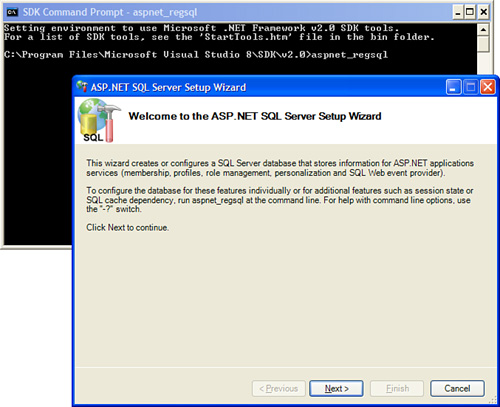
To complete the first task, you can use the aspnet_regiis command-line tool. This tool is located in the following folder:
WindowsMicrosoft.NETFrameworkv4.0.30319
Note
If you open the Visual Studio Command Prompt, you don’t need to navigate to the Microsoft.NET folder before using the aspnet_regsql tool because that tool is already in the path
If you execute the aspnet_regsql tool without supplying any parameters, the ASP.NET SQL Server Setup Wizard appears (see Figure 27.7). You can use this wizard to select a database and install the Membership objects automatically.
Figure 27.7. Using the ASP.NET SQL Setup Wizard.

If you prefer, rather than use the aspnet_reqsql tool, you can execute the following two SQL batch files to install Membership:
WINDOWSMicrosoft.NETFrameworkv4.0.30319InstallCommon.sql
WINDOWSMicrosoft.NETFrameworkv4.0.30319InstallMembership.sql
If you don’t want to install.NET Framework on your database server, you can execute these SQL batch files.
After you have configured your database to support ASP.NET Membership, you must configure your application to connect to your database when using Membership. The web configuration file in Listing 27.23 connects to a database named MyDatabase located on a server named MyServer.
Listing 27.23. Web.Config
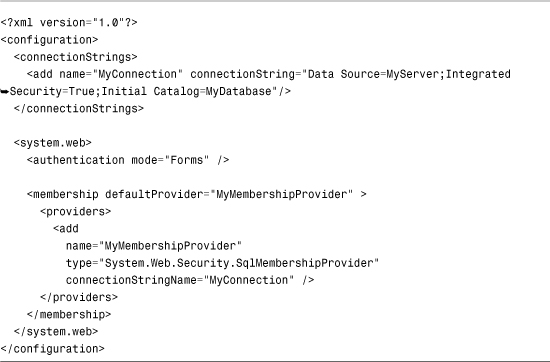
In Listing 27.23, a new default Membership provider named MyMembershipProvider is configured. The new Membership provider uses a connection string name that has the value MyConnection. The MyConnection connection string is defined in the connectionStrings element near the top of the configuration file. This connection string represents a connection to a database named MyDatabase located on a server named MyServer.
Configuring the ActiveDirectoryMembershipProvider
The other Membership provider included in ASP.NET Framework is the ActiveDirectoryMembershipProvider. You can use this provider to store user information in Active Directory or AD LDS (Active Directory Lightweight Directory Services).
AD LDS is a lightweight version of Active Directory. You can download AD LDS from the Microsoft website (www.microsoft.com/adam). AD LDS is compatible with both Windows Vista and Windows 7.
If you want to use ASP.NET Membership with AD LDS, you need to complete the following two steps:
- Create an AD LDS instance and create the required classes.
- Configure your application to use the
ActiveDirectoryMembershipProviderand connect to the ADAM instance.
The following sections examine each of these steps in turn.
Configuring AD LDS
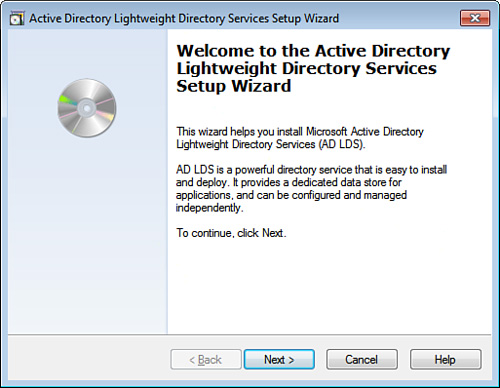
First, you need to set up a new instance of AD LDS. After downloading and installing AD LDS, follow these steps:
- Launch the Active Directory Lightweight Directory Services Setup Wizard by selecting Active Directory Lightweight Directory Services Setup Wizard from Control Panel, Administrative Tools (see Figure 27.8).
Figure 27.8. Creating a new AD LDS instance.
- In the Setup Options step, select the option to create a unique instance.
- In the Instance Name step, enter the name
WebUsersInstance. - In the Ports step, use the default LDAP and SSL port numbers (389 and 636).
- In the Application Directory Partition step, create a new directory application partition named
O=WebUsersDirectory. - In the File Locations step, use the default data file locations.
- In the Service Account Selection step, select Network Service Account.
- In the AD LDS Administrators step, select Currently Logged on User for the administrator account.
- In the Importing LDIF Files step, select
MS-AZMan.ldf,MS-InetOrgPerson.ldf,MS-User.ldf,MS-UserProxy.ldf.
After you complete the preceding steps, a new AD LDS instance named WebUsersInstance is created. The next step is to configure an AD LDS administrator account. Follow these steps:
Warning
If you are using Windows XP, and you don’t have an SSL certificate installed, you need to perform an additional configuration step. Otherwise, you receive an error when you attempt to reset a user password.
By default, you are not allowed to perform password operations over a non-secured connection to an AD LDS instance. You can disable this requirement by using the dsmgmt.exe tool included with AD LDS. Open the AD LDS Tools Command Prompt and type the following series of commands:
-
Type
dsmgmt. -
Type
ds behavior. -
Type
connections. -
Type
connect to server localhost:389. -
Type
quit. -
Type
allow passwd op on unsecured connection. -
Type
quit.
If you don’t use an SSL connection, passwords are transmitted in plain text. Don’t do this in the case of a production application.
- Open the AD LDS ADSI Edit application from the Control Panel, Administrative Tools (see Figure 27.9).
Figure 27.9. Using ADLDS ADSI Edit.

- Open the Connection Settings dialog box by selecting Action, Connect To.
- In the Connection Settings dialog box, select the option to connect to a node by using a distinguished name, and enter the name
O=WebUsersDirectory. In the Computer group, choose Select or Type a Domain or Server and enterlocalhostin the field. Click OK. - Expand the new connection and select the
O=WebUsersDirectorynode. - Select Action, New, Object.
- In the Create Object dialog box, select the
organizationalUnitclass and name the new classWebUsers. - Select the
OU=WebUsersnode and select Action, New, Object. - In the Create Object dialog box, select the user class and name the new class
ADLDSAdministrator. - Select
CN=ADLDSAdministratorand select Action, Reset Password and enter the passwordsecret. - Select the
CN=Rolesnode and double-click theCN-Administratorsnode. - Double-click the
Memberattribute and add the distinguished name for theADLDSAdministratorADAM account (CN=ADLDSAdministrator,OU=WebUsers,O=WebUsersDirectory).
After you complete this series of steps, an ADLDSAdministrator account is configured. You need to use this account when connecting to the ADLDS instance from the ActiveDirectoryMembershipProvider.
Configuring the ActiveDirectoryMembershipProvider
The next step is to configure your application to use the ActiveDirectoryMembership provider. You can use the web configuration file in Listing 27.24.
Listing 27.24. Web.Config

The web configuration file in Listing 27.24 configures a new default Membership provider named MyMembershipProvider. This provider is an instance of the ActiveDirectoryMembershipProvider.
Several of the attributes used with the ActiveDirectoryMembershipProvider require additional explanation. The connectionStringName attribute points to the connection string defined in the connectionStrings section. This connection string connects to a local ADAM instance that listens on port 389.
The connectionProtection attribute is set to the value None. If you don’t modify this attribute, you are required to use an SSL connection. If you do use an SSL connection, you need to change the port used in the connection string (typically port 636).
The connectionUsername and connectionPassword attributes use the ADLDSAdministrator account that you configured in the previous section. When you don’t use an SSL connection, you must provide both a connectionUsername and connectionPassword attribute.
Finally, notice that the provider declaration includes an enableSearchMethods attribute. If you want to configure users by using the Web Site Administration Tool, you must include this attribute.
The ActiveDirectoryMembershipProvider class supports several attributes specific to working with Active Directory:
• connectionStringName—Enables you to specify the name of the connection to the Active Directory Server in the connectionStrings section.
• connectionUsername—Enables you to specify the Active Directory account used to connect to Active Directory.
• connectionPassword—Enables you to specify the Active Directory password used to connect to Active Directory.
• connectionProtection—Enables you to specify whether or not the connection is encrypted. Possible values are None and Secure.
• enableSearchMethods—Enables the ActiveDirectoryMembershipProvider class to use additional methods. You must enable this attribute when using the Web Site Administration Tool.
• attributeMapPasswordQuestion—Enables you to map the Membership security question to an Active Directory attribute.
• attributeMapPasswordAnswer—Enables you to map the Membership security answer to an Active Directory attribute.
• attributeMapFailedPasswordAnswerCount—Enables you to map the Membership MaxInvalidPasswordAttempts property to an Active Directory attribute.
• attributeMapFailedPasswordAnswerTime—Enables you to map the Membership PasswordAttemptWindow property to an Active Directory attribute.
• attributeMapFailedPasswordAnswerLockoutTime—Enables you to map the Membership PasswordAnswerAttemptLockoutDuration property to an Active Directory attribute.
After you finish these configuration steps, you can use the ActiveDirectoryMembershipProvider in precisely the same way that you can use the SqlMembershipProvider. When you use the Login control, users are validated against Active Directory. When you use the CreateUserWizard control, new users are created in Active Directory.
Creating a Custom Membership Provider
Because ASP.NET Membership uses the provider model, you can easily extend ASP.NET membership by creating a custom Membership provider. There are two main situations in which you might need to create a custom Membership provider.
First, imagine that you have an existing ASP.NET 1.x or ASP classic application. You are currently storing membership information in your own custom set of database tables. Furthermore, your table schemas don’t easily map to the table schemas used by the SqlMembershipProvider.
In this situation, it makes sense to create a custom Membership provider that reflects your existing database schema. If you create a custom Membership provider, you can use your existing database tables with ASP.NET Membership.
Second, imagine that you need to store membership information in a data store other than Microsoft SQL Server or Active Directory. For example, your organization might be committed to Oracle or DB2. In that case, you need to create a custom Membership provider to work with the custom data store.
In this section, we create a simple custom Membership provider: an XmlMembershipProvider that stores membership information in an XML file.
Unfortunately, the code for the XmlMembershipProvider is too long to place here. The code is included on the book’s website in a file named XmlMembershipProvider.cs, located in the App_Code folder.
The XmlMembershipProvider class inherits from the abstract MembershipProvider class. This class has more than 25 properties and methods that you are required to implement. For example, you are required to implement the ValidateUser() method. The Login control calls this method when it validates a username and password.
You also are required to implement the CreateUser() method. This method is called by the CreateUserWizard control when a new user is created.
The web configuration file used to set up the XmlMembershipProvider is contained in Listing 27.25.
Listing 27.25. Web.Config

Notice that the XmlMembershipProvider supports a number of attributes. For example, it supports a passwordFormat attribute that enables you to specify whether passwords are stored as hash values or as plain text. (It does not support encrypted passwords.)
The XmlMembershipProvider stores membership information in an XML file named Membership.xml, located in the App_Data folder. If you want, you can add users to the file by hand. Alternatively, you can use the CreateUserWizard control or the Web Site Administration Tool to create new users.
A sample of the Membership.xml file is contained in Listing 27.26.
Listing 27.26. App_DataMembership.xml

The sample code folder on the book’s website includes a Register.aspx, Login.aspx, and ChangePassword.aspx page. You can use these pages to try out different features of the XmlMembershipProvider.
Warning
Dynamic XPath queries are open to XPath Injection Attacks in the same way that dynamic SQL queries are open to SQL Injection Attacks. When writing the XmlMembershipProvider class, I avoided using methods such as the SelectSingleNode() method to avoid XPath Injection Attack issues, even though using this method would result in leaner and faster code. Sometimes, it is better to be safe than fast.
Using the Role Manager
Instead of configuring authorization for particular users, you can group users into roles and assign authorization rules to the roles. For example, you might want to password-protect a section of your website so that only members of the Administrators role can access the pages in that section.
Like ASP.NET Membership, the Role Manager is built on the existing ASP.NET authentication framework. You configure role authorization rules by adding an authorization element to one or more web configuration files.
Furthermore, like ASP.NET Membership, the Role Manager uses the provider model. You can customize where role information is stored by configuring a particular Role provider.
The ASP.NET Framework includes three role providers:
• SqlRoleProvider—Enables you to store role information in a Microsoft SQL Server database.
• WindowsTokenRoleProvider—Enables you to use Microsoft Windows groups to represent role information.
• AuthorizationStoreRoleProvider—Enables you to use Authorization Manager to store role information in an XML file, Active Directory, or Activity Directory Lightweight Directory Services (ADLDS).
In the following sections, you learn how to configure each of these Role providers. You also learn how to manage role information programmatically by working with the Roles application programming interface.
Configuring the SqlRoleProvider
The SqlRoleProvider is the default role provider. You can use the SqlRoleProvider to store role information in a Microsoft SQL Server database. The SqlRoleProvider enables you to create custom roles. You can make up any roles that you need.
You can use the SqlRoleProvider with either Forms authentication or Windows authentication. When Forms authentication is enabled, you can use ASP.NET Membership to represent users and assign the users to particular roles. When Windows authentication is enabled, you assign particular Windows user accounts to custom roles. I assume, in this section, that you use Forms authentication.
Warning
The Web Site Administration Tool does not support assigning users to roles when Windows authentication is enabled. When Windows authentication is enabled, you must assign users to roles programmatically.
The web configuration file in Listing 27.27 enables the SqlRoleProvider.
Listing 27.27. Web.Config

The Role Manager is disabled by default. The configuration file in Listing 27.27 simply enables the Role Manager. Notice that the configuration file also enables Forms authentication.
If you don’t want to type the file in Listing 27.27, you can let the Web Site Administration Tool create the file for you. Open the Web Site Administration Tool in Visual Web Developer by selecting Website, ASP.NET Configuration. Next, click the Security tab and the Enable roles link (see Figure 27.10).
Figure 27.10. Enabling Roles with the Web Site Administration Tool.

After you enable the Role Manager, you need to create some roles. You can create roles in two ways. You can use the Web Site Administration Tool or you can create the roles programmatically.
Open the Web Site Administration Tool and click the Create or Manage Roles link located under the Security tab. At this point, you can start creating roles. I’ll assume that you have created a role named Managers.
After you create a set of roles, you need to assign users to the roles. Again, you can do this by using the Web Site Administration Tool or you can assign users to roles programmatically.
If you have not created any users for your application, create a user now by clicking the Create User link under the Security tab. Notice that you can assign a user to one or more roles when you create the user (see Figure 27.11). You can click the Create or Manage Roles link to assign roles to users at a later date.
Figure 27.11. Assigning a new user to a role.

After you finish creating your roles and assigning users to the roles, you can use the roles in the authentication section of a web configuration file. For example, imagine that your website includes a folder named SecretFiles and you want only members of the Managers role to be able to access the pages in that folder. The web configuration file in Listing 27.28 blocks access to anyone except members of the Managers role to the SecretFiles folder.
Listing 27.28. Web.Config

The configuration file in Listing 27.28 authorizes Managers and denies access to everyone else.
If you prefer, you can manage authorization with the Web Site Administration Tool. Behind the scenes, this tool creates web configuration files that contain authorization elements (in other words, it does the same thing as we just did).
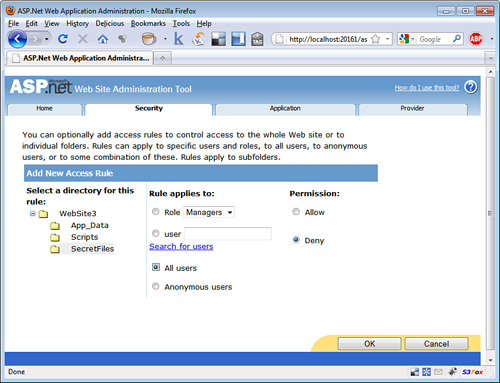
Under the Security tab, click the Create Access Rules link. Select the SecretFiles folder from the tree view, the Managers role, Allow (see Figure 27.12). Click the OK button to create the rule. Next, create a second access rule to deny access to users not in the Managers role. Select the SecretFiles folder, All Users, Deny. Click the OK button to add the new rule.
Figure 27.12. Creating authorization rules.
Using a Different Database with the SqlRoleProvider
By default, the SqlRoleProvider uses the same Microsoft SQL Server Express database as ASP.NET Membership: the AspNetDB.mdf database. This database is created for you automatically in your application’s root App_Data folder.
If you want to store role information in another Microsoft SQL Server database, then you must perform the following two configuration steps.
• Configure the database so that it contains the necessary database objects.
• Configure your application to use the new database.
Before you can store role information in a database, you need to add the necessary tables and stored procedures to the database. The easiest way to add these objects is to use the aspnet_regsql command-line tool. This tool is located in the following folder:
WINDOWSMicrosoft.NETFramework[version]
If you execute aspnet_regsql without any parameters, the ASP.NET SQL Server Setup Wizard opens (see Figure 27.13). You can use this wizard to connect to a database and add the necessary database objects automatically.
Figure 27.13. Using the SQL Server Setup Wizard.
Alternatively, you can set up a database by executing the following two SQL batch files.
• InstallCommon.sql
• InstallRoles.sql
These batch files are located in the same folder as the aspnet_regsql tool.
After you set up your database, you need to configure a new SqlRoleProvider that includes the proper connection string for your database. The web configuration file in Listing 27.29 configures a new provider named MyRoleProvider that connects to a database named MyDatabase located on a server named MyServer.
Listing 27.29. Web.Config

The configuration file in Listing 27.29 creates a new default RoleManager named MyRoleProvider. Notice that the MyRoleProvider provider includes a connectionStringName attribute that points to the MyConnection connection.
Configuring the WindowsTokenRoleProvider
When you use the WindowsTokenRoleProvider, roles correspond to Microsoft Windows groups. You must enable Windows authentication when using the WindowsTokenRoleProvider. You cannot use Forms authentication or ASP.NET Membership with the WindowsTokenRoleProvider.
The configuration file in Listing 27.30 configures the WindowsTokenRoleProvider as the default provider.
Listing 27.30. Web.Config

The page in Listing 27.31 contains a LoginView control. The LoginView control displays different content to the members of the Windows Administrators group than it displays to everyone else (see Figure 27.14).
Figure 27.14. Displaying different content to members of the Windows Administrators group.

Listing 27.31. ShowWindowsRoles.aspx

If you request the page in Listing 27.31 after enabling the WindowsTokenRoleProvider, you see the content displayed by the LoginView control only when you are a member of the Windows Administrators group.
Configuring the AuthorizationStoreRoleProvider
Authorization Manager (AzMan) is a component of Windows Server 2003 and Windows Server 2008. You can use Authorization Manager to define roles, tasks, and operations.
Authorization Manager supports more features than the authorization framework included in ASP.NET Framework. For example, Authorization Manager supports role inheritance, which enables you to easily define new roles based on existing roles.
Authorization Manager can store role information in three different ways. You can create an authorization store by using an XML file, by using Active Directory, or by using Active Directory Lightweight Directory Services (AD LDS).
Before you use Authorization Manager with the ASP.NET Framework, you need to create an authorization store. Role information is stored in an XML file local to the application. Follow these steps:
- Launch Authorization Manager by executing the command
AzMan.mscfrom a command prompt (see Figure 27.15).Figure 27.15. Using Authorization Manager.

- Switch Authorization Manager into Developer mode by selecting Action, Options and selecting Developer mode.
- Open the New Authorization Store dialog box by selecting Action, New Authorization Store.
- Select the XML file option and enter the path to your application’s App_Data folder for the Store Name field. For example:
c:WebsitesMyWebsiteApp_DataWebRoles.xml
- Create a new Authorization Manager application by right-clicking the name of your authorization store and selecting New Application. Enter the name WebRoles for your application (you can leave the other fields blank).
After you complete these steps, a new XML file is added to your application. This XML file contains the authorization store.
Next, you need to configure the ASP.NET Role Manager to use the authorization store. The web configuration file in Listing 27.32 uses the WebRoles.xml authorization store.
Listing 27.32. Web.Config

You should notice a couple of things about the configuration file in Listing 27.32. First, notice that the connection string uses the prefix msxml: to indicate that the connection string represents a connection to an XML file.
Second, notice that the AuthorizationStoreRoleProvider includes an applicationName attribute. This attribute must contain the name of the Authorization Manager application that you created in the preceding steps.
After you complete these configuration steps, you can use the Authorization Manager just as you do the default SqlMembershipProvider. You can define new roles by using either the Web Site Administration Tool or the Authorization Manager interface (see Figure 27.16).
Figure 27.16. Creating a new role definition with Authorization Manager.

Caching Roles in a Browser Cookie
To improve your application’s performance, you can cache user roles in a browser cookie. That way, the Role Manager does not have to perform a query against the Role provider each and every time a user visits a page.
Caching roles in cookies is disabled by default. You can enable this feature with the web configuration file in Listing 27.33.
Listing 27.33. Web.Config

The web configuration in Listing 27.33 enables role caching. Furthermore, it causes the roles to be cached in a persistent cookie rather than a session cookie.
Warning
When you cache roles in a cookie, there is the potential that a user’s cached roles can become out of sync with a user’s actual roles. If you update users’ roles on the server, they don’t get updated on the browser. You can call the Roles.DeleteCookie() method to delete the cached cookies.
You can set a number of attributes related to the roles cookie:
• cacheRolesInCookie—Enables you to cache user roles in a browser cookie (the default value is false).
• cookieName—Enables you to specify the name for the roles cookie (the default value is .ASPXROLES).
• cookiePath—Enables you to specify the path associated with the cookie. (The default value is /.).
• cookieProtection—Enables you to encrypt and validate the roles cookie. Possible values are All, Encryption, None, and Validation (the default value is All).
• cookieRequireSSL—Enables you to require that the roles cookie be transmitted over a Secure Sockets Layer connection. (The default value is False.).
• cookieSlidingExpiration—Enables you to prevent a cookie from expiring just as long as a user continues to request pages. (The default value is True.)
• cookieTimeout—Enables you to specify the amount of time in minutes before a cookie times out. (The default value is 30.)
• createPersistentCookie—Enables you to create a persistent rather than a session cookie. (The default value is False.)
• domain—Enables you to specify the domain associated with the cookie. (The default value is an empty string.)
• maxCachedResults—Enables you to specify the maximum number of roles that are cached in a cookie. (The default is 25.)
Using the Roles Application Programming Interface
The Roles class exposes the main application programming interface for manipulating roles. If you need to create roles programmatically, delete roles, or assign users to roles; then you use the methods of the Roles class.
The Roles class includes the following methods:
• AddUsersToRole—Enables you to add an array of users to a role.
• AddUsersToRoles—Enables you to add an array of users to an array of roles.
• AddUserToRole—Enables you to add a user to a role.
• AddUserToRoles—Enables you to add a user to an array of roles.
• CreateRole—Enables you to create a new role.
• DeleteCookie—Enables you to delete the roles cookie.
• DeleteRole—Enables you to delete a particular role.
• FindUsersInRole—Enables you to return a list of users in a role that has a particular username.
• GetAllRoles—Enables you to retrieve a list of all roles.
• GetRolesForUser—Enables you to get a list of all roles to which a user belongs.
• GetUsersInRole—Enables you to get a list of users in a particular role.
• IsUserInRole—Enables you to determine whether a particular user is a member of a particular role.
• RemoveUserFromRole—Enables you to remove a particular user from a particular role.
• RemoveUserFromRoles—Enables you to remove a particular user from an array of roles.
• RemoveUsersFromRole—Enables you to remove an array of users from a particular role.
• RemoveUsersFromRoles—Enables you to remove an array of users from an array of roles.
• RoleExists—Enables you to determine whether a particular role exists.
The page in Listing 27.34 illustrates how you can use the methods of the Roles class. The Page_Load() method creates two roles named Sales and Managers (if they don’t already exist). Next, it assigns the current user to both roles. The body of the page contains a GridView that displays all the roles to which the current user belongs (see Figure 27.17).
Figure 27.17. Displaying a user’s roles.

Listing 27.34. ShowRoles.aspx


Summary
In this chapter, you learned about the four security frameworks included in ASP.NET Framework. In the first part, you learned how to authenticate users by enabling both Forms and Windows authentication. You learned how to take advantage of several advanced features of authentication such as cookieless authentication and cross-application authentication.
You also learned how to authorize users to access particular resources. You not only learned how to control access to ASP.NET pages, but also how you can control access to image files and other files or pages.
Next, you learned how to use ASP.NET Membership to represent user information. You learned how to use the Membership class to create users, delete users, and modify user properties programmatically. You also explored the two Membership providers included with ASP.NET Framework: SqlMembershipProvider and ActiveDirectoryMembership Provider. Finally, we created a custom MembershipProvider: the XmlMembershipProvider.
The final section was devoted to the Role Manager. You learned how to configure the three Role providers included in ASP.NET Framework: SqlRoleProvider, WindowsTokenRoleProvider, and AuthorizationStoreRoleProvider. You also learned how to take advantage of the Roles class to create roles, delete roles, and assign users to roles programmatically.