
Chapter 26. Using the Login Controls
In This Chapter
• Overview of the Login Controls
• Using the CreateUserWizard Control
• Using the LoginStatus Control
• Using the ChangePassword Control
• Using the PasswordRecovery Control
• Summary
You can use the ASP.NET Login controls to easily build a user registration system for your website. You can use the Login controls to display user registration forms, login forms, change password forms, and password reminder forms.
By default, the Login controls use ASP.NET Membership to authenticate users, create new users, and change user properties. When you use the Login controls, you are not required to write any code when performing these tasks.
In the first part of this chapter, you are provided with an overview of the Login controls. You learn how to password-protect a section of your website and enable users to register and log in to your website.
In the remainder of this chapter, you learn how to use each of the following Login controls in detail:
• Login—Enables you to display a user login form.
• CreateUserWizard—Enables you to display a user registration form.
• LoginStatus—Enables you to display either a log in or log out link, depending on a user’s authentication status.
• LoginName—Enables you to display the current user’s registered username.
• ChangePassword—Enables you to display a form that allows users to change their passwords.
• PasswordRecovery—Enables you to display a form that allows users to receive an email containing their password.
• LoginView—Enables you to display different content to different users depending on the their authentication status or role.
Overview of the Login Controls
You won’t have any fun using the Login controls unless you have confidential information to protect. Therefore, let’s start by creating a page that needs password protection.
Create a new folder in your application named SecretFiles and add the page in Listing 26.1 to the SecretFiles folder.
Listing 26.1. SecretFilesSecret.aspx

There is nothing special about the page in Listing 26.1. It just displays the message This Page is Secret!.
To password-protect the Secret.aspx page, you need to make two configuration changes to your application: You need to configure both authentication and authorization.
First, you need to enable the proper type of authentication for your application. By default, Windows authentication is enabled. To use the Login controls, you need to enable Forms authentication by adding the web configuration file in Listing 26.2 to the root of your application.
Listing 26.2. Web.Config
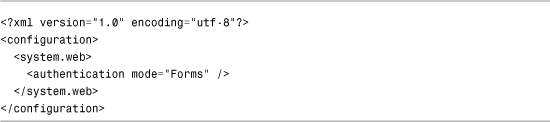
The web configuration file in Listing 26.2 contains an authentication element that includes a mode attribute. The mode attribute has the value Forms.
Note
Authentication and authorization is discussed in more detail in Chapter 27, “Using ASP.NET Membership.”
By default, all users have access to all pages in an application. If you want to restrict access to the pages in a folder, you need to configure authorization for the folder.
If you add the web configuration file in Listing 26.3 to the SecretFiles folder, anonymous users are prevented from accessing any pages in the folder.
Listing 26.3. SecretFilesWeb.Config

The web configuration file in Listing 26.3 contains an authorization element. This element contains a list of authorization rules for the folder. The single authorization rule in Listing 26.3 prevents anonymous users from accessing pages in the folder. (The ? represents anonymous users.)
Visual Web Developer Note
If you prefer, you can use the Web Site Administration Tool to configure authentication and authorization. This tool provides you with a form interface for performing these configuration changes. When using Visual Web Developer, you can open the Web Site Administration Tool by selecting Website, ASP.NET Configuration.
If you attempt to request the Secret.aspx page after adding the web configuration file in Listing 26.3, you are redirected to a page named Login.aspx automatically. Therefore, the next page that we need to create is the Login.aspx page. (By default, this page must be located in the root of your application.)
The Login.aspx page in Listing 26.4 contains a Login control. The Login control automatically generates a login form (see Figure 26.1).
Figure 26.1. Displaying a Login form.

Listing 26.4. Login.aspx

The Login control includes a CreateUserText and CreateUserUrl property. Adding these properties to the Login control causes the control to display a link to a page that enables a new user to register for your application. The Login control in Listing 26.4 links to a page named Register.aspx. This page is contained in Listing 26.5.
Listing 26.5. Register.aspx

The Register.aspx page contains a CreateUserWizard control. This control automatically generates a user registration form (see Figure 26.2). After you submit the form, a new user is created, and you are redirected back to the Secret.aspx page.
Figure 26.2. Displaying a registration form.

Warning
The default ASP.NET Membership provider requires you to create a password that contains at least seven characters, and at least one of the characters must be nonalphanumeric (not a letter and not a number). So, secret_ is a valid password, but secret9 is not. In the next chapter, you learn how to change these default password complexity requirements.
That’s all there is to it. We have created a complete user registration system without writing a single line of code. All the messy details of storing usernames and passwords are taken care of by ASP.NET Framework in the background.
Using the Login Control
The Login control renders a standard user login form. By default, the Login control uses ASP.NET Membership to authenticate users. However, as you see in a moment, you can customize how the Login control authenticates users.
The Login control supports a large number of properties that enable you to customize the appearance and behavior of the control (too many properties to list here). The page in Listing 26.6 illustrates how you can modify several of the Login control’s properties to customize the form rendered by the control (see Figure 26.3).
Figure 26.3. Customizing the Login form.

Listing 26.6. ShowLogin.aspx


The page in Listing 26.6 uses Cascading Style Sheets (CSS) to change the appearance of the login form rendered by the Login control. By taking advantage of Cascading Style Sheets, you can customize the appearance of the Login control in any way that you can imagine.
Note
For the complete list of properties supported by the Login control, see the Microsoft .NET Framework SDK Documentation.
Automatically Redirecting a User to the Referring Page
If you request a page that you are not authorized to view, the ASP.NET Framework automatically redirects you to the Login.aspx page. After you log in successfully, you are redirected back to the original page that you requested.
When you are redirected to the Login.aspx page, a query string parameter named ReturnUrl is automatically added to the page request. This query string parameter contains the path of the page that you originally requested. The Login control uses the ReturnUrl parameter when redirecting you back to the original page.
You need to be aware of two special circumstances. First, if you request the Login.aspx page directly, a ReturnUrl parameter is not passed to the Login.aspx page. In that case, after you successfully log in, you are redirected to the Default.aspx page.
Second, if you add the Login control to a page other than the Login.aspx page, the ReturnUrl query string parameter is ignored. In this case, you need to set the Login control’s DestinationPageUrl property. When you successfully log in, you are redirected to the URL represented by this property. If you don’t supply a value for the DestinationPageUrl property, the same page is reloaded.
Automatically Hiding the Login Control from Authenticated Users
Some websites display a login form at the top of every page. That way, registered users can log in at any time to view additional content. The easiest way to add a Login control to all the pages in an application is to take advantage of Master Pages. If you add a Login control to a Master Page, the Login control is included in every content page that uses the Master Page.
You can change the layout of the Login control by modifying the Login control’s Orientation property. If you set this property to the value Horizontal, the Username and Password text boxes are rendered in the same row.
If you include a Login control in all your pages, you should also modify the Login control’s VisibleWhenLoggedIn property. If you set this property to the value False, the Login control is not displayed when a user has already authenticated.
For example, the Master Page in Listing 26.7 contains a Login control that has both its Orientation and VisibleWhenLoggedIn properties set.
Listing 26.7. LoginMaster.master


The content page in Listing 26.8 uses the Master Page in Listing 26.7 (see Figure 26.4). When you open the page in a browser, the Login control is hidden after you successfully log in to the application.
Figure 26.4. Adding the Login control to a Master Page.

Listing 26.8. LoginContent.aspx

Using a Template with the Login Control
If you need to completely customize the appearance of the Login control, you can use a template. The Login control includes a LayoutTemplate property that enables you to customize the layout of the controls rendered by the Login control.
When you create a Layout template, you can add controls to the template that have the following IDs:
• UserName
• Password
• RememberMe
• FailureText
You also need to add a Button control that includes a CommandName property with the value Login.
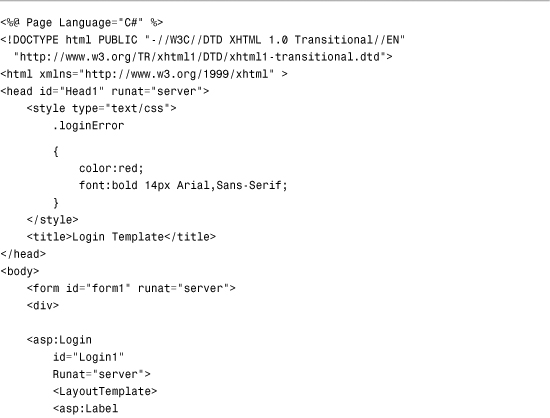
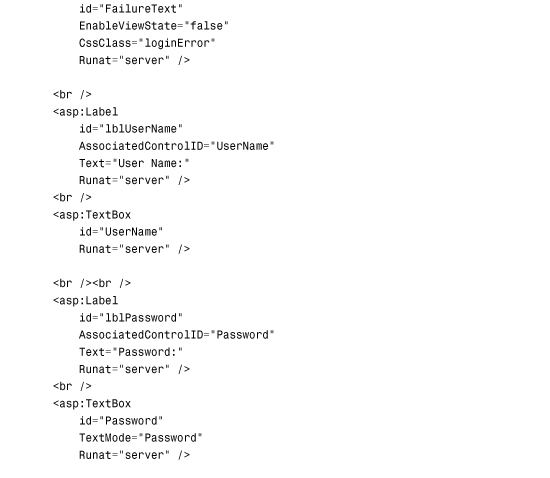
The page in Listing 26.9 illustrates how you can use a LayoutTemplate to customize the appearance of the Login control (see Figure 26.5).
Figure 26.5. Using a template with the Login control.

Listing 26.9. LoginTemplate.aspx

Performing Custom Authentication with the Login Control
By default, the Login control uses ASP.NET Membership to authenticate a username and password. If you need to change this default behavior, you can handle the Login control’s Authenticate event.
Imagine, for example, that you are building a simple application and you want to store a list of usernames and passwords in the web configuration file. The web configuration file in Listing 26.10 contains the credentials for two users named Bill and Ted.
Listing 26.10. Web.Config

The page in Listing 26.11 contains a Login control that authenticates users against the list of usernames and passwords stored in the web configuration file.
Listing 26.11. LoginCustom.aspx

The page in Listing 26.11 includes a method that handles the Login control’s Authenticate event. The second parameter passed to the Authenticate event handler is an instance of the AuthenticateEventArgs class. This class includes the following property:
• Authenticated
If you assign the value True to this property, the Login control authenticates the user.
In Listing 26.11, the FormsAuthentication.Authenticate() method is called to check for a username and password in the web configuration file that matches the username and password entered into the login form. The value returned from this method is assigned to the AuthenticateEventArgs.Authenticated property.
Using the CreateUserWizard Control
The CreateUserWizard control renders a user registration form. If a user successfully submits the form, a new user is added to your website. In the background, the CreateUserWizard control uses ASP.NET membership to create the new user.
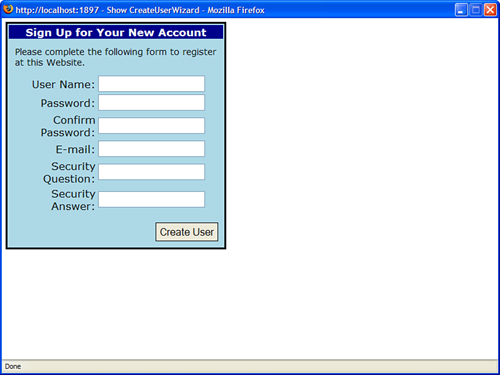
The CreateUserWizard control supports a large number of properties (too many to list here) that enable you to modify the appearance and behavior of the control. For example, the page in Listing 26.12 uses several of the CreateUserWizard properties to customize the appearance of the form rendered by the control.
Listing 26.12. ShowCreateUserWizard.aspx

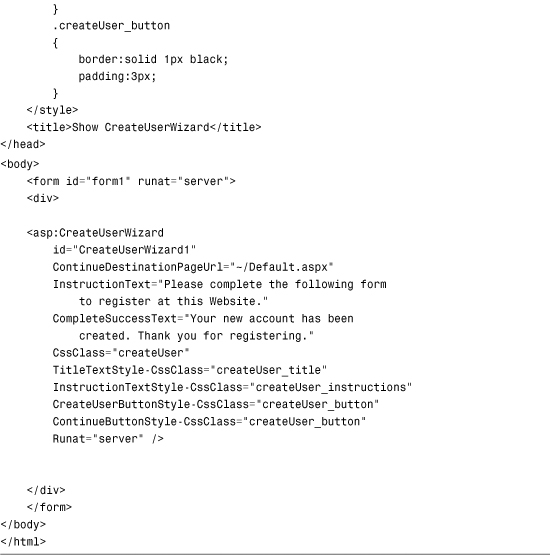
The CreateUserWizard control in Listing 26.12 is formatted with Cascading Style Sheets (see Figure 26.6). The control’s ContinueDestinationPageUrl property is set to the value "~/Default.aspx". After you successfully register, you are redirected to the Default.aspx page.
Figure 26.6. Formatting the CreateUserWizard control.
Note
For the complete list of properties supported by the CreateUserWizard control, see the Microsoft .NET Framework SDK Documentation.
Configuring Create User Form Fields
By default, the CreateUserWizard control displays the following form fields:
• Username
• Password
• Confirm Password
• Security Question
• Security Answer
These are the default form fields. The last three fields are optional.
If you don’t want to require a user to enter either an email address or a security question and answer, you need to modify the configuration of the default membership provider. The web configuration file in Listing 26.13 makes both an email address and security question and answer optional.
Listing 26.13. Web.Config

If you add the web configuration file in Listing 26.13 to your application, the CreateUserWizard control does not render fields for a security question and answer. However, the CreateUserWizard control still renders an email field. If you don’t want the email form field to be rendered, you must perform an additional step. You must set the CreateUserWizard control’s RequireEmail property to the value False.
If you add the page in Listing 26.14 to an application that contains the web configuration file in Listing 26.13, the email, security question, and security answer form fields are not displayed (see Figure 26.7).
Figure 26.7. An abbreviated registration form.

Listing 26.14. CreateUserWizardShort.aspx

Warning
Don’t set the CreateUserWizard control’s RequireEmail property to the value False when the membership provider’s requiresUniqueEmail property is set to the value True. In other words, don’t require an email address when you haven’t provided a user with a method for entering an email address.
Sending a Create User Email Message
You can set up the CreateUserWizard control so that it automatically sends an email when a new user registers. For example, you can send an email that contains the new user’s registered username and password to that user’s email account.
Warning
Sending an unencrypted email across the Internet with a user’s password is dangerous. However, it also is a common practice to include a password in a registration confirmation email.
The page in Listing 26.15 includes a MailDefinition property that specifies the properties of the email that is sent to a user after the user successfully registers.
Listing 26.15. CreateUserWizardEmail.aspx

The MailDefinition class supports the following properties:
• BodyFileName—Enables you to specify the path to the email message.
• CC—Enables you to send a carbon copy of the email message.
• EmbeddedObjects—Enables you to embed objects, such as images, in the email message.
• From—Enables you to specify the FROM email address.
• IsBodyHtml—Enables you to send an HTML email message.
• Priority—Enables you to specify the priority of the email message. Possible values are High, Low, and Normal.
• Subject—Enables you to specify the subject of the email message.
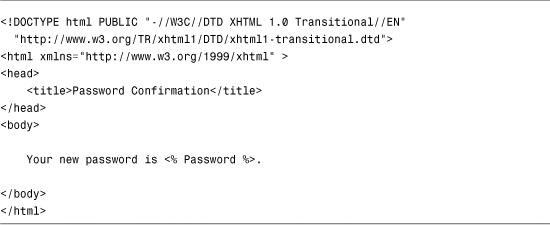
The MailDefinition associated with the CreateUserWizard control in Listing 26.15 sends the contents of the text file in Listing 26.16.
Listing 26.16. Register.txt

The email message in Listing 26.16 includes two special expressions: <% UserName %> and <% Password %>. When the email is sent, the user’s registered username and password are substituted for these expressions (see Figure 26.8).
Figure 26.8. Receiving a registration email.

Note
You can send a user’s password in an email message even when the password is encrypted or hashed by the Membership provider.
The MailDefinition class uses the email server configured by the smtp element in the web configuration file. For example, the web configuration file in Listing 26.17 illustrates how you can configure the MailDefinition class to use the local SMTP server included with Internet Information Services. (You can enable the local SMTP Server by opening Internet Information Services from the Administrative Tools folder.)
Listing 26.17. Web.Config

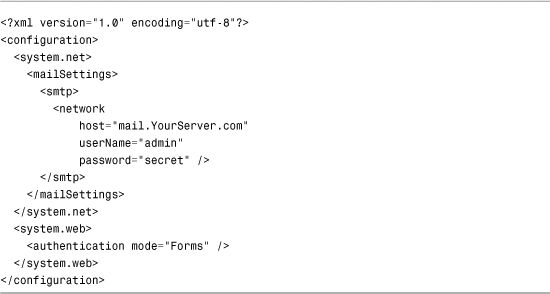
If you need to connect to a mail server located on another machine, you can use the web configuration file in Listing 26.18. In Listing 26.18, the smtp element includes a network element that specifies a mail host, username, and password.
Listing 26.18. Web.Config
Note
If you need to customize the email message sent by the CreateUserWizard control, you can handle the CreateUserWizard control’s SendingMail event. See the CreateUserWizardCodeConfirmation.aspx page in the next section.
Automatically Redirecting a User to the Referring Page
When you successfully log in from the Login.aspx page, you automatically are redirected back to the original page you requested. The CreateUserWizard control, on the other hand, does not redirect you back anywhere. If you want the CreateUserWizard control to work in the same way as the Login control, you need to write some code.
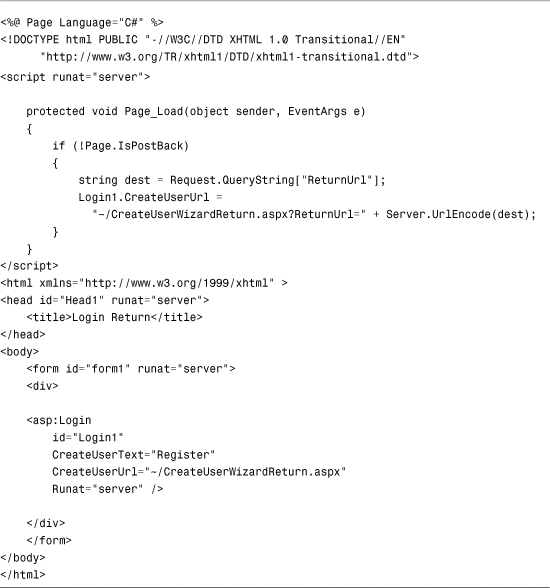
The Login control in Listing 26.19 includes a link to a user registration page named CreateUserWizardReturn.aspx. In the Page_Load() event handler, the value of the ReturnUrl query string parameter is added to the link to the registration page.
Listing 26.19. LoginReturn.aspx
Before you use the page in Listing 26.19, you need to rename the page to Login.aspx. If a user requests a page that the user is not authorized to access, the user is automatically redirected to the Login.aspx page. The ReturnUrl parameter is automatically added to the request for Login.aspx.
The page in Listing 26.20 contains a CreateUserWizard control. This page also contains a Page_Load() event handler. The value of the ReturnUrl query string parameter is used to redirect the user back to the originally requested page.
Listing 26.20. CreateUserWizardReturn.aspx

Automatically Generating a Password
Some websites require you to complete multiple steps when registering. For example, you must complete the following steps when registering for a new account at eBay:
- Complete the registration form.
- Receive an email with a confirmation code.
- Enter the confirmation code into a form.
This method of registration enables you to verify a user’s email address. If someone enters an invalid email address, the confirmation code is never received.
If you need to implement this registration scenario, you need to know about the following three properties of the CreateUserWizard control:
• AutoGeneratePassword—Enables the CreateUserWizard control to generate a new password automatically.
• DisableCreatedUser—Enables you to disable the new user account created by the CreateUserWizard control.
• LoginCreatedUser—Enables you to prevent a new user from being logged in automatically.
You can send two types of confirmation email messages. First, you can generate a new password automatically and send the password to the user. In that case, you want to enable the AutoGeneratePassword property and disable the LoginCreatedUser properties.
Alternatively, you can allow a new user to enter her own password and send a distinct confirmation code in the confirmation email message. In that case, you want to enable the DisableCreatedUser property and disable the LoginCreatedUser property. Let’s examine each of these scenarios in turn.
The page in Listing 26.21 contains a CreateUserWizard control that does not render a password form field. The control has its AutoGeneratePassword property enabled and its LoginCreatedUser property disabled. After you complete the form rendered by the CreateUserWizard control, you can click the Continue button to open the Login.aspx page.
Listing 26.21. CreateUserWizardPasswordConfirmation.aspx

Warning
Don’t set the membership provider’s passwordStrengthRegularExpression attribute when enabling the CreateUserWizard control’s AutoGeneratePassword property.
The CreateUserWizard control in Listing 26.21 sends the email message contained in Listing 26.22.
Listing 26.22. PasswordConfirmation.htm
The email message in Listing 26.22 includes the automatically generated password. When the new user receives the automatically generated password in her inbox, she can enter the password in the Login.aspx page.
In the second scenario, the user gets to choose his password. However, the user’s account is disabled until he enters his confirmation code.
The CreateUserWizard control in Listing 26.23 has its DisableCreateUser property enabled and its LoginCreatedUser property disabled.
Listing 26.23. CreateUserWizardCodeConfirmation.aspx


The page in Listing 26.23 includes a SendingMail event handler. The confirmation code is the unique key assigned to the new user by the membership provider (a GUID). The confirmation code is substituted into the email message before the message is sent. The email message is contained in Listing 26.24.
Listing 26.24. CodeConfirmation.htm

After you complete the form rendered by the CreateUserWizard control, you can click the Continue button to open the ConfirmCode.aspx page in Listing 26.25 (see Figure 26.9).
Figure 26.9. Entering a confirmation code.

Listing 26.25. ConfirmCode.aspx


If the user enters the correct username and confirmation code, his account is enabled. The MembershipUser.IsApproved property is assigned the value True and the updated user information is saved with the Membership.UpdateUser() method.
Using Templates with the CreateUserWizard Control
If you need to customize the appearance of the form rendered by the CreateUserWizard control, you can create templates for the CreateUserWizardStep and the CompleteWizardStep. For example, the page in Listing 26.26 displays a drop-down list to display options for the security question (see Figure 26.10).
Figure 26.10. Customizing the CreateUserWizard control with templates.

Listing 26.26. CreateUserWizardTemplate.aspx


In the CreateUserWizardStep, you can add controls with the following IDs:
• UserName
• Password
• Email
• ConfirmPassword
• Question
• Answer
• ErrorMessage
Of course, you can add any other controls that you need. For example, you can request additional information when a new user registers and store the information in a separate database table (see the next section).
In the CreateUserWizardStep, you also can add Button controls that contain CommandName properties with the following values:
• CreateUser
• Cancel
Adding Steps to the CreateUserWizard Control
The CreateUserWizard control inherits from the base Wizard control. That means that you can use all the properties supported by the Wizard control when using the CreateUserWizard control. In particular, you can extend the CreateUserWizard control with additional wizard steps.
For example, imagine that you want to require new users to enter their first and last names. The page in Listing 26.27 contains an additional WizardStep that includes both first and last name form fields.
Listing 26.27. CreateUserWizardExtra.aspx


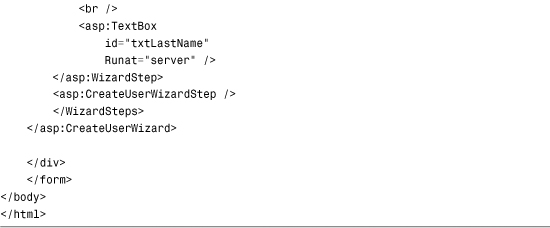
The page in Listing 26.27 includes a CreatedUser event handler that executes after the new user is created. This handler adds the new user’s first and last name to a database named UserProfilesDB.
Using the LoginStatus Control
The LoginStatus control displays either a Login link or a Logout link, depending on your authentication status. When you click the Login link, you are transferred to the Login.aspx page. When you click the Logout link, you are logged out of the website.
The page in Listing 26.28 contains a LoginStatus control (see Figure 26.11).
Figure 26.11. Displaying a Login link with the LoginStatus control.

Listing 26.28. ShowLoginStatus.aspx

After you open the page in Listing 26.28, if you click the Login link, you are redirected to the Login page. If you enter a valid username and password, you are redirected back to the ShowLoginStatus.aspx page.
The LoginStatus control supports the following properties:
• LoginImageUrl—Enables you to specify an image for the Login link.
• LoginText—Enables you to specify the text for the Login link.
• LogoutAction—Enables you to control what happens when the Logout link is clicked. Possible values are Redirect, RedirectToLoginPage, and Refresh.
• LogoutImageUrl—Enables you to specify an image for the Logout link.
• LogoutPageUrl—Enables you to specify a page to which the user is redirected when the user logs out. This property is ignored unless the LogoutAction property is set to the value Redirect.
• LogoutText—Enables you to specify the text for the Logout link.
The LoginStatus control also supports the following two events:
• LoggingOut—Raised before the user is logged out.
• LoggedOut—Raised after the user is logged out.
Using the LoginName Control
The LoginName control displays the current user’s registered username. If the current user is not authenticated, the LoginName control renders nothing.
The page in Listing 26.29 contains both a LoginName and LoginStatus control.
Listing 26.29. ShowLoginName.aspx

When you first open the page in Listing 26.29, the LoginName control displays nothing. However, if you login by clicking the Login link, the LoginName control displays your username (see Figure 26.12).
Figure 26.12. Displaying the current username with the LoginName control.

The LoginName control supports the following property:
• FormatString—Enables you to format the username when the username is rendered.
Using the ChangePassword Control
The ChangePassword control enables a user (or administrator) to change a user password. The page in Listing 26.30 illustrates how you can use this control.
Listing 26.30. ShowChangePassword.aspx


The form in Listing 26.30 includes form fields for entering your username, old password, and new password (see Figure 26.13). After you submit the form, your old password is changed to the new password.
Figure 26.13. Changing your password with the ChangePassword control.

The ChangePassword control in Listing 26.30 includes a DisplayUserName property. When this property is enabled, the username form field is rendered. You don’t need to include the DisplayUserName property when you place the page within a password-protected section of your web application. In that case, the ChangePassword control uses the name of the current user automatically.
Sending a Change Password Email
After the user changes his password, you can use the ChangePassword control to automatically send an email message that contains the new password. The page in Listing 26.31 contains a ChangePassword control that automatically sends an email.
Note
You can send a user’s password in an email message even when the password is encrypted or hashed by the membership provider.
Listing 26.31. ChangePasswordEmail.aspx

The ChangePassword control in Listing 26.31 includes a MailDefinition property that defines the email sent by the control. The ChangePassword control emails the message contained in Listing 26.32.
Listing 26.32. ChangePassword.txt

The email message in Listing 26.32 includes two special expressions: <% UserName %> and <% Password %>. When the email is sent, the user’s existing username and new password are substituted for these expressions.
Note
The MailDefinition class uses the email server configured by the smtp element in the web configuration file. For more information on configuring the smtp element, see the earlier section of this chapter, “Sending a Create User Email Message.”
Using Templates with the ChangePassword Control
If you need to completely modify the appearance of the ChangePassword control, you can use templates to format the control. The ChangePassword control supports both a ChangePasswordTemplate and a SuccessTemplate.
The page in Listing 26.33 illustrates how you can use both the templates supported by the ChangePassword control (see Figure 26.14).
Figure 26.14. Customizing the ChangePassword control with templates.

Listing 26.33. ChangePasswordTemplate.aspx


You can use controls with the following IDs in the ChangePasswordTemplate template:
• UserName
• CurrentPassword
• ConfirmPassword
• NewPassword
• FailureText
You also can add Button controls with the following values for the CommandName property:
• ChangePassword
• Cancel
• Continue
Using the PasswordRecovery Control
If a user forgets her password, she can use the PasswordRecovery control to email herself her password. The PasswordRecovery control either sends the user’s original password or resets the password and sends the new password.
The page in Listing 26.34 contains a PasswordRecovery control.
Listing 26.34. ShowPasswordRecovery.aspx

After you open the page in Listing 26.34 in your web browser, you are first asked to enter your username (see Figure 26.15). Next, you are asked to enter the answer to the security question that you entered when registering. Finally, a password is emailed to your registered email account.
Figure 26.15. Retrieving a lost password with the PasswordRecovery control.

Note
Before you use the PasswordRecovery control, you must specify your mail server settings in your application’s web configuration file. See the earlier section in this chapter, “Sending a Create User Email Message.”
By default, the PasswordRecovery control first resets your password before sending you the password. In the next section, you learn how to send a user’s original password.
Sending the Original Password
By default, the PasswordRecovery control does not send a user’s original password. If you don’t want the PasswordRecovery control to reset a user’s password before sending it, you must change the configuration of the membership provider. Three configuration settings matter: passwordFormat, enablePasswordRetrieval, and enablePasswordReset.
By default, the passwordFormat attribute has the value Hashed. When passwords are hashed, the PasswordRecovery control cannot send a user’s original password. This limitation makes sense because when passwords are hashed, the actual passwords are never stored anywhere. If you want to send a user his original password, you need to set the passwordFormat attribute to either the value Clear or Encrypted.
By default, the enablePasswordRetrieval attribute has the value False. Therefore, if you want to send a user his original password, you must enable this property in the web configuration file.
Finally, by default, the enablePasswordReset attribute has the value True. Regardless of the value of the passwordFormat or enablePasswordRetrieval attributes, you can always reset a user’s password and email the new password to the user.
The web configuration file in Listing 26.35 contains the necessary configuration settings to enable a user’s original password to be sent.
Listing 26.35. Web.Config


The configuration file in Listing 26.35 causes passwords to be stored in plain text rather than hashed. Furthermore, password retrieval is enabled.
Requiring a Security Question and Answer
When you use the CreateUserWizard control to register, you are required to select a security question and answer. The PasswordRecovery control displays a form that contains the security question. If you cannot enter the correct security answer, your password is not sent.
If you do not want to require users to answer a security question before receiving their passwords, you can modify the configuration of the membership provider. The web configuration file in Listing 26.36 assigns the value false to the requiresQuestionAndAnswer attribute.
Listing 26.36. Web.Config

Using Templates with the PasswordRecovery Control
If you need to completely customize the appearance of the PasswordRecovery control, you can use templates. The PasswordRecovery control supports the following three types of templates:
• UserNameTemplate
• QuestionTemplate
• SuccessTemplate
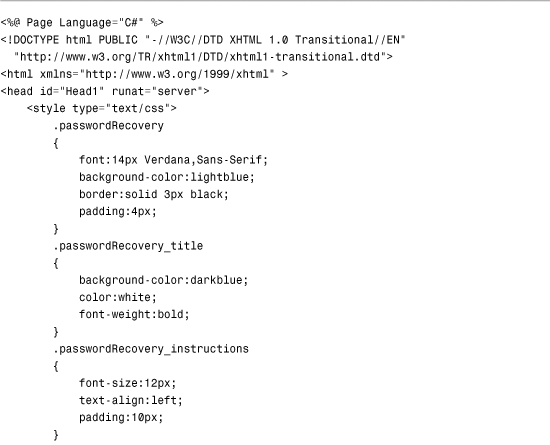
The page in Listing 26.37 illustrates how you can use all three of these templates.
Listing 26.37. PasswordRecoveryTemplate.aspx


The UserNameTemplate must contain a control with an ID of UserName. You also can include a control with an ID of FailureText when you want to display error messages. This template also must contain a Button control with a CommandName that has the value Submit.
The QuestionTemplate must contain a control with an ID of Question and a control with an ID of Answer. Optionally, you can include a FailureText control when you want to display error messages. It also must have a Button control with a CommandName that has the value Submit.
The SuccessTemplate, on the other hand, does not require any special controls.
The PasswordRecovery control in Listing 26.37 includes a MailDefinition property that references a custom email message. The message is contained in Listing 26.38.
Listing 26.38. PasswordRecovery.txt

The email message in Listing 26.38 contains substitution expressions for both the username and password.
Using the LoginView Control
The LoginView control enables you to display different content to different users depending on their authentication status. For example, the page in Listing 26.39 displays different content for authenticated users and anonymous users (see Figure 26.16).
Figure 26.16. Displaying content to authenticated users with the LoginView control.

Listing 26.39. ShowLoginView.aspx

The LoginView control in Listing 26.39 contains two templates: an AnonymousTemplate and a LoggedInTemplate. Only one of the two templates is displayed at a time.
The page also includes a LoginStatus control. You can use this control to log in and log out quickly.
Using Roles with the LoginView Control
You also can use the LoginView control to display different content to users who belong to different roles. The page in Listing 26.40 contains a LoginView that contains two RoleGroup controls. The first RoleGroup contains content that is displayed to members of the Administrator role. The second RoleGroup contains content that is displayed to members of the Manager and Worker roles.
Listing 26.40. LoginViewRoles.aspx
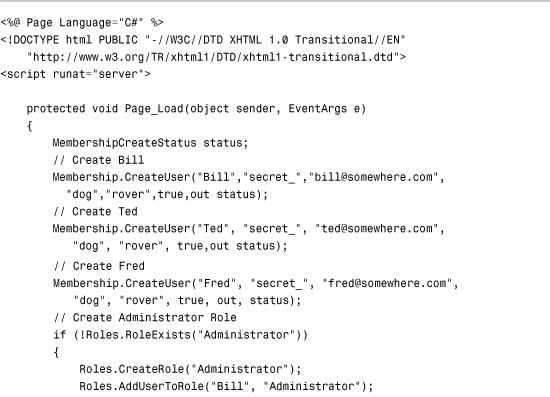


The Page_Load() handler in Listing 26.40 creates three users named Bill, Ted, and Fred. Bill is added to both the Administrator and Manager roles; Ted is added to the Manager role; and Fred is added to the Worker role.
The content of only one RoleGroup is displayed by the LoginView control at a time. If a user matches more than one RoleGroup, the content of the first RoleGroup matched is displayed and the other RoleGroups are ignored.
Before you can use the page in Listing 26.40, you must enable roles in the web configuration file. The file in Listing 26.41 contains the necessary roleManager element.
Listing 26.41. Web.Config

Summary
This chapter was devoted to the ASP.NET Login controls. In the first section, you were provided with an overview of the Login controls. You learned how to create both a Login and Registration page.
Next, we examined each of the Login controls one by one. You learned how to use the Login control to authenticate users and the CreateUserWizard control to register new users. You also learned how to send an email to new users automatically.
We also examined the LoginStatus and LoginView controls. You learned how to display either a Login or Logout link with the LoginStatus control. You learned how to display the current user’s name with the LoginName control.
You also learned how to change passwords and send password reminders by using the ChangePassword and PasswordRecovery controls. You learned how to customize both of these controls by using templates.
Finally, you learned how to use the LoginView control to display different content to different users, depending on their authentication status. We also discussed how you can use roles with the LoginView control.