
Chapter 32. Building Dynamic Data Applications
In This Chapter
• Introducing ASP.NET Dynamic Data
• Building a Dynamic Data Application
• Working with Dynamic Data Templates
• Summary
ASP.NET Dynamic Data originally appeared in .NET Framework 3.5 Service Pack 1 release and its templates came with Visual Studio 2008 SP1. This chapter provides you with an overview of ASP.NET Dynamic Data and walks you through the process of building an application with it and discuss when you might (and might not) build a dynamic data application.
When you finish this chapter you should have a good idea of what it’s like to build dynamic data applications and the productivity benefits they provide for developers, and you can compare and contrast this framework with traditional Web Forms and ASP.NET MVC Framework.
Introducing ASP.NET Dynamic Data
The hallmark of every good programmer is the ability to locate redundant code and factor it out into a reusable module or library. Many people these days equate good programming skills with writing far less lines of code than we used to while still producing incredible applications.
When we build ASP.NET applications that sit on top of a data store of some kind, there are always a set of common tasks that we need to provide a UI for. Although the data models can vary from application to application, several common patterns emerge in virtually any data-driven application. Just a few of these patterns are listed here:
• Entity Lists—Display a list of rows in a table.
• Detail Form—Displays the details of a single entity.
• Edit Form—Enables the user to edit the details of a single entity.
• Create—Adds a new entity to a list.
• Delete—Deletes an entity from a list.
• Navigation—Provides Search, Filter, Sort, and Paginate lists of entities.
These tasks are common to virtually all web applications regardless of the underlying data model. The ASP.NET Dynamic Data framework takes this into account and, out-of-the-box, gives you scaffolding and templates that can provide all this functionality for you without you writing more than a few lines of code. In the next section, you see how to build a dynamic data application, and you see the features and functionality provided for you as a starting point.
Building a Dynamic Data Application
Before we start building a sample application, we need something to build. In the spirit of keeping things simple so that we can focus this chapter solely on dynamic data, the application must also be simple.
We call it ZombiePedia, a website for cataloguing the appearances of various zombies. This way, during the zombie apocalypse, we can all hit ZombiePedia from our smart phones to log zombies we’ve seen and look up repeat zombies to find their vital statistics. After all, we need to know if we can touch a zombie with bare hands or if it’s a virus carrier, don’t we?
Without dynamic data, we would have to hand-code the page that displays the list of zombie sightings, the sighting detail and edit forms, the ability to create new sightings, and the pages that add, remove, and edit zombie types, and a bunch more plumbing. Doing this by hand, even with a rapid development framework like the MVC Framework, would be tedious and time-consuming. If our goal is to produce a functioning prototype that we can use as the launching point to start building our production application, we should use dynamic data.
To start, let’s create a new web application. Open up Visual Studio 2010 and create a new project. Under the Installed Templates panel in the Web category, click ASP.NET Dynamic Data Entities Web Application (shown in Figure 32.1). Call the application whatever you like, but ZombiePedia might be a good choice.
Figure 32.1. Creating a new ASP.NET Dynamic Data Entries Project.
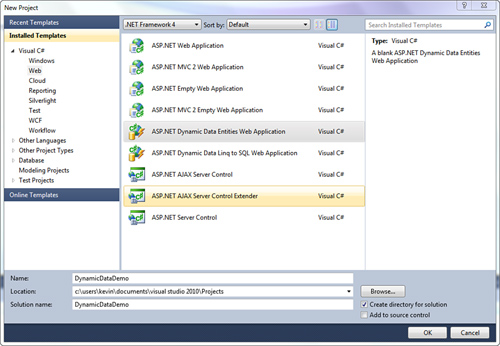
This particular template creates an ASP.NET Dynamic Data website that comes pre-equipped with code, scaffolding, and references to build a dynamic user interface on top of ADO.NET Entity Framework Entity Data Model (EDM).
Before we go any further, we need to add the entity data model to our project. You can mock this up quickly by creating two simple tables in a SQL database: ZombieType (ID, Name, Description) and ZombieSighting (ID, Name, Longitude, Latitude, and so on). Figure 32.2 shows the dialog box with which you are presented after right-clicking the project and choosing to add a new ADO.NET Entity Model and choosing Generate from Database.
Figure 32.2. Adding an ADO.NET Entity Data Model by Generating from Database.

With a dynamic data website created and an entity data model added to the project, we’re almost ready to run the application—no code written yet! First, let’s take a look at the project that Visual Studio 2010 created for us.
The key folder of importance here is the DynamicData folder. A content folder serves as a root folder for all your content and media. The EntityTemplates folder contains user controls that apply to screens that deal with an individual entity. This folder comes with files for rendering an entity, editing an entity, and inserting a new entity. These files work against any entity type and are generic. This is a great starting point, but you can also customize these later and tailor the UI more specifically to your schema, as you see later in the chapter.
Also worth looking at is the FieldTemplates folder, which contains user controls for rendering read-only and edit-mode views of individual fields. There is a field here for virtually every type of column-level data you can think of including enumerated types, email addresses, dates, decimals, and even foreign-key controls such as ForeignKey and ManyToMany.
You can’t see it clearly in Figure 32.3, but PageTemplates folder contains default templates for all the different types of pages: Details, Edit, Insert, Delete, List, and ListDetails. It is no coincidence that a page template exists for each of the different types of reusable data-driven application patterns we mentioned at the beginning of the chapter.
Figure 32.3. Default Project Created By ASP.NET Dynamic Data Template.

Before we can run the application as it stands, we need to tell the dynamic data framework about our entity model. To do that, open up the Global.asax.cs file.
A commented outline of code calls the DefaultModel.RegisterContext method. After uncommenting, it looks something like this:
![]()
In our situation, the name of the entity model context created was called Entities, so that’s what we passed as the first parameter to the method. The ScaffoldAllTables parameter instructs dynamic data to enable all the tables in our entity model to be scaffolded. That is, each table will have its own fully functioning UI that enables for listing, detail viewing, editing, inserting, and deleting. We can choose not to scaffold all tables and manually control which tables are scaffolded if we want.
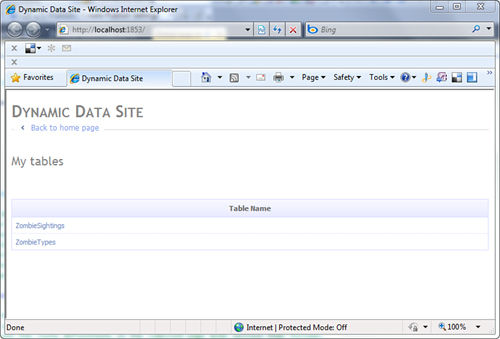
With this in place, and assuming that the entities connection string is sitting in our Web.config file properly, we can then run the application. When we run the application, the home page (shown in Figure 32.4) presents us with a list of tables. This list of tables, as mentioned previously, is either all the tables in the model or is manually defined by code. In our case we have two tables: ZombieTypes and ZombieSightings. Note that these table names were pluralized by the Entity Framework—SQL Server thinks these tables are called ZombieType and ZombieSighting.
Figure 32.4. List of Scaffolded Tables in Dynamic Data Application.
Clicking the ZombieSightings link takes us to the list display page for the zombie sightings table. The URL for this is /ZombieSightings/List.aspx. Our application does not contain a ZombieSightings folder. The combination of the URL Routing engine (see Chapter 26, “Using the Login Controls,”) and dynamic data work together to merge the information in the URL with the dynamic data templates.
Figure 32.5 shows the list view. Not only do we have a pagination-enabled grid view showing the rows of data, but also we can filter on columns (even columns that are foreign keys!) and sort by clicking the column headers.
Figure 32.5. Displaying Data in an Entity List Scaffold view.
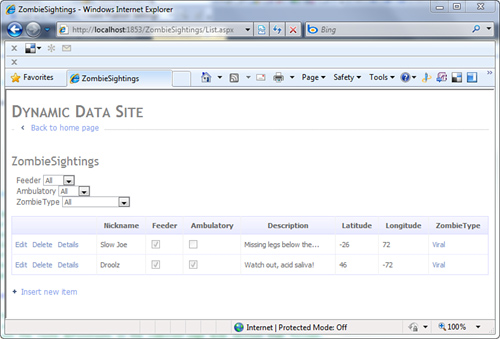
Automatically, the reverse of each foreign key relationship is made available on the corresponding entity page. So if you click the Viral zombie type in the screen, as shown in Figure 32.5, you will be taken to the details page for the Viral zombie type. On that page there is a View ZombieSightings link, enabling you to see the other end of the foreign key relationship. Any developer who has ever built a data-driven website knows how much code and manual labor this normally takes—and we haven’t written a single line of code!
Working with Dynamic Data Templates
Using the default templates is a great place to start for building a data-driven, dynamic web application. They provide all the functionality that you need to start. However, they should be used as just that—a starting point.
Typical web applications, especially those applications in service of a line of business, have specific functionality to that application. There is custom business logic, custom UI, subtle tweaks to the way controls work, and the overall user experience. All this combines to make a compelling user experience and an excellent web application. To do that with a dynamic data application, you need to know how to create your own templates and customize the shared templates.
Following are two types of template changes you can make:
• Shared Templates—Apply to all entities within an application. Making a change here can cause the change to appear in the UI everywhere in the application.
• Custom Templates—Apply only to a specific entity and override the shared templates when the dynamic data framework finds them.
Making Shared Template Changes
If you make changes to the user controls in the FieldTemplates, PageTemplates, EntityTemplates, or Filters directory, those changes apply to all entities for which your application provides scaffolding.
To see how this works in action, let’s modify the list template to pretty up the message that we get when no records are found. This message displays when there are no records and when the search criteria returns no results. To help clarify that, we change the text a little.
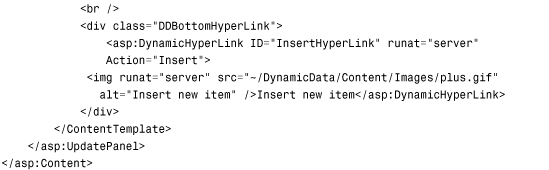
Open the List.aspx page in the PageTemplates folder, and scroll down to the GridView1 grid view control and locate the EmptyDataTemplate element. Replace it with the following:
![]()
Now when we run the application, no matter which table we view, we see this new display text when we attempt to set a filter that returns 0 rows or if the table is empty.
Obviously in a production application, the level of customization is much higher. The great thing about these templates is that because they apply automatically to all tables, it becomes incredibly easy to make sweeping changes to the look, feel, and functionality of your application regardless of the underlying data model. These custom templates, because of their loosely coupled nature, can even be reused among multiple applications within the same organization to create a strong, branded feel and shared functionality.
Creating Type and Entity-Specific Templates
Having the ability to make changes to every piece of your website with a single code change is powerful but also not necessarily the most prudent way to make changes. It brings up the old hitting-a-nail-with-a-sledgehammer analogy. After you make your subtle changes to the shared templates, you might want to make changes to the templates for a single entity.
To do this, you make use of the CustomPages folder. For this exercise, we modify the list template for the ZombieSightings table so that we are not using auto-generated columns and we have a bit more control over how this grid displays.
To start, create a new folder called ZombieSightings under the CustomPages folder. Make a copy of the List.aspx page from the PageTemplates folder, and copy it to the ZombieSightings folder.
Now open up the List.aspx page in your new ZombieSightings folder. At this point we have build errors because there is a type name conflict. Change the Inherits property at the top of the page to ZombieList; then in the List.aspx.cs file, change the class name to ZombieList. This now prevents the custom list template from having a name collision with the shared list template at compile time.
Modify the markup for List.aspx for our custom list so that it looks like the following code:
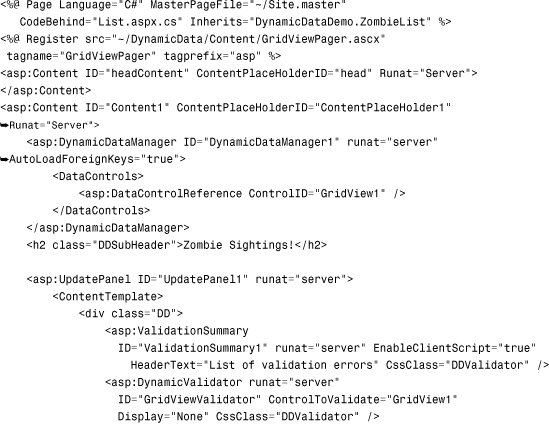


After having made these changes, we can run the application and click the ZombieSightings link from the home page. This presents a UI that looks like the one shown in Figure 32.6. Go back to the main page; then click on the ZombieTypes link to verify that it still conforms to the globally shared list template.
Figure 32.6. Custom Entity-Specific List template.

What we’ve just done is just the tip of the iceberg. If we stay within the structure of the dynamic data template system, we can create incredibly powerful, reusable templates that dramatically increase the productivity of developers and decrease the time gap between database schema creation and the corresponding web UI.
Summary
This chapter has provided you with an overview of the ASP.NET Dynamic Data system. This framework enables you to rapidly build web applications with extremely powerful, interactive, data-driven user interfaces with little-to-no initial coding. Starting from the basic scaffolding, you can stack subtle and rapid customizations over time to take your application from a test scaffold to a full-fledged production application.
ASP.NET Dynamic Data is just one more tool in the ASP.NET 4 developer’s toolbox, making ASP.NET an appealing choice for building just about any kind of web application under virtually any circumstances.