
Chapter 19. Building Data Access Components with ADO.NET
In This Chapter
• Executing Asynchronous Database Commands
• Building Database Objects with the .NET Framework
• Summary
In the previous chapter, you learned how to use the ObjectDataSource control to bind data controls—such as the GridView or DetailsView controls—to a data access component. In this chapter, we shift focus from the ObjectDataSource control to the topic of building data access components.
This chapter provides you with an overview of ADO.NET, which is the main set of classes included in .NET Framework for working with database data. For example, under the covers, the SqlDataSource control uses ADO.NET classes to retrieve data from a SQL Server database.
The classes in ADO.NET Framework support two models of data access: a connected and disconnected model. In the first part, you learn how to take advantage of the connected model of data access. You learn how to use ADO.NET Connection, Command, and DataReader classes to retrieve and modify database data.
In the next part, you learn how to take advantage of the disconnected model of data access represented by ADO.NET DataAdapter, DataTable, DataView, and DataSet classes. You can use these classes to build an in-memory representation of database data.
Finally, at the end of this chapter, we explore two advanced topics. You learn how to take advantage of two important new features included in ADO.NET 2.0. First, you learn how to improve the performance of your database access code by executing asynchronous database commands. You learn how to build asynchronous ASP.NET pages that execute asynchronous ADO.NET commands.
You also learn how to build Microsoft SQL Server database objects, such as stored procedures and user-defined types, by using .NET Framework. For example, you learn how to write a Microsoft SQL Server stored procedure, using C# programming language.
Note
If you don’t want to get your hands dirty touching any actual SQL or ADO.NET code, skip this chapter and read Chapter 20, “Data Access with LINQ to SQL.” LINQ to SQL enables you to access the database without writing any ADO.NET or SQL code.
Connected Data Access
The ADO.NET Framework encompasses a huge number of classes. However, at its heart, it actually consists of the following three classes:
• Connection—Enables you to represent a connection to a data source.
• Command—Enables you to execute a command against a data source.
• DataReader—Enables you to represent data retrieved from a data source.
Most of the other classes in ADO.NET Framework are built from these three classes. These three classes provide you with the fundamental methods of working with database data. They enable you to connect to a database, execute commands against a database, and represent the data returned from a database.
Now that you understand the importance of these three classes, it’s safe to tell you that they don’t actually exist. ADO.NET uses the Provider model. You use different sets of ADO.NET classes for communicating with different data sources.
For example, there is no such thing as the Connection class. Instead, there are the SqlConnection, OracleConnection, OleDbConnection, and ODBCConnection classes. You use different Connection classes to connect to different data sources.
The different implementations of the Connection, Command, and DataReader classes are grouped into the following namespaces:
• System.Data.SqlClient—Contains ADO.NET classes for connecting to Microsoft SQL Server version 7.0 or higher.
• System.Data.OleDb—Contains ADO.NET classes for connecting to a data source with an OLEDB provider.
• System.Data.Odbc—Contains ADO.NET classes for connecting to a data source with an ODBC driver.
• System.Data.OracleClient—Contains ADO.NET classes for connecting to an Oracle database (requires Oracle 8i Release 3/8.1.7 Client or later).
• System.Data.SqlServerCe—Contains ADO.NET classes for connecting to SQL Server Mobile.
If you connect to Microsoft SQL Server 7.0 or higher, you should always use the classes from the SqlClient namespace. These classes provide the best performance because they connect directly to SQL Server at the level of the Tabular Data Stream (the low-level protocol that Microsoft SQL Server uses to communicate with applications).
Of course, there are other databases in the world than Microsoft SQL Server. If you are communicating with an Oracle database, you should use the classes from the OracleClient namespace. If you are communicating with another type of database, you need to use the classes from either the OleDb or Odbc namespaces. Just about every database created by man has either an OLEDB provider or an ODBC driver.
Because ADO.NET follows the Provider model, all implementations of the Connection, Command, and DataReader classes inherit from a set of base classes. Here is a list of these base classes:
• DbConnection—The base class for all Connection classes.
• DbCommand—The base class for all Command classes.
• DbDataReader—The base class for all DataReader classes.
These base classes are contained in the System.Data.Common namespace.
All the sample code in this chapter assumes that you work with Microsoft SQL Server. Therefore, all the sample code uses the classes from the SqlClient namespace. However, because ADO.NET uses the Provider model, the methods that you would use to work with another database are similar to the methods described in this chapter.
Note
Before you can use the classes from the SqlClient namespaces in your components and pages, you need to import the System.Data.SqlClient namespace.
Before we examine the Connection, Command, and DataReader classes in detail, let’s look at how you can build a simple data access component with these classes. The component in Listing 19.1, named Movie1, includes a method named GetAll() that returns every record from the Movies database table.
Listing 19.1. App_CodeMovie1.cs

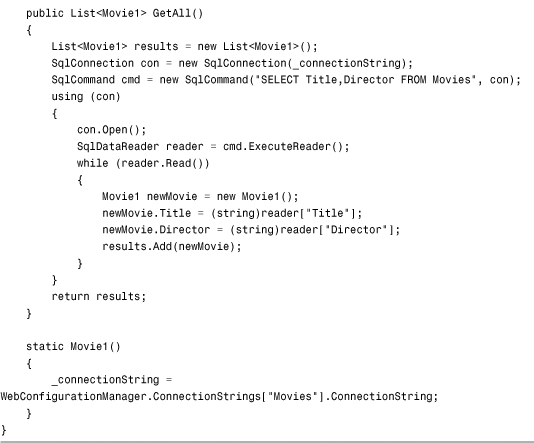
In Listing 19.1, a SqlConnection object represents a connection to a Microsoft SQL Server database. A SqlCommand object represents a SQL SELECT command. The results of executing the command are represented with a SqlDataReader.
Each row returned by the SELECT command is retrieved by a call to the SqlDataReader.Read() method from within a While loop. When the last row is retrieved from the SELECT command, the SqlDataReader.Read() method returns False and the While loop ends.
Each row retrieved from the database is added to a List collection. An instance of the Movie1 class represents each record.
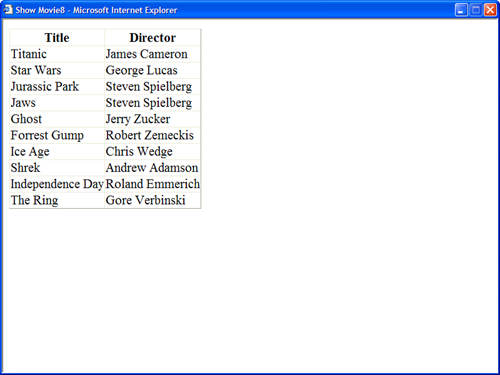
The page in Listing 19.2 uses a GridView and ObjectDataSource control to display the records returned by the Movie1 data access component (see Figure 19.1).
Figure 19.1. Displaying movie records.

Listing 19.2. ShowMovie1.aspx

Using the Connection Object
The Connection object represents a connection to a data source. When you instantiate a Connection, you pass a connection string to the constructor, which contains information about the location and security credentials required for connecting to the data source.
For example, the following statement creates a SqlConnection that represents a connection to a Microsoft SQL Server database named Pubs that is located on the local machine:
![]()
For legacy reasons, there are a number of ways to write a connection string that does exactly the same thing. For example, the keywords Data Source, Server, Address, Addr, and Network Address are all synonyms. You can use any of these keywords to specify the location of the database server.
Note
You can use the SqlConnectionStringBuilder class to convert any connection string into canonical syntax. For example, this class replaces the keyword Server with the keyword Data Source in a connection string.
Before you execute any commands against the data source, you first must open the connection. After you finish executing commands, you should close the connection as quickly as possible.
A database connection is a valuable resource. Strive to open database connections as late as possible, and close database connections as early as possible. Furthermore, always include error handling code to make sure that a database connection gets closed even when there is an exception.
For example, you can take advantage of the Using statement to force a connection to close even when an exception is raised, like this:

The using statement forces the connection to close, regardless of whether an error occurs when a command is executed against the database. The using statement also disposes of the Connection object. (If you need to reuse the Connection, you need to reinitialize it.)
Alternatively, you can use a try...catch statement to force a connection to close like this:
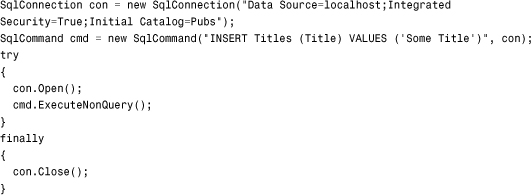
The finally clause in this try...catch statement forces the database connection to close both when there are no errors and when there are errors.
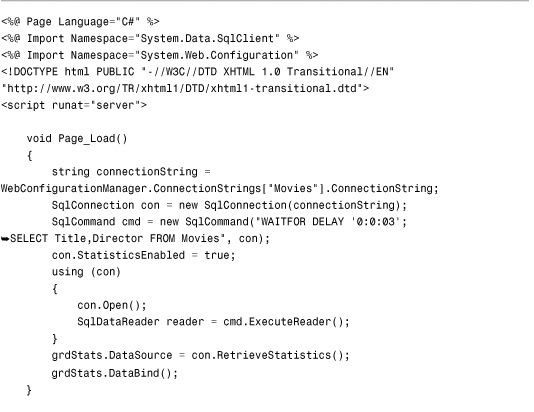
Retrieving Provider Statistics
When you use the SqlConnection object, you can retrieve statistics about the database commands executed with the connection. For example, you can retrieve statistics on total execution time.
The GetAll() method exposed by the component in Listing 19.3 includes a parameter named executionTime. After the database command executes, the value of executionTime is retrieved from the Connection statistics.
Listing 19.3. App_CodeMovie2.cs


In Listing 19.3, the SqlConnection.StatisticsEnabled property is set to the value True. You must enable statistics before you can gather statistics. After the command executes, a dictionary of statistics is retrieved with the SqlConnection.RetrieveStatistics() method. Finally, you retrieve the executionTime by looking up the ExecutionTime key in the dictionary.
Note
In Listing 19.3, the SQL WAITFOR statement is used to pause the execution of the SELECT command for three seconds so that a more interesting execution time is retrieved from the ExecutionTime statistic. Because the SELECT command is such a simple command, if you don’t add a delay, you often receive an execution time of 0 milliseconds.
The page in Listing 19.4 illustrates how you can use this component to display both the results of a database query and the database query execution time (see Figure 19.2).
Figure 19.2. Displaying execution time statistics.

Listing 19.4. ShowMovie2.aspx


The SqlConnection object supports the following properties and methods related to gathering statistics:
• StatisticsEnabled—Enables you to turn on statistics gathering.
• RetrieveStatistics()—Enables you to retrieve statistics represented with an IDictionary collection.
• ResetStatistics()—Resets all statistics to 0.
You can call the RetrieveStatistics() method multiple times on the same SqlConnection. Each time you call the method, you get another snapshot of the Connection statistics.
Here’s a list of the statistics that you can gather:
• BuffersReceived—Returns the number of TDS packets received.
• BuffersSent—Returns the number of TDS packets sent.
• BytesReceived—Returns the number of bytes received.
• BytesSent—Returns the number of bytes sent.
• ConnectionTime—Returns the total amount of time that the connection has been opened.
• CursorsOpen—Returns the number of cursors opened.
• ExecutionTime—Returns the connection execution time in milliseconds.
• IduCount—Returns the number of INSERT, DELETE, and UPDATE commands executed.
• IduRows—Returns the number of rows modified by INSERT, DELETE, and UPDATE commands.
• NetworkServerTime—Returns the amount of time spent waiting for a reply from the database server.
• PreparedExecs—Returns the number of prepared commands executed.
• Prepares—Returns the number of statements prepared.
• SelectCount—Returns the number of SELECT commands executed.
• SelectRows—Returns the number of rows selected.
• ServerRoundtrips—Returns the number of commands sent to the database that received a reply.
• SumResultSets—Returns the number of resultsets retrieved.
• Transactions—Returns the number of user transactions created.
• UnpreparedExecs—Returns the number of unprepared commands executed.
The page in Listing 19.5 displays the values of all these statistics in a GridView control (see Figure 19.3).
Figure 19.3. Displaying all provider statistics.

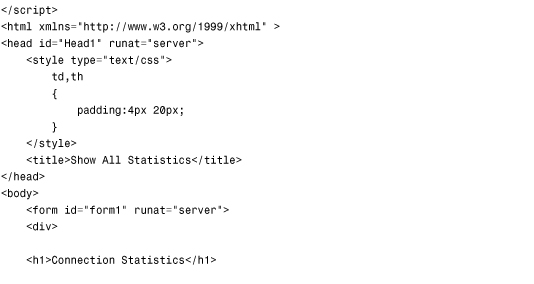
Listing 19.5. ShowAllStatistics.aspx

Improving Performance with Connection Pooling
Database connections are precious resources. If you want your ASP.NET application to scale to handle the demands of thousands of users, you need to do everything in your power to prevent database connections from being wasted.
Opening a database connection is a slow operation. Rather than open a new database connection each time you need to connect to a database, you can create a pool of connections that can be reused for multiple database queries. When connection pooling is enabled, closing a connection does not really close the connection to the database server. Instead, closing the connection releases the database connection back into the pool. That way, the next time a database query is performed, a new connection to the database does not need to be opened.
When you use the SqlConnection object, connection pooling is enabled by default. By default, the ADO.NET Framework keeps a maximum of 100 connections opened in a connection pool. You need to be warned about two things in regard to connection pooling. First, when taking advantage of connection pooling, it is still important to close your connections by calling the SqlConnection.Close() method. If you don’t close a connection, the connection is not returned to the pool. It might take a long time for an unclosed connection to be reclaimed by ADO.NET.
Second, different connection pools are created for different connection strings. In particular, a different connection pool is created for each unique combination of connection string, process, application domain, and Windows identity.
An exact character-by-character match is performed on the connection string. For this reason, you should always store your connection strings in the web configuration file. Don’t hardcode connection strings inside your components. If there is a slight variation between two connection strings, separate connection pools are created, which defeats the performance gains that you get from connection pooling.
The SqlConnection object supports two methods for clearing connection pools programmatically:
• ClearAllPools—Enables you to clear all database connections from all connection pools.
• ClearPool—Enables you to clear all database connections associated with a particular SqlConnection object.
These methods are useful when you work with a cluster of database servers. For example, if you take a database server down, you can programmatically clear the connection pool to the database server that no longer exists.
You can control how connections are pooled by using the following attributes in a connection string:
• Connection Timeout—Enables you to specify the maximum lifetime of a connection in seconds. (The default value is 0, which indicates that connections are immortal.)
• Connection Reset—Enables you to reset connections automatically when retrieved from the connection pool. (The default value is True.)
• Enlist—Enables you to enlist a connection in the current transaction context. (The default value is True.)
• Load Balance Timeout—Same as Connection Timeout.
• Max Pool Size—Enables you to specify the maximum number of connections kept in the connection pool. (The default value is 100.)
• Min Pool Size—Enables you to specify the minimum number of connections kept in the connection pool. (The default value is 0.)
• Pooling—Enables you to turn on or off connection pooling. (The default value is True.)
The page in Listing 19.6 displays a list of all the current user connections to a database in a GridView (see Figure 19.4). The connection string used when connecting to the database creates a minimum connection pool size of 10 connections. (You need to refresh the page at least once to see the 10 connections.)
Figure 19.4. Displaying user database connections.

Listing 19.6. ShowUserConnections.aspx


Using the Command Object
The Command object represents a command that can be executed against a data source. In this section, you learn how to use the SqlCommand object to execute different types of database commands against Microsoft SQL Server.
Executing a Command
You can use the SqlCommand.ExecuteNonQuery() method to execute a SQL command that does not return a set of rows. You can use this method when executing SQL UPDATE, DELETE, and INSERT commands. You can also use this method when executing more specialized commands, such as a CREATE TABLE or DROP DATABASE command.
For example, the component in Listing 19.7 includes Update() and Delete() methods that update and delete movie records.
Listing 19.7. App_CodeMovie3.cs


The page in Listing 19.8 contains a GridView that binds to the data access component in Listing 19.7. The GridView enables you to display, update, and delete database records (see Figure 19.5).
Figure 19.5. Updating and deleting database records.
Listing 19.8. ShowMovie3.aspx

Executing a Command with Parameters
Most database commands that you execute include parameters. For example, when updating a database record, you need to supply parameters that represent the new values of the database record columns.
Warning
Never build command parameters through string concatenation because concatenating strings is an open invitation for SQL injection attacks. If a user enters the proper sequence of characters in a form field, and a SQL command is built through concatenation, a user can execute an arbitrary SQL command.
Always explicitly create parameters by creating instances of the SqlParameter object. When a SQL command is executed with explicit parameters, the parameters are passed individually to a SQL Server stored procedure named sp_executesql.
You represent a parameter with the SqlParameter object. You can create a new SqlParameter in multiple ways. The easiest way is to call the SqlCommand.AddWithValue() method like this:
![]()
The first statement creates a SqlCommand object that represents a SQL INSERT command. The command includes a parameter named @Title.
The second statement adds a SqlParameter to the SqlCommand object’s Parameters collection. The AddWithValue() method enables you to add a parameter with a certain name and value. In this case, the method supplies the value for the @Title parameter.
When you execute the SqlCommand, the following command is sent to Microsoft SQL Server:
![]()
The SqlCommand object calls the sp_executesql stored procedure when it executes a command. In this case, it passes the type, size, and value of the @Title parameter to the sp_executesql stored procedure.
When you use AddWithValue(), the SqlCommand object infers the type and size of the parameter for you. The method assumes that string values are SQL NVarChar values, integer values are SQL Int values, decimal values are SQL decimal values, and so on.
As an alternative to using the AddWithValue() method, you can create a SqlParameter explicitly and add the SqlParameter to a SqlCommand object’s Parameters collection. The advantage of creating a parameter explicitly is that you can specify parameter properties explicitly, such as its name, type, size, precision, scale, and direction.
For example, the following code creates a parameter named @Title with a particular data type, size, and value:

If this seems like a lot of code to do something simple, you can use one of the overloads of the Add() method to create a new SqlParameter like this:
![]()
In general, in this book and in the code that I write, I use the AddWithValue() method to create parameters. I like the AddWithValue() method because it involves the least typing.
Executing a Command That Represents a Stored Procedure
You can use a SqlCommand object to represent a Microsoft SQL Server stored procedure. For example, you can use the following two statements to create a SqlCommand object that represents a stored procedure named GetTitles:
![]()
When you execute this SqlCommand, the GetTitles stored procedure is executed. When you create SqlParameters for a SqlCommand that represents a stored procedure, the SqlParameters represent stored procedure parameters. The modified Movie component in Listing 19.9 uses stored procedures to retrieve and update movie records.
Listing 19.9. App_CodeMovie4.cs


The component in Listing 19.9 uses the MovieSelect and MovieUpdate stored procedures contained in Listing 19.10.
Listing 19.10. MovieStoredProcedures.sql

The ASP.NET page in Listing 19.11 contains a GridView that is bound to the modified Movie component. This GridView enables you to display and update movie records.
Listing 19.11. ShowMovie4.aspx

You can use a SqlParameter to represent not only stored procedure input parameters, but also to represent stored procedure return values and output parameters. If you need to return an integer value from a stored procedure, you can create a SqlParameter that represents a return value. For example, the stored procedure in Listing 19.12 returns the number of rows in the Movies database table.
Listing 19.12. GetMovieCount.sql

The page in Listing 19.13 displays the return value from the GetMovieCount stored procedure with a Label control (see Figure 19.6).
Figure 19.6. Displaying a stored procedure return value.

Listing 19.13. ShowMovieCount.aspx

In Listing 19.13, a SqlParameter is created that has the name ReturnVal. The name of the SqlParameter is not important. However, the SqlParameter.Direction property is set to the value ReturnValue. After the SqlCommand is executed, the return value can be retrieved by reading the value of this parameter.
A stored procedure has only one return value, and it must be an integer value. If you need to return more than one value, or values of a different data type than an integer, you need to use stored procedure output parameters.
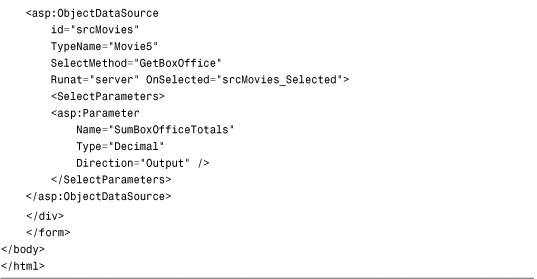
For example, the stored procedure in Listing 19.14 returns movie titles and box office totals. The stored procedure includes an output parameter named @SumBoxOfficeTotals. This output parameter represents a sum of all box office totals.
Listing 19.14. GetBoxOfficeTotals.sql

The data access component in Listing 19.15 contains a method named GetBoxOffice() that calls the GetBoxOfficeTotals stored procedure. The method adds an output parameter to the SqlCommand object.
Listing 19.15. App_CodeMovie5.cs
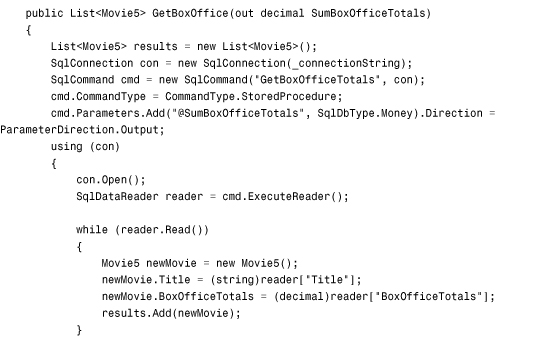

In Listing 19.15, the SqlDataReader is explicitly closed before the output parameter is read. If you do not close the SqlDataReader first, attempting to read the value of the output parameter raises an exception.
Finally, the page in Listing 19.16 displays the movie box office totals in a GridView. In addition, it displays the value of the output parameter in a Label control (see Figure 19.7).
Figure 19.7. Displaying an output parameter.

Listing 19.16. ShowMovie5.aspx


Returning a Single Value
If you need to return a single value from a database query, you can use the SqlCommand.ExecuteScalar() method. This method always returns the value of the first column from the first row of a resultset. Even when a query returns hundreds of columns and billions of rows, everything is ignored except for the value of the first column from the first row.
For example, the page in Listing 19.17 contains a lookup form. If you enter the title of a movie, the movie’s total box office returns display in a Label control (see Figure 19.8).
Figure 19.8. Retrieving a value with ExecuteScalar().

Listing 19.17. ShowExecuteScalar.aspx

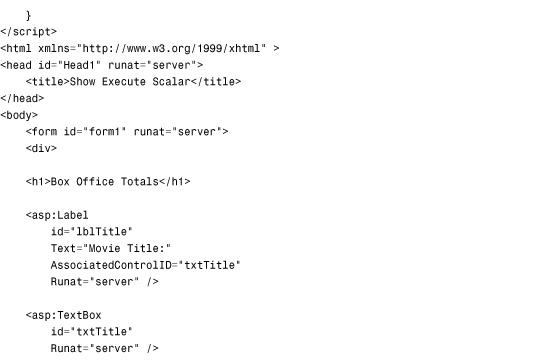

The ExecuteScalar() method returns a value of type Object. This means that you must cast the value returned from ExecuteScalar() to a particular type before you do anything with the value. In Listing 19.17, after verifying that a value is returned, the value is cast to a decimal.
You have a choice here. Rather than use the ExecuteScalar() method, you can use an output parameter. You can use either method to return a single value from a database. There is no real difference in performance between using the ExecuteScalar() method with a stored procedure or using an output parameter. The approach you take is largely a matter of preference.
Note
For performance comparisons between ExecuteScalar and output parameters, see Priya Dhawan’s article at the Microsoft MSDN website (msdn.Microsoft.com), “Performance Comparison: Data Access Techniques.”
Returning a Resultset
If you need to return multiple rows of data with a SqlCommand object, you can call the SqlCommand.ExecuteReader() method. This method returns a SqlDataReader that you can use to fetch each row of records from the database.
For example, the data access component in Listing 19.18 contains a method named GetAll() that returns all the movies from the Movies database table. After the ExecuteReader() method is called, each row is retrieved from the SqlDataReader and dumped into a generic List collection.
Listing 19.18. App_CodeMovie6.cs


The page in Listing 19.19 contains a GridView bound to an ObjectDataSource that represents the component in Listing 19.18 (see Figure 19.9).
Figure 19.9. Returning a resultset.

Listing 19.19. ShowMovie6.aspx

The component in Listing 19.18 copies all the records from the SqlDataReader to a collection before returning the results of the query.
If you want to skip the copying step, and not add the records to a collection, you can pass a CommandBehavior.CloseConnection parameter to the ExecuteReader() method. This parameter causes the database connection associated with the SqlDataReader to close automatically after all the records have been fetched from the SqlDataReader.
The component in Listing 19.20 illustrates how you can use CommandBehavior.CloseConnection with the ExecuteReader() method.
Listing 19.20. App_CodeMovie7.cs

The page in Listing 19.21 displays the records returned from the component in Listing 19.20 in GridView.
Listing 19.21. ShowMovie7.aspx
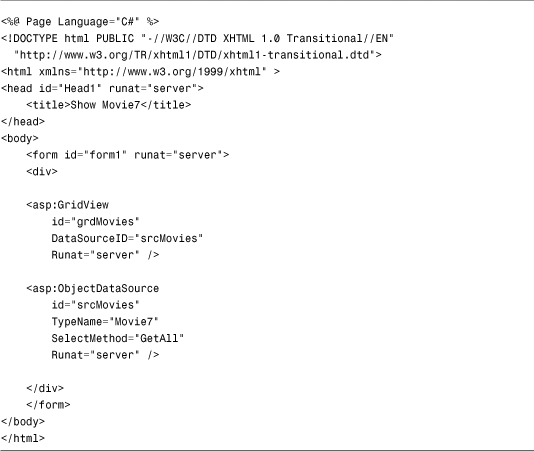
The CommandBehavior.CloseConnection parameter enables you to return a SqlDataReader from a method. When all the records are read from the SqlDataReader, the CommandBehavior.CloseConnection parameter causes the SqlConnection object associated with the SqlDataReader to close automatically.
The big disadvantage of using the CommandBehavior.CloseConnection parameter is that it prevents you from adding any exception handling code. You can’t use a Using statement or Try...Catch statement with the SqlConnection created in the component in Listing 19.19. A Using statement or Try...Catch statement would force the SqlConnection to close before the SqlDataReader is returned from the method.
Using the DataReader Object
The DataReader object represents the results of a database query. You get a DataReader by calling a Command object’s ExecuteReader() method.
You can verify whether a DataReader represents any rows by checking the HasRows property or calling the Read() method. The Read() method returns true when the DataReader can advance to a new row. (Calling this method also advances you to the next row.)
The DataReader represents a single row of data at a time. To get the next row of data, you need to call the Read() method. When you get to the last row, the Read() method returns False.
There are multiple ways to refer to the columns returned by a DataReader. For example, imagine that you use a SqlDataReader named reader to represent the following query:
SELECT Title, Director FROM Movies
If you want to retrieve the value of the Title column for the current row represented by a DataReader, you can use any of the following methods:
string title = (string)reader["Title"];
string title = (string)reader[0];
string title = reader.GetString(0);
SqlString title = reader.GetSqlString(0);
The first method returns the Title column by name. The value of the Title column is returned as an Object. Therefore, you must cast the value to a string before you can assign the value to a string variable.
The second method returns the Title column by position. It also returns the value of the Title column as an Object, so you must cast the value before using it.
The third method returns the Title column by position. However, it retrieves the value as a String value. You don’t need to cast the value in this case.
Finally, the last method returns the Title column by position; however, it returns the value as a SqlString rather than a normal String. A SqlString represents the value using the specialized data types defined in the System.Data.SqlTypes namespace.
There are trade-offs between the different methods of returning a column value. Retrieving a column by its position rather than its name is faster. However, this technique also makes your code more brittle. If the order of your columns changes in your query, your code no longer works.
Returning Multiple Resultsets
A single database query can return multiple resultsets. For example, the following query returns the contents of both the MovieCategories and Movies tables as separate resultsets:
SELECT * FROM MoviesCategories;SELECT * FROM Movies
A semicolon is used to separate the two queries. Executing multiple queries in one shot can result in better performance. When you execute multiple queries with a single command, you don’t tie up multiple database connections.
The component in Listing 19.22 illustrates how you can retrieve multiple resultsets with a single query when using a SqlDataReader. The GetMovieData() method returns two collections: a collection representing MovieCategories and a collection representing Movies.
Listing 19.22. App_CodeDataLayer1.cs


The SqlDataReader.NextResult() method is called to advance to the next resultset. This method returns either True or False depending on whether a next resultset exists. In Listing 19.22, it is assumed that there is both a movies category and movies resultset.
The page in Listing 19.23 displays the contents of the two database tables in two GridView controls (see Figure 19.10).
Figure 19.10. Displaying two resultsets.

Listing 19.23. ShowDataLayer1.aspx


Working with Multiple Active Resultsets
ADO.NET 2.0 introduced a new feature named Multiple Active Results Sets (MARS). In the previous version of ADO.NET, a database connection could represent only a single resultset at a time. If you take advantage of MARS, you can represent multiple resultsets with a single database connection. Using MARS is valuable in scenarios in which you need to iterate through a resultset and perform an additional database operation for each record in the resultset. MARS is disabled by default. To enable MARS, you must include a MultipleActiveResultSets=True attribute in a connection string.
For example, the page in Listing 19.24 programmatically builds the nodes in a TreeView control. The page displays a list of movie categories and, beneath each movie category, it displays a list of matching movies (see Figure 19.11).
Figure 19.11. Fetching database records with MARS enabled.

Listing 19.24. ShowMARS.aspx


The MultipleActiveResultSets attribute is included in the connection string used to open the database connection. If MARS were not enabled, you couldn’t loop through the interior SqlDataReader that represents the matching movies while the containing SqlDataReader that represents the movie categories is open.
Disconnected Data Access
The ADO.NET Framework supports two models of data access. In the first part of this chapter, you saw how you can use the SqlConnection, SqlCommand, and SqlDataReader objects to connect to a database and retrieve data. When you read data from a database by using a SqlDataReader object, an open connection must be maintained between your application and the database.
In this section, we examine the second model of data access supported by ADO.NET: the disconnected model. When you use the objects discussed in this section, you do not need to keep a connection to the database open.
This section discusses four new ADO.NET objects:
• DataAdapter—Enables you to transfer data from the physical database to the in-memory database and back again.
• DataTable—Represents an in-memory database table.
• DataView—Represents an in-memory database view.
• DataSet—Represents an in-memory database.
The ADO.NET objects discussed in this section are built on top of the ADO.NET objects discussed in the previous section. For example, behind the scenes, the DataAdapter uses a DataReader to retrieve data from a database.
The advantage of using the objects discussed in this section is that they provide you with more functionality. For example, you can filter and sort the rows represented by a DataView. Furthermore, you can use the DataTable object to track changes made to records and accept or reject the changes.
The big disadvantage of using the objects discussed in this section is that they tend to be slower and more resource intensive. Retrieving 500 records with a DataReader is much faster than retrieving 500 records with a DataAdapter.
Note
For detailed performance comparisons between the DataReader and DataAdapter, see Priya Dhawan’s article at the Microsoft MSDN website (msdn.Microsoft.com), “Performance Comparison: Data Access Techniques.”
Therefore, unless you need to use any of the specialized functionality supported by these objects, my recommendation is that you stick with the objects discussed in the first part of this chapter when accessing a database. In other words, DataReaders are good and DataAdapters are bad.
Using the DataAdapter Object
The DataAdapter acts as the bridge between an in-memory database table and a physical database table. You use the DataAdapter to retrieve data from a database and populate a DataTable. You also use a DataAdapter to push changes that you have made to a DataTable back to the physical database.
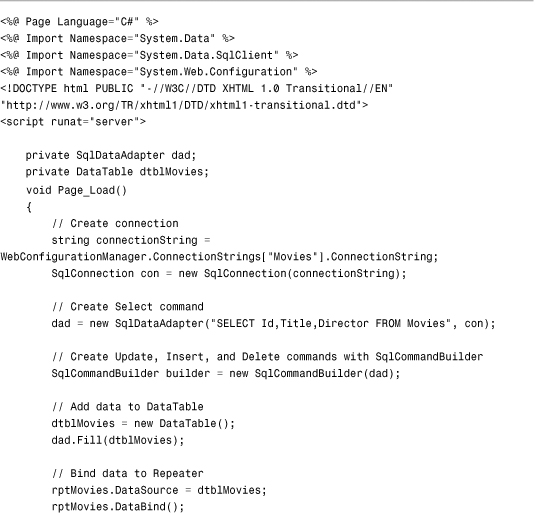
The component in Listing 19.25 illustrates how you can use a SqlDataAdapter to populate a DataTable.
Listing 19.25. App_CodeMovie8.cs

The page in Listing 19.26 contains a GridView that is bound to an ObjectDataSource that represents the component in Listing 19.25 (see Figure 19.12).
Figure 19.12. Displaying data with a DataAdapter.
Listing 19.26. ShowMovie8.aspx

A SqlConnection is never explicitly created in the component in Listing 19.25. When you call the SqlDataAdapter object’s Fill() method, the SqlDataAdapter automatically creates and opens a connection. After the data is fetched from the database, the Fill() method automatically closes the connection.
You don’t need to wrap the call to the Fill() method within a Using or Try...Catch statement. Internally, the SqlDataAdapter uses a Try...Catch statement to ensure that its connection gets closed.
Opening and closing a database connection is a slow operation. If you know that you will need to perform another database operation after using the SqlDataAdapter, you should explicitly create a SqlConnection and open it like this:
If a SqlConnection is already open when you call the Fill() method, it doesn’t close it. In other words, the Fill() method maintains the state of the connection.
Performing Batch Updates
You can think of a SqlDataAdapter as a collection of four SqlCommand objects:
• SelectCommand—Represents a SqlCommand used for selecting data from a database.
• UpdateCommand—Represents a SqlCommand used for updating data in a database.
• InsertCommand—Represents a SqlCommand used for inserting data into a database.
• DeleteCommand—Represents a SqlCommand used for deleting data from a database.
You can use a DataAdapter not only when retrieving data from a database, but also when updating, inserting, and deleting data from a database. If you call a SqlDataAdapter object’s Update() method, and pass the method a DataTable, the SqlDataAdapter calls its UpdateCommand, InsertCommand, and DeleteCommand to make changes to the database.
You can assign a SqlCommand object to each of the four properties of the SqlDataAdapter. Alternatively, you can use the SqlCommandBuilder object to create the UpdateCommand, InsertCommand, and DeleteCommand for you. The SqlCommandBuilder class takes a SqlDataAdapter that has a SELECT command and generates the other three commands automatically.
For example, the page in Listing 19.27 displays all the records from the Movies database table in a spreadsheet created with a Repeater control (see Figure 19.13). If you make changes to the data and click the Update button, the Movies database table is updated with the changes.
Figure 19.13. Batch updating database records.
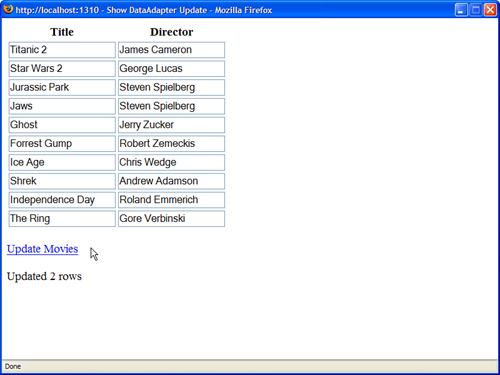
Listing 19.27. ShowDataAdapterUpdate.aspx
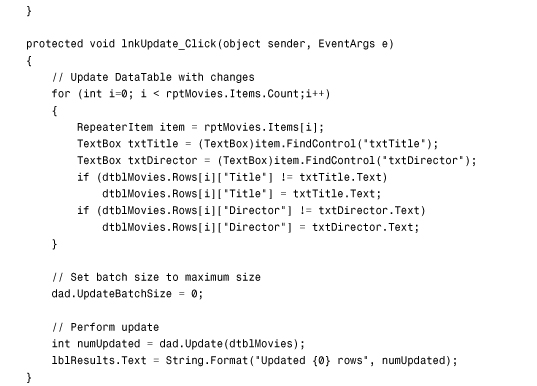

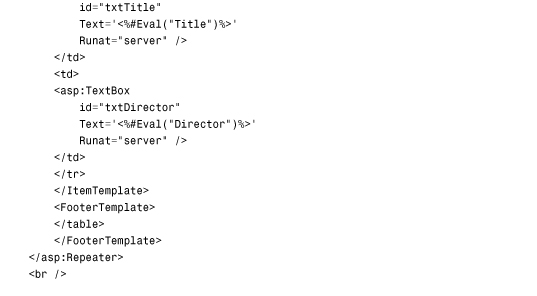

The SqlDataAdapter in Listing 19.27 performs a batch update. When a SqlDataAdapter object’s UpdateBatchSize property is set to the value 0, the SqlDataAdapter performs all its updates in a single batch. If you want to perform updates in smaller batches, you can set the UpdateBatchSize to a particular size.
Using the DataTable Object
The DataTable object represents an in-memory database table. You can add rows to a DataTable with a SqlDataAdapter, with a SqlDataReader, with an XML file, or programmatically. For example, the page in Listing 19.28 builds a new DataTable programmatically. The contents of the DataTable then display in a GridView control (see Figure 19.14).
Figure 19.14. Displaying a DataTable that was built programmatically.

Listing 19.28. ShowDataTableProgram.aspx
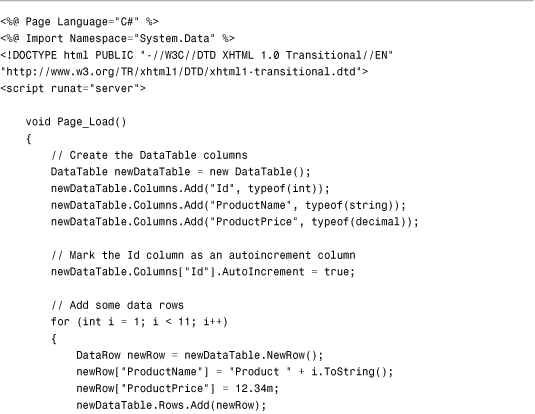

In Listing 19.28, a DataTable with the following three columns is created: Id, ProductName, and ProductPrice. The data type of each column is specified with a .NET Framework type. For example, the ProductPrice column is created as a decimal column. Alternatively, you could create each column with a SqlType. For example, you could use System.Data.SqlTypes.SqlDecimal for the type of the ProductPrice column.
The Id column is created as an autoincrement column. When you add new rows to the DataTable, the column increments its value automatically.
Selecting DataRows
You can retrieve particular rows from a DataTable by using the DataTable object’s Select() method. The Select() method accepts a filter parameter. You can use just about anything that you would use in a SQL WHERE clause with the filter parameter.
When you retrieve an array of rows with the Select() method, you can also specify a sort order for the rows. When specifying a sort order, you can use any expression that you would use with a SQL ORDER BY clause.
For example, the page in Listing 19.29 caches a DataTable in memory with the ASP.NET Cache object. The page contains a TextBox control. When you enter a partial movie title into the TextBox control, a list of matching movies is displayed in a GridView control. The rows are sorted in order of the movie title (see Figure 19.15).
Figure 19.15. Selecting matching rows from a cached DataTable.

Listing 19.29. ShowDataTableSelect.aspx


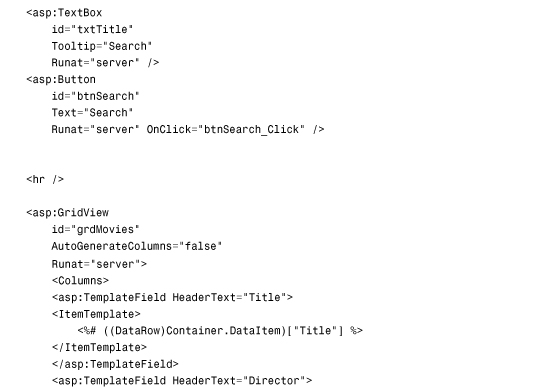

The DataTable Select() method returns an array of DataRow objects. There is nothing wrong with binding an array of DataRow objects to a GridView control. However, you must explicitly cast each data item to a DataRow and read within a GridView TemplateField.
DataRow States and DataRow Versions
When you modify the rows in a DataTable, the DataTable keeps track of the changes that you make. A DataTable maintains both the original and modified version of each row.
Each row in a DataTable has a particular RowState that has one of the following values:
• Unchanged—The row has not been changed.
• Added—The row has been added.
• Modified—The row has been modified.
• Deleted—The row has been deleted.
• Detached—The row has been created but not added to the DataTable.
Each row in a DataTable can have more than one version. Each version is represented by one of the following values of the DataRowVersion enumeration:
• Current—The current version of the row.
• Default—The default version of the row.
• Original—The original version of the row.
• Proposed—The version of a row that exists during editing.
You can use the DataTable.AcceptChanges() method to copy the current versions of all the rows to the original versions of all the rows. And you can use the DataTable.RejectChanges() method to copy the original versions of all the rows to the current versions of all the rows.
For example, the component in Listing 19.30 includes an AcceptChanges() and RejectChanges() method. The component maintains a DataTable in Session state. If you update a row in the DataTable, the row is updated in memory. If the RejectChanges() method is called, any changes made to the DataTable are rejected. If the AcceptChanges() method is called, the database is updated and all changes are accepted.
Listing 19.30. App_CodeMovie9.cs
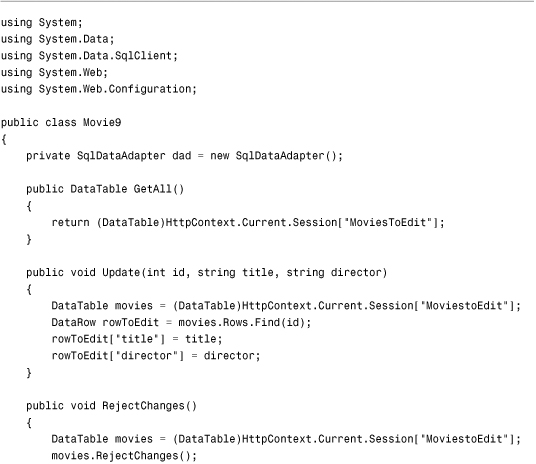

The page in Listing 19.31 contains a GridView that is bound to the component in Listing 19.30. The GridView includes a column that indicates whether each row has been changed. The column displays the value of the corresponding DataRow object’s RowState property (see Figure 19.16).
Figure 19.16. Tracking data row changes.

Listing 19.31. ShowMovie9.aspx


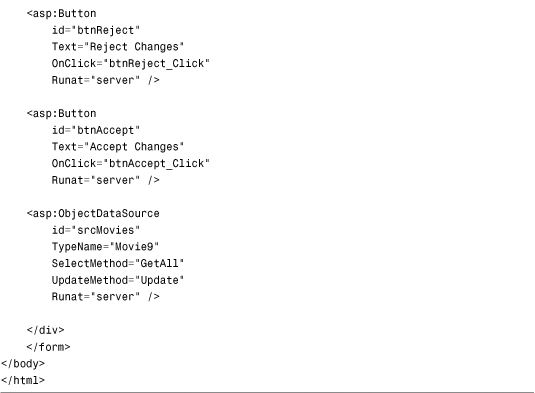
If you click the Accept Changes button, all the changes made to the rows in the GridView are sent to the database. If you click the Reject Changes button, all the rows revert to their original values.
Using the DataView Object
The DataView object represents an in-memory database view. You can use a DataView object to create a sortable, filterable view of a DataTable.
The DataView object supports three important properties:
• Sort—Enables you to sort the rows represented by the DataView.
• RowFilter—Enables you to filter the rows represented by the DataView.
• RowStateFilter—Enables you to filter the rows represented by the DataView according to the row state (for example, OriginalRows, CurrentRows, Unchanged).
The easiest way to create a new DataView is to use the DefaultView property exposed by the DataTable class like this:
Dim dataView1 As DataView = dataTable1.DefaultView;
The DefaultView property returns an unsorted, unfiltered view of the data contained in a DataTable.
You also can directly instantiate a new DataView object by passing a DataTable, filter, sort order, and DataViewRowState filter to the DataView object’s constructor, like this:
DataView dataView1 = new DataView(dataTable1,
"BoxOfficeTotals > 100000",
"Title ASC",
DataViewRowState.CurrentRows);
This statement creates a new DataView from a DataTable that represents the Movies database table. The rows are filtered to include only the movies that have a box office total greater than 100,000 dollars. Also, the rows are sorted by the movie title in ascending order. Finally, all the current rows are represented from the DataTable (as opposed, for instance, to rows that have been deleted).
The page in Listing 19.30 illustrates one way that you can use a DataView. In Listing 19.32, a DataView is cached in Session state. You can sort the cached DataView by clicking on the header links rendered by the GridView control (see Figure 19.17).
Figure 19.17. Sorting a cached DataView.

Listing 19.32. ShowDataView.aspx


Using the DataSet Object
The DataSet object represents an in-memory database. A single DataSet can contain one or many DataTable objects. You can define parent/child relationships between the DataTable objects contained in a DataSet.
For example, the page in Listing 19.33 contains a TreeView control. The TreeView displays a list of movie categories and, beneath each movie category, a list of matching movies (see Figure 19.18).
Figure 19.18. Building a TreeView from a DataSet.

Listing 19.33. ShowDataSet.aspx

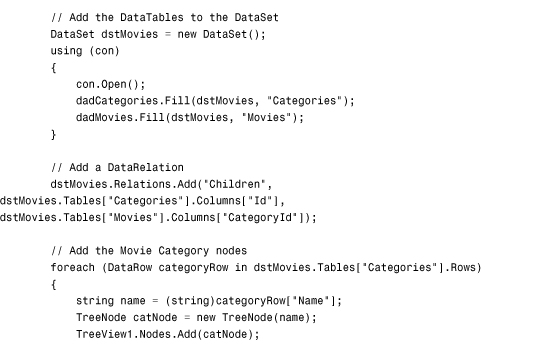

The TreeView is built programmatically. In the BuildTree() method, a DataSet is created that contains two DataTable objects. The first DataTable represents the MovieCategories database table, and the second DataTable represents the Movies database table. A parent/child relationship is created between the two DataTable objects with the help of a DataRelation.
The DataRelation is used to get the movies that match each movie category. The DataRow.GetChildRows() method is called to retrieve the movies that match a particular movie category.
Executing Asynchronous Database Commands
Normally, when you execute a database command, the thread executing the command must wait until the command finishes before executing any additional code. In other words, normally, when you execute a database command, the thread is blocked.
When you take advantage of asynchronous commands, on the other hand, the database command is executed on another thread so that the current thread can continue performing other work. For example, you can use the current thread to execute yet another database command.
There are two reasons that you might want to use asynchronous database commands when building an ASP.NET page. First, executing multiple database commands simultaneously can significantly improve your application’s performance. This is especially true when the database commands are executed against different database servers.
Second, the ASP.NET Framework uses a limited thread pool to service page requests. When ASP.NET Framework receives a request for a page, it assigns a thread to handle the request. If ASP.NET Framework runs out of threads, the request is queued until a thread becomes available. If too many threads are queued, the framework rejects the page request with a 503—Server Too Busy response code.
If you execute a database command asynchronously, the current thread is released back into the thread pool so that it can be used to service another page request. While the asynchronous database command is executing, ASP.NET Framework can devote its attention to handling other page requests. When the asynchronous command completes, the framework reassigns a thread to the original request and the page finishes executing.
Note
You can configure the ASP.NET thread pool with the httpRuntime element in the web configuration file. You can modify the appRequestQueueLimit, minFreeThreads, and minLocalRequestFreeThreads attributes to control how many requests ASP.NET Framework queues before giving up and sending an error.
There are two parts to this task undertaken in this section. A data access component that supports asynchronous ADO.NET methods must be created and an ASP.NET page that executes asynchronously.
Using Asynchronous ADO.NET Methods
There are asynchronous versions of several ADO.NET methods. These methods come in pairs: a Begin and End method. For example, the SqlCommand object supports the following asynchronous methods:
• BeginExecuteNonQuery()
• EndExecuteNonQuery()
• BeginExecuteReader()
• EndExecuteReader()
• BeginExecuteXmlReader()
• EndExecuteXmlReader()
The idea is that when you execute the Begin method, the asynchronous task is started on a separate thread. When the method finishes executing, you can use the End method to get the results.
To use these asynchronous methods, you must use a special attribute in your connection string: the Asynchronous Processing=true attribute.
The data access component in Listing 19.34 contains a BeginGetMovies() and EndGetMovies() method that fetches movies from the Movies database table asynchronously. These methods use the ADO.NET BeginExecuteReader() and EndExecuteReader() to fetch a DataReader asynchronously.
Listing 19.34. App_CodeAsyncDataLayer.cs


Using Asynchronous ASP.NET Pages
When you take advantage of asynchronous ADO.NET methods, you must also enable asynchronous ASP.NET page execution. You enable an asynchronous ASP.NET page by adding the following two attributes to a page directive:
<%@ Page Async="true" AsyncTimeout="8" %>
The first attribute enables asynchronous page execution. The second attribute specifies a timeout value in seconds. The timeout value specifies the amount of time that the page gives a set of asynchronous tasks to complete before the page continues execution.
After you enable asynchronous page execution, you must set up the asynchronous tasks and register the tasks with the page. You represent each asynchronous task with an instance of the PageAsyncTask object. You register an asynchronous task for a page by calling the Page.RegisterAsyncTask() method.
For example, the page in Listing 19.35 displays the records from the Movies database table in a GridView control. The database records are retrieved asynchronously from the AsyncDataLayer component created in the previous section.
Listing 19.35. ShowPageAsyncTask.aspx
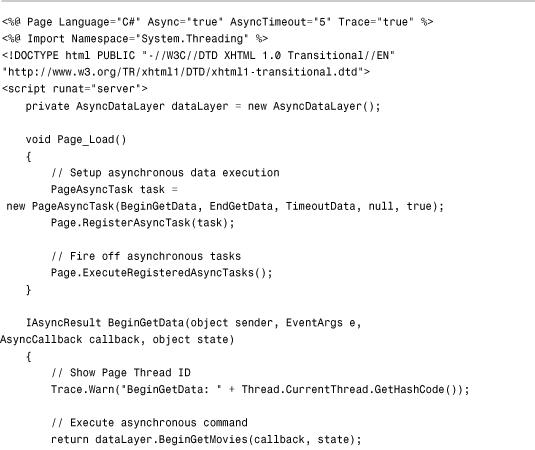


The page in Listing 19.35 creates an instance of the PageAsyncTask object that represents the asynchronous task. Next, the PageAsyncTask object is registered for the page with the Page.RegisterAsyncTask() method. Finally, a call to the Page.ExecuteRegisteredAsyncTasks() method executes the task. (If you don’t call this method, any asynchronous tasks registered for the page are executed during the PreRender event automatically.)
The constructor for the PageAsyncTask object accepts the following parameters:
• beginHandler—The method that executes when the asynchronous task begins.
• endHandler—The method that executes when the asynchronous task ends.
• timoutHandler—The method that executes when the asynchronous task runs out of time according to the Page directive’s AsyncTimeout attribute.
• state—An arbitrary object that represents state information.
• executeInParallel—A Boolean value that indicates whether multiple asynchronous tasks should execute at the same time or execute in sequence.
You can create multiple PageAsyncTask objects and register them for the same page. When you call the ExecuteRegisteredAsyncTasks() method, all the registered tasks are executed.
If an asynchronous task does not complete within the time allotted by the AsyncTimeout attribute, the timoutHandler method executes. For example, the page in Listing 19.35 gives the asynchronous tasks 5 seconds to execute. If the database SELECT command does not return a record within the 5 seconds, the TimeoutData() method executes.
It is important to understand that the asynchronous task continues to execute even when the task executes longer than the interval of time specified by the AsyncTimeout attribute. The AsyncTimeout attribute specifies the amount of time that a page is willing to wait before continuing execution. An asynchronous task is not canceled if takes too long.
The page in Listing 19.35 has tracing enabled and is sprinkled liberally with calls to Trace.Warn() so that you can see when different events happen. The Trace.Warn() statements writes out the ID of the current Page thread. The Page thread ID can change between the BeginGetData() and EndGetData() methods (see Figure 19.19).
Figure 19.19. Trace information for a page executed asynchronously.

You can force the asynchronous task in Listing 19.35 to time out by adding a delay to the database command executed by the AsyncDataLayer.BeginGetMovies() method. For example, the following SELECT statement waits 15 seconds before returning results:
WAITFOR DELAY '0:0:15';SELECT Title,Director FROM Movies
If you use this modified SELECT statement, the asynchronous task times out and the TimeoutData() method executes. The TimeoutData() method simply displays a message in a Label control.
Note
As an alternative to using the Page.RegisterAsyncTask() method to register an asynchronous task, you can use the Page.AddOnPreRenderCompleteAsync() method. However, this latter method does not provide you with as many options.
Building Database Objects with the .NET Framework
Microsoft SQL Server 2005 and 2008 (including Microsoft SQL Server Express) supports building database objects with .NET Framework. For example, you can create user-defined types, stored procedures, user-defined functions, and triggers written with the Visual Basic .NET or C# programming language.
The SQL language is optimized for retrieving database records. However, it is a crazy language that doesn’t look like any other computer language on earth. Doing basic string parsing with SQL, for example, is a painful experience. Doing complex logic in a stored procedure is next to impossible (although many people do it).
When you work in the .NET Framework, on the other hand, you have access to thousands of classes. You can perform complex string matching and manipulation by using the Regular expression classes. You can implement business logic, no matter how complex.
By taking advantage of the .NET Framework when writing database objects, you no longer have to struggle with the SQL language when implementing your business logic. In this section, you learn how to build both user-defined types and stored procedures by using .NET Framework.
Enabling CLR Integration
By default, support for building database objects with .NET Framework is disabled. You must enable CLR integration by executing the following SQL Server command:
sp_configure 'clr enabled', 1
RECONFIGURE
When using SQL Express, you can execute these two commands by right-clicking a database in the Database Explorer window and selecting the New Query menu option. Enter the following string:
sp_configure 'clr enabled', 1; RECONFIGURE
Select Query Designer, Execute SQL to execute the commands (see Figure 19.20). You receive warnings that the query can’t be parsed, which you can safely ignore.
Figure 19.20. Executing a database query in Visual Web Developer.

Creating User-Defined Types with .NET Framework
You can create a new user-defined type by creating either a .NET class or .NET structure. After you create a user-defined type, you can use it in exactly the same way as the built-in SQL types such as the Int, NVarChar, or Decimal types. For example, you can create a new type and use the type to define a column in a database table.
To create a user-defined type with the .NET Framework, you must complete each of the following steps:
- Create an assembly that contains the new type.
- Register the assembly with SQL Server.
- Create a type based on the assembly.
We go through each of these steps and walk through the process of creating a new user-defined type. We create a new user-defined type named DBMovie. The DBMovie type represents information about a particular movie. The type includes properties for the Title, Director, and BoxOfficeTotals for the movie.
After we create the DBMovie type, we can use the new type to define a column in a database table. Next, we write ADO.NET code that inserts and retrieves DBMovie objects from the database.
Creating the User-Defined Type Assembly
You can create a new user-defined type by creating either a class or a structure. We create the DBMovie type by creating a new .NET class. When creating a class that will be used as a user-defined type, you must meet certain requirements:
• The class must be decorated with a SqlUserDefinedType attribute.
• The class must be able to equal NULL.
• The class must be serializable to/from a byte array.
• The class must be serializable to/from a string.
If you plan to use a class as a user-defined type, you must add the SqlUserDefinedType attribute to the class. This attribute supports the following properties:
• Format—Enables you to specify how a user-defined type is serialized in SQL Server. Possible values are Native and UserDefined.
• IsByteOrdered—Enables you to cause the user-defined type to be ordered in the same way as its byte representation.
• IsFixedLength—Enables you to specify that all instances of this type have the same length.
• MaxByteSize—Enables you to specify the maximum size of the user-defined type in bytes.
• Name—Enables you to specify a name for the user-defined type.
• ValidationMethodName—Enables you to specify the name of a method that is called to verify whether a user-defined type is valid (useful when retrieving a user-defined type from an untrusted source).
The most important of these properties is the Format property. You use this property to specify how the user-defined type is serialized. The easiest option is to pick Native. In that case, SQL Server handles all the serialization issues, and you don’t need to perform any additional work. Unfortunately, you can take advantage of native serialization only for simple classes. If your class exposes a nonvalue type property such as a String, you can’t use native serialization.
Because the DBMovie class includes a Title and Director property, it’s necessary to use UserDefined serialization. This means that it’s also necessary to implement the IBinarySerialize interface to specify how the class gets serialized.
The DBMovie class is contained in Listing 19.36.
Listing 19.36. DBMovie.cs


The class in Listing 19.36 exposes three properties: the movie Title, Director, and BoxOfficeTotals properties. The BoxOfficeTotals property is decorated with a SqlFacet attribute that indicates the precision and scale of the property value. You must include this attribute if you want to perform SQL queries that use comparison operators with this property.
The class in Listing 19.36 also includes both an IsNull and Null property. SQL Server uses a three-valued logic (True,False,Null). All SQL Server types must be nullable.
The DBMovie class also includes both a Parse() and a ToString() method. These methods are required for converting the DBMovie class back and forth to a string representation.
Finally, the DBMovie class includes both a Write() and Read() method. These methods are required by the IBinarySerialize interface. The Write() method serializes the class. The Read() method deserializes the class. These methods must be implemented because the class uses UserDefined serialization.
You need to compile the DBMovie class into a separate assembly (.dll file). After you create (and debug) the class, move the class from your App_Code folder to another folder in your application, such as the root folder. Next, open the Visual Studio 2010 Command prompt and execute the following command:
csc /t:library DBMovie.cs
This command uses the C# command-line compiler to compile the DBMovie class into an assembly.
Registering the User-Defined Type Assembly with SQL Server
After you create the assembly that contains your user-defined type, you must register the assembly in SQL Server. You can register the DBMovie assembly by executing the following command in a query window:
CREATE ASSEMBLY DBMovie
FROM 'C:DBMovie.dll'
You need to provide the right path for the DBMovie.dll file on your hard drive.
After you complete this step, the assembly is added to Microsoft SQL Server. When using Visual Web Developer, you can see the assembly by expanding the Assemblies folder in the Database Explorer window. Alternatively, you can view a list of all the assemblies installed on SQL Server by executing the following query:
SELECT * FROM sys.assemblies
You can drop any assembly by executing the DROP Assembly command. For example, the following command removes the DBMovie assembly from SQL Server:
DROP Assembly DBMovie
Creating the User-Defined Type
After you have loaded the DBMovie assembly, you can create a new user-defined type from the assembly. Execute the following command:
CREATE TYPE dbo.DBMovie EXTERNAL NAME DBMovie.DBMovie
If you need to delete the type, you can execute the following command:
DROP TYPE DBMovie
After you have added the type, you can use it just like any other SQL Server native type. For example, you can create a new database table with the following command:
CREATE TABLE DBMovies(Id INT IDENTITY, Movie DBMovie)
You can insert a new record into this table with the following command:
INSERT DBMovies (Movie)
VALUES ('Star Wars,George Lucas,12.34')
Finally, you can perform queries against the table with queries like the following:
![]()
I find the fact that you can execute queries like this truly amazing.
Building a Data Access Layer with a User-Defined Type
In this final section, let’s actually do something with our new user-defined type. We create a new data access component that uses the DBMovie class and an ASP.NET page that interfaces with the component.
Before we can do anything with the DBMovie type, we need to add a reference to the DBMovie.dll assembly to our application. In Visual Web Developer, select Website, Add Reference, and browse to the DBMovie.dll. Alternatively, you can create an application root Bin folder and copy the DBMovie.dll into the Bin folder.
Our new data access component is contained in Listing 19.37.
Listing 19.37. App_CodeDBDataLayer.cs


The component in Listing 19.37 contains two methods: GetAll() and Insert(). The GetAll() method retrieves all the Movie objects from the DBMovies database table. You can cast the object represented by the DataReader directly to a DBMovie.
The Insert() method adds a new DBMovie to the DBMovies database table. The method creates a normal ADO.NET Command object. However, a special parameter is added to the command that represents the DBMovie object.
When you create a parameter that represents a user-defined type, you must specify a UdtTypeName property that represents the name of the user-defined type. In Listing 19.37, the value DBMovie is assigned to the UdtTypeName property. When the command executes, a new DBMovie object is added to the DBMovies database table.
The page in Listing 19.38 contains a GridView, DetailsView, and ObjectDataSource control. The GridView displays all the movies from the DBMovies database table. The DetailsView control enables you to insert a new DBMovie into the database (see Figure 19.21).
Figure 19.21. Displaying and inserting DBMovie objects.

Listing 19.38. ShowDBDataLayer.aspx

Creating Stored Procedures with .NET Framework
You can use .NET Framework to build a SQL stored procedure by mapping a stored procedure to a method defined in a class. You must complete the following steps:
• Create an assembly that contains the stored procedure method.
• Register the assembly with SQL Server.
• Create a stored procedure based on the assembly.
In this section, we create two stored procedures with .NET Framework. The first stored procedure, named GetRandomRow(), randomly returns a single row from a database table. The second stored procedure, GetRandomRows(), randomly returns a set of rows from a database table.
Creating the Stored Procedure Assembly
Creating a stored procedure with .NET Framework is easy. All you need to do is decorate a method with the SqlProcedure attribute.
The method used for the stored procedure must satisfy two requirements. The method must be a shared (static) method. Furthermore, the method must be implemented either as a subroutine or as a function that returns an integer value.
Within your method, you can take advantage of the SqlPipe class to send results back to your application. The SqlPipe class supports the following methods:
• Send()—Enables you to send a DataReader, single-row resultset, or string.
• ExecuteAndSend()—Enables you to execute a SqlCommand and send the results.
• SendResultsStart()—Enables you to initiate the sending of a resultset.
• SendResultsRow()—Enables you to send a single row of a resultset.
• SendResultsEnd()—Enables you to end the sending of a resultset.
Within the method used for creating the stored procedure, you can use ADO.NET objects such as the SqlCommand, SqlDataReader, and SqlDataAdapter objects in the normal way. However, rather than connect to the database by using a normal connection string, you can create something called a context connection. A context connection enables you to connect to the same database server as the stored procedure without authenticating.
Here’s how you can initialize a SqlConnection to use a context connection:
SqlConnection con = new SqlConnection("context connection=true");
You don’t specify credentials or the location of the database in the connection string. Remember that the method actually executes within SQL Server. Therefore, you don’t need to connect to SQL Server in the normal way.
The class in Listing 19.39 contains two methods named GetRandomRow() and GetRandomRows(). Both methods use a SqlDataAdapter to fill a DataTable with the contents of the Movies database table. The GetRandomRow() method grabs a single row from the DataTable and sends it back to the client. The GetRandomRows() method sends multiple rows back to the client.
Listing 19.39. RandomRows.cs


You need to compile the RandomRows class into a separate assembly (.dll file). After you create (and debug) the class, move the class from your App_Code folder to another folder in your application, such as the root folder. Next, open the SDK Command prompt and execute the following command:
csc /t:library RandomRows.cs
This command uses the C# command-line compiler to compile the RandomRows class into an assembly.
Registering the Stored Procedure Assembly with SQL Server
After you compile the RandomRows assembly, you are ready to deploy the assembly to SQL Server. You can load the assembly into SQL Server by executing the following command:
CREATE ASSEMBLY RandomRows
FROM 'C:RandomRows.dll'
You need to supply the proper path to the RandomRows.dll assembly on your hard drive. If you need to remove the assembly, you can execute the following command:
DROP Assembly RandomRows
Creating the Stored Procedures
Now that the assembly is loaded, you can create two stored procedures that correspond to the two methods defined in the assembly. Execute the following two SQL commands:
CREATE PROCEDURE GetRandomRow AS
EXTERNAL NAME RandomRows.RandomRows.GetRandomRow
CREATE PROCEDURE GetRandomRows(@rowsToReturn Int) AS
EXTERNAL NAME RandomRows.RandomRows.GetRandomRows
After you execute these two commands, you have two new stored procedures named GetRandomRow and GetRandomRows. You can treat these stored procedures just like normal stored procedures. For example, executing the following command displays three random movies from the Movies database:
GetRandomRows 3
If you need to delete these stored procedures, you can execute the following two commands:
DROP PROCEDURE GetRandomRow
DROP PROCEDURE GetRandomRows
Executing a .NET Stored Procedure from an ASP.NET Page
After the two stored procedures have been created, you can use the stored procedures with an ASP.NET page. For example, the component in Listing 19.40 contains two methods that call the two stored procedures.
Listing 19.40. App_CodeRandomDataLayer.cs

In Listing 19.40, the GetRandomRow and GetRandomRows stored procedures are executed with the help of SqlCommand objects.
The page in Listing 19.41 contains a GridView and ObjectDataSource control. The ObjectDataSource control represents the RandomDataLayer component. When you request the page, a single random movie title displays in a Label control. Furthermore, a list of five random movie titles displays in the GridView control (see Figure 19.22).
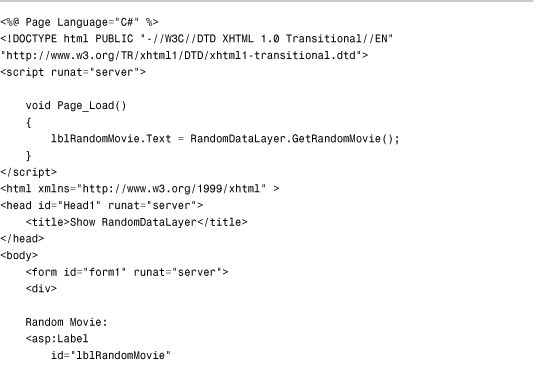
Figure 19.22. Calling a .NET stored procedure from an ASP.NET page.
Listing 19.41. ShowRandomDataLayer.aspx

Summary
This chapter provided you with an overview of ADO.NET. It described how you can use ADO.NET to represent database data with both a connected and disconnected model of data access.
In the first part, you learned how to use the Connection, Command, and DataReader objects to connect to a database, execute commands, and represent the results of a database query. You learned how to retrieve provider statistics such as command execution times. You also learned how to represent stored procedures with the Command object. Finally, you learned how to work with multiple active resultsets (MARS).
In the second part, you learned how to work with the DataAdapter, DataTable, DataView, and DataSet objects. You learned how you can perform batch updates with the DataAdapter object. You also learned how to use the DataTable object to represent and edit database rows.
Next, you learned how to improve the data access performance of your ASP.NET pages by executing asynchronous database commands within asynchronous ASP.NET pages.
Finally, you got a chance to tackle the advanced topic of building database objects with .NET Framework. You learned how you can use .NET Framework to build both user-defined types and stored procedures. For example, you learned how to insert and select a custom class from a database table by creating a user-defined type with .NET Framework.