
Steps in Setting Up AICs
Essentially you need to complete three steps to set up an AIC component:
1. |
Build the component. |
2. |
Register the component |
3. |
Deploy the component in BizTalk. |
But before we begin building the component, it would be a good idea to select a scenario to implement.
Scenario—Simulating an Update to an ERP System Using SQL Server
If you are reading this book, we assume that you have installed or will install BizTalk Server on your machine to work or play with the examples in this book. You must have SQL Server 7.0 SP2 or SQL Server 2000 to install BizTalk Server. We will use SQL Server 2000 to set up the scenario.
Although we are simulating an actual ERP system using SQL Server, the same technique can be used to interface and update an ERP system such as SAP R/3.
Hackers Den is a fast-growing software company paid by software development companies to find security holes in their software products. Currently, its HR Department manually fills out a new employee form for every new employee that joins Hackers Den. The information on the form is manually keyed into an ERP system and then manually forwarded to the IT department where an e-mail account and exchange mailbox are created. This process takes a week or so to complete, leaving the new employee sitting at his desk, staring at his computer, and dreaming of his next hacking assignment. These days the hacking business is a little slow, so with cost cutting now a priority, the CEO of Hackers Den requested that the entire process be automated to eliminate 90 percent of the traditional keying costs.
In the new scenario, a new employee fills out his personal information using a Web-based application. The application formats the employee information into an XML document and then drops that document into a file system directory. BizTalk Server is configured to pick up the message and process it through a BizTalk channel bound to a port configured with a transport of type AIC. The AIC component's job is to take the message, extract the information in it, and update the SQL Server database ADO.
The script AcctMngSys.sql creates a database in SQL Server called AcctMngSys, a simple table called UserAcctInfo, and a stored procedure called ams_CreateUser. Figure 17.3 displays a snapshot of the UserAcctInfo table. Note that the Alias column is the Primary Key in the UserAcctInfo table. The SQL script to create the AcctMngSys database objects is located in ..Chp17SQL_Scripts.
Figure 17.3. The UserAccountInfo Table in the AcctMngSys database. Note the Alias column is the Primary Key.

Now let's look at the Web application where the user fills out a New Hire form. This consists of default.htm and an ASP page CreateNewAccount.asp. These pages are located in the ..Chp17WebApp directory. A snapshot of the WebApp is shown in Figure 17.4
Figure 17.4. The WebApp that serves to take the New Hire info.

Deciding on a Schema for the Inbound Document
The Web application uses a simple XML message to send the information to the ERP system. The XML message is based on a schema named AcctMngSys_NewHire.xml. You can find the schema file in the ..Chp17Schema directory. Both the schema and an instance of the XML message are displayed in Listing 17.1.
Listing 17.1 shows the content of the schema file, as generated by BizTalk Editor. All XML documents that BizTalk processes must comply with this schema. Failure to comply causes validation failure, and your XML document lands in the Suspended Queue.
Listing 17.1. XDR Schema of the New Hire Info XML Message created by BizTalk Editor.
<?xml version="1.0"?> <!-- Generated by using BizTalk Editor on Sat, Sep 22 2001 12:25:16 PM --> <!-- Microsoft Corporation (c) 2000 (http://www.microsoft.com) --> <Schema name="UserAcctInfo" b:BizTalkServerEditorTool_Version="1.0" b:root_reference="UserAcctInfo" b:standard="XML" xmlns="urn:schemas-microsoft-com:xml-data" xmlns:b="urn:schemas-microsoft-com:BizTalkServer" xmlns:d="urn:schemas-microsoft-com:datatypes"> <b:SelectionFields/> <ElementType name="UserAcctInfo" content="eltOnly" model="closed"> <b:RecordInfo/> <element type="HEADER" maxOccurs="*" minOccurs="0"/> <element type="BODY" maxOccurs="*" minOccurs="0"/> </ElementType><ElementType name="Phone" content="textOnly" model="closed"> <b:RecordInfo/> <AttributeType name="Number"> <b:FieldInfo/></AttributeType> <AttributeType name="AreaCode"> <b:FieldInfo/></AttributeType> <attribute type="AreaCode"/> <attribute type="Number"/> </ElementType><ElementType name="Name" content="textOnly" model="closed"> <b:RecordInfo/> <AttributeType name="Last"> <b:FieldInfo/></AttributeType> <AttributeType name="First"> <b:FieldInfo/></AttributeType> <AttributeType name="Alias"> <b:FieldInfo/></AttributeType> <attribute type="First"/> <attribute type="Last"/> <attribute type="Alias"/> </ElementType><ElementType name="Level" content="textOnly" model="closed"> <b:RecordInfo/> <AttributeType name="Title"> <b:FieldInfo/></AttributeType> <AttributeType name="Code"> <b:FieldInfo/></AttributeType> <attribute type="Code"/> <attribute type="Title"/> </ElementType><ElementType name="HEADER" content="textOnly" model="closed"> <b:RecordInfo/> <AttributeType name="ReturnPort"> <b:FieldInfo/></AttributeType> <attribute type="ReturnPort"/> </ElementType><ElementType name="BODY" content="eltOnly" model="closed"> <b:RecordInfo/> <element type="Name" maxOccurs="*" minOccurs="0"/> <element type="Address" maxOccurs="*" minOccurs="0"/> <element type="Phone" maxOccurs="*" minOccurs="0"/> <element type="Level" maxOccurs="*" minOccurs="0"/> </ElementType><ElementType name="Address" content="textOnly" model="closed"> <b:RecordInfo/> <AttributeType name="ZipCode"> <b:FieldInfo/></AttributeType> <AttributeType name="Street"> <b:FieldInfo/></AttributeType> <AttributeType name="State"> <b:FieldInfo/></AttributeType> <AttributeType name="City"> <b:FieldInfo/></AttributeType> <attribute type="Street"/> <attribute type="City"/> <attribute type="State"/> <attribute type="ZipCode"/> </ElementType></Schema> |
The best way to look at the content of the schema is to open the schema file in the BizTalk Editor.
Listing 17.2 is a sample XML instance of an XML document compliant to the schema. The sample shows New User Account Info.
Listing 17.2. An XML Instance of the Message That Conforms to the Schema AcctMngSys_NewHire.xml
<?xml version="1.0" ?>
<UserAcctInfo>
<HEADER ReturnPort=""/>
<BODY><Name First="Ken" Last="Archer" Alias="ken_archer"/>
<Address Street="614 Elvis Presley Way" City="Hacker Land" State="TX"
|
Deciding on a Schema for the Outbound Document
To keep the scenario simple, we will keep the outbound schema the same as the inbound. There will be no need to do any mapping in this case because we are not transforming the incoming message.
Transport Protocol
We must now determine the transport protocol to use to deliver the message to BizTalk Server and update the SQL Server database. In this case, we will use the file system directory as the receiving location and create a simple file receiving function in the BizTalk Administration Console to process the incoming messages. We will use the AIC transport on the outbound side to update the SQL database.
The advantage of the file system protocol is that it gives you the capability to decouple the Web application from the BizTalk server. Now the server can continue to receive requests for New Hire even when BizTalk Server is down or has been configured to process messages only at a certain time of the day. The file system has no limitation on the size of the message it can receive as opposed to the MSMQ transport, which has a size limitation of 2 MB for Unicode messages, and 4 MB for ASCII messages. Microsoft is working to eliminate this restriction in the next version of MSMQ.
Implementing the System
Because this chapter is dedicated to the discussion of Application Integration Components, we will not focus on the implementation of the Web application. It should be sufficient to know that the application drops the New Hire information as an XML file onto a local file system directory. When the message is dropped into the directory, a file receive function is triggered.
Note
To learn more on how to set up a file receive function, refer to the BizTalk Server Documentation online help.
The file receive function picks up the incoming NewUserInfo message and delivers it to a BizTalk Messaging Channel. The channel then passes the message on to a messaging port. Because the inbound and outbound documents are the same, no transformation is done in the channel. The port in this case points to an AIC. The AIC takes the XML message and uses ADO to update the SQL Server database. Figure 17.5 shows the sequence of events and the names of the channel, port, and AIC used by BizTalk Server Messaging.
Figure 17.5. The sequence of processing steps and the names of the channel, port, and AIC Component used by BizTalk Server Messaging.

Building an AIC Component
As mentioned earlier, you can build an AIC component using the IBTSAppIntegration interface, the IPipelineComponent interface, or the BizTalk Scriptor Component. In the following sections, you will look at each one of them.
The IBTSAppIntegration interface is a simple COM interface that supports a single method called ProcessMessage(). ProcessMessage() has only one parameter, which is of type BSTR; BizTalk passes the interchange document to the AIC component using this parameter. The return parameter is also of type BSTR, where the method can optionally return a response if required. BizTalk publishes this interface using the type library file btscomplib.tlb. Table 17.1 shows detailed information on the interface.
| Method | Parameters/Type/Description |
|---|---|
| ProcessMessage () | The method processes a document and optionally returns a response. The BizTalk Server calls it via the port when it is ready to hand over the document. |
| Input | bstrDocument of type BSTR, containing the content of the document that is to be delivered. |
| Return | pbstrResponseDocument of type BSTR, containing an optional response document. |
The AIC component we will build has the ProgID of AcctMngSys.CreateUser. The component extracts the information from the incoming XML message and then uses ADO to create the user in the SQL Server database.
Accessing XML Content
If you have handled XML documents in your code before, you're familiar with the XML Document Object Model (DOM). DOM objects parse and load an XML document from a string or a file into memory in a hierarchical tree structure. After the XML is loaded into the DOM object, you can use DOM APIs to traverse, sort, search, read, and/or update the values on any element or attribute in the document.
The DOM is not suitable for large XML documents because it requires the entire XML document to be loaded into memory prior to processing. In addition, the parsing process consumes large CPU cycles. The Simple API for XML (SAX) is more suitable for large XML documents, given that it is event-driven and does not require that the entire document be loaded into memory.
Because documents are not first loaded into memory, SAX can parse files of any size, making it both a fast and simple-to-use technology. SAX is also useful in situations where you want to build your own data structure representation of the XML contents.
Microsoft implements both DOM and SAX technologies in msxml3.dll. MSXML3.0 was released in November 2000.
In our AIC we will use the DOM to load the incoming XML document because the incoming XML messages are small in size and most XML developers are familiar with DOM. The New Hire information is then extracted and sent to SQL Server using ADO.
Note
To learn more about XML technology and the DOM object model, refer to Chapter 2, “XML and Related Technologies.”
Developing the AcctMngSys.CreateUser AIC Using IBTSAppIntegration
The AcctMngSys.CreateUser AIC component implements IBTSAppIntegration interface and is developed in VB6. The VB Project file is AcctMngSys.vbp. The code processes the incoming New Hire user account information and then creates the user in the SQL Server database. The complete code is located at ..Chp17SourceCodeAIC_BTS.
To implement the AIC interface and reference ADO objects, you need to reference several libraries. To set these references, open the project file in Visual Basic, select the project in the project explorer, and then choose the Project menu's References option. Note, there are three references added to the project: one for Microsoft ActiveX Data Access Objects 2.5, one for Microsoft XML V3.0, and one for the Microsoft BizTalk Server Application Interface Component, as shown in Figure 17.6.
Figure 17.6. Project references for ADO, XML, and BTS application interface components.

The project contains a single class called CreateUser in the class file named CreateUser.cls. The CreateUser class implements the IBTSAppIntegration interface. We have kept the code simple. Essentially the code has two statements that call the following private functions:
| ExtractUserInfo() | The function loads the XML message in a DOM object and then extracts different pieces of the User information. |
| CreateUserAccount() | The function creates an ADO object and calls a stored procedure ams_CreateUeser. |
Now look at the code for these functions. First look at the method ProcessMessage() that the AIC exposes to accept the incoming message. Listing 17.3 shows the code for the function ProcessMessage().
Listing 17.3. The Code for Function ProcessMessage()
Option Explicit
'Implements the IBTSAppIntegration Interface
Implements IBTSAppIntegration
Private Function IBTSAppIntegration_ProcessMessage ByVal bstrDocument As String) As String
Dim strFirstName As String
Dim strLastName As String
Dim strAlias As String
Dim strPhone As String
Dim strStreet As String
Dim strCity As String
Dim strZipCode As String
Dim strState As String
Dim strLevel As String
Dim strTitle As String
Dim strPassword As String
Dim strResponse As String
On Error GoTo IBTSAppIntegration_ProcessMessage_err
ExtractUserInfo bstrDocument, strFirstName, strLastName, strAlias, strPhone, _
strStreet, strCity, strZipCode, strState, _
strLevel, strTitle
CreateUserAccount strFirstName, strLastName, strAlias, strPhone, _
strStreet, strCity, strZipCode, strState, _
strLevel, strTitle, strResponse
IBTSAppIntegration_ProcessMessage_exit:
App.LogEvent "User Account Successfully Created for User = " & strFirstName & " " &
|
The function IBTSAppIntegration_ProcessMessage() in the Listing 17.3 is the main function. The function uses many helper functions. The key is the error handling. In the event of an error, either in the helper functions or a system error, the execution jumps to the error handling code. The error handling code logs the error in the Event Log; more important is the code Err.Raise(). This signals to BizTalk Messaging that the transport AIC raised an error and the document submitted needs to be moved to the Suspended Queue.
Listing 17.4 is for the function ExtractUserInfo().
Listing 17.4. The Code for Function ExtractUserInfo()
Private Function ExtractUserInfo(ByVal strXML As String, _
                                 ByRef strFirstName As String, _
                                 ByRef strLastName As String, _
                                 ByRef strAlias As String, _
                                 ByRef strPhone As String, _
                                 ByRef strStreet As String, _
                                 ByRef strCity As String, _
                                 ByRef strZipCode As String, _
                                 ByRef strState As String, _
                                 ByRef strLevel As String, _
                                 ByRef strTitle As String)

Dim oXMLDom As MSXML2.DOMDocument
Dim oNode As IXMLDOMElement
Dim strAreaCode As String
Dim strNumber As String

On Error GoTo ExtractUserInfo_err

Set oXMLDom = CreateObject("MSXML2.DOMDocument")
oXMLDom.loadXML strXML

'Get the attribute values from the NAME Node of the XML Message
Set oNode = oXMLDom.getElementsByTagName("Name").Item(0)
strFirstName = oNode.getAttribute("First")
strLastName = oNode.getAttribute("Last")
strAlias = oNode.getAttribute("Alias")


'Get the attribute values from the ADDRESS Node of the XML Message
Set oNode = oXMLDom.getElementsByTagName("Address").Item(0)
strStreet = oNode.getAttribute("Street")
strCity = oNode.getAttribute("City")
strState = oNode.getAttribute("State")
strZipCode = oNode.getAttribute("ZipCode")

'Get the attribute values from the PHONE Node of the XML Message
Set oNode = oXMLDom.getElementsByTagName("Phone").Item(0)
strAreaCode = oNode.getAttribute("AreaCode")
strNumber = oNode.getAttribute("Number")
strPhone = strAreaCode & "-" & strNumber


'Get the attribute values from the LEVEL Node of the XML Message
Set oNode = oXMLDom.getElementsByTagName("Level").Item(0)
strLevel = oNode.getAttribute("Code")
strTitle = oNode.getAttribute("Title")

ExtractUserInfo_exit:
  Set oNode = Nothing
  Set oXMLDom = Nothing
  Exit Function

ExtractUserInfo_err:
  Set oNode = Nothing
  Set oXMLDom = Nothing

  Err.Raise 1000 + Err.Number, Err.Source & ":ExtractUserInfo", Err.Description
  Exit Function

End Function
|
The line, Set oXMLDom = CreateObject("MSXML2.DOMDocument") creates an instance of the DOM object. The second line oXMLDom.loadXML strXML loads the string strXML that contains the XML message sent to the AIC by BizTalk. The remaining lines of code get a reference to the first occurrence of Element Name and then retrieve the attribute values for First, Last, Alias and other elements.
Next look at what's happening in the function CreateUserAccount() (see Listing 17.5).
Listing 17.5. The Code for Function CreateUserAccount()
Private Function CreateUserAccount(ByVal strLastName As String, _
                                   ByVal strFirstName As String, _
                                   ByVal strAlias As String, _
                                   ByVal strPhone As String, _
                                   ByVal strStreet As String, _
                                   ByVal strCity As String, _
                                   ByVal strZipCode As String, _
                                   ByVal strState As String, _
                                   ByVal strLevel As String, _
                                   ByVal strTitle As String, _
                                   ByRef strResponse) As Boolean

  Dim oCnn As ADODB.Connection
  Dim oCmd As ADODB.Command

On Error GoTo CreateUserAccount_err

  Set oCnn = CreateObject("ADODB.Connection")

  'Note the hard coded string for the DSN Name
  oCnn.ConnectionString = "DSN=AcctMngSys;UID=sa;PWD="
  oCnn.Open
  Set oCmd = CreateObject("ADODB.Command")
  oCmd.ActiveConnection = oCnn
  oCmd.CommandType = adCmdStoredProc
  oCmd.CommandText = "ams_createUser"

  oCmd.Parameters.Refresh

  With oCmd.Parameters
    .Item("@firstName").Value = strFirstName
    .Item("@lastName").Value = strLastName
    .Item("@alias").Value = strAlias
    .Item("@phone").Value = strPhone
    .Item("@street").Value = strStreet
    .Item("@city").Value = strCity
    .Item("@zipcode").Value = strZipCode
    .Item("@state").Value = strState
    .Item("@level").Value = strLevel
    .Item("@title").Value = strTitle
  End With

  oCmd.Execute

CreateUserAccount_exit:
  strResponse = "Successfully Created the User in the ERP System"
  CreateUserAccount = True
  Exit Function

CreateUserAccount_err:
  strResponse = Err.Description
  CreateUserAccount = False
  Exit Function


End Function
|
Note that ConnectionString is hard-coded in the line (oCnn.ConnectionString = "DSN=AcctMngSys;UID=sa;PWD=") for the ADO connection object. This is a limitation of an IBTSAppIntegration AIC, in that it does not allow the component to be configured at the time of deployment. Of course, we could have put the ConnectionString into a Registry entry and read the Registry entry at runtime. You will see later how to overcome this limitation in IPipelineComponent AIC.
So now let's get back to the rest of the code in this function. The function sets up the Command object to call a stored procedure called ams_createUser. There are several advantages to using a stored procedure instead of creating a dynamic query to do this. First, stored procedures are precompiled in SQL Server and are much more efficient as well as faster. In addition, using a stored procedure allows the underlying database schema to change without affecting your application code. Writing a stored procedure in SQL Server is not that difficult. Of course, in this example we are using a simple stored procedure that inserts a record into a single table. Let's look at the stored procedure used in this example, as shown in Listing 17.6.
Listing 17.6. SQL Script for the Stored Procedure ams_CreateUser
CREATE PROCEDURE [ams_CreateUser]
@alias nchar(10),
@firstName varchar (20),
@lastName varchar(20),
@phone varchar(15),
@street varchar(50),
@city varchar(20),
@zipcode varchar(10),
@state varchar(2),
@level varchar(2),
@title varchar(50)
AS
INSERT INTO UserAccountInfo (Alias, LastName, FirstName, Phone, HireDate, Street, City
|
Deployment of IBTSAppIntegration AIC
Deployment of IBTSAppIntegration is a two-step process:
1. |
Register the AIC. |
2. |
Configure BizTalk Messaging to use the AIC. |
Registering AIC Manually Using Regedit
After you have built and compiled the AcctMngSys.CreateUser into a DLL, the next step is to register the AcctMngSys.dll as an AIC component of type IBTSAppIntegration for it to be recognized by BizTalk Server Messaging as an AIC component.
As discussed earlier in this chapter, the underlying implementation of a BizTalk Server AIC is something known as a pipeline, a technology introduced in Microsoft Site Server Commerce Edition 3.0. If you are familiar with SSCE 3.0, you know that the product comes with a pipeline editor that allows users to add components to a staged pipeline. A GUID Category ID identifies every pipeline, and another GUID Category ID identifies the different stages. In Site Server Commerce, a user can add a component to a shipping stage, subtotal stage, or check-out stage.
Similarly, BizTalk Messaging's underlying pipeline can be viewed to have a parsing stage, transformation stage, serialize stage, and transport stage. AICs implementing IBTSAppIntegration or IPipelineComponent interface are placed in the transport stage. BizTalk has a published GUID for the BizTalk Server AIC transport component. To be used as an AIC, you must identify the published GUID Category ID (40FC6ED5-2438-11CF-A3DB-080036F12502) in the component's Implemented Categories section in the Registry. This allows BizTalk Messaging to look through the Registry and discover the components that have implemented the IBTSAppIntegration or IPipelineComponent interface.
There are two ways you can register a component as an AIC to make it available to BizTalk Server. You can register it manually using regedit and/or a .reg file, or you can register it by adding it to a COM+ application.
Adding Registry Entries
When you compile your VB project for the IBTSAppIntegration component to build the AcctMngSys.dll, Visual Basic registers your component to create an unconfigured COM+ application. If you want to use an IBTSAppIntegration AIC developed by others, you can use the RegSvr32.exe utility to register the AIC Component. What VB or RegSvr32.exe utility does not do is add the additional Registry entries to make the component visible to BizTalk. To add these entries into the Registry, you first find the GUID CLSID of your AIC component and then add the two GUID Category IDs to the Implemented Key. You can create a .reg file as shown in Listing 17.7 and import it in the Registry editor.
Listing 17.7. Registry Key entries for the Implemented Categories
REGEDIT4
HKEY_CLASSES_ROOTCLSID{<Your AIC Component CLSID>}Implemented
Categories{40FC6ED5-2438-11CF-A3DB-080036F12502}
|
Now to see the Registry entries that need to be added for our AcctMngSys.CreateUser AIC component with a CLSID of {578B3C74-36D9-41FE-B0C4-18ABC3006E37}, we can edit the Registry above, specifically for our example (see Listing 17.8).
Listing 17.8. The Registry Entry Specific to the CAcctMngSys.CreateUser AIC Component
REGEDIT4
HKEY_CLASSES_ROOTCLSID{578B3C74-36D9-41FE-B0C4-18ABC3006E37}Implemented
Categories{40FC6ED5-2438-11CF-A3DB-080036F12502}
|
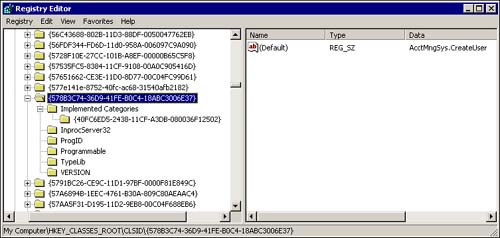
Again, your component's class ID will be different from what is in Listing 17.8. Figure 17.7 shows the Regsvr32.exe utility with the implemented categories for the AIC in the Registry.
Figure 17.7. Implemented Categories key in the Windows Registry.
Registering AIC Using COM+ Application
Life has been easy since COM+ applications. Instead of using the regsvr32 utility to create an unconfigured COM+ application, you can create a configured COM+ application using the Windows Component Services MMC and install the component into the application. BizTalk Server UI will then be able to detect the Component, and there is no need to add the Registry entries.
Putting the component in the COM+ application makes it easy to debug your AIC at runtime. The way to do this is to set the Project Property MTSTransactionMode in the VB IDE to NoTransaction instead of the default NotAnMTSObject. Next you set your break points in your code and run the component by pressing F5. When BizTalk server delivers the message to your component, it triggers the VB debugger. To be able to debug in your familiar VB IDE makes it easier for you to fix problems in your AIC, unless of course you never have to debug code that you write. The VB Add-In for Component Services automatically refreshes your component in the COM+ application with the changes you make in the IDE.
Adding a Component in Windows 2000 Component Services
To install a component in a COM+ application, you need to first install a COM+ application in the Component Services. You can access the Component Services MMC by selecting the Start button and then selecting Programs, Administrative Tools, Component Services. Next expand My Computer, right-click on the COM+ Applications, and in the Action menu select New, Application. This opens up the COM Application Installation Wizard. Walk through the installation wizard to create a COM+ application. You could use a COM+ application that someone in your group has already created; however, it is better to create one separately for your application. This way you will not be constrained in configuring your application for security, identity, and other things.
After you have installed a COM+ application, it is easy to install a COM component, in this case the AIC into the COM+ application. Expand the COM+ application by double-clicking on it and then locate the COM+ application you just installed. Expand your application by double-clicking on it; this exposes Components and Roles. First double-click on the Components and then right-click on the components, New, Component. This opens a COM Component Install Wizard. Walk through the wizard to install your component.
If you are not familiar with COM+ applications in Windows 2000, it is a good time to become so. You can take advantage of declarative programming using COM+ applications, such as enabling security, impersonation, roles, and transactions without writing a single line of code inside your component. Visit http://msdn.microsoft.com and search for COM+ Application to learn more.