
Creating AICs Using IPipelineComponent Interface
Microsoft, in its Site Server Commerce Edition 3.0, first introduced the IPipelineComponent interface. BizTalk Messaging is backward-compatible to the existing Site Server Pipeline components, through the IPipelineComponent interface. So if you have an existing IpipelineComponent, you can leverage those components in BizTalk Messaging as an AIC.
The IPipelineComponent AIC interface functionality has been enhanced by an additional interface called IPipelineComponentAdmin. This interface allows the component to be configured at the time it is deployed. It also allows the IPipelineComponent AICs to be configured differently per channel. Table 17.3 shows in detail the two interfaces IPipelineComponent and IPipelineComponentAdmin.
IPipelineComponentAdmin interface exposes two methods, GetConfigData() and SetConfigData(), as shown in Table 17.3, that give you the capability to configure the component at the time of deployment.
The IPipelineComponent interface exposes two methods, Execute() and EnableDesign(), as shown in Table 17.4. The type library of this interface is published in the pipecomplib.tlb file and is located in Program FilesCommon FilesMicrosoft SharedEnterprise ServersCommerce. The project references to include in a VB IDE for building an IPipelineComponent AIC are Microsoft Commerce 2000 Core Components Type Library and Commerce 2000 Default Pipeline Components Type Library. Now look at the IPipelineComponent interface.
| Methods | Parameters and Descriptions |
|---|---|
| Execute(ByVal pdispOrder As Object, ByVal pdispContext As Object, ByVal lFlags As Long) | The method processes the incoming document and optionally returns a response document if available. pdispOrder is a CDictionary object that contains the document to be processed and context data such as source and organization name.
pdispContext is a required parameter in the method signature but is ignored by BizTalk Server. In Commerce Server, this parameter is used to pass context information to the component. lFlags is a reserved parameter. |
| EnableDesign(ByVal fEnable As Long) | This method is used at design mode when setting properties of the pdispOrder Dictionary object. |
Comparing the IBTSAppIntegration and IPipelineComponent
The IBTSAppIntegration component method ProcessMessage() receives a single pa-rameter that contains the document to process, whereas the pipeline component method Execute() receives a CDictionary object. The dictionary contains a set of predefined name-value pairs and user-defined properties. One of the name-value pairs is the working_data, and the other is responsefield. The working_data contains the document to be processed. The component can optionally send a response back to BizTalk via the responsefield.
In addition to these two keys, the pdispOrder dictionary object contains several other keys that contain additional information on the processing context of the document, such as the source and destination organization names. Except for the Responsefield key, all others are input parameters. Table 17.5 lists the other keys in the pdispOrder dictionary object.
| Key Name | Description |
|---|---|
| Working_data | Content of the document submitted to BizTalk. |
| Doc_type | Name of the root node of the incoming document. |
| Out_doc_doc_type | Name of the root node of the outgoing document. |
| Src_ID_Type | Source organization identifier—for example, organization name. |
| Src_ID_Value | Source organization identifier value—for example, Microsoft. |
| Nbr_bytes | The size in bytes of the document. |
| Tracking_ID | ID for tracking outbound document, stored in the DTA database. |
| In_doc_key | Incoming document key stored in DTA. |
| Document_Name | Inbound document definition. |
| In_doc_trcking_id | Tracking ID for inbound document, stored in DTA database. |
| Syntax | The document standard property, Flatfile, Custom XML. |
| Dest_ID_Type | Destination organization identifier—for example, organization name. |
| Dest_ID_Value | Destination organization identifier value—for example, Compaq. |
| Submission_id | Submission ID; this can be used to track document in the Suspended queue. |
| Id_interchange_key | Interchange key stored in the DTA database. |
| Responsefield | Optionally used to return to BizTalk a response document. Useful when document is submitted using IBTSInterchange::SubmitSync() and the transport in the port is Loop-Back. |
Building IPipelineComponent AIC
One of the problems with the IBTSAppIntegration component is that it cannot be configured at the time of deployment. In our example we used a hard-coded connection string for accessing the SQL Server database. It would be great if the component could be configured at deployment. Of course, we could have stored the connection string in the Registry and modified the Registry to access different databases. In our example, the IPipelineComponent exposes the connection string as a configuration parameter.
Listing 17.9 shows you how to implement the functionality demonstrated earlier with little change to the code of the IBTSAppIntegration AIC component. This time we will construct the AIC by implementing the IPipelineComponent and IPipelineComponentAdmin interfaces. The pipeline component project is named NewHirePipeline.vbp. Open the project in VB. The project has a single class CreateUser implemented in CreateUser.cls. The source code can be found at ..Chp17SourceCodeAIC_Pipeline.
The CreateUser class implements the IPipelineComponent interface and the helper interface IPipelineComponentAdmin. Look at the two methods of IPipelineComponentAdmin interface in Listing 17.9
Listing 17.9. Getting Configuration Data
Private Function IPipelineComponentAdmin_GetConfigData() As Object
   Dim oDic As CDictionary

   Set oDic = New CDictionary
   oDic.Value("ConnectionString") = m_ConnectionString
   Set IPipelineComponentAdmin_GetConfigData = oDic

End Function
|
The GetConfigData() method creates a CDictionary object. Line three creates a new key called ConnectionString and sets its value to the value of the private data member m_ConnectionString. Finally, the function returns the oDic object.
Listing 17.10 shows the SetConfigData() method of the IPipelineComponentAdmin interface.
Listing 17.10. Setting the Configuration Data to Private Data Members
Private Sub IPipelineComponentAdmin_SetConfigData(ByVal pDict As Object)
  m_ConnectionString = CStr(pDict.Value("ConnectionString"))
End Sub
|
The SetConfigData() method is simply a reverse of GetConfigData(). The Value of the key ConnectionString from the dictionary object is assigned to the private data member m_ConnectionString.
In the private method CreateUserAccount (), the code now, instead of using the hard-coded ConnectionString, gets the value from the private data member m_ConnectionString. Listing 17.11 illustrates this.
Listing 17.11. Accessing the Private Data Member to Get the ConnectionString
Private Function CreateUserAccount(ByVal strLastName As String, _
                                   ByVal strFirstName As String, _
                                   ByVal strAlias As String, _
                                   ByVal strPhone As String, _
                                   ByVal strStreet As String, _
                                   ByVal strCity As String, _
                                   ByVal strZipCode As String, _
                                   ByVal strState As String, _
                                   ByVal strLevel As String, _
                                   ByVal strTitle As String, _
                                   ByRef strResponse) As Boolean

  Dim oCnn As ADODB.Connection
  Dim oCmd As ADODB.Command

On Error GoTo CreateUserAccount_err

  Set oCnn = CreateObject("ADODB.Connection")

  'Note the Connection string is not hard coded, but is set at design time
  'using the IPipelineComponentAdmin
  'methods GetConfigData() and SetConfigData()

  oCnn.ConnectionString = m_ConnectionString
  oCnn.Open

  Set oCmd = CreateObject("ADODB.Command")
  oCmd.ActiveConnection = oCnn
  oCmd.CommandType = adCmdStoredProc
  oCmd.CommandText = "ams_createUser"

  oCmd.Parameters.Refresh

  With oCmd.Parameters
    .Item("@firstName").Value = strFirstName
    .Item("@lastName").Value = strLastName
    .Item("@alias").Value = strAlias
    .Item("@phone").Value = strPhone
    .Item("@street").Value = strStreet
    .Item("@city").Value = strCity
    .Item("@zipcode").Value = strZipCode
    .Item("@state").Value = strState
    .Item("@level").Value = strLevel
    .Item("@title").Value = strTitle
  End With

  oCmd.Execute

CreateUserAccount_exit:
  strResponse = "Successfully Created the User in the ERP System"
  CreateUserAccount = True
  Exit Function

CreateUserAccount_err:
  strResponse = Err.Description
  CreateUserAccount = False
  Exit Function

  End Function
|
Even though we will not add any code to the EnableDesign() method of the IPipelineComponent interface, we must declare each of the methods that are part of the interface that we implement in a class. The Visual Basic 6.0 compiler enforces that the class implements all the pieces of the interface. You will get a Visual Basic Compile error if you leave this or any method out. This method is used by BizTalk to tell the component that it is running in the design mode. Listing 17.12 shows the empty function for EnableDesign().
Listing 17.12. Empty EnableDesign() Method
Private Sub IPipelineComponent_EnableDesign(ByVal fEnable As Long) End Sub |
Custom Property Pages for NewHirePipe.CreateUser Component
We must now provide a way for a user to configure the component's ConnectionString at design time. In Site Server 3.0 Commerce Edition, the pipeline component implemented yet another interface named IPipelineComponentUI to provide developers with the capability to build front-end UIs for pipeline components. BizTalk Server makes this process easier by providing the front-end to the GetConfigData() and SetConfigData() methods using two ASP pages.
The developers create two ASP pages and place them into a designated directory, ..Program FilesMicrosoft BizTalk ServerMessagingManagerpipeline. This enables BizTalk Messaging to automatically detect them at design time. You can create the ASP pages in Visual InterDev or simply in any text editor, like the universal notepad. There are some restrictions in the way the two ASP pages are named.
The two ASP pages must comply with following naming convention:
<ProjectName>_<ClassName>.asp where <ProjectName> is the name of the project in VB project, and <ClassName> is the name of the class that implements IPipelineComponent and IpipelineComponentAdmin.
<ProjectName>_<ClassName>_post.asp— The difference in the name of the two files is that in the second one, post is appended to it.
For our example, the ProgID of our AIC component is NewHirePipeline.CreateUser. So the two ASP property pages that we need to create are named NewHirePipeLine_Createuser.asp and NewHirePipeLine_CreateUser_post.asp. Both the pages have the standard includes for header and footer code. These includes are standard for all pipeline property pages.
In our example, the NewHirePipeline_Createuser.asp page looks like this:
<%@ LANGUAGE = VBScript %>
<!--#INCLUDE FILE="pe_edit_header.asp" -->

<%
        call InputText("ConnectionString")
%>
<!--#INCLUDE FILE="pe_edit_footer.asp" -->
As you can see, there are only three lines of code in the page; most of the work is done by the two include files pe_edit_header.asp and pe_edit_footer.asp. The only line I have added is the call InputText("ConnectionString"). This page prompts the user with a text box and a prompt of ConnectionString. The user input is then passed to the post page.
The ASP page NewHirePipeline_CreateUser_post.asp looks similar to the edit page.
<%@ LANGUAGE = VBScript %>
<!--#INCLUDE FILE="pe_global_edit.asp" -->

<%
        call GetInputText("ConnectionString", 0, bufsize_medium)
%>
<!--#INCLUDE FILE="pe_post_footer.asp" -->
The user-entered value for the ConnectionString is received here, and the include files have code sections to call SetConfigData() in the pipeline component.
Note
The ASP page NewHirePipeline_Createuser.asp is used to display the data to the user to set the configuration data of the AIC, in the Advanced button of the Channel Creation Wizard. The second ASP page NewHirePipeline_CreateUser_ post.asp is called by the first, to take the user's updated configuration data and persist it in the channel.
This is the same channel that delivers the data to the port. You can have multiple channels whose endpoints are the same port. Recall that the AIC is bound to the port. By configuring the AIC property for each channel, the configuration data is persisted as part of the channel. You are effectively using the same AIC with different configuration settings. Just think of the benefits in a real-world scenario—for example, Cyber Source's Tax Calculation AIC component.
The ASP page NewHirePipeline_Createuser.asp is used to display the data to the user to set the configuration data of the AIC in the Advanced button of the channel creation wizard. The second asp page NewHirePipeline_CreateUser_post.asp is called by the first, to take the user's updated configuration data and persist it in the channel.
This is the same channel that delivers the data to the port. You can have multiple channels whose end points are the same port. You recall that the AIC is bound to the port. By configuring the AIC property for each channel, the configuration data is persisted as part of the channel. You are effectively using the same AIC, with different configuration settings. Just think of the benefits in a real world scenario, for example Cyber Source's Tax Calculation AIC component.
Deploying IPipelineComponent AIC
Deploying the IPipelineComponent consists of two steps:
1. |
Registering |
2. |
Configuring BizTalk Messaging Port and Channel |
Registering IPipelineComponent AIC
Registering an IPipelineComponent is identical to registering the IBTSAppIntegration AIC component. You may choose to use the RegSvr32.exe utility to register and create an unconfigured COM+ application and then add the Category IDs using a Registry file. The choice is definitely yours; however, if you do not want to muck with the registry, the recommended way is to create a COM+ application using the Component Services and then install the IPipelineComponent into the application. Both methods of registration were discussed in the “Registering AIC Manually Using Regedit” section and “Registering AIC Using COM+ Application.”
Configuring Messaging Port
To make it simple, we will use the BizTalk Messaging setup used for the IBTSAppIntegration AIC Component in Table 17.2. We will simply swap out the IBTSAppIntegration component with the IPipelineComponent.
This can be done by editing the messaging port CreateUser in SQL Server and selecting the IPipelineComponent AIC for the primary transport. Figure 17.12 shows the port is now configured for the IPipelineComponent AIC, NewHirePipeline.CreateUser component.
Figure 17.12. Binding the port to the Pipeline Component AIC.

We have completed adding the IPipelineComponent AIC to the messaging port, but we still have to configure the component to pass a valid value for the ConnectionString at design time.
Intuitively, you would think that the property pages for the component will be available somewhere on the port where we installed the AIC component. This is not the case; in fact, the property pages are accessible through the advanced configuration of the channel. Before configuring properties using the property pages, make sure that the ASP pages are in the appropriate BizTalk Server directory, ..Program FilesMicrosoft BizTalk ServerMessagingManagerpipeline. The ASP property pages have been discussed in detail in the section “Custom Property Pages for NewHirePipe.CreateUser Component” of the chapter.
Recall from the earlier chapters that a single port can service multiple channels. By being able to set the property at the channel level, this allows us to set a unique set of properties for each document type or channel port combination.
Setting Component Properties in the Channel
The AIC component properties are set in the channel using the channel's Advanced Configuration page. Open the channel, NewHire Channel, for edit in the Hackers Den organization.
Navigate to the Advanced Configuration property page of the channel by clicking on the Next button. This is the last page on the Channel property. Figure 17.13 shows the Advanced Configuration page of the channel.
Figure 17.13. Advanced Configuration page to set channel properties.
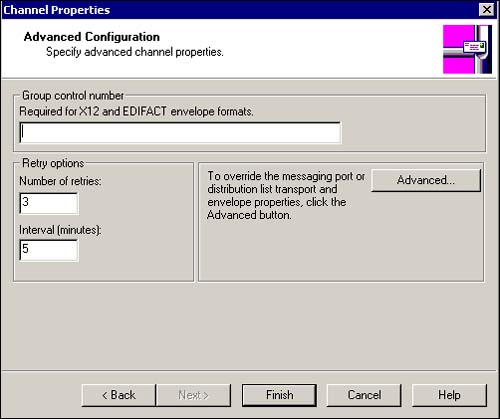
Click on the Advanced button. This takes you to the Override Messaging Port Defaults dialog box, as shown in Figure 17.14. The dialog box shows the AIC component we assigned as the primary transport in the port.
Figure 17.14. Overriding the default settings of the port.
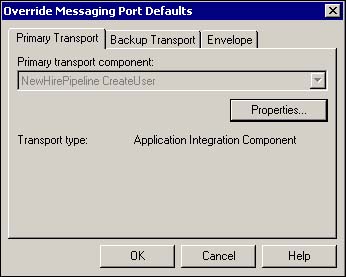
When you click the Properties button on the Override Messaging Port Defaults dialog box, you will be executing the property page NewHirePipeline_CreateUser.asp that we created and placed in the BizTalk Server messaging pipeline directory.
In our example, the page displays the dialog box with a prompt for ConnectionString, as shown in Figure 17.15.
Figure 17.15. Channel Configuration page to configure the AIC Component.

This is where you provide the configuration information for the IPipelineComponent AIC at deployment time. We defined DSN using the ODBC Data Source Administrator in the section “Running IBTSAppIntegration AIC” earlier in the chapter. You will recall that the Connection string was hard-coded in the code (refer to Listing 17.5) for our IBTSAppIntegration AIC. In the case of IpipelineComponent AIC, we are providing the configuration for the Connection string at the time of deployment. Figure 17.15 provides the connection string.
Finally, for all those “codeholics,” Listing 17.13 shows the code for the Execute() function and the rest of the code for the class NewHirePipleline.CreateUser.
Listing 17.13. Code Listing for CreateUser Class that Implements IPipelineComponent and IPipelineComponentAdmin
Option Explicit 'the component implements IPipelineComponent and 'IPipelineComponentAdmin Interfaces Implements IPipelineComponent Implements IPipelineComponentAdmin Private m_ConnectionString As String Private Sub IPipelineComponent_EnableDesign(ByVal fEnable As Long) End Sub Private Function IPipelineComponent_Execute(ByVal pdispOrder As Object, ByVal pdispContext |
Running the IPipelineComponent AIC
Once you have set up the property pages and configured the AIC as in Figure 17.15, you are ready to test. You will run this exactly the same way as you did IBTSAppIntegration AIC in the section “Running the IBTSAppIntegration AIC.”