
Message Routing
One of the most important features of BizTalk Messaging is its capability to route messages between applications. It is logical to think of the path that a message takes from its source to its final destination as the route of travel. Although this may be conceptually correct, you need to understand the mechanics of how BizTalk Server processes messages to truly understand the routing process. This leads us to the formal definition of BizTalk Server routing: Routing is the process of selecting channels and associated ports to process a message.
In the following sections, we will examine how BizTalk Server goes about selecting a channel and port for message processing. We will then discuss the various ways that you can specify the parameters required for channel selection. Finally, we will focus on a particular type of message routing known as dynamic routing.
The Channel Selection Process
When a message arrives in BizTalk Server, an algorithm known as the channel selection process is invoked. Understanding the channel selection process is the key to mastering BizTalk Server routing. Channel configurations are stored in the BizTalk Messaging database, which is typically named InterchangeBTM. When a channel is not explicitly specified by the submitter of an interchange, BizTalk Server examines each channel stored in InterchangeBTM to determine whether the channel should be executed. This process is depicted in Figure 12.21.
Figure 12.21. The channel selection process.
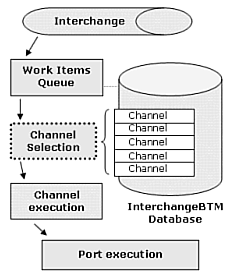
When a channel is not explicitly specified by the submitter of an interchange, there are three key pieces of information that BizTalk Server Messaging requires to select a channel:
The source organization
The destination organization
The document definition for the message
By comparing these three inputs to each channel configuration in the InterchangeBTM database, BizTalk Messaging can select the proper channel to invoke.
Note
If more than one channel matches the combination of source organization, destination organization, and document definition, all the matching channels are executed. If no channels match, the interchange is moved to the suspended queue.
What makes BizTalk Server routing interesting is that the source organization, destination organization, and document definition can be specified using a variety of techniques. These techniques are examined later in this chapter.
Note
Throughout this chapter we refer to the combination of source organization, destination organization, and document definition as routing instructions.
BizTalk Server is flexible in its capability to extract routing instructions from an interchange. Each technique for specifying routing instructions has benefits and limitations, so it is important to understand all the available options. The following list summarizes the set of effective techniques for specifying routing information in BizTalk Server:
Call-based routing
Self-routing documents
Custom receive functions
Call-based routing puts the onus on the submitter of the interchange to specify routing instructions as part of the submission call. Self-routing documents encapsulate routing instructions inside the document itself. Self-routing is discussed later as part of the more general topic of dynamic routing. Finally, custom receive functions allow you to specify routing instructions that apply to any message processed by the receive function. The following sections discuss each of these options in detail.
Call-Based Routing
Call-based routing refers to the placement of routing instructions inside the parameters of an IInterchange::Submit() (or IInterchange::SubmitSync()) function call. We've already discussed the IInterchange::Submit() parameters earlier in the chapter. This section covers how routing is affected by the various combinations of these parameters.
Call-based routing can be summarized as meaning one of two things: either the channel is explicitly specified or the sourceId, destinationId, and docName are explicitly specified. Other permutations of IIntechange::Submit() parameter values fall under the general technique of dynamic routing, discussed later in this chapter.
Explicitly Specifying a Channel Name
When a channel name is explicitly specified in an IInterchange::Submit() call, the channel is invoked regardless of the other parameters specified. There is nothing dynamic about this type of document submission. The caller is essentially saying “take this document and process it exactly as I tell you.” The channel selection process is bypassed, and the named channel is invoked. Scenario 1 of the RouteTest application demonstrates this technique and is displayed in Figure 12.22.
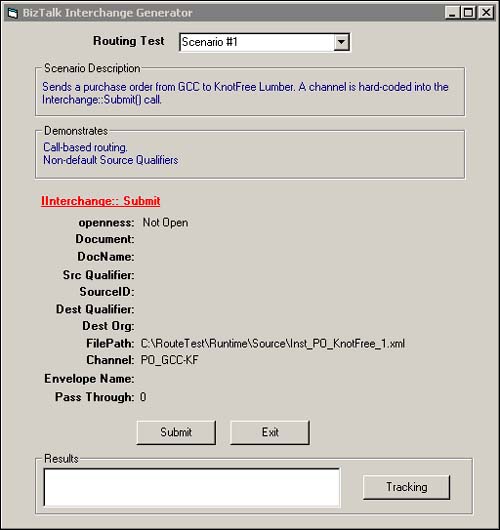
To run the scenario, select Scenario1 in the Routing Test drop-down list box and click the Submit button. If the scenario runs successfully, you will see an output document in the RouteTestRuntimeDestKnotFree directory named PO.xml.
BizTalk Server throws an error (shown in Figure 12.23) if any additional routing instructions are specified along with a channel name. This means that you must omit source, destination, and document information when specifying a channel. Scenario2 in the RouteTest example demonstrates this.
Figure 12.23. Error displayed when specifying routing information with a channel.

Figure 12.24 shows the error displayed when selecting the Submit button.
Figure 12.24. The Error dialog that appears for Scenario2.

In the next section, we will discuss how to route the same input document using the IInterchange::Submit parameters.
Specifying Routing Instructions in IInterchange::Submit()
The steps presented in the BizTalk Messaging Manager Channel Wizard provide the ability to input a source organization, document definition, and destination organization. When you invoke IInterchange::Submit() by specifying values that match those specified in a channel, BizTalk Server automatically invokes that channel and any other channel that matches the criteria.
Scenario 3, displayed in Figure 12.25, of the RouteTest application demonstrates this technique. The ChannelName parameter is left empty, but the values of DocName, SourceQualifier, SourceID, DestQualifier, and DestID match the values configured in the PO_GCC-KF channel. Therefore, BizTalk Server automatically invokes the PO_GCC_KF channel when this scenario is submitted.
Figure 12.25. Scenario 3—Specifying routing instructions.

Again, if the scenario executes successfully, the PO.xml document appears in the .RouteTestRuntimeDestKnotFree directory.
If more than one channel had matched the source, destination, and document types provided in the submit method parameters, each channel would have been invoked. This feature gives you the ability to route a document to multiple business partners and applications with a single submit call. It also gives you the ability to map the inbound document to the multiple outbound document formats with a single submit. This may seem conceptually similar to a distribution list; however, distribution lists are a little different. Distribution lists allow you to specify multiple recipients for a single inbound document and outbound document combination. You cannot perform multiple transformations, one per recipient, as you can using the channel selection process. Distribution lists are discussed in detail later in this chapter.
Note
Direct routing between applications is not supported by BizTalk Server. Routing takes place between organizations, not between the applications inside an organization. Routing between applications can be accomplished indirectly by setting up different organizations for each application. You can simulate this by creating multiple channels with the same source organization but different application names. The channel selection process will occur based on the organization name, not the application name.
Now that we understand the role that the source organization, destination organization, and the document definition play in message routing, we will take a look at how these values can be “parameterized” using self-routing documents, a technique where routing instructions are placed within the actual documents submitted to BizTalk Server. Ports and channels can also be made more dynamic and reusable by configuring them as open. In the following section, we will discuss how to dynamically route documents using open ports and channels as well as self-routing documents.
Dynamic Routing
Business circumstances may arise that require the execution of the same core business process regardless of the source and destination addresses. For example, multiple departments in a company may need to send purchase orders to one or more of the same suppliers. Each of these transactions will likely have a similar workflow and document format. Therefore, it makes sense to programmatically implement the common workflow and have the specifics of each transaction be data driven. BizTalk's dynamic routing capabilities facilitate this as well as code reuse and process abstraction, two important attributes of a well-architected system.
Figure 12.26 shows how a document flows through the BizTalk Server Messaging Engine. Within this process flow are several elements that can be “parameterized” and targeted for reuse.
Figure 12.26. BizTalk Server document processing.

There are three ways to accomplish dynamic routing:
Open source channels
Open destination ports
Self-routing documents
In the following sections, we will discuss each of these and then demonstrate how they work using the RouteTest sample application.
Open Source Channels
Open source channels allow you to specify the source organization at runtime programmatically using the IInterchange interface or inside a self-routing document. In this case, the channel selection process uses two of the three parameters, document and destination, to select the channel(s). The source organization value is not important because the channel selection process compares the two values to all channels and then selects those that are marked as open source and that have the same document and destination specified. This allows you to configure a single channel and port combination that can accept a document from multiple sources as opposed to having to construct a new channel for each source organization.
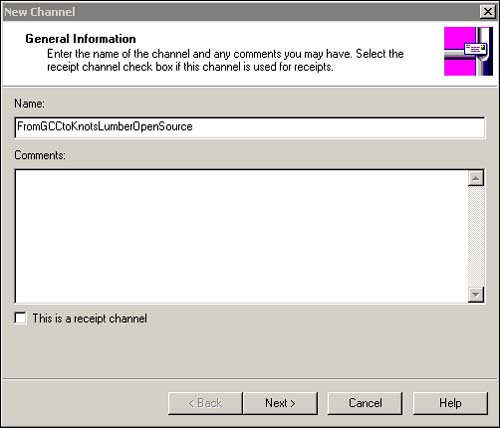
To demonstrate this concept, we have created a new channel that is connected to the same port we created earlier named PortFromGCCtoKnotsLumber. To create the new channel, open the BizTalk Messaging Manager, select the Messaging Ports hyperlink, and click Search. Select the PortFromGCCtoKnotsLumber port in the port list that appears and right-click. In the pop-up menu that appears, select the New Channel from an Organization option. In the dialog that appears, name the channel FromGCCtoKnotsLumberOpenSource as displayed in Figure 12.27.
Figure 12.27. Adding the open source channel.
Click Next and in the Channel Properties, Source Organization dialog that appears, select the Open Source radio button as displayed in Figure 12.28; then click Next.
Figure 12.28. Setting the Open property.

Next, set the inbound and outbound documents to the same values specified in the channel created earlier. The inbound document should be set to SPEC_PO_GCC, and the outbound document to SPEC_PO_KF. The outbound Channel Properties dialog prompts you for a map. Select the Map_PO_GCC-KFSelfRoute.xml map from the root WebDav directory as displayed in Figure 12.29.
Figure 12.29. Setting the map for the open source channel.

Next, click Finish. We have now configured BizTalk Messaging for an open source channel.
In Scenario 4, displayed in Figure 12.30, of the RouteTest sample application, we demonstrate the use of the open channel by specifying the destination and document name values and not the channel name. We also specify the lOpenness parameter as Open Source.
Figure 12.30. Scenario 4 of the RouteTest application.

If you do not specify the routing parameters programmatically or within the document itself, the document will fail the channel selection process and end up in the suspended queue. This is demonstrated in Scenario 5 of the RouteTest application and is shown in Figure 12.31.
Figure 12.31. Scenario 5 of the RouteTest application.

In the next section, we will discuss the concept of open ports. An open port allows you to specify the destination as opposed to the source at runtime.
Note
A channel specified as an open channel cannot be created for a messaging port specified as an open messaging port.
Open Destination Ports
Open destination ports are similar to open source channels; however, they require the destination transport address to be either programmatically specified or available in the document that is submitted. In this case, the channel selection process uses the document name and source organization name to select the channel(s) to execute by comparing those values to channels that have the same values and that are bound to open ports. It then evaluates the transport information to know how to route the document. Thus, open ports give you the ability to construct a single port that represents multiple destinations.
Note
An open messaging port can be used to transport documents only to organizations, and the encryption security properties are disabled because the destination organization is unknown. To set the encryption properties, you need to specify a certificate from a specific, known destination organization.
When you declare a messaging port as an open messaging port, you cannot create channels for the messaging port that have an X12 or EDIFACT outbound document definition. To build an X12 or EDIFACT envelope, BizTalk server must have a source and a destination organization identifier. An open messaging port does not specify a destination organization identifier. In addition, the documents for an open messaging port must have the destination address within the document, but X12 and EDIFACT documents do not contain this information.
When submitting a document to an open channel, you have the choice of submitting the destination information programmatically or within the document. If the destination information is provided in the document, the inbound document definition for that channel must reference a specification that is properly configured. If the submission parameters are used with the IInterchange interface, they override any destination and transport information contained within the document.
In many ways, the functionality of open ports may seem similar to the functionality achieved with a distribution list. There are, however, some major differences. An open messaging port differs from a distribution list in the following ways:
With an open messaging port, each document from a channel results in only one document being delivered to only one destination. With a distribution list, each document from a channel can result in the document being delivered to multiple destinations.
With an open messaging port, you do not have to change the properties of the messaging port to send information to a different trading partner organization. With a distribution list, you have to add a messaging port to send information to a different trading partner organization.
In our sample application, General Construction Company sends purchase orders to several different suppliers of raw materials, including KnotFree Lumber, Buzz Electrical Supplies, and Rigid Steel Company. Because each transaction is so similar, you can avoid having to write code for each potential supplier. Instead, you can make the process data driven by allowing BizTalk Server to route the purchase order based on either the contents of the order or by specifying an open destination port. The concept of self-routing documents will be covered in the next example. To demonstrate the ability to route a document using an open port, we need to create a new open port bound to a new channel. We cannot reuse a channel already created because a port can be bound to many channels, but a channel can be bound to one and only one port.
To create the new port, open the BizTalk Messaging Manager, select the Port hyperlink, and click Search. Then, right-click on the Port list and, in the pop-up menu that appears, select the New Messaging Port, To an Organization menu option. Name the new port FromGCCtoKnotsLumberOpen and click Next.
Note
Open ports cannot be created to an application.
In the New Messaging Port Destination Organization dialog that appears, select the Open Destination radio button as displayed in Figure 12.32 and click Next.
Figure 12.32. Creating the open port.

Then, keeping the default values in the Envelop Information dialog, click Next again. In the New Messaging Port Security Information dialog that appears, keep the default values as displayed in Figure 12.33 and click Finish.
Figure 12.33. Creating a new channel for the open port.

In the New Channel dialog that appears, name the channel FromGCCtoKnotsLumberOpenDest and click Next. Then, in the Source Application dialog that appears, select the GCC App application and click Next. The source, destination, and map properties will be configured as they have been in the previous channels. The source document should be named SPEC_PO_GCC, the destination document should be named Spec_PO_KF, and the map, Map_PO_GCC-KFSelfRoute.xml, should be selected from the WebDav root as displayed in Figure 12.34.
Figure 12.34. Selecting the map for the new open destination channel.

Next, click Finish allowing the remainder of the wizard steps to keep their default properties.
To test the configuration of the open port, we need to first learn a little about self-routing documents. In Scenario 7 of the RouteTest example, we will use the self-routing capabilities of BizTalk Server to execute the open port we just created.
Self-Routing Documents
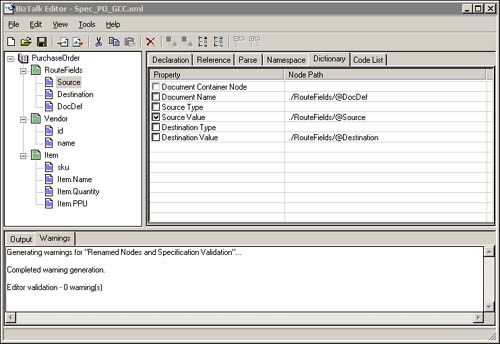
Self-routing documents encapsulate all the information required by BizTalk Server to achieve dynamic routing. The source organization, destination organization, and document definition can each be discovered by BizTalk Server's Messaging Engine during the parsing of the document. Different types of documents have different ways of communicating routing instructions. Therefore, the location of routing instructions within a document is specified during the creation of its associated BizTalk specification in the BizTalk Editor using the Dictionary tab.
In the RouteTest examples, the GCC purchase order named SPEC_PO_GCC contains the routing instructions. The routing instructions are contained within the fields in the RouteFields record. To set the routing values, open the SPEC_PO_GCC specification and navigate to the Dictionary tab for the RouteFields fields. Then set the values as displayed in Figure 12.35.
Figure 12.35. Dictionary tab of BizTalk Editor for the GCC purchase order.
In this case, we are going to use three fields in the XML document to represent the routing parameters. Each of the fields needs to be set in the Dictionary tab to their appropriate routing properties. The Source field in the RouteFields record is set equal to the Source Value in the Dictionary tab (refer to Figure 12.35). The Destination field is set to the DestinationValue property, as displayed in Figure 12.36, and the DocDef field is set to the DocumentName property, as shown in Figure 12.37.
Figure 12.36. Setting the destination value in the Dictionary tab.

Figure 12.37. Setting the DocDef property in the Dictionary tab.

In the previous examples, the RouteFields were present in the XML purchase order schema, but no values were supplied for them in the XML purchase order instance. In Scenarios 6 and 7, we will specify routing parameters using two new example purchase order instance files, Inst_PO_SelfRoute.xml, displayed in Listing 12.6, and Inst_PO_SelfRouteFile.xml, shown in Listing 12.7.
Listing 12.6. The Inst_PO_SelfRouteFile.xml File
<PurchaseOrder>
<RouteFields Source="General Construction Company"
Destination="file://c:
outetest
untimedestknotfreePOSelfRoute.xml"
|
Listing 12.7. The Inst_PO_SelfRoute.xml Purchase Order Instance
<PurchaseOrder>
    <RouteFields Source="General Construction Company" Destination="Knots
Lumber" DocDef="Spec_PO_GCC"></RouteFields>
    <Vendor id="3005" name="Knotfree Lumber"/>
    <Item sku="1425A3X">
        <Item.Name>Pine 2x4x10</Item.Name>
        <Item.Quantity>75</Item.Quantity>
        <Item.PPU>1.20</Item.PPU>
    </Item>
    <Item sku="1847B2Z">
         <Item.Name>Cedar TG</Item.Name>
         <Item.Quantity>120</Item.Quantity>
         <Item.PPU>4.59</Item.PPU>
    </Item>
</PurchaseOrder>
|
Two remaining scenarios demonstrate both the power of self-routing documents and that of open channels and ports. Scenario 6 demonstrates the capability to submit a self-routing document that contains the routing information required to select the open source channel. The only two parameters specified in the scenario are the lOpenness parameter, which is set to True, and the document name parameter, which now reads the Inst_PO_ SelfRouteFile.xml document. Figure 12.38 displays Scenario 6.
Figure 12.38. Scenario 6—Self-routing documents with the open source channel.

To run the scenario, select it in the Routing Test drop-down list box and click the Submit button. If the scenario runs successfully, you will see an output document in the RouteTestRuntimeDestKnotFree named PO.xml.
Scenario 7 of the Route Test example demonstrates the open port configured earlier and is displayed in Figure 12.39.
Figure 12.39. RouteTest Scenario 7—Self-routing document example.

Scenario 7 passes only two parameters to the IInterchange::Submit() method, lOpenness, which is set to Open Destination, and the name of the file to submit, which in this case is Inst_PO_SelfRouteFile.xml, displayed earlier in Listing 12.7. Note the RouteFields in the following code example. In this scenario, the RouteFields must contain the destination transport information if the channel selection process is to successfully execute a channel connected to an open port.
<RouteFields Source="General Construction Company" Destination="file://c: outetest untimedestknotfreePOSelfRoute.xml" DocDef="Spec_PO_GCC"></RouteFields>
To run the example, select Scenario7 in the drop-down list box and click the Submit button. If the scenario executes successfully, a file named POSelfRoute.xml should be placed in the RouteTestRuntimeDestKnotFile directory.
Each of the scenarios we have discussed assumes a programmatic submission of the instance document using the IInterchange interface. We also have the option of using a receive function. In the next section, we will discuss how to create and set the properties required to implement dynamic routing with a BizTalk receive function.
Configuring Receive Functions for Dynamic Routing
You can configure a single receive function that handles non-self-routing documents to receive a specific type of document from multiple sources better known as open source scenario. The location of the source organization, the destination organization, and the document definition information must be in the document or in parameters submitted along with the document.
For example, in the RouteTest open source Scenario6, we configured BizTalk messaging to receive an XML purchase order from multiple undefined sources using an open source channel and the IInterchange::Submit method. BizTalk Server parsed the document to read the document name and destination values to route the XML document.
We could also configure a receive function to accomplish the same results by setting the document definition and destination organization identifier properties in the receive function properties dialog. When BizTalk Server parses the document, it recognizes that the source is open and then combines this information with the parameters set in the receive function, to find the correct channel, and then processes the document.
To configure this example, open the BizTalk Administration console and navigate to the Receive Functions folder under the BizTalk Server Group as displayed in Figure 12.40.
Figure 12.40. Configuring a receive function for dynamic routing.

Next, right-click on the Receive Functions folder, and in the pop-up menu that appears, select New, File Receive Function from the menu. In the Add a File Receive Function dialog that appears, configure the properties as displayed in Figure 12.41.
Figure 12.41. Configure the Add a File Receive Function dialog.

Next, select the Advanced tab. In the Advanced Receive Function Options dialog that appears, configure the properties as displayed in Figure 12.42.
Figure 12.42. The Advanced tab properties on the file receive function.

We are now ready to run the RouteTest application. To run the application, make a copy of the Inst_PO_KnotFree_1.xml document from the RouteTestRuntimeSource directory and place it into the RouteTestRuntimeSourceFileOut directory. If the example executes successfully, you should see an instance of the PO.xml file located in the RouteTestRuntimeDestKnotFree directory.
Channel Filtering
BizTalk Messaging routes documents using the channel selection process. The channel selection process relies on the document name, source and destination values to select a channel, or group of channels to execute. To provide a more granular approach to channel selection, BizTalk Messaging also gives you the ability to apply a channel filter. Channel filtering enables a developer to build a filtering expression that facilitates content-based channel selection based on the value of a field or fields within the document. The Expression property contains an XPath expression that evaluates to a Boolean value. If the expression evaluates to true, the channel is used to process the document. Otherwise, the channel is not invoked to process the document.
Note
A channel filter is applied to only those documents that pass the normal channel selection process.
XPath expressions can be used to obtain the value of a specific element, attribute, or collection of these items within an XML document. Consider the following XML document:
<PurchaseOrder>
    <Vendor id="3005" name="Knotfree Lumber"/>
    <Item sku="1425A3X">
        <Item.Name>Pine 2x4x10</Item.Name>
        <Item.Quantity>75</Item.Quantity>
        <Item.PPU>1.20</Item.PPU>
    </Item>
    <Item sku="1847B2Z">
        <Item.Name>Cedar TG</Item.Name>
        <Item.Quantity>120</Item.Quantity>
        <Item.PPU>4.59</Item.PPU>
    </Item>
</PurchaseOrder>
Based on this document, the following XPath expression can be created to ensure that this channel only processes purchase orders that contain an item named TG:
myChannel.Expression = "/PurchaseOrder/Item/Name[@VALUE=""TG""]"
In the RouteTest example, we created three channels. Let's now modify the PO_GCC-KF channel to incorporate a channel filter. To accomplish this, open the BizTalk Server Messaging Manager, select the Channels hyperlink, and click Search Now. Then select the PO_GCC-KF channel in the channel list and right-click. In the pop-up menu that appears, select the Edit menu option and then navigate to the Channel Properties Inbound Document Wizard dialog as displayed in Figure 12.43.
Figure 12.43. Setting the channel filtering option on a channel.

Next, check the Filter Inbound Document check box and select the Filtering button. In the Channel Filtering Expressions dialog that appears, navigate to the Item tree member and double-click to see its subfields. Then select the Item.name field and click the Add button as displayed in Figure 12.44.
Figure 12.44. Creating the channel filter.

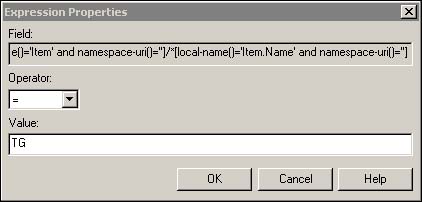
In the Expression Properties dialog that appears, enter the TG in the Value field as displayed in Figure 12.45 and click OK.
Figure 12.45. The channel expression properties.
Click OK again to save the filter and click Finish to save the modifications to the channel.
You have now successfully created a channel filter.
Note
The RouteTest example does not contain a scenario that tests this channel filter, but you can do so yourself by running Scenario1 and modifying the Inst_PO_ KnotFree_1.xml inbound document to contain items named TG and not named TG.
Distribution Lists
A distribution list is a group of messaging ports with which you can send the same document to several different trading partner organizations or internal applications. For example, you can send the same catalog, price list, or newsletter to several trading partner organizations by submitting the information only once to Microsoft BizTalk Server 2002.
You must first create a messaging port to each of the trading partner organizations or internal applications that you want to receive the data and then add the messaging ports to a distribution list. Open messaging ports cannot be added to a distribution list. You can create new messaging ports to additional trading partner organizations or internal applications and then add those messaging ports to an existing distribution list.
You must create at least one channel for each distribution list, or else the distribution list is not functional.
When BizTalk Server 2002 invokes a channel related to a distribution list, it invokes only the channel associated with the distribution list to process the data. None of the channels associated with the individual messaging ports in the distribution list are invoked. The server uses the properties of each messaging port successively to transport the data to the destinations specified in the messaging ports.
Again this may seem similar in nature to an open messaging port; however, there are some major differences. A distribution list differs from an open messaging port in the following ways:
With a distribution list, each document from a channel can result in the document being delivered to multiple destinations. With an open messaging port, each document from a channel results in only one document being delivered to only one destination.
With a distribution list, you have to add a messaging port to send information to a different trading partner organization. With an open messaging port, you do not have to change the properties of the messaging port to send information to a different organization.