
Adding AIC to BizTalk Messaging
Up to now we have built the AIC and have appropriately registered the AIC either using the RegSvr32 utility and manually adding the Category IDs, or by creating a COM+ application and installing the component into the application. The next step is to add the component to the BizTalk messaging port.
To complete the example, we will set up an organization including an application, a document definition, a channel, port, and a receive function. Finally, we will configure the component to the messaging port.
BizTalk Messaging Setup
In the BizTalk Messaging Manager, we will create an organization called Hackers Den and an internal application named NewHireApp. We will also create a document definition, port, channel, and a file receive function, as shown in Table 17.2.
Table 17.2 details the property settings for the BizTalk Messaging objects used in this example. Only those properties that you need to explicitly set are shown on the table. You can leave the other properties to their default settings. The section “Configuring the BizTalk Messaging Port” walks you through the port and the channels to make sure that you are on the right track.
Note
For details in creating the organization, document definition, port, channel, and receive function, refer to Chapter 6, “Introduction to BizTalk Messaging,” and Chapter 7, “Using the BizTalk Messaging Manager.”
We are using only one document definition, because our inbound and outbound documents are the same. Also there is no need for a mapping file because we are not doing any transformation in the channel.
Configuring the BizTalk Messaging Port
The following steps walk you through setting up the BizTalk Messaging Port and configuring it for adding the AIC component we developed. Open the BizTalk Messaging Manager and create a new port to an application, as specified in Table 17.2.
Note
We have created a COM+ applicati on called Hackers Den, using the component services, and have added the AIC component. You can name your COM+ application anything you want. A server application runs your component in a separate process. Any ill-behaved component will not crash the callers.
1. |
Select the destination Application on Destination Application page. Figure 17.8 shows the Destination Application page of the Messaging Port Wizard. Figure 17.8. Selecting a destination application.
|
2. |
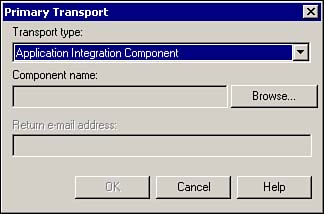
To specify the primary transport type, click on the Browse button, as shown in Figure 17.9. This takes you to a page where you select the Transport Types. Figure 17.9. Selecting the Application Integration Component as the transport type.
|
3. |
From the Transport Type drop-down list, select Application Integration Component as shown in Figure 17.9. |
4. |
Click the Browse button on the Primary Transport dialog as shown in Figure 17.9. At this point, the BizTalk UI scans the COM+ applications and determines the applications that have implemented IBTSAppIntegration interface. The next step is to specify which Application Integration Component will be attached to this port. Figure 17.10 shows the list of the AICs BizTalk has determined to have been registered in the machine. |
5. |
Select AcctMngSys.CreateUser
AIC component from the list as shown in Figure 17.10. When you click OK, the AIC component will be attached to the port. The attached AIC now appears in the Primary Transport of the Messaging Port, as shown in Figure 17.11. Figure 17.11. The Messaging Port now bound to the AIC Component AcctMngSys.CreateUser.
|


Tip
What could go wrong?
You do not see your AIC Component listed in Figure 17.9 or, worse, you see it listed more than once.
There are two possible reasons why you might not see your AIC. First, you forgot to register the component or to install the component in the COM+ application. Second, if you used regsvr32.exe to register the AIC component, you might have forgotten to add the Implemented Categories ID into the Registry for the component.
I strongly recommend that you install your AIC in the COM+ applications and not bother with the Registry. The topic was discussed to show you what goes on under the hood.
You can see and select the AIC component, but you get an error when you try to click Finish in the BizTalk Messaging Port Wizard.
This error occurs when the BizTalk Messaging Port attempts to bind the port to the AIC. You might have installed the AIC in the COM+ application and have decided to run the component as a specific user under the identity tab rather than the interactive user (this is by default). Either the username or the password is not valid. It is a good practice to install the AIC component as a specific user; this way your component will function even if no one is logged into the machine.
Running the IBTSAppIntegration AIC
The Web application front-end takes New Hire information, formats the information into an XML file, and drops the file onto file system directory c:NewHireinput. Please create the directory when you are ready to run the example. A file receive function, NewHireRecvFunc, is configured to pick all files with an extension of *.xml from this location. The receive function then delivers the content of the file to the BizTalk channel, NewHire. The channel then delivers the document to the port, CreateUser in SQL Server. The port is configured to send the message to the AIC, AcctMngSys.CreateUser. The AIC creates a New User in the SQL Server. In our example, the SQL Server represents an ERP system.
When the application is run, it drops the NewUserInfo.xml file into the c:NewHireinput folder. If everything is configured correctly, the New User is created in the SQL Server database.
For the AIC to work correctly, you need to set up a System DSN (Data Source Name) on your machine to access the database AcctMngSys. Recall in Listing 17.5 that the Connection string for the AIC was hard-coded as
oCnn.ConnectionString = "DSN=AcctMngSys;UID=sa;PWD="
Using the ODBC Data Source Administrator, create a system-level DSN to point to the AcctMngSys database. The system-level DSN allows all users of the system to use the DSN.
To test the application, run the Web application, as shown earlier in Figure 17.4, several times, each time changing the Alias field and other information. Remember the Alias field is the Primary Key and must be unique. To run the WebApp, you need to have Internet Information Server and need to configure a virtual directory using the Internet Service Manage MMC to point to the ..Chp17WebApp directory where the default.htm and CreateNewAccount.asp files have been provided.
Alternatively, you can copy and drop the Test_NewUserInfo.xml file into the directory. This sample test file is provided in the directory ..Chp17input.
Limitations
In summary, the IBTSAppIntegration AIC components interface is simple and easy to implement. However, it has a couple of limitations:
There is no way to pass additional parameters to the AIC, other than the document content itself. Of course, we can extend the schema of the XML document and pass additional information to the ProcessMessage() method. You will recall that the ConnectionString in the component's CreateUser() function was hard-coded.
The other limitation is that the IBTSAppIntegration components are not aware of the context of the document they are processing. For example, there is no way to know the source or destination organization or any of the tracking data.
We will soon see how IPipelineComponent can overcome these limitations.
To verify that the AIC component was successfully executed, open the SQL Server Enterprise Manager and expand the AcctMngSys database. You should see the New User entry in the UserAccountInfo table.