
DTC Style Transactions
The next example looks at a DTC style, short-lived, transaction. The schedule we will be working with looks as shown in Figure 13.11.
Figure 13.11. SimpleTxn.skv business process.

Figure 13.11 shows a schedule with a DTC style transaction. As you work through this example, you also see the following:
How a COM+ configured component participates in a transaction
How the transaction retries and the back-off timing mechanism works
How the schedule manages state
How the message specification page in the XML Communication Wizard is used and the use of XPath expressions
How to create MSMQ queues and post messages to it programmatically
Description of SimpleTxn.skv Example
The first action in the schedule shown in Figure 13.11, Get first doc, reads a document from an MSMQ queue .private$Port_1. The flow then enters a transaction named TxnGetDoc. Inside the transaction, the action Get second doc reads another document from the queue. The documents each have the message type of CommonPO. Each message is read into the same message in the schedule called msgCommonPO.
The next action, called Optionally abort, is connected via Port_2 to a component called AdvOrchTxn.CAbortTxn. This component has a single method that, when called, asks the user to interactively abort or commit the transaction. If the transaction is aborted, the message read from the MSMQ queue is returned to the queue.
The last action, called Show recv'd doc, actually displays the received document. It uses the component AdvOrchUtil.CMsg created in the previous section.
We will create a script to create the MSMQ queue and deliver documents into it. We will also create the component AdvOrchTxn.CAbortTxn. Both these activities are described in a later section. The next section describes the construction of the schedule itself.
The example shows how TxnGetDoc affects the behavior of the schedule and the messages flowing through it.
Building SimpleTxn.skv—Binding to Queue
First create the business process shown in Figure 13.11. This creates the actions, the short-lived transaction enclosing the two actions and the linear process path from the Begin to End shapes. We will set the specific properties of the transaction later. See Chapter 9 on how to build a business process.
Next, create the Port_1 using the MSMQ queue port implementation. This is a static queue, common to all instances. The private queue name is Port_1. On the last page of the Message Queuing Binding Wizard, ensure that you select transactions required for the queue.
Now you can start the XML Communication Wizard by connecting the first action to Port_1. Choose to receive a message; allow for enough latency for the schedule to dehydrate, say 400 seconds. Name the message msgCommonPO. Choose to receive XML messages and specify the message type as CommonPO. On the last page of the wizard, also specify the document specification and enable document validation, as described later.
The document specification for CommonPO is provided with the product and is located at Program FilesMicrosoft BizTalk ServerBizTalkServerRepositoryDocSpecsMicrosoftCommonPO.xml. You can copy it over to the same directory as your schedule is in for ease of use. You also need a document instance of this specification; there is one handy at Program FilesMicrosoft BizTalk ServerSDKMessaging SamplesBTSAppIntegrationVBDoc_CommonPO.xml. Copy this file also into the current directory to make life easy later. You can see the structure of the document instance by viewing it in the Internet Explorer.
Figure 13.12 shows the last page of the XML Communication Wizard.
Figure 13.12. Message specification for msgCommonPO in SimpleTxn.skv.

By default, only two fields are created for an XML message. One is the system field __Sender__, which contains the authenticated identity of the sender in the form of an SID, and the other is the Document field containing the entire document. We will need another field for this example. The value of this field is used to demonstrate how state is handled with transactions. You also see an example of how an XPath expression is used to add fields to messages on the Data page.
On this last page of the wizard, after specifying the CommonPO.xml document specification and selecting the Validate Messages Against the Specification check box, click the Add button. This brings up the Field Selection dialog box. The document schema is shown in a tree form. Traverse the nodes of the tree as indicated by the XPath expression /CommonPO/Item/ItemHeader/@Quantity. When you select the leaf node, Quantity, the Node Path and Field Name text boxes are populated. At this point, edit the XPath expression to read /CommonPO/Item[3]/ItemHeader/@Quantity. This XPath expression states that we are interested in the third Item in the document. Close the dialog box and complete this wizard step.
This additional field is named Quantity, and we use the value of this field to determine and show which document has been retained in the schedule.
Note
The message specification path shown in Figure 13.12 is the path during schedule development. This path will need to be modified for your machine. This also applies if you download the schedule from the publisher's Web site.
Configuring TxnGetDoc Transaction
Inside the transaction TxnGetDoc, shown in Figure 13.11, the second action makes a synchronous call to the method AskToAbort of the COM+ configured component AdvOrchTxn.CAbortTxn. This component is simple; it displays a message box and asks whether you want to abort the transaction. For this example, we always choose to abort the transaction. This component is developed in the next subsection.
The properties of the transaction are set as shown in Figure 13.13.
Figure 13.13. Properties of the transaction TxnGetDoc.

In Figure 13.13, note that Timeout is 60 seconds. If you do not respond to the dialog box in that time, the transaction automatically aborts. The Retry Count is 3, and the Backoff Time is 3 seconds. This means that the first retry should occur in 3 seconds, and the subsequent attempts should be successively at 9 (3 ** 2) and 27 (3 ** 3) seconds.
Building the Data page for SimpleTxn.skv
The last action of the schedule in Figure 13.11 makes a synchronous call to the method ShowMsgBox of the component AdvOrchUtil.CMsg developed in Listing 13.1. Using this call, we show the Quantity field of the msgCommonPO and the port reference for the Port_1 MSMQ queue. The Data page appears as shown in Figure 13.14.
Figure 13.14. SimpleTxn.skv data page.

As Figure 13.14 shows, the Data page is simple. We will look at the value of msgCommonPO.Quantity shown by the message box. The port reference for an MSMQ queue is used for demonstration only. Note that the message AskToAbort_* has no fields other than the built-in system fields. The transaction is managed using built-in COM+ support. This is what we will look at next.
Building AdvOrchTxn.CAbortTxn Component
Listing 13.7 contains the entire code for the AdvOrchTxn.CAbortTxn class. There are a few embellishments from Listing 13.1; otherwise, the only thing new is the procedure AskToAbort().
Listing 13.7. Code for AdvOrchTxn.CAbortTxn.cls
Option Explicit Private Declare Sub OutputDebugString Lib "kernel32" Alias "OutputDebugStringA" (ByVal |
In the Listing 13.7, the Trace procedure is augmented to display a time stamp; this allows you to verify the backoff and retry mechanism.
To implement the procedure AskToAbort, we have to add a reference to the COMSVCS.DLL; this is listed as the COM+ Services Type Library under project references. Using this, we get a reference to the COM+ object context. Using this object context, we first check whether the component is being called in the context of a transaction. If it is, then we ask whether the user wants to abort or allow the transaction to commit. Finally, we either abort or commit the transaction and generate a trace for the action taken.
The class CAbortTxn is set to UsesTransaction. Compile the DLL and install it in a COM+ server application, say TestCOM+ App, discussed in Figure 13.4.
Script to Create and Send Messages to the Queue
Now we need a way to create and stuff the queue with two distinct messages but conform to the CommonPO document schema. The two documents should have a different value for the Quantity attribute of the third Item. Recall that we set the XPath expression to extract this item in the message field. This task of creating and sending the message is done using the RunSimpleTxn.vbs Visual Basic script shown in Listing 13.8.
Listing 13.8. RunSimpleTxn.vbs
Option Explicit
On Error Resume Next

' Constants
Const sQueuePath = ".private$Port_1"
Const sDocName = "Doc_CommonPO.xml"
Const MQ_SEND_ACCESS            = 2
Const MQ_DENY_NONE                      = 0
Const MQ_SINGLE_MESSAGE         = 3

Dim oMQInfo, oQ
OpenMSMQQueue

Dim sPath, sFile
sPath = WScript.ScriptFullName
sPath = Mid(sPath, 1, InStrRev(sPath, ""))
sFile = sPath & sDocName

Dim xmlDoc
Set xmlDoc = CreateObject("MSXML2.DOMDocument")
xmlDoc.setProperty "SelectionLanguage", "XPath"
xmlDoc.load sFile

Dim oMsg
Set oMsg = CreateObject("MSMQ.MSMQMessage")

xmlDoc.SelectSingleNode("//Item[3]/ItemHeader/@Quantity").text = "44"
oMsg.Body = xmlDoc.xml
oMsg.Label = "CommonPO"
oMsg.Send oQ, MQ_SINGLE_MESSAGE

xmlDoc.SelectSingleNode("//Item[3]/ItemHeader/@Quantity").text = "55"
oMsg.Body = xmlDoc.xml
oMsg.Label = "CommonPO"
oMsg.Send oQ, MQ_SINGLE_MESSAGE

oQ.Close

Sub OpenMSMQQueue
    On Error Resume Next

    Set oMQInfo = CreateObject("MSMQ.MSMQQueueInfo")
    oMQInfo.Label = ""
    oMQInfo.PathName = sQueuePath
    oMQInfo.Refresh
    if Len(oMQInfo.Label) = 0 then
        oMQInfo.Label = "BTS Unleashed: Adv Orchestration"
        oMQInfo.Create True, True ' transactional and world readable
    end if

    Set oQ = oMQInfo.Open(MQ_SEND_ACCESS, MQ_DENY_NONE)
End Sub
|
In Listing 13.8, skipping past the preamble of defining constants, the first action is opening the .private$Port_1 queue to send messages. This is done by calling the procedure OpenMSMQQueue. The queue is created, if not found, and as a transactional queue that everyone can read from. This procedure sets the variable oQ as a reference to this queue.
The next four statements calculate the full path of the document instance to use to create the messages in the queue. You should have already copied the document instance to the current directory.
Prior to stuffing the queue with the message, we use the XML DOM to manipulate the value of the Quantity in the third Item to be "44" for the first document and "55" for the second document. Finally, we load an MSMQ message, oMsg, with the modified document and stuff it into the queue. Each document is also labeled CommonPO.
Running the SimpleTxn.skx Schedule
If you start the schedule first, without creating the queue, it will failfast with an event log entry for XLANG Scheduler, category WFBinding, stating that the queue Port_1 is not present. You could start the schedule after manually creating the MSMQ queue and see the schedule dehydrate. Alternatively, you could run a subset of the RunSimpleTxn.vbs script from Listing 13.8, as shown in Listing 13.9.
Listing 13.9. CreateQueue.vbs
Option Explicit
On Error Resume Next

' Constants
Const sQueuePath = ".private$Port_1"

Dim oMQInfo
Set oMQInfo = CreateObject("MSMQ.MSMQQueueInfo")
oMQInfo.Label = ""
oMQInfo.PathName = sQueuePath
oMQInfo.Refresh
if Len(oMQInfo.Label) = 0 then
    oMQInfo.Label = "BTS Unleashed: Adv Orchestration"
    oMQInfo.Create True, True ' transactional and world readable
end if
|
For this example, create the queue first by using the CreateQueue.vbs script from Listing 13.9.
You run a script by either using the right mouse menu and selecting Open with Command Prompt or running the script using the CScript or WScript engines. If you were to run the script RunSimpleTxn.vbs and look under the Private Queues in the Message Queuing management console, you would see the port_1 queue. In the Queue Messages under this queue, you would also see the two messages present in the queue. The Message Queuing management console is available under the Computer Management and Services and Applications MMC snap-ins. However, we will run the RunSimpleTxn.vbs script only after starting the schedule, to deliver the messages to the queue.
So, the steps are to create the queue using CreateQueue.vbs script, run the SimpleTxn.skx schedule, and then send messages to the queue using RunSimpleTxn.vbs script.
Open the Component Services management console and view the node Transaction List under the Distributed Transaction Coordinator to see which transactions are flowing through the system. Also, start the XLANG Event Monitor and the DbMon debug monitor application. Run the schedule using the event monitor. Notice that the schedule soon dehydrates waiting for messages. Now run the RunSimpleTxn.vbs script.
You should see the schedule consume the messages in the queue. It also asks whether you want to abort the schedule; for this example, choose Yes. With the Retry Count set to 3, you will get three prompts. The resulting trace is shown in Figure 13.15. The trace contains all events; nothing is filtered out.
Figure 13.15. Schedule execution trace for SimpleTxn.Skx.
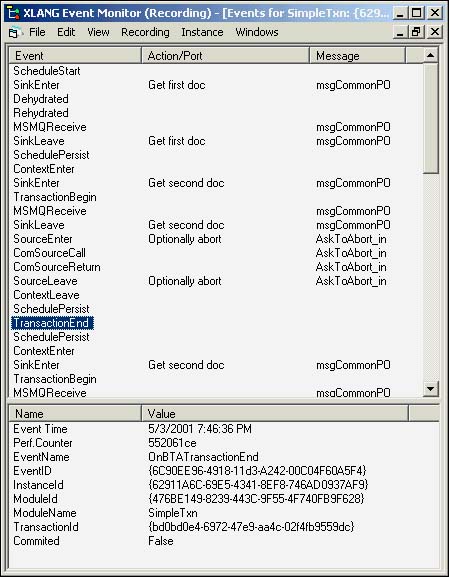
Looking at the events for the schedule SimpleTxn.skx in Figure 13.15, you can see that the schedule dehydrates soon after attempting to get the first document. When the script stuffs the queue with a document, the schedule is rehydrated by the engine. The event MSMQReceive denotes a message being read in by the schedule. The event ContextEnter denotes that the schedule is entering the transaction context. Just prior to this event, note that the schedule trace displays the SchedulePersist event. This denotes that the state of the schedule is checkpointed before attempting the transaction. The transaction is aborted. The highlighted event, TransactionEnd, shows that the transaction was in fact not committed (see the last line in the bottom pane).
Listing 13.10 displays the entire execution trace as seen in the DbMon console.
Listing 13.10. DbMon Execution Trace for Schedule SimpleTxn.skx
580: 7:46:55 PM:AdvOrchTxn.CAbortTxn: Class_Initialize() 580: 7:46:59 PM:AdvOrchTxn.CAbortTxn: AskToAbort(): Aborted! 580: 7:46:59 PM:AdvOrchTxn.CAbortTxn: Class_Terminate() 580: 7:47:03 PM:AdvOrchTxn.CAbortTxn: Class_Initialize() 580: 7:47:05 PM:AdvOrchTxn.CAbortTxn: AskToAbort(): Aborted! 580: 7:47:05 PM:AdvOrchTxn.CAbortTxn: Class_Terminate() 580: 7:47:14 PM:AdvOrchTxn.CAbortTxn: Class_Initialize() 580: 7:47:27 PM:AdvOrchTxn.CAbortTxn: AskToAbort(): Aborted! 580: 7:47:27 PM:AdvOrchTxn.CAbortTxn: Class_Terminate() 580: 7:47:54 PM:AdvOrchTxn.CAbortTxn: Class_Initialize() 580: 7:47:55 PM:AdvOrchTxn.CAbortTxn: AskToAbort(): Aborted! 580: 7:47:55 PM:AdvOrchTxn.CAbortTxn: Class_Terminate() 580: AdvOrchUtil.CMsg: Class_Initialize() 580: AdvOrchUtil.CMsg: ShowMsgBox(): Msg=44 Title=bztk.bztkdom.omicron.comprivate$port_1 580: AdvOrchUtil.CMsg: Class_Terminate() |
Listing 13.10 shows that each time the transaction is attempted, an instance of the class AdvOrchTxn.CAbortTxn is created. The trace shows this with the traces bracketed by the Class_Initialize() and Class_Terminate() trace statements. There are four sets of these, indicating that the class was instantiated four times. This is consistent with the three retries set up for the transaction. If you also look at the elapsed times between Class_Terminate() traces and following Class_Initialize() traces, you will note the 3, 9, and 27 second backoff time periods, as expected.
The remaining traces in Listing 13.10 show the content of the message box. Note, in particular, that only the first message (with the Quantity of 44) is successfully read. If you look into the pending messages in the queue .private$Port_1, you will see that the second message is still sitting in the queue. If, instead of aborting the transaction, you had chosen otherwise, this message would be retrieved from the queue and the message in the trace would have shown 55. The title portion of the message displays the port reference for an MSMQ queue.
In this example, we used the built-in support for transactions in COM+ and aborted the transaction that flowed from the XLANG schedule to the configured COM+ component AdvOrchTxn.CAbortTxn.
Using COM+ transaction services is not the only way transactions get aborted. Any of the following may also cause such an abort:
When the process flow runs into an Abort shape inside a transaction.
A port connected to a component is defined to abort a transaction if the component returns a failed HRESULT.
A port connected to a messaging system is defined to abort a transaction if the message delivery or receipt fails.
The XLANG Scheduler Engine may abort a transaction—for example, it may encounter an error, or one of the resource managers in a distributed transaction may be unable to proceed with the transaction.
Pausing (suspending) a schedule may force the XLANG Scheduler Engine to abort transactions.
The number of retries as available for the transaction have already been attempted.
The time limit for the transaction to complete is exceeded.