
Example 1: Instantiating a New Schedule Instance from BizTalk Messaging
A business process is generally started with the arrival of a business document.
This simple example shows you how to instantiate a new schedule in response to a message delivered by BizTalk Messaging. Figure 16.2 is the first block of the overall EAI scenario that described in Figure 16.1.
Figure 16.2. BizTalk Messaging instantiates a new instance of a BizTalk Orchestration Schedule. The blob “Receive User Acct Info” is part of the orchestration schedule.

Building Example 1
The following steps below walk you through Figure 16.2. The process begins when an XML message consisting of the new user information is dropped into a messaging queue. The message is picked up from the queue by a BizTalk MSMQ receive function. The receive function submits the message into BizTalk Messaging through a channel. The channel then passes the message to a port. The port creates a new instance of the XLANG schedule AcctMngSys_16.skv and then delivers this message to the newly created instance of the schedule. This kicks off the business process.
1. |
A Web-based application drops a message onto a private MSMQ queue. |
2. |
The message is picked up from the queue using an MSMQ receive function and sent to BizTalk Messaging. |
3. |
The message is delivered via a channel and BizTalk Messaging port. |
4. |
The messaging port is configured to pass the message to a new instance of an orchestration schedule. |
5. |
The schedule receives the message and executes the business process. The business process in this case consists of two actions. The first action merely receives the message, and the second action sends the message to a WSC scripting component. The component then displays a message box welcoming the new hire. The appearance of the message box is an indicator that a new instance of a schedule has been created and executed. |
Note
The message box in this example is for testing purposes only. Message boxes require human intervention and would cause a schedule running in a production environment to stall until someone responded to the message box. However, this is a quick way to debug each of the actions in a schedule during the development phase. You can also use the XLANG Scheduler monitor to watch the execution of schedule instances.
Web Application—Account Management System
Before jumping to the business process, we will show you what triggers the business process. A simple Web application consisting of two Web pages—default.htm and CreateNewAccount.asp—starts the process. The two pages simply take the new user information, create an XML message, and drop the message into a local private queue. Figure 16.3 shows the default.htm page filled with a sample new hire information.
Figure 16.3. Simple Web application that drops the New Hire Account Info into the message queue. This triggers a business process.

Source code for the Web application is available in the ..Chp16AcctMngSysWebAppdirectory. Of course, to run the WebApp, you will need to have Internet Information Server and configure a virtual directory to point to the WebApp directory where the default.htm and CreateNewAccount.asp files are. In addition to the Web application, you will create a private MSMQ queue called ReceiveNewHire on your machine to receive the New User Account Information.
To simplify the example, we have provided a VBScript called File2Queue.vbs (..Chp16AcctMngSysSourcedirectory). The script takes a filename as the only command-line parameter. A sample test file called AcctMngSys_NewHire.xml is included in the source directory. The file in our case contains the New User Account Information in an XML format. The script will drop this file into the private queue ReceiveNewHire. You still have to remember to create the local private queue. In this example and in all other examples in this chapter, we will use the File2Queue.vbs script to start our process instead of the Web application.
Creating an Orchestration Schedule
The orchestration schedule in Figure 16.4 shows the business process. This section walks you through the important pieces of the schedule and shows you how BizTalk Messaging has been configured.
Figure 16.4. Snapshot of the orchestration schedule—AcctMngSys_16.skv.

Figure 16.4 illustrates the orchestration schedule file AcctMngSys_16.skv. The schedule consists of two actions, Receive Request and WelcomeNewHire. The first action, ReceiveRequest, is bound to a BizTalk Messaging implementation shape using the orchestration binding port named UserAcctInfo. The second action, WelcomeNewHire, is bound to a Windows scripting component named NewHireMsg.wsc using the orchestration binding port named DisplayMsgPort. The file NewHireMsg.wsc can be found in the ..Chp16AcctMngSysSourcedirectory.
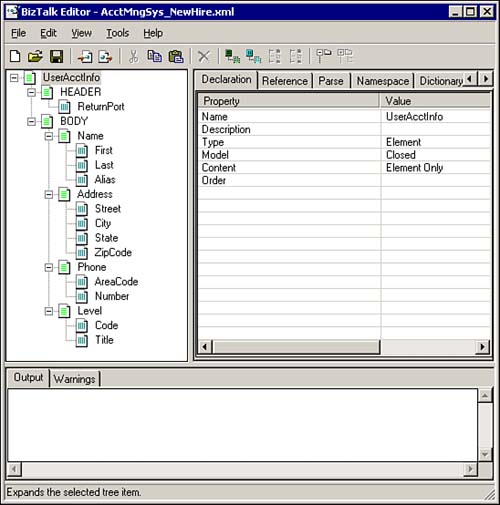
The document or the XML message the schedule processes is defined by a schema named UserAcctInfoXML.xml. The process begins with the submission of an XML message that conforms to this schema to BizTalk Server Messaging. BizTalk Messaging receives the document and then passes it to an orchestration schedule instance. The schema was developed using the BizTalk Editor and stored in the WebDAV. The schema is shown in Figure 16.5, and a sample test message contained in the file AcctMngSys_NewHire.xml is shown in Listing 16.1.
Figure 16.5. The schema file UserAcctInfo.xml is shown in the BizTalk Editor.
Listing 16.1. Sample XML Data File, AcctMngSys_NewHire.xml
<?xml version="1.0" ?>
<UserAcctInfo>
<HEADER ReturnPort=""/>
<BODY><Name First="Ken" Last="Archer" Alias="ken_archer"/>
<Address Street="614 Elvis Presley Way" City="Hacker Land" State="Texas"
|
Let's now go back to Figure 16.4 and the orchestration schedule AcctMngSys_16.skv. Load the schedule into the BizTalk Orchestration Designer. Double-click on the BizTalk Messaging implementation shape. This starts up the BizTalk Messaging Binding Wizard as shown in Figure 16.6.
Figure 16.6. Binding the BizTalk Messaging implementation shape to an action on the schedule.

After you specify an appropriate name and click next, you get to the Communication Direction page as shown in Figure 16.7. Here you specify whether the schedule is receiving or sending a message. We have set it to receive the New Hire Account Info XML message.
Figure 16.7. Selecting the direction of the message; either the schedule is receiving the message or sending the message.

The text on this page tells you that a dynamically created queue sits between the BizTalkMessaging and the schedule. We will discuss this further. Click Next to get to the, XLANG Schedule Activation Information page as shown in Figure 16.8.
Figure 16.8. Determining the activation of the schedule. A Yes indicates that an instance of the schedule is created each time a new message is delivered.

Click Finish to close the BizTalk Messaging Binding Wizard. Do not close the XLANG schedule. Next double-click the arrow that enters into the first action Receive Request. The Welcome to the Communication Wizard pops up. Click Next four times to accept the defaults, until you are on the page Message Specification Information as shown in Figure 16.9. Here you select the specification for the incoming message. The XLANG engine will validate the incoming message against the specification because the Validate Messages Against the Specification box is checked. Notice how we exposed the First and Last names attributes in the UserAcctInfo XML message. You can add fields by using the Add button and merely selecting the fields.
Figure 16.9. You select the specification for the message that the schedule action will receive.

Figure 16.9 shows a simple way of exposing the message contents in a schedule instance without having to programmatically load the document using the DOM. By simply pointing to the document schema using the wizard, you can quickly and easily expose pieces of information that you may need in certain steps of your schedule. The value of this becomes more important when the document schema is large. It eliminates the need for your components to load and parse the message manually to get to the needed attributes.
Now let's examine what is going on in the data page of the orchestration schedule. Figure 16.10 shows the data page for AcctMngSys_16.skv. From the incoming message, we are passing three pieces of data—the document (the whole message), the First attribute, and the Last attribute of the incoming message—to the appropriate parameters in the WelcomeNewHire_in message. The Port References block in the upper-left shows the implementation binding ports, UserAcctInfo and DisplayMsgPort, defined in the schedule.
Figure 16.10. Data from the incoming message is flowed into the WelcomeNewHire_in message parameters.

The second action in the schedule in Figure 16.4 (WelcomeNewHire) is bound to a Windows scripting component. The scripting component is defined in the file NewHireMsg.wsc. The file is located in .Chp16AcctMngSysSourcedirectory. Listing 16.2 shows the code for the component.
The component has a single method, WelcomeNewHire(), and takes three parameters sMsg, sFirstName, and sLastName. The method displays a message box containing the entire XML message, and the title of the message box shows the new hire first and last name concatenated together.
Listing 16.2. Code for the Scripting Component, NewHireMsg.wsc
<?xml version="1.0"?>
<component>

<?component error="true" debug="true"?>

<registration
    description="NewHireMsg"
    progid="NewHireMsg.wsc"
    version="1.00"
    classid="{9E7D4862-4B16-4fa1-ACF1-23CFB503F5F0}"
>
</registration>

<public>
    <method name="WelcomeNewHire">
        <PARAMETER name="sMsg"/>
        <PARAMETER name="sFirstName"/>
        <PARAMETER name="sLastName"/>
    </method>
</public>

<script language="VBScript">
<![CDATA[

function WelcomeNewHire(sMsg, sFirstName, sLastName)
    MsgBox CStr(sMsg), vbOKOnly, CStr(sFirstName & " " & sLastName)
    WelcomeNewHire = ""
end function
]]>
</script>
</component>
|
After the XLANG schedule has been configured for the messages and binding ports, the next step is to compile the schedule. You need to register the scripting component, WelcomeNewHireMsg.wsc before you can compile the schedule successfully. Use Regsvr32.exe to register the component in the same manner you register a COM component DLL. To compile the XLANG schedule to a .skx file, select File, Make AcctMngSys_16.skx from the menu.
Setting Up BizTalk Messaging Objects
We have completed the orchestration schedule that contains a BizTalk Messaging receive port that will instantiate an instance of the schedule on receipt of an incoming XML message. When the schedule receives the message, it displays a message box, showing the XML message and the name of the new hire in its title bar. In this section, we will configure BizTalk Messaging to call the orchestration schedule. Table 16.1 summarizes the BizTalk Messaging objects required.
| Objects | Options and Settings Chosen | Note |
|---|---|---|
| Organization/Application | Name: Home Organization Application: NewHireApp | Use the default Home Organization. |
| Document definition | Name: NewHireInfo Spec: UserAcctInfoXML.xml | The doc specification was created in the Editor. First copy this file to your WebDAV repository and then create the document definition. |
| Document Instance | Filename: AcctMngSysNewHire.xml | This is provided for you to test the app. If you want, you can create one in XML Notepad. |
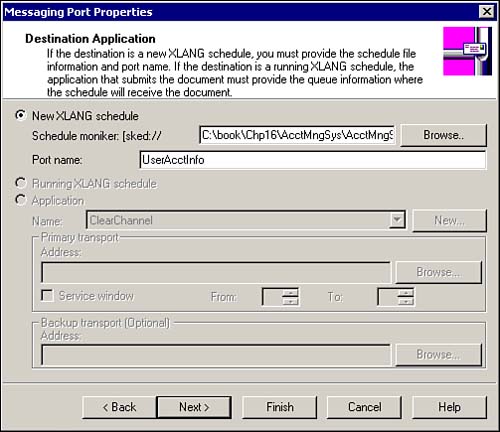
| Port | Name: NewHirePort (To an Application)
Destination Application: New XLANG Schedule Schedule Moniker: AcctMngSys_16.skx Schedule Port: UserAcctInfo | You must type the schedule port name exactly as it is in the orchestration drawing. |
| Channel | Name: NewHireChannel (From an Application)
Application Name: NewHireApp InBoundDocument: NewHireInfo OutBoundDocument: NewHireInfo Mapping: No Document Logging: Check only, In Native Format Advanced Configuration: Take the Defaults | No mapping is required because the inbound doc spec is the same as outbound document spec. |
Note
BizTalk Server uses the term ports in two places. In BizTalk Messaging Manager, a port refers to an abstract destination point where a message will be delivered after it has been transformed by the channel. In the BizTalk Orchestration Designer, a port refers to an abstract functionality (I like to call this an implementation binding), where it binds an action in the business process (orchestration schedule) to an implementation shape—for example, a COM component, MSMQ, BizTalk Messaging, or scripting component.
Figure 16.11 shows the completed BizTalk Messaging port. The port was created using the property settings shown in Table 16.1.
Figure 16.11. The messaging port NewHirePort delivers the XML message to the XLANG schedule AcctMngSys_16.skx at the implementation binding port UserAcctInfo.
This completes the destination where the message is going. Next, the channel defines where the message is coming from and the type of message being processed. Figure 16.12 shows the Source Application page of the Channel Wizard. Again, the channel was created using the property settings as shown in Table 16.1. Because the inbound and outbound document definitions are the same, NewHireInfo, mapping file is specified for the channel.
Figure 16.12. Source Application page of the channel, NewHireChannel.

Next we need a private transactional queue, where the VBScript File2Queue.vbs will drop the content of the sample data file AcctMngSys_NewHire.xml. Open up the Computer Management MMC Console and expand Services and Applications. Down the list is Message Queuing, expand Message Queuing to see the Private and Public Queues. Message Queuing is part of Windows 2000 and can be installed from the Windows 2000 Setup CD. Table 16.2 shows the properties of the private queue ReceiveNewHire.
| Objects | Options and Settings Chosen | Note |
|---|---|---|
| Queue | Name: ReceiveNewHire
Type: Private Transaction: Yes | Transactional queue allows themessage to be returned to the queue if there is an error and later retried |
Finally we need to create an MSMQ receive function to pick up messages from the queue. The receive function will pick up the message from the queue and deliver the message to the channel, NewHireChannel. Open the BizTalk Server Administration MMC and expand the BizTalk Server Group. Next expand the Receive Functions. Table 16.3 shows the property settings for the MSMQ receive function, NewHireReceiveFunc.
| Objects | Options and Settings Chosen | Note |
|---|---|---|
| Receive function | Name: NewHireReceiveFunc
Type: MSMQ Receive Function PollingLoc: Direct=OS:.private$ReceiveNewHire Advanced Tab: Openness: Not Open Channel Name: NewHireChannel | The Not Open in the Openness, indicates to BizTalk Server that the destination and source are explicitly specified. |
Running Example 1
Let's begin with the fun part. We have just created an orchestration schedule and configured BizTalk Messaging to process and deliver a message to the schedule from an internal application. The AcctMngSys has a Web front-end, where a new hire enters his information. The Web application then submits the information on to an MSMQ queue. The MSMQ receive function picks up the message from the queue and then submits it to BizTalk Messaging, which in turn instantiates a business process, in our example the orchestration schedule. The orchestration schedule then displays the new hire info in a message box. In this example and the rest of the examples in this chapter, instead of the Web front-end, we have provided a VBScript (File2Queue.vbs) that drops the message to the queue. The script takes one parameter, the filename, which contains the XML file to submit. Listing 16.3 shows the script.
Listing 16.3. Source Code for the VBScript, File2Queue.vbs
'*************************************************************
'MSMQ constants
'Access modes
const MQ_RECEIVE_ACCESS = 1
const MQ_SEND_ACCESS = 2
const MQ_PEEK_ACCESS = 32
'Sharing modes
const MQ_DENY_NONE = 0
const MQ_DENY_RECEIVE_SHARE = 1
'Transaction Options
const MQ_NO_TRANSACTION = 0
const MQ_MTS_TRANSACTION = 1
const MQ_XA_TRANSACTION = 2
const MQ_SINGLE_MESSAGE = 3
'*************************************************************
'Queue Path
const QUEUE_PATH = ".private$ReceiveNewHire"
'*************************************************************
dim qinfo, qSend, mSend, xmlDoc
dim sPath, sFile, sMesg, sInFileName
'Input file name
sInFileName = WScript.Arguments(0)
'*************************************************************
' Create the queue
'*************************************************************
set qinfo = CreateObject("MSMQ.MSMQQueueInfo")
qinfo.PathName = QUEUE_PATH
'*************************************************************
' Open queue with SEND access.
'*************************************************************
Set qSend = qinfo.Open(MQ_SEND_ACCESS, MQ_DENY_NONE)
'*************************************************************
' Put file into message.
'*************************************************************
sPath = WScript.ScriptFullName
sPath = Mid(sPath, 1, InStrRev(sPath, ""))
sFile = sPath & sInFileName
set xmlDoc = CreateObject("MSXML.DOMDocument")
xmlDoc.load sFile
set mSend = CreateObject("MSMQ.MSMQMessage")
mSend.Body = xmlDoc.xml
mSend.Label = "NewHireInfo"
'*************************************************************
' Send message to queue.
'*************************************************************
mSend.Send qSend, MQ_SINGLE_MESSAGE
if err <> 0 then
msgbox "Error Submitting to queue. Error = " & Cstr(err.Number) & ", Description = " &
|
The script displays a message box on successful submission to the queue or notifies the user with a failure message if an error occurs. To begin, type the following on the command line to run this example:
File2Queue.vbs Test_NewHire.xml
If the message is correctly dropped into the queue, the message box in Figure 16.13 confirms that this has been successfully done.
Figure 16.13. Message box confirms that the content of the XML file AcctMngSys_NewHire.xml was successfully dropped into the queue, ReceiveNewHire.

Click OK to acknowledge the message. Depending on whether you are running this for the first time, a few seconds will elapse before you see the second message box as in Figure 16.14. In the subsequent runs of the example, the message boxes may appear almost at the same time.
Figure 16.14. This message box confirms that the message has flown from the BizTalk Messaging port and into the XLANG schedule, entering through the first action, flowing into the second action, and finally invoking the scripting component.

The message box is displayed by the Windows scripting component, NewHireMsg.wsc. This component is associated with the second action in the schedule.
Why did we use MSMQ? The introduction of the queue in the architecture helps to totally decouple the Web front-end application from the BizTalk Server. Should the BizTalk Server be offline for any reason, nothing prevents the Web front-end from continuing to receive new hire information totally unaware of the final destination of the message. In addition, this allows BizTalk Server to be configured to process hundreds of these messages waiting in the queue at one time as a batch during some off-peak hours of the day. By making the queue transactional, we guarantee that either the whole process succeeds or the failed message is returned to the queue. The system is fault-tolerant and totally decoupled. We have achieved all this without writing a single line of code.
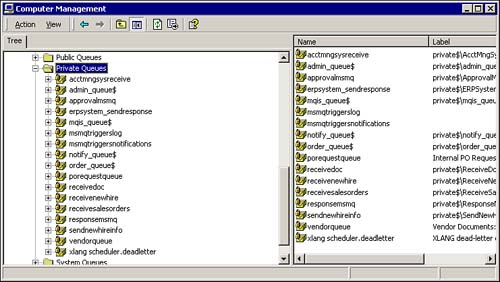
For similar reasons internally, BizTalk Messaging sends a message to the XLANG schedule through a dynamically created per-instance queue. This keeps the two applications totally decoupled. If you look at the Computer Management MMC and drill down to Message Queuing/Private Queues, you will notice a queue named UserAcctInfo{GUID}. Figure 16.15 shows the per-instance queue.
Figure 16.15. The per-instance queue generated by the XLANG Engine. The queue sits between the BizTalk Messaging and the XLANG schedule.

The prefix is the same as the port name of the implementation binding port in the BizTalk Orchestration Designer when hooking up the first action in the schedule to the BizTalk implementation. The GUID is dynamically generated. The port name combined with the GUID is the name of the queue that the XLANG Engine creates. The message queue is called a per-instance message queue because a unique message queue is created for each message transferred from BizTalk Messaging to the orchestration. After the schedule runs to completion, the per-instance message queue is removed. Figure 16.16 shows the Computer Management Console MMC after the schedule has run to completion.
Figure 16.16. The per-instance queue is removed after the schedule has completed running.
Some people have found that the per-instance queue does not go away after the schedule has run to completion. The most common reason for the per-instance queue not going away can be attributed to some kind of error condition. However, in some rare cases, this has been blamed on COM+ and the XLANG Engine. Bizet, the code name for the next release of BizTalk Server, addresses this issue.
You may have noticed that when you ran the example for the first time, it took a little longer than when you ran it the second time. This is because the XLANG Engine reads the schedule from the disk when you run for the first time, compiles it, and stores the schedule in its internal representation. In subsequent runs, the XLANG Engine simply uses the compiled version. Thus, the first message passing through the system suffers a small performance hit.
Monitoring the Execution of an Orchestration Schedule
BizTalk Server provides an XLANG Monitoring tool, XLANGMon.exe, which you can find in the ..Program FilesMicrosoft BizTalk ServerSDKXLANG Tools directory. The tool referred to as XLANG Event Monitor by default only monitors a subset of the COM+ events generated by the orchestration engine. You can, however, choose to view additional events by choosing View, Events Filter from the menu and checking the COM and MSMQ binding check boxes.
Open the XLANG Event Monitor and choose View, Events Filter. Click the Check All button to monitor all the events and leave it running. From the command line, run the script File2Queue.vbs AcctMngSys_NewHire.xml that you ran previously. The script puts the message on the ReceiveNewHire queue and puts up a message box to notify that the message has been dropped. After the message has been picked up by BizTalk Messaging and passed to the orchestration schedule, at the same time a second message box is displayed showing the message and the name of the new hire on the title bar. Do not click OK yet. Figure 16.17 shows our schedule instance in the Running folder of the XLANG Event Monitor.
Figure 16.17. Monitoring running instance of a schedule in the XLANG Event Monitor.

Click OK on the message box. This completes the schedules, and the XLANG Event Monitor moves the entry from the Running to the Completed folder.
Some users have experienced problems with the XLANG Event Monitor. In some cases, schedule instances do not show up in the Running folder, or, when the schedule instance has completed, the instance does not move to the Completed folder. One way to get around this is to open two instances of the monitor. Schedule monitoring has improved dramatically in BizTalk Server 2002.
We learned in detail the integration of BizTalk Messaging to an orchestration schedule. We also looked at the benefits of the message queuing architecture and the per-instance queue concepts. Next we will dive deeper into schedule correlation.