
Building Specifications Using the BizTalk Editor
In this section, we will build specifications that facilitate the delivery and transformation of bank transaction data between three banks, Sunset Bank, Bank of America, and Fidelity. The application we will build is going to reside at Sunset Bank, whose internal systems expect to receive an XML transaction document. An example instance of the Transaction.xml XML document is displayed in Listing 4.2.
Listing 4.2. The TransactionInstance.XML Document
<Transaction>
   <Account>1</Account>
   <Amount>500.00</Amount>
   <Type>Credit</Type>
   <Facility>Bank of America</Facility>
   <Location>
      <Name>Manassas</Name>
      <Address>6815 Stillbrooke Road</Address>
   </Location>
</Transaction>
|
Sunset Bank receives transaction data from two banks, Bank of America and Fidelity. Bank of America's internal systems export data to a CSV-delimited file and Fidelity's systems export their data to a positional flat file. To consume these input files, Sunset Bank's internal systems will need to transform both the CSV and positional flat file into the XML document format expected by their systems. To accomplish this, we will build three specifications: one that describes Sunset Bank's XML format, one that defines Fidelity's positional flat file format, and one that defines Bank of America's CSV transaction.
In the sections that follow you will learn how to build:
A BizTalk specification based on an XML document.
A BizTalk specification that describes a delimited flat file.
A BizTalk specification that describes a positional flat file.
The Sunset Bank example in this chapter will walk through the steps required to create the specifications; however, the maps that would transform the documents into the Sunset Bank XML format are not discussed. The BizTalk Mapper is covered in detail in Chapter 5, “The BizTalk Mapper,” of this book.
Building an XML BizTalk Specification
The first BizTalk specification we are going to build will define the Sunset Bank XML document.
Sunset bank requires an XML schema named Transaction.
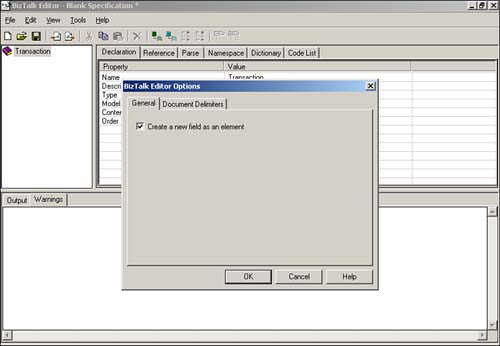
To begin, open the BizTalk Editor and select File, New from the menu. In the New Document Specification dialog that appears, select the Blank specification option and click OK. A new blank XML specification appears in your BizTalk Editor window. Next, select the Blank Specification tag in the left-hand panel and right-click. In the pop-up menu that appears, select the Rename menu option and rename the root node of the document Transaction. The Transaction document will consist of element nodes as opposed to attribute nodes. We can configure the Editor to do this without having to manually declare each. To configure the BizTalk Editor options, select Tools, Options from the menu. In the BizTalk Editor Options dialog that appears, check the Create a New Field as an Element Option and click OK as displayed in Figure 4.1.
Figure 4.1. Setting the Editor options.
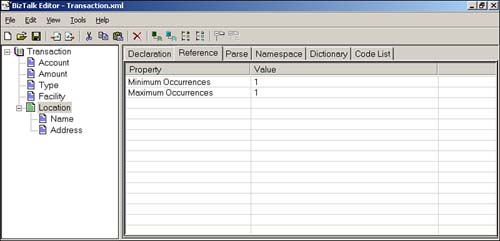
This XML document contains several elements and one record. The element names are Account, Amount, Type, and Facility. The record name is Location and consists of two elements, Name and Address. The XML specification for this document is displayed in Figure 4.2.
Figure 4.2. The Transaction BizTalk specification.

To add the elements and records to the BizTalk specification, select the Transaction root node in the left-hand panel and right-click. In the pop-up menu that appears, select the New Field menu option and name it Account. Then repeat the same steps, creating three additional fields, Amount, Type, and Facility. Next, select the Transaction root node, right-click, and select the New Record menu option. Name the new record Location. Then select the new location record in the left-hand panel and right-click.
In the pop-up menu that appears, select the New Field menu option and name the field Name. Then repeat the same steps to add a second field to the Location record named Address.
Next, we need to set the data type for each of the elements we created. To accomplish this, select each of the elements in the left-hand panel and navigate to the Declaration tab. Then select the Data Type property and configure the data types for each element as displayed in Table 4.1.
| Element Name | Data Type |
|---|---|
| Account | Number |
| Amount | Float |
| Type | String |
| Facility | String |
| Name | String |
| Location | String |
Next, we need to set the Location record properties. To accomplish this, select the Location record in the left-hand panel and navigate to the Reference tab. Then, set the Minimum Occurrence property to 1 and Maximum Occurrence property to 1 as displayed in Figure 4.3.
Figure 4.3. Setting the Minimum and Maximum Occurrence properties.
Finally we need to configure the required fields properties and restrict the length of the Facility element to 15 characters. To set the maximum length, select the Facility field in the left-hand panel and navigate to the Declaration tab. Locate the Maximum Length property and set it to 15. The Transaction XML schema only requires data in two elements, Account and Amount. To set these properties, select each individually in the left-hand panel and navigate to the Reference tab. Then, locate the Required property and set its value to Yes.
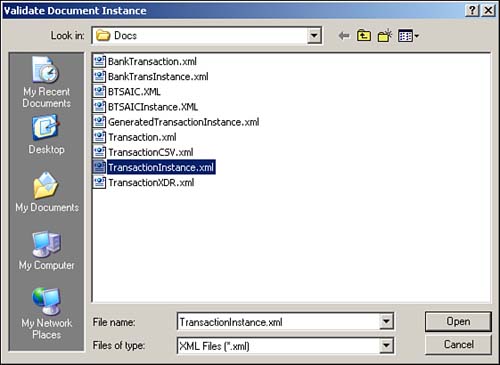
We are now ready to save and test our specification. The easiest way to test the specification is to select the Tools, Validate Instance option from the menu. If you don't have an instance of the document, you can have the Editor generate a native instance for you and then review its contents for accuracy. The Sunset Bank example located on the publisher's Web site has an instance of the document named TransactionInstance.xml. To test the Transaction specification, select Tools, Validate Instance from the menu.
In the Validate Document Instance dialog that appears, navigate to the TransactionInstance.xml instance document and select it as displayed in Figure 4.4.
Figure 4.4. Validating the instance.
The TransactionInstance.XML document was displayed previously in Listing 4.2.
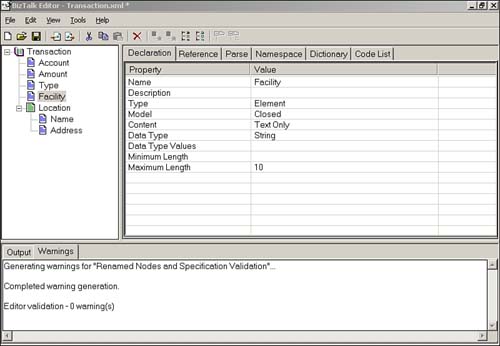
If the document had failed validation, a warning notifying you of the error would appear in the Warnings tab at the bottom of the Editor window. To demonstrate this, select the Facility field in the left-hand panel, reset its Maximum Length property to 10, and then test the validation of the TransactionInstance.xml document again. The TransactionInstance.xml document has a Facility name 15 characters in length and will therefore fail validation. The warning obtained is displayed in Figure 4.5.
Figure 4.5. Validating the instance when it fails validation.
You can also have the BizTalk Editor generate an instance of the document for you. To accomplish this, select Tools, Create XML Instance from the menu. In the Create Document Instance As dialog that appears, name and save your instance file. The sample instance for the Transaction BizTalk specification we just created is displayed in Listing 4.3. Because the Transaction specification describes an XML document, the Create Native Instance menu option is unavailable on the Tools menu.
Listing 4.3. The Transaction BizTalk Generated Instance
<Transaction><Account>1.</Account><Amount>1.0</Amount><Type>Type_1</Type> <Facility> |
In the next section, we will create a specification that contains the same transaction data; however, this time the transaction instance file and specification will describe the comma-delimited Bank of America data.
Building a Delimited Flat File Specification
The Bank of America transaction consists of data stored in a comma-delimited format with a carriage return line feed at the end of each record. This type of file is typically called a CSV delimited flat file. A delimited flat file is a term used to describe a file format in which a single character or pattern of characters is used to separate data into manageable pieces. Table 4.2 shows a list of common delimiters and their hexadecimal values.
| Common Delimiters | Hex Value |
|---|---|
| TAB | 0x09 |
| SPACE | 0x20 |
| LF | 0xa |
| CR | 0xd |
| * | 0x2a |
| + | 0x2b |
| , | 0x2c |
| . | 0x2e |
| ; | 0x3b |
| | | 0x7c |
Looking back at our scenario, the managers at Bank of America needed to come up with a good way to share account information. Due to time constraints and lack of IT infrastructure, they decided to go with a simple CSV format for transmitting account data. Listing 4.4 shows a sample flat file representing a Bank of America financial transaction.
Listing 4.4. Bank of America's Transaction Data in Delimited Flat File Format
987890,-300 987890,-45.96 987890,-32.16 987890,2000 987890,-112.53 987891,3015 987891,-12.35 987891,-456.55 987891,-102.02 987891,-36.12 987891,110.5 |
Notice that the first column of data (prior to the comma delimiter) represents an account number, and the second column is the +/- value of the account transaction amount for that particular record. The specification we will create contains additional fields; however, only the account and transition amount are required.
Now that Bank of America has come up with a formatted standard for sharing its financial information, our goal is to be able to reformat the data into the Sunset Bank XML document format. To enable Sunset Bank to process the delimited document, we will need to create new BizTalk specifications to describe it and then a map to convert the contents of the file into the Sunset Bank XML transaction format.
To create the delimited specification, begin by opening the BizTalk Editor and selecting File, New from the menu. In the New Specification dialog that appears, select a Blank Specification and click OK. Next, select the Blank Specification root element displayed in the left panel and right-click. In the pop-up menu that appears, select the Rename menu option and rename the root object Transaction. The Transaction document will consist of element nodes as opposed to attribute nodes. To configure the Editor options to accommodate this, select Tools, Options from the menu. In the BizTalk Editor Options dialog that appears, check the Create a New Field as an Element option and click OK.
Next, select the Transaction root node and right-click. In the pop-up menu that appears, select the New Record menu option and name the new record Transactions. Adding a record denotes an important distinction between an XML document specification and its delimited counterpart. A delimited specification requires this subrecord to define the delimiters for each record in the file whereas an XML specification does not. In this example, the record delimiter is a carriage return line feed. If we didn't add this record, there would be no way to distinguish between the field and record delimiters for the file.
Next, we need to add five element fields beneath the Transactions record: Account, Amount, Type, Facility, LocationName, and LocationAddress. To accomplish this, select the Transactions record in the left-hand pane and right-click. In the pop-up menu that appears, select the New Field menu option and rename the field Amount. Repeat these steps four additional times for each of the remaining fields.
Next, as we did in the XML transaction example, we need to set the data type for each of the elements we created. To accomplish this, select each of the elements in the left-hand panel and navigate to the Declaration tab. Then select the Data Type property and configure the data types for each element as displayed in Table 4.3.
| Element Name | Data Type |
|---|---|
| Account | Number |
| Amount | Float |
| Type | String |
| Facility | String |
| Name | String |
| Location | String |
We also need to configure the required field properties and restrict the length of the Facility element to 15 characters. To set the maximum length, select the Facility field in the left-hand panel and navigate to the Declaration tab. Locate the Maximum Length property and set it to 15. The TransactionCSV specification requires data in two elements—Account and Amount. To set these properties, select each individually in the left-hand panel and navigate to the Reference tab. Then locate the Required property and set its value to Yes.
Because the specification is describing a delimited file, we need to set several attributes to identify how the document is delimited. Let's begin by setting the document type, field, and record delimiters. First, select the root Transaction node in the left-hand panel and navigate to the Reference tab. Then, set the Standard property to Custom to denote a flat file specification type. Next, select the Parse tab and configure the properties as described in Table 4.4.
Note
You will be warned by a prompt when changing the Standard property that “Changing the standard property might cause some properties to be cleared." Select Yes in this dialog to continue.
| Property | Value |
|---|---|
| Structure | Delimited |
| Field Order | Postfix |
| Delimiter Type | Character |
| Delimiter Value | CR |
| Skip Carriage Return | No |
The Structure property denotes the physical structure of the specification, which in this case is Delimited. The Field Order property describes the location of the delimiters relative to one another. There are three Field Order property options: Prefix, Postfix, and Infix. Prefix describes delimiters that appear before each member in a series, *a*a*b*c. Postfix describes delimiters that appear after each member a*b*c*, and Infix delimiters appear between components a*a*b*c. In the Bank of America CSV file, the field delimiter should be configured as Postfix because each record is delimited with a carriage return, line feed with a carriage return, line feed after the last record. If the file does not have a carriage return, line feed after the last record, you would need to set this value to Infix.
Note
The line feed character is automatically ignored by the BizTalk Server flat file parser.
Finally, the Delimiter Type property should be set to Character with a Delimiter Value of CR and the Skip Carriage Return property should be set to No. The Transaction root node parse properties are displayed in Figure 4.6.
Figure 4.6. The root node parse properties.

Next, we need to configure the parse properties for the fields in the document by setting the parse properties on the Transactions record. To accomplish this, select the Transactions record node in the left-hand panel and navigate to the Parse tab. Then configure the parse properties as displayed in Figure 4.7.
Figure 4.7. The Transactions record parse properties.

Again the Structure is Delimited, this time with a Field Order of Infix, a Delimiter Type of Character, and a Delimiter Value of ",".
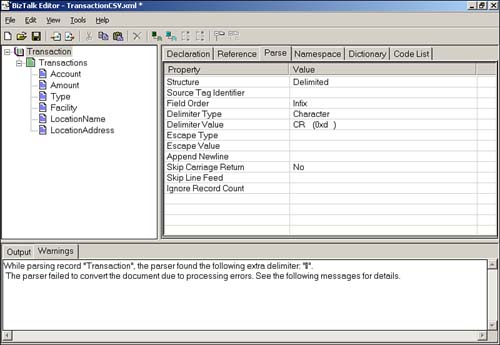
We are now ready to save and test the TransactionCSV.xml BizTalk specification. To test the specification, select Tools, Validate Instance from the menu. In the dialog that appears, select the .txt file to validate. The publisher's Web site contains a copy of the TransactionCSV.xml specification as well as an instance of a CSV file with and without carriage returns at the end of the last record. Let's first validate the CSV sample file, TransactionCSV.txt, with carriage returns at the end of each line. Because we have set the record Field order to PostFix, the validate should successfully execute. Then, let's validate the specification again, but before we do, modify the specification's Transaction root node Field Order property setting to Infix. A warning message should appear as displayed in Figure 4.8, notifying you of the additional delimiter at the end of the file.
Figure 4.8. Testing the CSV specification with Field Order set to Infix.
In the next section, we will build a positional BizTalk specification that defines the same transaction data.
Building a Positional Flat File Specification
Now assume that we want to do business with yet another bank, this time Fidelity. Fidelity uses a positional flat file to exchange financial data with its partners and customers. We (Sunset Bank) need to create a BizTalk specification to represent this flat file, so that it can be transformed by BizTalk Messaging into the XML format that our applications are designed to work with.
Here is an example of what a typical Fidelity positional transaction file will look like:
R987890-300xxxxxxx
R987890-45.96xxxxx
R987890-32.16xxxxx
R9878902000xxxxxxx
R987890-112.53xxxx
R9878913015xxxxxxx
R987891-12.35xxxxx
R987891-456.55xxxx
R987891-102.02xxxx
R987891-36.12xxxxx
R987891110.5xxxxxx
Note
The x's in the file denote blank space in the file in the real TransactionPOS.txt file.
Notice that there is an “R” in every transaction record. This character is a Source Tag Identifier used to represent the beginning of a new record. Each record contains a fixed-length account number field that is 6 characters in length and an 11-character amount field that supports (-+) positive and negative signs for deductions and credits to and from the account. The records are also delimited by a carriage return (CR), line feed (LF), just as in the Bank of America example. In this sense, the Fidelity document is both a positional and a delimited flat file. This is important to keep in mind as we build the BizTalk specification.
To create the TransactionPOS.xml specification, begin by opening the BizTalk Editor and selecting New, Blank Specification from the menu. In the blank specification that appears, select the BlankSpecification root node and right-click. In the pop-up menu that appears, select the Rename menu option and rename the root node TransactionPOS. Next, select the TransactionPOS root node in the left-hand panel and right-click. In the pop-up menu that appears, select the New Record menu option and name the new record Transactions. Then, select the Transactions record in the left-hand menu and right-click. In the pop-up menu that appears, select the New Record menu option and name the new subrecord BankTransaction.
Now, we are ready to add the fields for the specification. The Fidelity specification requires only two of the elements supported in the Bank of America specification, Account and Amount. To add the fields, select the BankTransaction record in the left-hand panel and right-click. In the pop-up menu that appears, select the New Field menu option and name the new field Account. The Account field data type should also be set to Number in that same property tab. Then repeat the same steps and add a second field named Amount, setting its data type to Float. The TransactionPOS specification should look as displayed in Figure 4.9. The fields in this case are denoted as attributes of the BankTransaction element. These could also be changed to elements with no effect on the outcome of this application.
Figure 4.9. The TransactionPOS specification after the fields are added.

First, we need to set the Standard property to Custom on the TransactionPOS root node. This sets the document type for the document to flat file. To accomplish this, select the TransactionPOS root node in the left-hand panel and then navigate to the Reference tab. When you navigate off the Standard property that's been set to Custom, a pop-up dialog appears notifying you that changing this property might cause some properties to be cleared. Select Yes as displayed in Figure 4.10.

Then, we need to set the Default Record Delimiter property to CR in the same tab. The Reference tab for the TransactionPOS record should appear as displayed in Figure 4.11.
Figure 4.11. Setting the TransactionPOS root node Standard to Custom.

Next we need to set the Parse properties for the TransactionPOS record. Remember that this record denotes how the records in the file are delimited. In this case, the records are delimited by a CR, LF. To configure the properties, select the TransactionPOS root record in the left-hand panel and navigate to the Parse tab. Then set the properties as displayed in Table 4.5.
| Property | Value |
|---|---|
| Structure | Delimited |
| Field Order | Postfix |
| Delimiter Type | Default Record Delimiter |
| Append New Line | Yes |
| Skip Carriage Return | No |
The Structure is Delimited, and the Field Order is Postfix because a CR LF follows each record as well as the last record. The delimiter is set to the Default Record Delimiter, which was configured earlier as CR in the Reference tab. LF CR are automatically ignored unless they are explicitly specified in the Skip Line Feed and Skip Carriage Return properties. In this case, we want the LF to be skipped, so we don't need to set the property. The Append New Line property is set to ensure that an LF is placed at the end of each record when the BizTalk Messaging Engine uses the specification to serialize the outbound document. The Parse tab for the TransactionPOS root node appears as displayed in Figure 14.12.

Next, we need to set the properties for the Transactions record. The Transactions record defines the properties for each record. This may seem a bit confusing to have two records that define how a single record is parsed; however, it is necessary when creating specifications for positional flat files that are also delimited. The Source TagIdentifier in this case is the letter “R,” and its positioning is Infix relative to the structure of the record. This subrecord is needed to differentiate between the CR LF record delimiters, which are Postfix, and the Source Tag identifier which is Infix.
To configure the properties, begin by selecting the Transactions record in the left-hand pane and navigating to the Reference tab to set the Maximum Occurrences value to *. This property denotes that the record can occur zero to many times. Next, navigate to the Parse tab on this same record and set the properties as defined in Table 4.6. The Parse properties are similar to those set on the TransactionPOS root node.
| Property | Value |
|---|---|
| Structure | Delimited |
| Source Tag Identifier | R |
| Field Order | Infix |
| Delimiter Type | Default Record Delimiter |
| Skip Carriage Return | No |
In this case, the record is again delimited; however, this time we add a reference to the Source Tag Identifier “R,” which is Infix relative to the records in the file. The Delimiter Type is again set to the Default Record Delimiter CR, and the Skip Carriage Return property is set to No. The Transactions Parse tab should appear as displayed in Figure 4.13.
Figure 4.13. Setting the Transactions node Parse properties.

Next, we need to set the properties for the positional BankTransaction record and fields. To accomplish this, select the BankTransaction record in the left-hand panel and navigate to the Reference tab. Notice that the MaximumOccurrences property is set to 1 by default. Next, navigate to the Parse tab for the same record and set the Structure property to Positional. Again, when you navigate from the property, a warning appears notifying you that changing this property could result in the loss of some property values. Select OK when this message box appears. Then set the Skip Carriage Return to No. The Parse properties for the BankTransaction Parse tab should appear as displayed in Figure 4.14.
Figure 4.14. Setting the BankTransaction node Parse properties.

Finally we need to set the Account and Amount properties. Select the Account field in the left-hand panel and navigate to the Reference tab. Then set the Required property to Yes, the Start Position property to 1, and the End Position property to 6 as displayed in Figure 4.15.
Figure 4.15. Setting the Account element reference properties.

Then select the Amount field and set the Required property to Yes, the Start Position to 7, and the End Position property to 18. We are now ready to save and test the TransactionPOS.xml specification. The publisher's Web site contains a sample instance named TransactionPOS.txt to assist us with this task. The TransactionPOS.txt file consists of two records and is displayed in Listing 4.5.
Listing 4.5. The TransactionPOS.txt File
R1 -300 R2 +500 |
To test the specification, select Tools, Validate Instance from the menu and select the TransactionPOS.txt example test file. The file should be parsed as displayed in Figure 4.16.

Voilá, we have created our BizTalk specification for a positional flat file that represents a data transmission from Fidelity.