
Understanding Out of the Box SharePoint Workflows
SharePoint 2010 provides out of the box many useful workflows. Table 15.1 lists some of the important workflows that you will find yourself using frequently.
Table 15.1. Out of the Box Workflows in SharePoint 2010

Using the Out of the Box Three-State Workflow
The Out of the Box Three-State workflow enables you to manage the state of the list item and the transition between the three states. The state of the list item is represented by a field that you can configure when attaching the workflow. The Three-State workflow enables you to create tasks for each state and transition the list item into the appropriate state upon completing the tasks.
Try It Yourself: Use the Three State Workflow
1. Browse to your SharePoint site and create a new document library named ThreeStateDemo.
2. Add a column of type Choice. Name it ItemStatus and add Open, In Progress, and Closed as options, as shown in Figure 15.1.

Figure 15.1. Creating a new column—ItemStatus
3. Go to the Library in the ribbon and click the Workflow Settings command in the Settings section.
4. You are shown the Workflow Settings page as shown in Figure 15.2. This page lists all the workflows associated with the list and also provides the option to add a new workflow.

Figure 15.2. Workflow Settings
5. Click the Add a Workflow link to add a new workflow. You see the Add a Workflow page shown in Figure 15.3.
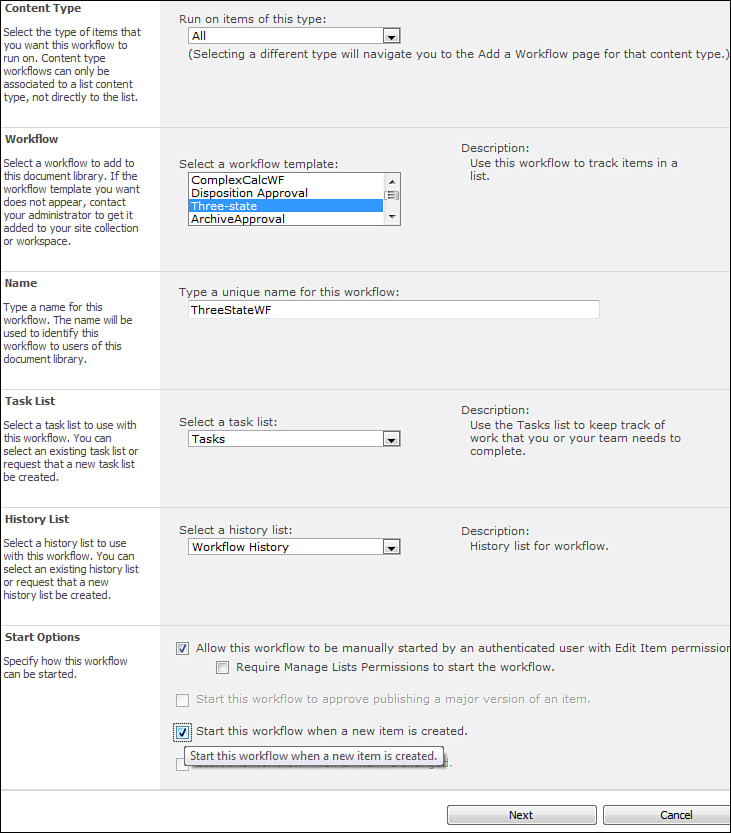
Figure 15.3. Adding a workflow
6. Select Three-State from the list of workflow templates. Name the workflow ThreeStateWF.
7. Select an existing task list or a new task list in the Select a Task List drop-down. Any tasks related to the workflow are created in this list.
8. Select an existing list or a new list in the history list. Select the option Start This Workflow When a New Item Is Created. Click Next.
9. You see the Customize the Three-State Workflow screen. This screen allows you to select the field representing the three states of the list item. In addition it allows you to update the details of the tasks created when the item is created and when it is transitioned into its middle state. The ItemStatus field is selected by default, and the values Open, In Progress, and Closed are automatically mapped to the Initial State, Middle State, and Final State, respectively.
10. Modify the Custom Message in the first Task Details to New Request Created. Uncheck the Send E-mail Message check box as you don’t need to send any email for now. Figure 15.4 shows the first Task Details.

Figure 15.4. Task Details 1
11. Modify the Custom Message in the Second Task Details to Task Started. Uncheck the Send E-mail Message check box. Figure 15.5 shows the second Task Details.

Figure 15.5. Task Details 2
12. Click OK. Go back to the Workflow Settings for the ThreeStateDemo library and you can see the new Three-State workflow association listed.
13. Upload a new document to the ThreeStateDemo library. Once you upload the document you see the ThreeStateWF is initiated as shown in Figure 15.6.

Figure 15.6. ThreeStateDemo Library—three state workflow in progress
14. Click the In Progress link. This takes you to the Workflow Status screen as shown in Figure 15.7. This screen displays the tasks associated with the workflow and the workflow history. You can see that a new task with a title starting with “New Request Created” has been created. This is as per the configuration specified when associating the workflow to the library.

Figure 15.7. Workflow status
15. Edit the task, set the status to completed, and save the task. You can see that a new task is created with a title starting with “Task Started.” Browse to the ThreeStateDemo library and you can see that the ItemStatus for that list item has changed to “In Progress.”
16. Finally go back to the Workflow Status and update the Task Status to Complete. You can see in the Workflow Status screen that the status of the workflow has changed to completed. If you browse back to the list item you can see that the ItemStatus has also changed to Closed.
Sometimes the workflow is queued and you may need to refresh the page to see the changes in the status.