
Understanding the Object Model in Relation to Server and Site Architecture
Every time you intend to program against the SharePoint server side model you need to refer to Microsoft.SharePoint.dll in your code. This assembly contains the object model’s core classes inside the Microsoft.SharePoint namespace, as shown in Figure 7.3.
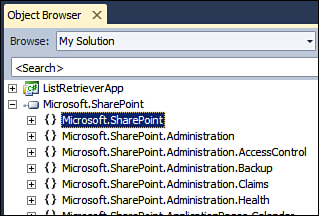
Figure 7.3. Exploring Microsoft.SharePoint.dll assembly using Object Browser
You need to understand the role of various core classes in this assembly in the context of SharePoint’s server and site architecture, discussed in the following sections.
Understanding the Object Model in Relation to Server Architecture
Let’s explore the core classes in the object model corresponding to various nodes in the SharePoint server architecture. At the top of the hierarchy is an object of the SPFarm class, representing a server farm, as shown in Figure 7.4.
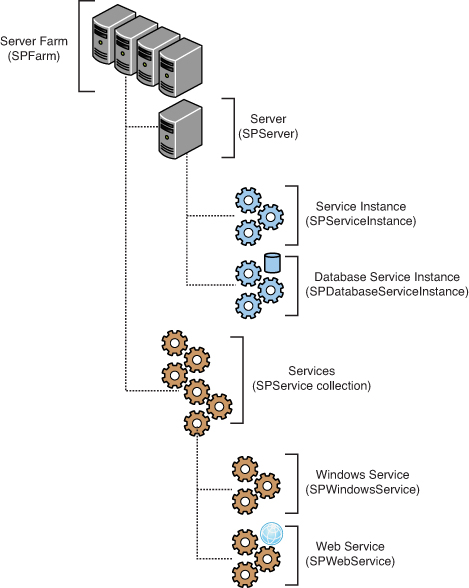
Figure 7.4. Object model in relation to the server architecture
SPFarm has two important properties namely, Servers and Services. The Servers property gets a collection of all the servers (SPServer objects) in the farm while the Services property gets a collection of SPService objects, representing logical services on the farm.
SPServer object, representing a server, has an important property called ServiceInstances, which provides references to individual service instances (SPServiceInstance objects) running on the server.
Two important classes, SPWindowsService and SPWebService inheriting from the SPService class, form the base classes for various Windows and web services, respectively. For example, implementation for a timer service (which is actually a Windows service) is provided by the SPTimerService class. As you would expect, this class inherits from the SPWindowsService class.
Further, the WebApplications property of the SPWebService gets the collection of web applications (SPWebApplication objects) that run the service. The Sites property gets the collection of site collections within the web application, and the ContentDatabases property gets the collection of content databases (objects of the SPContentDatabase class) used in the web application.
SharePoint 2010 introduces a new concept called Service Application Framework, which is actually a replacement of SharePoint 2007’s Shared Services Provider. Services implementing the Service Application Framework inherit from the SPServiceInstance class, which represents a single instance of a service that runs on a server and therefore associates services with servers. Services implementing the Service Application Framework can have multiple configured farm-scoped instantiations (CFSI), each having its own configuration settings.
Consider an example of the SPDatabaseServiceInstance class, which extends the SPServiceInstance class and represents a single instance of a database service running on the database server. There can be multiple instances of SPDatabaseServiceInstance running on different servers, each having its own configuration settings. Each service instance can access any farmwide settings that apply to the parent service of this instance (database service in our case) by using the Service property of the SPServiceInstance class.
Understanding the Object Model in Relation to Site Architecture
Next consider the core classes modeling various aspects of a SharePoint website. The SPSite class represents a site collection and can include any number of SPWeb objects representing subsites. Each subsite can further have a number of subsites. The Webs property (of SPWeb) returns a SPWebCollection object that represents all the subsites of a specified site. Further the Lists property of SPWeb returns an SPListCollection object that represents all the lists in the site. The SPList class represents a list containing a collection of list items (the Lists property), represented by SPListItem. Figure 7.5 represents this arrangement visually.
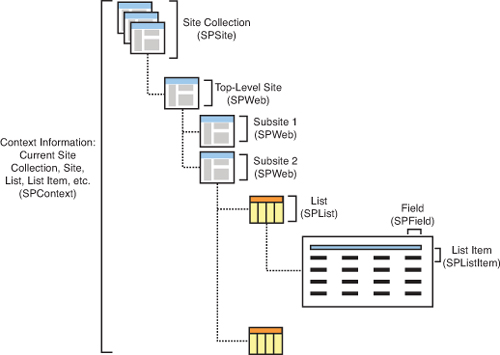
Figure 7.5. Object model in relation to the site architecture
The object hierarchy shown in Figure 7.5 is a much simplified and scaled-down version of the actual SharePoint object model. However, it effectively highlights the basic thought process behind the SharePoint object model and should get you going in the right direction.
Getting the Context Information
The SPContext class, shown previously in Figure 7.5, has so far not been discussed much. In the SharePoint world, the SPContext class gets the context of the current HTTP request. The static Current property of the SPContext class provides properties that return context information about the current web application, site collection, site, list, list item, and so on.
The following code illustrates how you can use the properties of the SPContext class to return the current list, site, site collection, and web application:
SPList currentList = SPContext.Current.List;
SPWeb currentWeb = SPContext.Current.Web;
SPSite currentSite = SPContext.Current.Site;
SPWebApplication currentWebApplication = SPContext.Current.Site.WebApplication;
Security Context and Security Elevation
The ListRetrieverWebPart runs under the security context of the authenticated user. This means that if you try to perform any operation in your server side code that the authenticated user is not authorized to perform, the user receives an Access Denied message. For example, if you create a DisplayAllWebs method (similar to DisplayAllLists) to list all the subsites under a given site, any user with read privileges (that is, added to your site’s visitor group) receives an Access Denied message on navigating to a page hosting your web part. Visitor group users have permissions to enumerate through collection of lists in a site but not thorough collection of subsites, hence the access denied message. Let’s discuss the SPSecurity class’s RunWithElevatedPrivileges method to deal with this issue.
The SPSecurity class provides methods and properties for security management. By using the RunWithElevatedPrivileges method of this class, you can run a block of code in an application pool account context (which is typically the System Account). Because the SPSecurity class is not allowed in sandboxed code, sandboxed solutions don’t support security elevation.
While employing Security Elevation, the highest level of impersonation you can obtain is “impersonating the application pool account.”
An important point to note while using the security elevation is that in the case we take reference of site object from the SPContext as shown in the following code, the associated security context will still be that of the current user.
// getting reference to the current site from SPContext won't work
// with elevated permissions
SPWeb site = SPContext.Current.Web;
Therefore, while employing security elevation we need to ensure that we create a new SPWeb instance from within the block of code that is to be executed inside the security elevated code block, as shown in the following code:
public void DisplayAllWebsElevatedSecurity()
{
// Get curent site collection and web ID
Guid siteCollectionID = SPContext.Current.Site.ID;
Guid webID = SPContext.Current.Web.ID;
// Create new site collection and web objects
using (SPSite newSite = new SPSite(siteCollectionID))
{
using (SPWeb newWeb = newSite.OpenWeb(webID))
{
// Display Site Title
LiteralControl siteTitle =
new LiteralControl(newWeb.Title + "<br/>");
this.Controls.Add(siteTitle);
// Loop through the webs collection and display the web title
foreach (SPWeb web in newWeb.Webs)
{
LiteralControl webTitle =
new LiteralControl(web.Title + "<br/>");
this.Controls.Add(webTitle);
}
}
}
}
This ensures that a new security context (that is, the application pool account) is loaded when the DisplayAllWebs method is called with security elevation. To call the previous method, you need to instantiate the SPSecurity.CodeToRunElevated delegate, pointing to the DisplayAllWebsElevatedSecurity method, as shown here:
SPSecurity.RunWithElevatedPrivileges(newSPSecurity. CodeToRunElevated(DisplayAllWebsElevatedSecurity));
Build and deploy your web part again and navigate to the same page where a user with read permissions got an access denied error earlier. This time the code runs under the security context of the application pool account and therefore the user is not presented with an access denied screen.
No matter how much confidence you have in your programming skills, it is always recommended to unit test your custom code by creating users with different set of privileges (administrator, contributor, visitor, and so on) and making your custom code execute in these different security contexts. This approach is useful for tracking improperly employed security elevation.
Allowing Unsafe Updates
When executing code with RunWithElevatedPrivileges, if you try to perform updates to SharePoint objects and the user does not have the privileges to do so, you receive a security exception. Even though your code block is executing with elevated permissions, still to perform updates you need to perform one additional task and that is setting the AllowUnsafeUpdates property to true. Setting this property to true allows your code to bypass security validation when making changes to SharePoint objects.
For example, consider a web part to upload images to a picture library. Recall that we developed such a web part (ImageUploaderWebPart) in Hour 5, “Working with Web Parts and Web Pages,” when exploring web part development concepts. If a user with read permissions tries to upload an image to a picture library, he receives the following error, even when the block of code to upload file is executed with elevated privileges, as illustrated in Figure 7.6 as well:

Figure 7.6. Security exception even when code is run with elevated permissions
The security validation for this page is invalid. Click Back in your Web browser, refresh the page, and try your operation again.
To fix this error, set the AllowUnsafeUpdates property of the related SPWeb object to true, as shown in the following code:
// Get root web reference
Guid rootWebID = SPContext.Current.Site.RootWeb.ID;
Guid siteID = SPContext.Current.Site.ID;
using (SPSite site = new SPSite(siteID))
{
using (SPWeb rootWeb = site.OpenWeb(rootWebID))
{
// Get reference to MyPictureLibrary
SPPictureLibrary myPictureLibrary =
rootWeb.GetList(this.PictureLibraryName) as SPPictureLibrary;
// Get the FileBytes from the File Upload Control
byte[] fileBytes = this.fileUpload.FileBytes;
// Prepare destination Url and upload the file
string fileName = Path.GetFileName(this.fileUpload.PostedFile.FileName);
// Set Allow unsafe updates to true
rootWeb.AllowUnsafeUpdates = true;
SPFile file =
myPictureLibrary.RootFolder.Files.Add(fileName, fileBytes, true);
file.Update();
this.labelUploadResult.Text = "Upload Successful!";
}
}
The idea behind AllowUnsafeUpdates is to protect you from cross-site scripting attacks. There are basically two scenarios where you would need to fiddle with its value:
• In case of an HTTP POST request, when using RunWithElevatedPrivileges for a user not having sufficient privileges to make changes to SharePoint objects
• In case of an HTTP GET request, when performing any changes to SharePoint objects, even for a user who has the required privileges to perform the operation
Although it is generally recommended not to set AllowUnsafeUpdates to true, there are always exceptions. While the second scenario just presented should be avoided as much as possible (that is, strictly no updates in HTTP GET), the first scenario can be dealt with more gracefully. To understand how, have a look at the concept of form digest.
Form digest basically contains information about the previous request that has generated the postback. When processing an HTTP POST request always make sure that you call the SPUtility.ValidateFormDigest method before performing any operation. This ascertains that the POST request is validated (that is, not a cross-site scripting attack). Thereafter you don’t need to worry about the value of AllowUnsafeUpdates as it automatically is set to true once the form digest is validated.
To understand the second scenario, consider the following code to update the title of the current web when the ImageUploaderWebPart is loaded:
protected override void OnLoad(EventArgs e)
{
SPWeb web = SPContext.Current.Site.RootWeb;
web.Title = "New Title";
web.Update();
}
While a user with read privileges will definitely receive an Access denied message when trying to perform the preceding operation, even a user having the required level of privileges to update the site title will receive the following error, asking for AllowUnsafeUpdates to be set to true, as shown in Figure 7.7.

Figure 7.7. Changes to SharePoint objects in HTTP GET require AllowUnsafeUpdates to be set to true
The reason you get an error message on an HTTP GET request, even when having required privileges to perform the operation, is that changes to SharePoint objects in an HTTP GET request are considered unsafe. For example, in the case of a cross-site scripting attack, malicious code can redirect you to the page performing such an operation and you might unintentionally modify the site title or delete a list item. That is why the SharePoint security model prompts you to set the AllowUnsafeUpdates property to true and entrusts you, the developer, with the responsibility of ensuring the correctness of your action. There are scenarios in which you might want to do such a thing—for example, you want to log whenever a user accesses a particular web part. In such cases the AllowUnsafeUpdates allows you to perform such a task.
The ImageUploaderWebPart, in the code samples for this hour, highlights all the scenarios discussed previously. You can uncomment specific sections in the source code to better understand various topics discussed in this section.
Using Disposable Objects
When working with the SharePoint object model, one must be aware of the fact that the object model contains objects that implement the IDisposable interface. The Microsoft .NET Framework requires such objects to be explicitly disposed once you are finished using them.
In case you fail to explicitly dispose the disposable objects, such objects might be retained for the long term in memory and might lead to issues like high memory consumption by the IIS worker process, frequent application pool recycling, and poor system performance.
As an example, both SPWeb and SPSite implement the IDisposable interface. So in your code, if you create a new instance of, say, the SPSite class, as shown here:
SPSite siteCollection = new SPSite("http://YourSiteCollection");
Then you must explicitly call the Dispose method on the object once you are done working with it, as follows:
// Disposing SPSite object instance after use
siteCollection.Dispose();
Another important point to note here is that in case your code throws an exception, the Dispose method might not actually get called. To ensure that the Dispose method is always called in such scenarios, either use a try..finally block or place the instant creation code inside a using block, as shown in the following code snippet:
try
{
SPSite siteCollection = null;
siteCollection = new SPSite("http://YourSiteCollection");
// Your code to manipulate siteCollection object here
}
finally
{
if (siteCollection != null)
{
// Dispose is always called even when
// code in try block throws exception
siteCollection.Dispose();
}
}
// Compiler automatically generates required code to dispose the object
using (SPSite siteCollection = new SPSite("http://YourSiteCollection"))
{
// Your code to manipulate siteCollection object here
}
As a general rule, you should ensure the proper disposal of objects created in your code. Do not try to dispose the objects obtained from the SharePoint context objects. For example, calling the Dispose method on an SPWeb object obtained using SPContext.Current.Web (as showing in the following code) should be avoided:
// Do not try to do this. SharePoint will manage such objects
SPWeb web = SPContext.Current.Web
web.Dispose()
// Do not place such objects in the using block as well
using (SPWeb web = SPContext.Current.Web)
{
}
Note that apart from explicitly creating objects using new keyword, calls to certain methods, for example, the SPSite class’s OpenWeb method, can cause creation of new objects, which must be disposed as well in your code. For example, SPSite.AllWebs [] index operator creates a new SPWeb instance when accessed, which must be disposed properly in your code. The following code demonstrates this scenario:
using (SPSite siteCollection = new SPSite("http://YourSiteCollection"))
{
// Creates a new SPWeb object, which must also be disposed
SPWeb web = siteCollection.AllWebs[0];
}
using (SPSite siteCollection = new SPSite("http://YourSiteCollection"))
{
// SPWeb object correctly disposed
using (SPWeb web = siteCollection.AllWebs[0])
{
}
}
The MSDN article http://msdn.microsoft.com/en-us/library/aa973248(v=office.12).aspx describes some more best practices for working with disposable objects. Refer to this article to further understand common mistakes and best practices when working with SharePoint objects that implement the IDispose interface.
Working with the SharePoint Dispose Checker Tool
Knowing when to call the Dispose method on a particular object and when not to can be confusing. Fortunately, a tool called SPDisposeCheck comes to the rescue when you’re in doubt. SPDisposeCheck analyzes your assemblies and validates them against known Microsoft dispose best practices. For more details on the SPDisposeCheck project, visit the http://code.msdn.microsoft.com/SPDisposeCheck site. You can choose to integrate the tool with Visual Studio by selecting the two options shown in Figure 7.8 at the time of installing the tool.
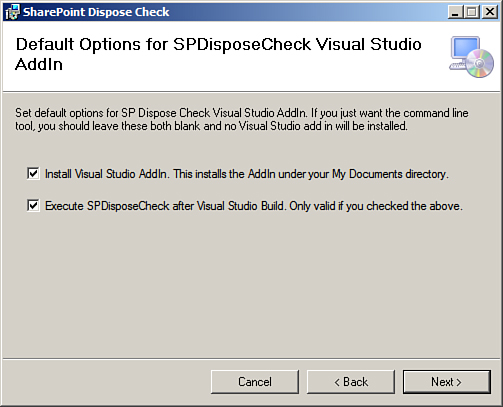
Figure 7.8. Integrating the SPDispose-Check tool with Visual Studio
You can also choose to run the tool from the command line. By default it is installed at C:Program Files (x86)MicrosoftSharePoint Dispose Check. You can fire up SPDisposeCheck.exe present at this location against your assemblies and analyze them for possible memory leaks.
For example, consider the following code. Clearly, we should be disposing the siteCollection and web objects, since they are created within our code.
// Would be flagged by the SPDisposeCheck tool for a possible memory leak
SPSite siteCollection = new SPSite("http://YourSiteCollection");
SPWeb web = siteCollection.OpenWeb();
As expected the SPDisposeCheck tool notifies you about the problem with the Disposable type not disposed error as shown in Figure 7.9.

Figure 7.9. The SPDispose-Check tool notifying about the “Disposable type not disposed” errors
As indicated in the error message as well, the tool’s recommendations may not be correct in all scenarios. In spite of that it’s a handy utility to have and you should also analyze your code from the same for possible memory leaks.