34. Using Data Storage Devices
Using Disks and Discs
Working with hard drives, CDs, DVDs, and other similar types of storage devices is an important part of using Mac OS X. The following bullets provide information about some useful disk- and disc-related tasks:
• You can control whether mounted disk, disc, and volume icons are automatically shown on the desktop using the Finder Preferences window (select Finder, Preferences and click the General tab). In the Show These Items on the Desktop section, activate the check box beside each type of storage device you want to see on the desktop: Hard Disks; External Disks; or CD, DVDs, and iPods. (If you chose not to have disk icons mounted on the desktop, you can access the mounted disks and volumes using the Computer folder and the Sidebar.)
• You can eject removable disks by dragging them to the Trash; selecting them and selecting File, Eject; pressing ![]() -E or your Apple keyboard’s eject button; using the contextual menu’s Eject command; or using the Eject icon that you can place on the Finder toolbar. You can also eject any ejectable item by clicking the Eject button that appears next to that item in the Sidebar. You should always eject any kind of disk before you disconnect it from your Mac; if you don’t, some or all of the data it contains might be damaged.
-E or your Apple keyboard’s eject button; using the contextual menu’s Eject command; or using the Eject icon that you can place on the Finder toolbar. You can also eject any ejectable item by clicking the Eject button that appears next to that item in the Sidebar. You should always eject any kind of disk before you disconnect it from your Mac; if you don’t, some or all of the data it contains might be damaged.
Tip
![]()
When you select a mounted volume (such as a CD), the Trash icon on the Dock becomes an eject symbol to indicate you are unmounting a volume rather than deleting it.
• To erase a disk under Mac OS X, use the Disk Utility application (Applications/Utilities). Open the application, select the disk you want to erase, click the Erase tab, select the format on the Volume Format pop-up menu, enter the volume name, and click Erase.
• Disk Image is a file type that mimics the behavior of a disk. When you open a disk image, it acts just as if it were a real disk. Disk images are most commonly used to distribute applications. When a disk image is mounted, you can open it as you would a physical disk, eject it, and so on.
![]() To learn more about disk images, see “Installing Mac OS X Applications,” p. 128.
To learn more about disk images, see “Installing Mac OS X Applications,” p. 128.
![]() To learn how to configure the action when you insert blank media, see “Configuring Disc Actions,” p. 661.
To learn how to configure the action when you insert blank media, see “Configuring Disc Actions,” p. 661.
Installing and Using a Hard Drive
Your Mac’s hard drive is one of its most important devices, and its performance and operation have a major impact on the performance and operation of your system. At some point, you may want to increase the amount of hard disk space available to you. Adding more hard drive space is relatively simple in most cases and offers many benefits to you.
Installing an External Hard Drive
Installing an external hard drive is very simple. Connect the power supply to the drive and to an electrical outlet, if needed (some drives take their power from the interface). Then, connect a FireWire, USB 2.0, or FireWire 800 cable to the drive and your Mac.
After you have connected the drive and powered it up, the installation part is complete (easy installation is a good reason to use an external drive). Because FireWire and USB are hot swappable, you don’t even need to shut your Mac down to connect it to an external hard drive. However, you should immediately initialize and partition the disk before you place any data on it. (See “Initializing and Partitioning a Hard Drive,” later in this chapter.)
Installing an Internal Hard Drive
Installing an internal hard drive is a bit more complicated than installing an external drive, but it is still relatively easy to do.
Note
![]()
Because I don’t recommend that most users replace a hard drive in most Macs, this section provides information only on adding additional hard drives to a Mac Pro. If you are comfortable enough working inside a Mac to be able to replace a hard drive, you probably don’t need any help doing so.
Before you get started, read through the instructions contained in your Mac’s user manual. Then do the following:
1. Get the drive ready to install by configuring it as a slave drive (if necessary); see the instructions that came with the drive for help with this. Typically, this involves configuring jumper clips on specific pins at the back of the drive. Most of the time, these pins are already set in the appropriate configuration.
2. Back up the data on your Mac (just in case).
3. Turn off and unplug the Mac Pro.
4. Put the Mac Pro upright on a solid surface, preferably one where the computer is within easy reach.
5. Pull up the lever on the back of the Mac Pro. This unlocks the side panel, which is the panel on the left when you’re looking at the back of the Mac Pro.
6. Open the side panel from the top, and then pull the panel away from the case.
7. Touch something metal to ground yourself.
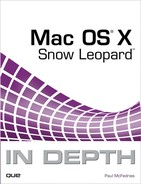
8. Locate the hard disk bay where you want to install the hard disk. Figure 34.1 shows the Mac Pro’s four hard disk bays.
Figure 34.1 The Mac Pro’s disk drive bays
9. Pull out an empty hard disk bay bracket.
10. Remove the four screws from the bracket.
11. Take your new hard disk and line up the four holes on the bottom of the disk with the four holes in the bracket.
12. Use the screws to attach the hard disk to the bracket.
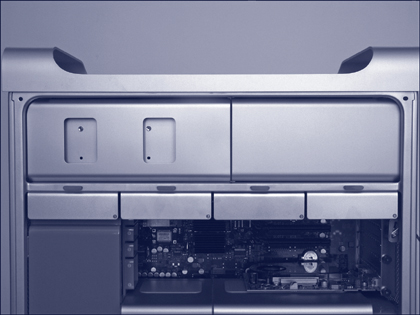
13. Slide the bracket back into the bay (see Figure 34.2) until the hard disk connectors snap into place.
Figure 34.2 After you’ve attached the hard disk to the bracket, slide the bracket back into the bay.
14. Replace the side panel and push the latch down.
15. Power the Mac up.
The Mac should restart normally. When it boots up, you might not notice any difference because you can’t use the drive until you initialize it, as described next.
Initializing and Partitioning a Hard Drive
Before you use a hard drive, whether it is internal or external, you should initialize it (you have to initialize most internal drives before you can use them, but most external drives can be used out of the box). You can also partition a hard drive to create multiple volumes on a single drive (for example, you might want to be able to install more than one instance of Mac OS X on a single disk).
When you partition a hard drive, logical volumes are created for each partition on the disk. For most practical purposes, a logical volume looks and acts just like a separate hard drive. There can be some small performance advantages to partitioning a disk, or you might choose to partition it to help you keep your system organized. The most likely reason to partition a drive is to be able to run more than one version of the Mac OS on your computer—each version needs to be installed on a separate volume. For example, you should create at least one partition to install an alternate startup version of Mac OS X in case your primary stops working correctly.
One of the results of partitioning a drive is that all the volumes outside of the startup volume are not a part of the default Mac OS X organization scheme. This can be a benefit or a problem depending on what you are doing. For example, documents you store on a separate volume aren’t secured using Mac OS X’s default permissions, as documents you store within your Home folder are. If you want to provide broader access to files, this is a good thing. If you don’t want people to be able to access these documents outside the control of Mac OS X’s security, it isn’t.
Be aware that when you partition a drive, the size of each partition becomes a size limitation, just as if the volume was a separate disk. If your partition sizes are too small, you might run out of free space in a specific volume even though the disk on which that volume is stored still has plenty of space. Generally, you should keep your partitions pretty large. If you run out of space on a partition, you have to delete files from it or re-partition the disk, which means that you must start over and reformat the disk (resulting in all files being erased). Unless you have a very specific reason to do so, you typically shouldn’t partition a drive into more than two volumes. If you aren’t going to have multiple versions of the Mac OS installed, you might not want to use multiple partitions at all.
To initialize and partition a disk, perform the following steps:
1. In Finder, select Applications, Utilities and then launch Disk Utility. In the Disk Utility window, you see two panes. In the left pane, you see the drives installed in your system (the drives are labeled by their capacities and types). Under each disk, you see the volumes into which that disk has been partitioned.
2. Select the drive with which you want to work. At the top of the right pane are five tabs; each tab enables you to view data about a drive or to perform a specific action. At the bottom of the window, you see detailed information about the drive with which you are working, such as its connection bus, type, capacity, and so on (see Figure 34.3).
Figure 34.3 The Source pane of the Disk Utility application shows one internal hard drive, and one external FireWire drive. Information about the selected drive appears at the bottom of the window.

3. Click the Partition tab. In the left part of this pane, you see a graphical representation of the partitions on the disk. If the disk is currently partitioned, you see its current partitions. If you are working with a new disk or one with a single partition, you see one partition called “Untitled” (if you’ve not named it before). In the right part of the pane, you see information about the selected volume, such as its name, current format, and size.
Note
![]()
Another reason you might want to partition a hard drive is to more easily share files with other users of your Mac. Because volumes outside the startup volume don’t use Mac OS X’s default security settings, it can be easier to provide access to a volume that all users share. For example, you might want to store files related to an iMovie project that other people are helping you with. They can then access these files without needing access to your Home folder.
4. Select the number of partitions you want to have on the drive by using the Volume Scheme pop-up menu. You can choose Current, which leaves the partitions as they are, or the number of partitions you want from 1 to 16. After you choose the number of partitions, each partition is represented by a box in the disk graphic shown under the Volume Scheme pop-up menu. The partitions are called Untitled 1, Untitled 2, and so on.
5. Select a volume by clicking its box. The volume’s partition is highlighted and information for that volume is shown in the Volume Information area.
6. Name the selected volume by typing a name in the Name box. As you type the name, it appears in the partition’s box.
7. Select the format type from the Format pop-up menu. You should almost always select Mac OS Extended (Journaled) or Mac OS Extended. The journaling option is the best choice if it is available because it improves Mac OS X’s capability to recover from unexpected power losses and other such circumstances. For each of these options, you can choose Case-sensitive. If you select a Case-sensitive format, file names are case sensitive meaning that a file called filename.file is not the same as a file called FileName.file. In most cases, you should choose Mac OS Extended (Case-sensitive, Journaled) to take advantage of the most sophisticated format option.
Note
![]()
The other format options include MS-DOS, Unix File System, and Free Space. These are useful in some special circumstances. For example, if you are going to run a Unix OS system (apart from Mac OS X) on your machine, you might want to use the Unix File System for one partition.
8. Enter the size of the partition in the Size box. You can also set the size of a partition by dragging its Resize handle in the Volumes pane.
9. Select the next partition.
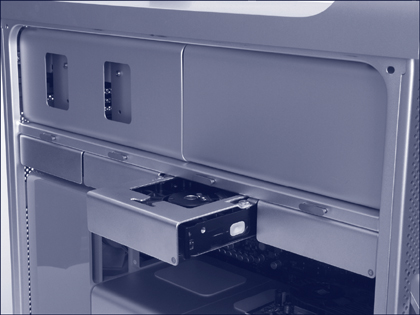
10. Repeat steps 6–8 for each of the volumes (see Figure 34.4).
Figure 34.4 This drive contains two volumes after it has been partitioned; one called Data and the other called Backups.
Caution
![]()
Partitioning a drive erases all the data on it. If the drive has data on it, make sure you back it up before you partition the drive.
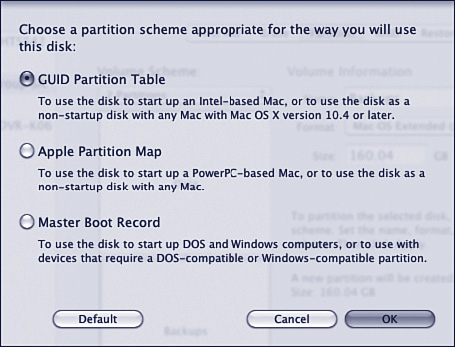
11. Click Options. The Options sheet appears (see Figure 34.5). If you want to use the disk as a startup disk for a PowerPC Mac or with any other kind of Mac, click Apple Partition Map. If you want to use the disk for a Windows startup disk, click Master Boot Record. If you are using an Intel Mac, leave the default GUID Partition Table option selected. Click OK.
Figure 34.5 If you use an Intel Mac, you won’t need to choose one of the other options when you partition a drive.
13. If you are sure that you want to initialize and partition the drive, click Partition in the Warning sheet. You return to the Disk Utility window and a progress bar appears in the lower-right corner of the window. You can use this to monitor the process.
You can also use Disk Utility for various other tasks, such as erasing a disk or a volume, managing disk images, disk maintenance, and creating a RAID disk.
![]() To learn how to use Disk Utility for disk maintenance tasks, see “Maintaining Your Disk Drives,” p. 675.
To learn how to use Disk Utility for disk maintenance tasks, see “Maintaining Your Disk Drives,” p. 675.
Working with Optical Discs
CDs and DVDs are the dominant removable media storage devices for Macs. They offer many benefits including large capacity per disc, inexpensive media, and ease of use. All modern Macs include an optical disc drive that reads CDs and DVDs and at least writes to CD too. Most Macs include an Apple SuperDrive that also writes to DVD in a variety of formats.
Note
![]()
Just as with hard drives, third-party DVD-R/DVD-RW drives are available. However, because Apple’s optical disc technology works so well and is included with Mac hardware and as part of Mac OS X, Apple’s technology is the focus of this section.
Before you burn your own discs, you should understand the type of drive your Mac has because that determines what kind of media you can use. CDs can hold about 700MB of data. Single-layer DVDs can hold up to 4.7 GB of data, and dual-layer discs can hold more than twice as much data.
Assessing Your Mac’s Disc Drive
There are a number of ways to determine which type of optical drive your Mac has.
Caution
![]()
Before purchasing a large number of discs, purchase a single disc from various manufacturers rated for your drive’s speed and try to born them with the application you intend to use to make sure they work properly.
All modern Mac models come with some version of the SuperDrive, which reads CDs and DVDs, and can write to CDs and DVDs, including dual-layer DVDs; there are some speed differences among the drives in some models, with the higher-end Macs having faster drives.
You can check the documentation that came with your Mac to determine which formats it supports. For example, if your Mac includes an 8x SuperDrive with 2.4x Dual Layer burn, you can use single-layer DVDs, dual-layer DVDs, and writable CDs (you can also use erasable versions of these formats).
You can also assess your Mac’s drive using the System Profiler.
1. Choose Apple, About This Mac.
2. Click More Info. The System Profiler launches.
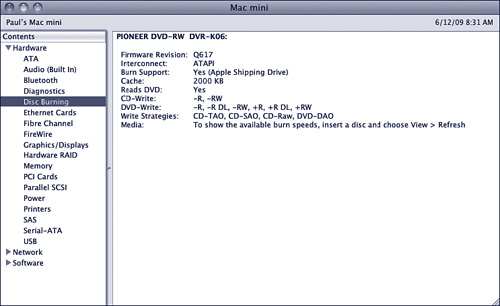
3. Open the Hardware branch and click the Disc Burning category in the left pane. In the right pane, you see the formats your Mac’s drive supports.
Tip
![]()
Any media you purchase should match one of the supported formats shown for your drive. For example, to burn to a dual-layer DVD, the +R DL format should be listed in the DVD-Write section.
4. To see information about the performance you achieve with specific media, insert a disc into the drive and choose View, Refresh (or press ![]() -R). Under the Media section, you see the type of media along with whether it is erasable and the write speeds it supports. (In Figure 34.6, you can see that a DVD+R DL disc is in the Mac’s drive.)
-R). Under the Media section, you see the type of media along with whether it is erasable and the write speeds it supports. (In Figure 34.6, you can see that a DVD+R DL disc is in the Mac’s drive.)
Figure 34.6 This Mac can read and write CDs and DVDs.
Configuring Disc Actions
You should configure Mac OS X to work with the disc drive you have installed. Do this through the CDs & DVDs pane of the System Preferences application.
Open the System Preferences application and click the CDs & DVDs icon to open that pane (see Figure 34.7).
Figure 34.7 Use the CDs & DVDs pane of the System Preferences application to configure the actions your Mac takes when you insert CDs and DVDs of various types.
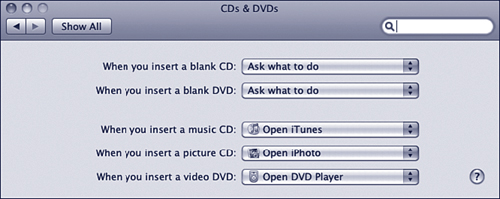
Use the When You Insert a Blank CD and the When You Insert a Blank DVD pop-up menus to select the action you want your Mac to take when you put a blank CD or DVD into your machine. (If your Mac’s drive doesn’t support DVD burning, you see only the CD menu.) You have the following options:
• Ask What to Do—When you insert a blank disc, your Mac prompts you and provides an Action pop-up menu containing a list of possible actions from which you can choose (see Figure 34.8).
Figure 34.8 Use the Action pop-up menu to choose what you want your Mac to do when you insert a blank disc.
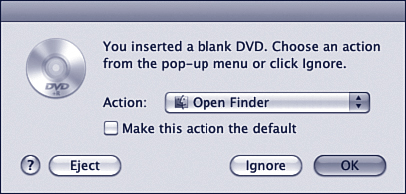
The Action pop-up menu contains a set of choices similar to those on the When You Insert a Blank Disc pop-up menus on the CDs & DVDs pane, such as Open Finder or Open iDVD (when you insert a blank DVD and iDVD is installed on your Mac). You can make the action you select on the Action pop-up menu the default (checking the Make This Action the Default check box in the prompt window does the same thing as selecting that option in the CDs & DVDs pane). The Eject, Ignore, and OK buttons in the dialog box do what you expect (eject the disc, ignore it, or implement the changes you make, respectively).
Because the Ask What to Do option provides the most flexibility, I recommend that you choose this option. However, for specific situations, the other choices might be more appropriate for you.
• Open Finder—When this option is the default or if you select it in the Action dialog box, the blank disc is mounted and a burnable folder is created. You can then use the Finder to name the folder, add content to it, and burn the disc. If you usually burn discs from the Finder and don’t like to be interrupted by the Action dialog box, this option is probably for you.
• Open iDVD—When a DVD is mounted, iDVD becomes the active application. If you mostly burn DVDs using iDVD, this setting can make the process more convenient. (iDVD must be installed on your Mac for this to appear.)
• Open iTunes—When a DVD or CD is mounted, iTunes becomes the active application. If you regularly burn discs for your iTunes content, this might be your best choice.
• Open Disk Utility—You can also burn discs using the Disk Utility application. If that is your preference, you can choose this option to have Disk Utility launch when you insert a recordable disc into your Mac’s drive.
• Open Other Application—You can use this option to select a different application to open when a disc is inserted.
• Run Script—With this option, an AppleScript you select is launched when you insert a blank disc. After you select the script you want to launch, it appears on the When You Insert a Blank CD/DVD pop-up menus. If you have a custom burn process implemented through an AppleScript, this is the option you should choose.
Tip
![]()
Use the other pop-up menus on the CDs & DVDs pane to set default actions for specific kinds of discs. For example, if you want iTunes to launch when you insert a music CD, choose Open iTunes on the When You Insert a Music CD pop-up menu.
• Ignore—When you insert a blank disc, your Mac takes no action. In fact, this disc is not even mounted in the Finder. You have to manually take some action later, such as opening an application that can burn DVDs, to do something with the disc. If you prefer to keep blank discs in your Mac and don’t want to be interrupted when you insert them, this might be the option you want to choose.
Burning Discs from the Finder
After you have configured your Mac, burning discs from the Finder is very straightforward, as the following steps demonstrate (these steps assume that you have selected the Ask What to Do option; however, using the Open Finder option works similarly). Do the following:
![]() To learn how to use Disk Utility to burn discs, see “Burning CDs/DVDs with Disk Utility,” p. 665.
To learn how to use Disk Utility to burn discs, see “Burning CDs/DVDs with Disk Utility,” p. 665.
Caution
![]()
Because burning CDs or DVDs from the Finder is a single session, you can burn to a disc only once. After it has been burned, you won’t be able to add files to it (unless it is a rewritable disc, in which case you can erase it and burn a new set of files to it). Make sure you have all the files on the disc that you want before you burn it. If you want to burn to a disc in more than one session, use Disk Utility instead.
1. Insert a blank disc into the drive. You are prompted to select an action (refer to Figure 34.8).
2. Select Open Finder on the Action pop-up menu, and then click OK. The blank disc is mounted on your desktop and you see a burnable folder icon on the Sidebar.
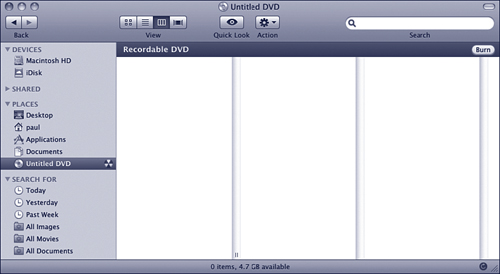
3. Select Untitled CD or Untitled DVD on the Sidebar or double-click the disc’s icon on the Desktop to open it in a Finder window (see Figure 34.9).
Figure 34.9 The selected burnable folder called Untitled DVD is a blank DVD.
4. Select the burnable folder on the Sidebar, open its contextual menu, and choose the Rename command. The disc’s name becomes editable.
5. Type a name for the disc and press Return to save the new name.
6. Drag the folders and files you want on the disc to the mounted disc, just like any other volume to which you can copy or move files. Aliases to those files and folders are created on the disc.
7. Arrange and organize the files as you want them to be on the disc (see Figure 34.10). At the bottom of the Finder window, you see the amount of space still available for more files.
Figure 34.10 After you add files and folders to the burn folder, Finder uses the status bar to display how much disc space you have left.

8. When you are ready to record the files on the disc, click the Burn button in the disc’s window. (You can also select the disc and choose File, Burn Disc, or click the Burn button next to the disc in the Sidebar.) The Burn Disc dialog box appears (see Figure 34.11).
Figure 34.11 Use the Burn Disc dialog box to name your disc.
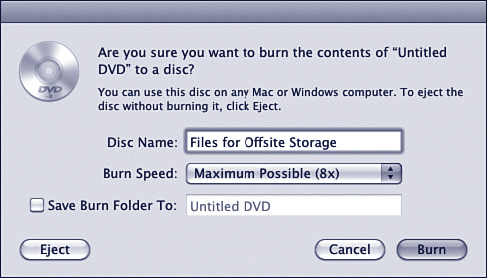
9. If you want to name the disc with a different name than it currently has, type the name of the disc in the Disc Name field. You can choose most any name you’d like. If you plan to share the disc with people who use other kinds of computers, keep the name relatively short, such as fewer than eight characters.
10. Select the speed at which you want to burn the disc on the Burn Speed pop-up menu. In most cases, choose the fastest speed available. However, if you are having problems burning discs at your drive’s maximum speed, you can try to burn at a lower speed, which might solve the problems.
11. If you want the data saved to a Burn folder, so you can make multiple copies of the disc for example, activate the Save Burn Folder To check box and name the Burn folder (the default name is the name of the current disc, but you can rename it if you want to).
12. Click Burn. If the files fit onto the disc, the burn process starts. If not, you see a prompt explaining that the selected files are too large for the disc; you need to remove some of the files until they fit on the disc and then start the burn again. As it proceeds, you see a progress window as the data is prepared and the disc is recorded and verified. When the process is complete, the disc is mounted on your Mac and is ready to use. The time it takes to burn a disc depends on the amount of data, type of disc, and the speed of your system. Fortunately, you can work on other tasks during the burn process.
Tip
![]()
In the CD Burn progress window, click the Stop button (the x) to abort the burn process. This might destroy the disc if the burn process is under way, so most of the time, it’s better to just let the process complete unless you are using erasable media.
Burning CDs/DVDs with Disk Utility
In addition to helping you maintain your disks, Disk Utility can also burn CDs and DVDs. It is especially useful when you want to burn a CD or DVD from a disk image file. Another great use of this utility is to back up image files for the applications you download from the Internet; rather than keeping a folder of these items on your hard drive, you can use Disk Utility to burn a folder of images onto a CD or DVD.
The benefit to burning a disk image onto a CD or DVD using Disk Utility rather than just using the Finder is that, when you use Disk Utility, the image is mounted when you insert the CD—you don’t have to first open the disk image file to mount it.
Tip
![]()
One of the best reasons to use Disk Utility to burn CDs or DVDs is that you can leave a disc open so you can burn to it multiple times. When you use the Finder, you can have only one recording session for a disc. When you use Disk Utility, you can choose to make a disc appendable, meaning you can burn to it more than one time.
Creating a Disk Image to Burn
Before you can burn a disc using Disk Utility, you create a disk image containing the folders and files you want to place on the disc using the following steps:
1. Open Finder, select Applications, Utilities, and then launch Disk Utility.
2. Click the New Image button on the toolbar. The New Image sheet appears.
3. Use the Save As text box top to name the disk image, and choose where you want to save it.
4. Name the volume you are creating by typing a name in the Name field. The name of the volume becomes the name of the disc you burn it onto.
5. Use the Volume Size pop-up menu to choose the size of the disk image. Because you are going to burn the image to disc, you want to choose one of the disc options, such as 663 MB (CD-ROM 80 min) if you’re putting the image on CD, or 4.6 GB (DVD-R/DVD-RAM) if you’re putting the image on a single-layer DVD.
6. Choose the format on the Volume Format pop-up menu. You have the same options as when you format a hard disk. In most cases, you want to use one of the Mac OS Extended formats.
7. If you want to protect the contents of the image with encryption, choose the level of encryption you want to use on the Encryption pop-up menu.
8. On the Partitions pop-up menu, select CD/DVD.
9. Leave Read/Write Disk Image selected on the Image Format pop-up menu.
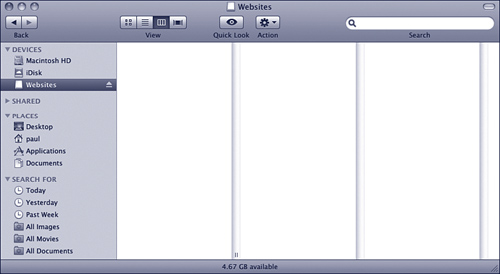
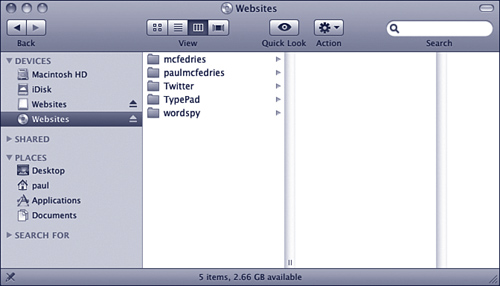
10. Click Create. The disk image is created and mounted on your Mac; you can access the disk image just like other volumes such as hard disks (see Figure 34.12).
Figure 34.12 The disk image called Websites is mounted and can be used just like other volumes available to this Mac.
11. Open the disk image by selecting it on the Sidebar and drag folders or files onto it to add them to the image. Do this until all the files and folders you want to put on disc are part of the disk image. You are limited to the size of the image you selected using the Volume Size pop-up menu; for example, if you selected the 663 MB option, the files can’t consume more than 663MB if you want them to fit on a single disc. If you try to place more files on the disk image than fit, you’re prevented from moving the files onto the image and a warning prompt appears.
Tip
![]()
To see how large a disk image currently is, select it in the Sidebar and use its contextual menu to choose Get Info. In the resulting Info window, expand the General section. In the middle of this section, you see the size of the image listed next to the text Capacity.
Burning a Single Disk Image on CD or DVD
Tip
![]()
Disk images are separated from physical disks by the dividing line that appears in the left pane of the Disk Utility window when at least one disk image is attached. Anything above the line is a volume on a physical disk of volume; anything below the line is a disk image.
To put a disc image on CD or DVD using Disk Utility, do the following:
1. Open Finder, select Applications, Utilities, and then launch Disk Utility. If you have worked with the disk image recently, it’s listed in the lower part of the left pane of the Disk Utility window (which Disk Utility calls being attached); you can skip to step 4. If it isn’t listed, you need to locate it using Disk Utility.
2. Locate the disk image by choosing File, Open Disk Image. The Select Image to Attach dialog box appears.
3. Move to and select the disk image you want to place on disc; then click Open. The image you selected is attached to Disk Utility and you see it in the left pane of the window.
Note
![]()
If the disk image is currently mounted, you see its mounted icon below the disk image file itself. You need to select the image file, not the mounted icon.
4. Select the disk image you want to burn to disc.
5. Choose Images, Burn. (You can also press ![]() -B or click the Burn button.) The Burn sheet appears.
-B or click the Burn button.) The Burn sheet appears.
6. Insert the disc on which you want to burn the image. The drive is prepared and the Burn button becomes active if the disc has enough space to hold the image. If not, you see a message saying so; click Cancel and use a smaller disk image or use a larger capacity disc. Then start the burn process again.
Tip
![]()
If you have more than one drive that can burn discs available to you, choose the drive you want to use on the Burn Disc In pop-up menu.
7. Click the downward-facing triangle next to the Burn Disc In text to see additional options (see Figure 34.13).
Figure 34.13 Use the options on this sheet to configure a burn session.
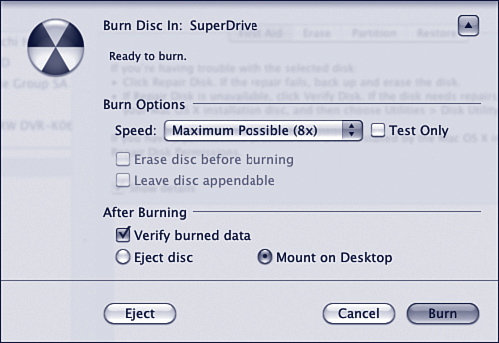
8. Set the burn speed by using the Speed pop-up menu. In most cases, Maximum Possible is the best choice. However, if you have problems burning discs, a slower speed might help.
Tip
![]()
If you move files from the disk image into the Trash, empty the trash to see the image’s current size.
9. If you want to test the burn process without actually burning the disc, check the Test Only check box. If the test is successful, you can come back and burn the disc; if not, you need to fix any issues you encounter. This can be a good way to prevent wasting discs during the burn process.
10. If you are burning to an erasable disc, activate the Erase Disc Before Burning check box to erase the disc before you burn to it.
11. If you want to be able to add more data to the disc at a later time, activate the Leave Disc Appendable check box. This is one of the best reasons to use Disk Utility to burn discs; you can add data to discs during multiple burn sessions.
12. Make sure the Verify Burned Data check box is activated to have your Mac verify the disc after the burn is complete; if you are confident and want to save some time, you can uncheck this box.
13. Click the Eject Disc radio button if you want the disc ejected when it has been burned, or click the Mount on Desktop radio button if you want the disc to be mounted instead.
Tip
![]()
To unattach disk images from Disk Utility, select the disk image file and press Delete or drag its icon out of the window. This does not delete the image file itself—it just removes it from the Disk Utility window.
14. Click Burn. You see the Progress window that displays the progress of the burn.
15. When the process is complete, you hear a tone and the finished prompt appears; click OK and the disc is ejected or mounted on the desktop, depending on the option you selected in step 13 (Figure 34.14 shows the disc mounted).
Figure 34.14 Here, I have placed a disk image (called Websites) containing website files on a DVD; above the DVD of the same name, you can also see the disk image which is still mounted.
If you leave a disc appendable, you can repeat these steps to add disk images to it. When you append files to a disc, the Burn button becomes the Append button to indicate that you are adding files to the disc rather than burning it for the first time.
Caution
![]()
If you want a disk image to mount when you insert the disc on which you want it burned, burn only one disk image on the disc. If you add multiple disk images to the same disc, only the one you most recently burned is accessible in the Finder. You should use the multiple session option only when you are burning other types of files onto a disc or when you are adding files to the same disk image.
Burning a Folder on CD or DVD
Using the following steps, you can create a disk image from a folder and then burn that image onto a disc:
1. Gather all the files you want to put onto a disc in a single folder.
2. Open Disk Utility.
3. Select File, New, Disk Image from Folder.
4. Move to and select the folder from which you want to create an image.
Tip
![]()
You can use Disk Utility to erase CD-RW or DVD-RW discs. To do so, launch the application, insert the CD-RW or DVD-RW you want to erase, select the icon for the disc drive, and use the tab’s tools to erase the disc. You can also erase such discs by activating the Erase Disc Before Burning check box in the Burn sheet.
5. Click Image. You see the New Image from Folder dialog box (see Figure 34.15). Use this dialog box to name the disk image and choose the options for the image.
Figure 34.15 The New Image From Folder dialog box enables you to configure a disk image you are creating.
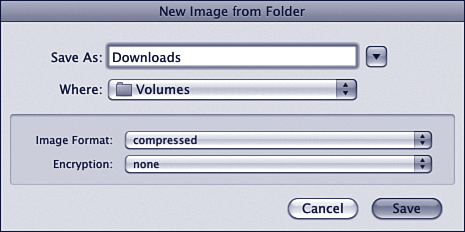
6. Name the disk image file and select the location in which you want to store it.
7. On the Image Format pop-up menu, select a format for the image you are creating:
• The Read/Write option creates an image you can add more files to later.
• The Read-Only option creates a “closed” image to which files can’t be added later.
• The Compressed option creates a compressed version of the folder so you can get more files in a smaller space.
• The DVD/CD Master option creates a disk image ready to be put on disc, so choose that one if you want to put the folder on a disc.
• The Hybrid Image (HFS+/ISO/UDF) option creates a file that can be used with other systems (not just Macs).
8. Use the Encryption pop-up menu to choose an encryption scheme for the image file if you want to protect the data it contains. If you select none, the image is not encrypted.
9. Click Save. You see a Progress window as the image file is created. When the process is complete, the disk image you created is shown in the Source pane.
10. Select the disk image you just created and follow the steps in the previous section to put that image on disc.
Burning a Volume on CD or DVD
You can also create a disk image from an entire volume. Then you can place that image on a disc for backup or other purposes. The steps you follow are very similar to those in the previous section. The only difference is that you select the volume from which you want to create a disk image and then select File, New, Image from volume where volume is the name of the volume you selected. That volume is then selected and you move to the Convert Image dialog box.