35. Maintaining Your Mac
Basic Mac Maintenance
Time and effort that you have to spend troubleshooting problems is time and effort you don’t have available to accomplish what you want to accomplish. To minimize the time you have to spend solving problems, you should take specific steps to maintain your Mac. In this chapter, I describe the following preventive maintenance chores:
• Maintaining your system software
• Maintaining your hard disks
• Maintaining alternative startup volumes and discs
• Building and maintaining a Mac toolkit
• Maintaining your applications
Maintaining your Mac in good condition with these tasks isn’t terribly difficult, and the effort you do put in pays off in having to spend less time and effort solving problems.
This list should certainly get you started with good Mac maintenance practices. A couple of other areas are equally or more important to keeping your Mac working and in good condition. These topics are so important that the next two chapters are dedicated to them.
![]() To learn about the most important Mac maintenance task you can and should do, see Chapter 36, “Backing Up Your Mac,” p. 689.
To learn about the most important Mac maintenance task you can and should do, see Chapter 36, “Backing Up Your Mac,” p. 689.
![]() To learn how to prevent problems using Mac OS X’s security features, see Chapter 37, “Securing Your Mac,” p. 705.
To learn how to prevent problems using Mac OS X’s security features, see Chapter 37, “Securing Your Mac,” p. 705.
Using Software Update to Maintain Your System Software
Apple regularly updates Mac OS X (and other applications, such as the iLife applications) to solve problems, enhance performance, and introduce new features. Keeping track of the updates manually would be time-consuming. Fortunately, you don’t have to. You can use the Software Update tool (which consists of a pane in the System Preferences application and the Software Update application) to check, download, and install updates to Mac OS X and related software (including firmware updates, updates to Apple applications you use, and so on).
Configuring Software Update
To configure Software Update, follow these steps:
1. Open the System Preferences application, and then open the Software Update pane (see Figure 35.1).
Figure 35.1 The frequency with which you check for updates depends on your connection to the Net; for most people, weekly updates are sufficient.

2. Use the check boxes, pop-up menu, and other buttons to configure the Software Update schedule (the options are described in the following bulleted list).
When configuring Software Update, you have the following options:
• Check for Updates—Use this check box to determine whether your system automatically checks for updates when you have a network connection. If you leave this check box activated, use the pop-up menu to set the checking frequency: Daily, Weekly (the default), or Monthly.
• Download Updates Automatically—If you leave this check box activated, Software Update automatically downloads important updates (such as updates to the OS) without bothering you first. When the update has been downloaded and is ready to be installed, you’re prompted to allow the operating system to start the installation process.
• Check Now—Click this button to manually check for updates. The Software Update window appears and you see a progress bar to indicate how the process is proceeding. If no updates are available, you see a message saying so along with the date and time at which you last checked for updates. If updates are available, the Software Update application opens.
Note
![]()
Whether the Download Updates Automatically option is good for you or not mostly depends on the type of Internet connection you have. If you have a broadband connection, this option doesn’t hurt because you aren’t tying up a phone line while updates are downloading. You can just choose not to install any updates you don’t want to. If you use a dial-up connection, it is better not to download updates in the background because some of the updates are quite large and you might tie up a phone line for a long time downloading an update you aren’t going to install anyway.
• Installed Software—Click this tab to see the history of all the updates Software Update has installed for you and when they were installed.
Working with Software Update
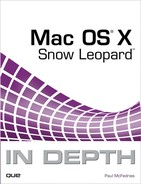
When you have configured your system to check for updates automatically and at least one update is available, you see the Software Update dialog box shown in Figure 35.2. (You also see this dialog box if you click Check Now in the Software Update pane of the System Preferences application, and at least one update is available.) You have three options:
• Show Details—Click this button to see the list of available updates (see Figure 35.2).
• Not Now—Click this button to skip the installation of the available updates.
• Install—Click this button to start the installation of the available updates.
Figure 35.2 You see this dialog box if Software Update has updates available for you to install.
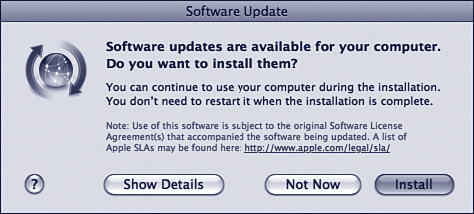
You can jump straight into the Software Update application (without opening the Software Update pane first) by selecting Apple menu, Software Update. The application launches and immediately checks for updates. If any are available, the Software Update window appears and you see the list of available updates, as shown in Figure 35.3.
Figure 35.3 The Software Update application manages the download and installation of available updates for you.
In the top pane of the application’s window you see a list of the available updates, which includes the update name, its version number, and its size. Here are two things to note about this list:
• If you select an update, information about that update appears in the lower pane of the window.
• If you see a grey circle with a white triangle inside (for example, see the iLife Support and Digital Camera Raw Compatibility Update items in Figure 35.3), it means Mac OS X will restart your Mac after it has finished installing the update.
Use the check boxes in the Install column to decide which updates you want to download and install. All the updates are selected by default, but if there are any you don’t want to install right now, deactivate the check box beside each of those updates. (If you don’t want to install anything right now, click the Not Now button.) When you’re ready to begin, click the Install X Items button (where X is the number of Install check boxes you left activated).
Note
![]()
As with other application installs, you have to authenticate yourself as an administrator to be able to install updates via Software Update. Depending on the type of update you install, you might have to agree to a license before the update can be installed on your computer (such as a new version of an iLife application).
Occasionally, updates are released that are of no value to you, such as updates for languages you don’t use, devices you don’t have, and so on. Software Update regularly reminds you of these updates until you download them. However, if you see an update that you are sure you won’t want to download and install, you can have Software Update ignore that specific update. To do so, use the following steps:
1. In the Software Update application, select the update you want to ignore.
2. Select Update, Ignore Update or press the Delete key.
Tip
![]()
Ignoring an update removes it from the list of available updates. If you don’t want to install a specific download, just uncheck its check box. To install that update, check its box before you click the Install button.
3. Click OK in the resulting warning sheet. The update is removed and you’re no longer prompted to download the current or future versions of the update you ignored.
Note
![]()
If you want to manually check for Apple software updates, go to www.apple.com/support. Use the tools on the Apple Support pages to locate and download updates. For example, in the Downloads section, you see a list of the current updates that are available.
You can see ignored updates again by selecting Software Update, Reset Ignored Updates. All the updates you have ignored are added back to the Software Update application and you are prompted to download and install them again. You can’t choose to restore a single update; you have to restore them all. Of course, you can choose to ignore specific updates again to remove them from the list.
After you have downloaded and installed an update, use the Installed Updates tab of the Software Update pane of the System Preferences application to verify that the updates were installed.
Maintaining Your Disk Drives
Maintaining your disk drives goes a long way toward maximizing performance and preventing problems. You can use the Mac OS X Disk Utility application to do basic disk maintenance and repair. For maximum performance, you can also consider defragmenting and optimizing your disks.
Checking and Repairing Disks with Disk Utility
Among other things, the Disk Utility application (located in the Applications/Utilities folder) enables you to check for problems with your disks and then repair problems that are found.
![]() See “Initializing and Partitioning a Hard Drive,” p. 656.
See “Initializing and Partitioning a Hard Drive,” p. 656.
Note
![]()
A volume is a disk that has been partitioned into two or more partitions. Each partition behaves as if it were on a separate hard disk. There are several reasons you might want to partition a disk into multiple volumes, such as for organization purposes or to create multiple startup volumes. See Chapter 34 for more information.
To check and repair a volume, perform the following steps:
1. Launch Disk Utility. In the left pane of the window are all the disks mounted on your Mac, including drives installed in your computer and those that are connected via FireWire or USB. Each volume on each disk is listed under that disk’s icon. You also see any disk images that have been mounted on the machine.
Note
![]()
Even if a disk has only one volume on it, you see that disk’s volume listed under the disk’s icon.
2. Select a disk, a volume on a disk, or a disk image you want to check. When you select a disk or volume, a number of tabs appear in the right pane of the window. How many tabs appear depends on what you select:
• If you select a hard disk, the following tabs appear: First Aid, Erase, Partition, RAID, and Restore.
• If you select a mounted volume, CD, or DVD, you see the following tabs: First Aid, Erase, and Restore.
• If you select a disk image, the First Aid, Erase, and Restore tabs appear.
3. Check the bottom of the Disk Utility window for information about the disk, volume, disc, or image you selected. Again, what you see here depends on what you have selected:
Note
![]()
In this context, volume and partition are the same thing. When you partition a disk, each partition becomes a mounted volume on that disk.
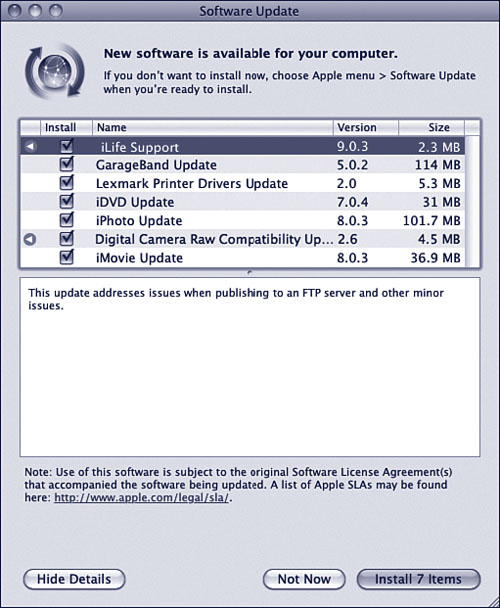
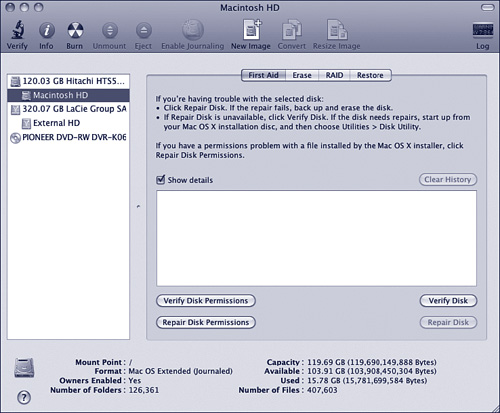
If you select a hard drive, you see the disk type, connection bus (such ATA for internal drives or USB for an external drive), connection type (internal or external), capacity, write status, S.M.A.R.T. status, and partition map scheme (see Figure 35.4).
Figure 35.4 At the bottom of the Disk Utility window, you see information about the selected hard disk; the name of the window is the name of the selected disk or volume.
• For most disks, the S.M.A.R.T. status provides an indication of the disk’s health. The status is Verified if the disk is in good working condition or About to Fail if the disk has problems. If a disk doesn’t support S.M.A.R.T., the status is Not Supported.
• If you select a volume on a disk, you see various data about the volume, such as its mount point (the path to it), format, whether owners are enabled, the number of folders it contains, its capacity, the amount of space available, the amount of space used, and the number of files it contains (see Figure 35.5).
Figure 35.5 A partition on a disk has been selected and information relevant to a volume is now shown at the bottom of the Disk Utility window.
• If you select a CD or DVD disc drive, you see the drive’s specifications and the types of discs with which the drive can work.
Note
![]()
S.M.A.R.T. stands for self-monitoring analysis and reporting technology. Most modern disk drives support this technology, which means potential problems with a disk are identified and reported before the problem occurs. The goal of this technology is to enable you to repair a disk before you lose any data or at least transfer the data on that disk to another disk.
• If you select a mounted CD or DVD, you see where the disc is mounted and its name, its format, its write status, the numbers of folders it contains, the disc’s capacity, the available space, the used space, and the number of files stored on it.
• If you select a disk image, you see its description, size of the image file, write status (mounted or not), connection bus, and where it is located (the path to it).
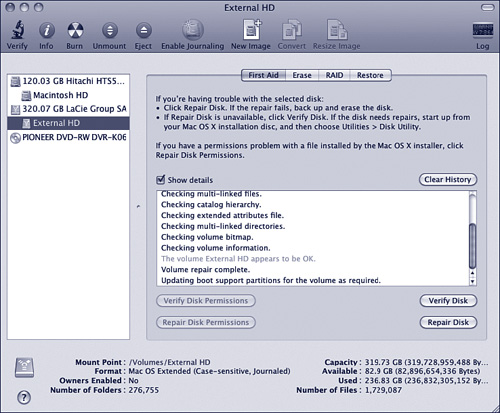
4. Click the First Aid tab to see some information explaining how Disk Utility works.
Note
![]()
You can’t repair a disk with open files, which means you can’t do these tasks with your Mac OS X startup volume. You can verify your startup volume to learn about any issues on that disk. To repair that volume, restart your Mac from the Mac OS X installation CD and select Disk Utility from the Installer menu. Or start up your Mac from an alternate startup volume, which should be part of every Mac user’s toolkit.
5. Click Repair Disk. The application checks the selected disk or volume for problems and repairs any it finds. If you select a volume on a disk, the application checks all the volumes on that disk automatically. As Disk Utility works, you see progress messages in the First Aid pane. When the process is complete, a report of the results appears (see Figure 35.6).
Figure 35.6 The selected disk appears to be okay.
![]() To learn how to run a Unix disk repair utility during startup, see “Starting Up in Single-User Mode,” p. 124.
To learn how to run a Unix disk repair utility during startup, see “Starting Up in Single-User Mode,” p. 124.
You can choose to verify a volume rather than to repair it. When you do so, the application finds problems with the disk and reports back to you. You then have to tell the application to repair those problems. Generally, you should use the Repair button to save the extra step and because you always choose to repair problems Disk Utility finds.
Note
![]()
For the Mac OS X startup volume, you never really need to run Disk First Aid. That is because the disk is checked and repaired during startup. You can also run a Unix disk repair utility during startup.
![]() To learn how to use the Disk Utility to initialize and partition hard disks, see “Initializing and Partitioning a Hard Drive,” p. 656.
To learn how to use the Disk Utility to initialize and partition hard disks, see “Initializing and Partitioning a Hard Drive,” p. 656.
You can also use Disk Utility to check or repair the permissions on the startup volume you are using. This can solve access problems with specific files on the machine when you don’t have the required permissions. Even if you aren’t currently having permissions related problems, it’s a good idea to do the following steps periodically as part of your disk maintenance tasks:
1. Select your current startup volume (if your startup disk has more than one volume, you have to select the startup volume, not the disk on which the volume is stored).
2. Click Repair Disk Permissions. The application starts searching for permission problems and repairing those it finds. As it works, you can view the status of the process in the window. When the process is complete, you see the results in the information window on the First Aid tab.
You can use the Verify Disk Permissions button to find permission problems. Then you have to tell the application to repair them. As with disk problems, you almost always repair any problems the application finds, so you can save yourself a step by using the Repair button instead.
Tip
![]()
Disk Utility has a toolbar, which you can configure by Control-clicking it and using the resulting pop-up menu to configure the toolbar.
Erasing Disks with Disk Utility
You can also use Disk Utility to quickly erase and reformat volumes or erasable disks (such as CD-RW discs):
1. Select the disk, disc, or volume you want to erase.
2. Click the Erase tab.
3. Choose the format you want to use for the volume on the Volume Format pop-up menu. The format options are Mac OS Extended (Journaled), Mac OS Extended, Mac OS Extended (Case-sensitive, Journaled), or Mac OS Extended (Case-sensitive). If you select a disk, you also see the MS-DOS File System format.
Tip
![]()
If you select a volume, you can use the Erase Free Space button to remove files that you have deleted from the volume to make them harder or impossible to recover using data recovery tools. When you click the Erase Free Space button, you can use the resulting sheet to choose how you want to overwrite the free space. There are three options, with each providing a different level of security.
4. Name the volume in the Name field.
5. Click the Security Options button. The Secure Erase Options sheet appears (see Figure 35.7).
Figure 35.7 When you erase a volume or disk, you can choose the security with which you erase that volume’s data.
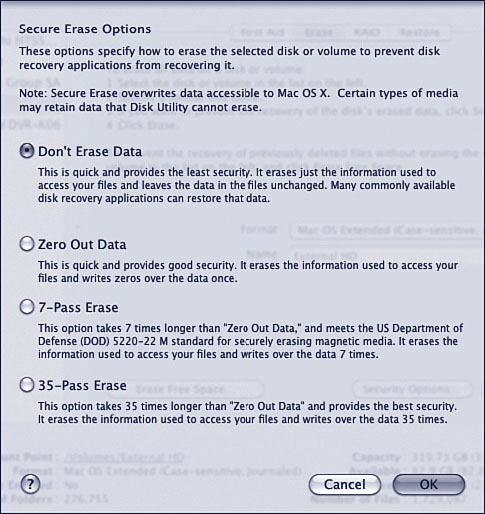
There are four options you can choose to determine how your Mac handles data it is erasing:
• Don’t Erase Data—This option makes the data unviewable from the Finder but leaves the data physically on the disk. As your Mac needs to write more files to the disk, it overwrites the erased space. Until the data is overwritten, that data can be recovered (unerased) using an application designed to recover data.
• Zero Out Data—This option writes zeros in all sectors on the disk.
• 7-Pass Erase—This option writes random data over the entire disk 7 times.
• 35-Pass Erase—This option writes random data over the entire disk 35 times.
The purpose of the last three options is to prevent data on the disk from being restored after you erase it. For example, if you were transferring a disk to someone else, you would want to select one of these options so that the data you had on the disk could not be recovered. The more overwrites you choose, the more secure the erase and the longer the process takes. If you are maintaining control of the disk, you probably don’t need to choose one of the secure erase options, but using the Zero Out Data option doesn’t add a lot of time to the process, so it isn’t a bad choice.
If you want to use one of these options, click its radio button and then click OK.
6. Click Erase. The confirmation sheet appears; if you are sure you want to erase the disk, click Erase again. The drive’s or volume’s data is erased and is formatted with the options you selected.
Tip
![]()
You can get detailed information about a device or volume by selecting it and clicking the Info button on the toolbar.
Enabling Journaling with Disk Utility
Under Mac OS X, disks can use the Mac OS (Journaled) file format. This format provides a journal function that tracks activity that has taken place in the main areas of the disk. This log helps re-create the data on the disk and makes repair operations more successful. In most cases, you should use this option because it gives you a better chance of recovering data and disks if you have problems. As you saw in the previous section, you can select the Journaled format when you erase a disk or volume. You can also enable journaling on an existing volume without erasing or reformatting it. To do the latter, use the following steps:
1. Select the volume on which you want to enable journaling.
2. Click the Enable Journaling button on the toolbar. (Alternatively, select File, Enable Journaling, or press ![]() -J.) The journaling information begins to be tracked for the selected disk or volume. (If this option is inactive, it means that journaling is already enabled or it can’t be activated on the current disk, in which case, you have to erase the disk to activate journaling.)
-J.) The journaling information begins to be tracked for the selected disk or volume. (If this option is inactive, it means that journaling is already enabled or it can’t be activated on the current disk, in which case, you have to erase the disk to activate journaling.)
Defragmenting and Optimizing Your Hard Disks
As you save files to a disk (again, this means any kind of disk you have mounted on your Mac, except for CD-ROMs, DVD-ROMs, and other locked disks from which you can only read data), data is written to the disk. The Mac is also frequently writing other sorts of data (such as preference changes and other system-level data) to the startup disk. As data is written to a disk, it is written in the next available space (called a block). After the data is laid down, the Mac returns to what it was doing. When it is time to save more data, the next batch is written in the next open space, and so on. Think of this as the Mac putting all the data down in a straight line (yes, the disk is round, but it is easier to think of it this way), one chunk after another.
As files are opened and closed, data from different files is laid down in the next available space so that, instead of all the data from one file being in a continuous block, it can be stored in blocks located in various spots around the disk. In this state, the data is fragmented. Although fragmentation is a normal part of the way disk drives function, excessive fragmentation can slow down the disk. Things slow down because the drive head must read data from all the blocks that make up a particular file. As those blocks become more numerous and are spread out around the disk, it takes longer and longer to read all the data for that file.
You use a process called defragmentation to correct this condition. You need a disk maintenance program to do this, such as Tech Tool Pro. What the defragmentation process does is pick up all the data blocks for each particular file and write them in a continuous block. It does this for every file on the disk. After the data is laid out nice and neat, the drive performs faster because it doesn’t have to move as far to read and write the data for a particular file.
Because a hard drive is made up of a round disk that spins at a constant speed, it takes longer to read and write data to various parts of the disk. Data near the center is read more quickly than data out near the rim. Data can be written to the disk in such a way that the access speed of the drive is optimized.
To do this, the data that is used constantly but not changed much—such as the system software and applications—is stored near the center of the disk. The documents and other data that are infrequently used are stored out toward the edge of the disk. This arrangement speeds up the disk because access to the most frequently used data is faster, and keeping the static data together means it does not become fragmented. Thus, the data is read and written in an optimized (for speed) fashion. You also need a disk maintenance tool to optimize a disk.
Usually, defragmentation and optimization are done at the same time using the same tool. The steps to perform these tasks depend on the particular software you use. Generally, this is not complicated and is a matter of choosing the drives you want to defragment and optimize and clicking Start.
Defragmentation and optimization are somewhat controversial topics. Many experts believe they do little to no good, but others believe you can gain some performance and reliability improvements by performing these tasks on your disks regularly. Personally, I think you can better spend your time by keeping your disks well organized and using Disk Utility to check them every so often rather than worrying about squeezing a few microseconds of performance out of them. But you might want to obtain and use a disk maintenance application, such as TechTool Pro, if getting the best possible performance from your disks is important to you. These applications also provide additional troubleshooting tools that can be useful.
Note
![]()
Many disk maintenance applications enable you to retrieve files you have deleted (an undelete or recover function). This is possible because during normal deletes (when you empty the Trash) the file is removed from the active system but might still exist on the disk in some form. The only way to be permanently rid of a file so it can’t be recovered is to write over the area in which that file was stored with other data. To do this, you need an application that writes zeros or other bogus data over the location where the file you are deleting is stored. Typically, disk maintenance and other tools enable you to “really” delete files that you don’t want to be able to be recovered. In Mac OS X, you can also do this by using the Finder’s Secure Empty Trash command or by erasing a disk with Disk Utility (see “Erasing Disks with Disk Utility,” earlier in this chapter).
Cleaning Up Your Drives
You can do a lot for the performance of your disks by simply keeping them cleaned up. The more data on your drive, the less room you have to store new files. If your disks get too full, their performance slows down significantly. More data means there is more information for your Mac to manage, and thus it has to work harder and uses more resources. You can also run into all kinds of problems if you try to save files to disks that are full to the brim; how full this is depends on the size of the files with which you are working.
Learn and practice good work habits such as deleting files you don’t need, uninstalling software you don’t use, and archiving files you are done with (such as on a DVD). Regularly removing files that you no longer need from your hard drives goes a long way toward keeping them performing well for you, not to mention maximizing the room you have to store files you do need.
Maintaining Alternative Startup Volumes
One of the most important tasks you need to be able to do reliably and quickly is to start up from an alternative startup volume. There are several situations in which you might need to do this. For example, if you find problems on your current startup volume, you need to start up from another volume to repair the startup volume. If something happens to your startup volume such that your Mac can no longer use it, you need to use an alternative startup volume to keep your Mac running. An alternate startup volume can also be very helpful when you are troubleshooting problems.
Several possibilities exist for alternative startup volumes; you should maintain at least one, and preferably two, of the following options
• Your Mac OS X installation disc—You can always use the disc that contains the Mac OS X installer as a startup volume. It contains the basic software you need to start up your Mac and accomplish a limited number of activities, such as reinstalling the operating system. The downside to this is that any updates you have applied to your active system are not included in the version on the installation disc. If the version of Disk Utility on the installation disc is too far removed from the version of the OS installed on your Mac, it is possible (but not likely unless you are using a very old installation disc) that Disk Utility on the disc is incompatible with the OS version installed on your startup disc. The biggest drawback to this option is that you can’t really use your Mac while it is started up with the Mac OS X installation disc. You can only install system software or use Disk Utility and the other tools that are available on the Installer’s menu.
Tip
![]()
If you choose to install a backup version of Mac OS X on an alternative startup volume, you should delete any applications in that Mac OS X installation that you won’t need when you are starting up from that volume. This reduces the storage space it consumes. You also should start up from that volume and run Software Update periodically to keep the alternative startup volume’s OS software current. Plus, this ensures that you can actually start up from that volume before you need to actually do so, such as when there is a problem with your primary startup volumes.
• An alternative Mac OS X installation on a different volume—You should install a backup installation of Mac OS X on a different volume from the one that you use for your primary system—if you can spare the disk space required to do so. Ideally, this alternative volume is also located on a separate disk (not just a separate volume) from your primary installation. For example, if you have an external USB or FireWire hard drive, you can install Mac OS X on it so you can also use it as a startup volume.
• Third-party application discs—Many third-party applications, such as disk maintenance, antivirus, and backup software, include discs that contain system software you can use to start up your Mac. These discs also enable you to run the application software so you can correct a problem that has prevented you from starting up your system from the primary startup volume.
To start up your Mac from an alternative volume, restart the machine and hold down the Option key. After a few moments, each valid startup volume appears. Select the volume from which you want to start up and click the arrow pointing to that volume. The volume you selected is used to start up your Mac. Depending on the type, such as a full installation of Mac OS X on a volume or the Mac OS X installation disc, you can access various functionality from full Mac OS X capabilities (a full install on an alternative volume) or at least attempt to repair the startup volume itself (using the installation disc).
Tip
![]()
If you use a wireless keyboard and mouse, keep wired versions handy. In some cases, you might not be able to use a wireless device to control system startup by pressing the Option key down. You would then need to attach a wired keyboard and mouse to start up your machine from an alternate volume.
If your Mac is hung, meaning it won’t respond to any commands, such as the Restart command, press and hold its Power button down until the machine shuts down. Press the Power button again to restart it and hold the Option key down so that you can select an alternate startup volume.
You can start up your Mac from a disc installed in it, such as the Mac OS X Installation disc, by holding down the C key while the machine is starting up.
A third approach is to use the Startup Disk pane of the System Preferences application to choose the volume you want to use to start up your Mac. Of course, your Mac has to be running to be able to do this.
Maintaining Your Applications
Along with the system software, you should also maintain the applications you use. It is good practice to regularly check for updates for the applications on which you rely. There are several ways to do this, including the following:
• Software Update—Mac OS X’s Software Update function also updates any Apple software installed on your computer, such as the iLife applications.
• Automatic update features—Most modern applications include the capability to go online to check for updates, automatically or manually. For example, most Adobe applications can check for updates to keep you informed when new versions or patches are available. You should configure your applications to check for updates periodically, just as the Software Update application checks for updates to Mac OS X.
• Company mailing lists—Some publishers maintain a mailing list for each application. Updates are announced in the mailing list, and the link to get to the update is provided.
• Company websites—Software publishers announce updates to their applications on their websites. Typically, you can check for and download updates from the Support area of a publisher’s website.
• Mac news—Many Mac news sites and mailing lists include information about updates to popular applications.
• Version Tracker—Most Mac applications are listed on www.versiontracker.com. You can regularly check this site to look for application updates and patches.
Note
![]()
As with the system software, it is sometimes wise to let a few days or a week pass after an update to an application is released before you download and install it in case problems are introduced by the update.
You should also organize your applications and ensure that you have all the registration and serial number information you need for each application. It is amazing how easy it is to lose this information; getting it from the publisher can be a time-consuming task (and if you have to relicense the software, it can be expensive). Consider making a list of each application along with its serial number or registration number and keeping that list with the original installation discs or the discs containing the installers and updaters you make for your applications. When you need to reinstall an application, this list can be a great timesaver.
Building and Maintaining a Mac Toolkit
One of the best maintenance-related tasks you can do is to assemble and maintain a Mac toolkit. In times of trouble, this toolkit can enable you to get back to work quickly. Not having to find your tools in times of trouble also reduces the stress you experience. Following are some fundamental items you should keep in your toolkit:
• Your system configuration—When you need help or are considering adding something to your system, having a detailed understanding of your system is very important. Use the System Profiler application (in the Applications/Utilities folder) to generate a report on your system. Print that report and keep it handy (in case you can’t generate it when you need it).
![]() For more information about Apple System Profiler, see “Using System Profiler to Create a System Profile,” p. 737.
For more information about Apple System Profiler, see “Using System Profiler to Create a System Profile,” p. 737.
• Up-to-date backups—Your toolkit should include everything you need to restore as much of your system as possible. This includes all your data, applications, and so on.
Caution
![]()
When selecting a disk maintenance application, make sure you get one that is written for the specific version of Mac OS X that you are using. Using one designed for an older version of the OS can be harmful to your Mac and its data.
• A disk maintenance application—You need one of these applications to solve disk problems you might encounter. Examples are Disk Utility (included with Mac OS X) or Tech Tool Pro.
• An antivirus application—You need this to protect your machine from infection and in the event that your system becomes infected.
• Your Mac OS X installation disc—Sometimes, this is the only thing that gets your Mac started again.
• Your original application installers on CD or DVD (even if you downloaded the installer originally), serial or registration numbers, and updates—You should maintain the current versions of all your applications by maintaining the discs on which they came. You should also create CDs or DVDs containing updates to those applications along with any applications you download from the Internet. Finally, be sure you have a list of the serial or registration numbers for your applications so you can restore them if needed.
Tip
![]()
Consider devising some secure way to record passwords, usernames, serial numbers, and other critical data so you don’t have to rely on memory to retrieve such information when you need it. Although keeping such information in hard copy is usually not advised, some people find it safer to develop and use some sort of code for this information and then have a hard copy of the encoded information handy.
Going Further with Disk Utility
Disk Utility is a very powerful and useful application. Covering all its functionality is beyond the scope of this chapter, but it is covered again in several other chapters for a variety of purposes. Following are some hints about other tasks for which you can use it:
• Create disk images—You can create disk images from files, folders, or even drives and volumes. Just as with other disk images you work with, you can easily put your disk images on CD, use them to quickly re-create a set of data in multiple locations, and so on. The commands you use to create and work with disk images are on the File and Images menus.
• Burn CDs and DVDs—Disk Utility enables you to burn CDs or DVDs from disk images. You can also use it to create multisession discs so that you can burn to a disc more than once. First, create a disk image for the files you want to put on disc. Then use the Burn button or the Burn command on the Images menu to access the application’s burn functionality.
Tip
![]()
To remove a disk image from Disk Utility, drag its icon out of the application window or select it and press Delete.
• Work with disk images—As you mount disk images in Disk Utility, it tracks those images in the lower part of the left pane so you can work with them again by selecting them. This makes accessing these images simple.
• Mount, unmount, or eject volumes—You can use the mount, unmount, and eject buttons and commands to perform those actions for disks, discs, volumes, and disk images.
• Restore any folder, volume, or disk—You can create a disk image from any source (such as a folder or volume) and use the application’s command to restore that information on a disk. For example, if you want to replicate a set of software on multiple machines, you can create a disk image and use the Restore function on each machine to re-create that data. After you have created the disk image, use the Restore tab to restore it.
• Access a log file—As you perform actions with it, Disk Utility maintains a complete log of the actions it performs (see Figure 35.8). To access this log, select Window, Show Log, press ![]() -L, or click the Log button in the toolbar. The Log opens and you can view its contents. This provides a complete history of your disk maintenance tasks.
-L, or click the Log button in the toolbar. The Log opens and you can view its contents. This provides a complete history of your disk maintenance tasks.
Figure 35.8 Disk Utility’s log shows you all the actions it has performed along with the results of those actions.

• Configure RAID disks—Redundant array of independent disks (RAID) is a scheme whereby multiple disks can be linked to work together for performance and reliability reasons (for example, disks can be mirrored so the same information is always stored on more than one disk in case of disk failure). You can use the RAID tab in Disk Utility to configure RAID services on a machine.