
CHAPTER 4
Zapping Word's Top Annoyances
- Dealing with graphics
- Eliminating irritating editing issues
- Making view annoyances vanish
- Teaching Word to look for Help locally
- Conquering the activation blues
- Stopping some automated changes
With an estimated 500 million users worldwide, Microsoft Word leads the word processing pack. This means that for most of us, jobs and other organizations require that we spend a fair amount of time using and getting used to Microsoft Word. Even though Microsoft invests tremendous resources in making each version of Word better than its predecessor, many users eventually encounter a Word feature or behavior that doesn't work as they would like or that becomes downright exasperating.
This chapter details a number of annoying things that prevent many users from enjoying and using Word as the makers intended. Some of the settings and behaviors here are defaults; others get turned on by accident. Some require you to dig a little deeper to find out what makes Word tick. What the annoyances covered in this chapter have in common is that they can be tamed or turned off. If some things about Word are giving you a headache, this chapter is your aspirin.
Dealing with Graphics Annoyances
More than ever, documents tell stories through graphics such as shapes, charts, and pictures in addition to text. Word 2013's tools for incorporating graphics in documents and formatting the graphics are better than ever. Selecting a graphic displays one or more contextual tabs jam-packed with settings you can use to refine the selected item's appearance. That being said, a few aspects of working with graphics can trip up your document design process. Learn how to deal with these graphics issues now.
Dismissing the drawing canvas
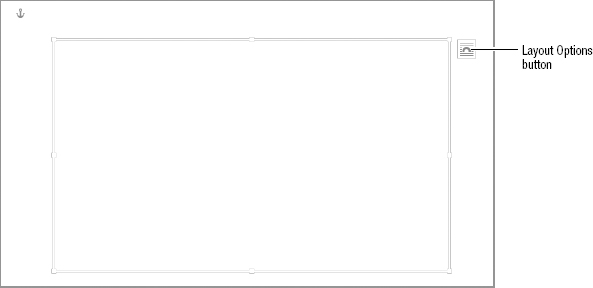
Figure 4.1 shows the drawing canvas. In earlier versions of Word, whenever you inserted a shape, the drawing canvas would appear automatically as a container for the shape. (It also displayed Create your drawing here inside the canvas.) Intended to clarify to the user that drawing objects exist in a different layer than text, the drawing canvas ended up getting in the way and confusing users.
If you upgraded from a pre-2010 version or another user changed settings, Word 2013 might still display the drawing canvas.
In Word 2013 the drawing canvas does not appear by default, but if you're one of the few users who actually got used to it and want it back, you can have it back. On the other hand, if you prefer not to use it and it appears in Word 2013 because you upgraded from a pre-2010 version of Word, you can get rid of it.
Use another of Word's Options settings to make the drawing canvas stop appearing (or to make it appear).
- Click File
 Options Advanced.
 - Under Editing options, click the Automatically create drawing canvas when inserting AutoShapes check box. Clearing the check box turns off the drawing canvas, while checking it turns it back on. Shapes were called AutoShapes in older Word versions, hence the appearance of that term in this option.
- Click OK.
Note in Figure 4.1 that in this version of Word, a Layout Options button that is a new Word 2013 feature appears beside the upper-right corner of the drawing canvas. This button also appears when you insert graphics without the drawing canvas, so you have the same tools for working with your graphic content whether or not you use the drawing canvas. Chapters 13 through 15 provide more detail about creating and formatting various types of graphics, including using the Layout Options button and other new formatting settings buttons.
Fixing text wrapping
Working with how text behaves around a graphic is another feature of working with graphics that can prove repetitive or problematic. The Wrap Text setting available for graphics, usually found on a Format contextual tab for the selected object, controls how text positions itself or flows relative to the position of a graphic you insert. For example, you can set Wrap Text to Top and Bottom to have the text stop at the line above the graphic and restart on the line below the graphic, so that no text appears beside the graphic.
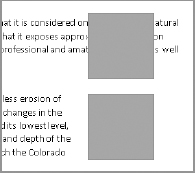
The default Wrap Text setting for inserted shapes in Word 2013 and at least a few prior versions has been In Front of Text. With this setting, the text doesn't wrap around the shape at all. Instead, the graphic appears on top of the text, obscuring the text behind it. This seems an odd choice, because there are only limited instances where most users would want to apply this setting. For example, I tend to use the Square and Tight wrap text settings most frequently. Figure 4.2 compares the default wrapping (top) versus square wrapping. As you can see, the text behind the top shape can't be read with the default wrap setting. The default Wrap Text setting for other types of graphics is In Line with Text.
The top square has the default In Front of Text wrapping, and the bottom one has Square wrapping.
Word 2013 fortunately enables you to change the default wrap and position setting (collectively called the layout) for new pictures, charts, or SmartArt graphics you insert in documents. Here's how to select a new default layout for these graphics:
- Insert a picture, chart, or SmartArt graphic, and leave it selected.
NOTE
A SmartArt graphic is a special type of automated diagram in Office applications. You can choose an overall SmartArt type—such as Lis, Process, Cycle, or Hierarchy—then choose a specific diagram style. From there, you add your text in the shapes in the SmartArt graphic to build its contents. The section called “Inserting SmartArt” in Chapter 13 provides more information about creating and working with SmartArt graphics.
- In the Arrange group of the Format contextual tab, choose the desired page position and wrap settings from the Position and Wrap Text drop-down lists. Note that the full name of the contextual tab depends on the type of object you created and selected. It might be the Chart Tools Format, Picture Tools Format, or SmartArt Tools Format tab. You can also click More Layout Options at the bottom of the Wrap Text menu, use the Layout dialog box that appears to set more detailed wrap and position settings, and then click OK.
- In the same tab and group, click Wrap Text Set as Default Layout. Future picture, chart, and SmartArt graphics you insert will use the Position and Wrap Text settings specified by your new default.
NOTE
The Set as Default Layout option is unavailable for inserted shapes. However, if you've inserted a picture, chart, or SmartArt graphic, one of a few things may be wrong if it's still unavailable. For example, you may not have changed the wrap setting yet, and in some cases you also have to change a position setting to make the command available. Also, if you're working with a chart or SmartArt, make sure the overall chart or SmartArt is selected, not an element within the overall graphic.
NOTE
Another Wrap Text setting, Behind Text, also does not wrap but instead places the graphic on the layer behind the text. Because you can see the text, this type of wrapping can be useful for adding interesting background colors or effects to parts of the document. You'll learn more details about wrapping text around various types of objects in Part IV, “Illustrating Your Story with Graphics.”
Resetting a graphic
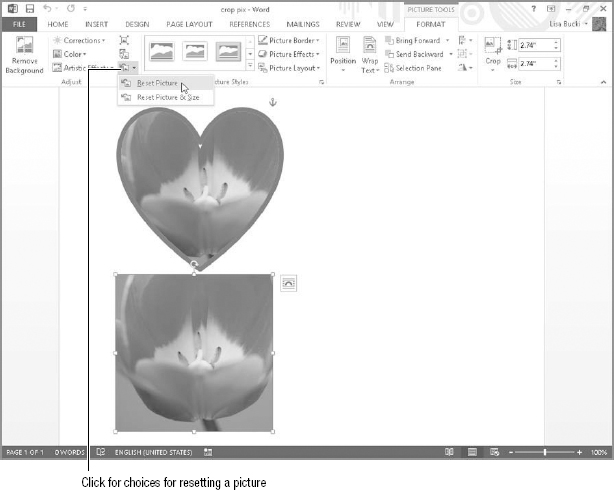
For each type of graphic, you can change around a couple of dozen overall settings, from recoloring and cropping a picture to recoloring a SmartArt Graphic. There are so many settings that it is possible to overdo it with your choices and create a frankengraphic. In older versions of Word, you had to re-create the graphic from scratch or remove all the settings you applied; now you can simply reset the graphic to its original appearance. Word offers a Reset Graphic command for several types of graphics. For example, in Figure 4.3, the top graphic is a plain picture of a blue background fill pattern, with an added wide, dark border, cropped to a heart shape. The bottom graphic is a copy of that same formatted object that has been reset to its original plain rectangle appearance using the Reset Picture command shown in the Adjust group on the Ribbon.
The top picture has the added border and cropping, whereas the bottom copy was reset to its original appearance.
NOTE
The command illustrated in Figure 4.3 is an example of when your screen may look different if you're using a higher resolution. At a higher resolution, you will see the name of the button, Reset Picture, rather than just the button with picture.
The Reset Picture command is pretty handy. Figuring out where it is can be a little trickier. Here's where to find it based on the type of graphic:
- SmartArt: SmartArt Tools Design contextual tab, in the Reset group at far right.
- Pictures: Picture Tools Format contextual tab, Adjust group. Click the Reset Picture down arrow button if you need to choose between Reset Picture and Reset Picture & Size.
- Charts: Chart Tools Format contextual tab, Current Selection group, Reset to Match Style command. This command works slightly different. It resets formatting for individual chart elements to match the overall chart style you've applied from the Chart Styles gallery in the Chart Styles group of the Chart Tools Design contextual tab; it does not reset the chart to its initial appearance when you created it.
- Shapes and WordArt: Not applicable because shapes and WordArt cannot be reset.
Overcoming Editing Annoyances
Word has dozens of editing options. The typical user in the broader Word community often has a love/hate relationship when it comes to particular settings and behaviors. What some users hate, others love, and vice versa. Word's options give every use the opportunity to turn off editing features that they dislike or have difficulty using.
Insert/Overtype
In older versions of Word, pressing the Insert key toggled between Insert mode, where typing text adds characters to the left of the insertion point and moves existing text to the right, and Overtype mode, where typing replaces text to the right of the insertion point. You learned about creating text in these modes in Chapter 2, “Diving Into Document Creation.”
Because on many keyboards the Insert key is right beside or below the Delete key, users often inadvertently switch to Overtype mode when trying to delete text. The result: inadvertently overtyping text. Word 2007 first removed the Insert key's control over toggling between the two text entry modes, but the way that it implemented the new method of toggling between the modes isn't obvious or intuitive to many users. Fortunately, you can easily switch between the Insert and Overtype modes:
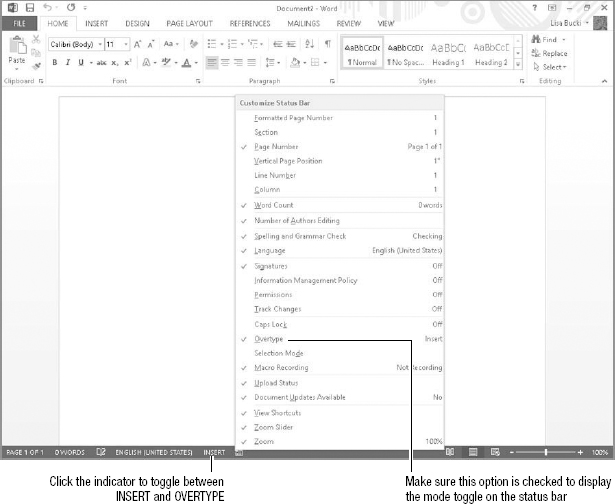
- Right-click the status bar at the bottom of the Word screen and ensure that Overtype has a check mark by it as shown in Figure 4.4. This turns on display of the INSERT/OVERTYPE indicator on the status bar.
- Press Esc to dismiss the Customize Status Bar menu.
- Click the INSERT/OVERTYPE indicator on the status bar to change between the modes as needed. The name displayed on the indicator tells you the current mode, so clicking INSERT changes to Overtype mode, and vice versa.
Turn on your ability to change between Insert and Overtype modes by customizing the status bar.
You still can revert to the prior behavior of having the Insert key toggle between Insert and Overtype modes. Select File ![]() Options
Options ![]() Advanced tab. Under Editing Options, click to enable the Use the insert key to control overtype mode option as shown in Figure 4.5, and then click OK. Of course, reverse this setting to turn the Insert key behavior back off. (Before clicking OK, you also could check the Use overtype mode check box just below Use the insert key to control overtype mode to turn on Overtype mode.)
Advanced tab. Under Editing Options, click to enable the Use the insert key to control overtype mode option as shown in Figure 4.5, and then click OK. Of course, reverse this setting to turn the Insert key behavior back off. (Before clicking OK, you also could check the Use overtype mode check box just below Use the insert key to control overtype mode to turn on Overtype mode.)
Control the Insert key toggle behavior in Word Options.

TIP
After you choose File ![]() Options
Options ![]() Advanced, scroll down to the Cut, copy, and paste section. If you click to enable the check box for Use the Insert key for paste, in the future you can press Insert to paste copied text and graphics rather than clicking the Paste button or pressing Ctrl+V. Of course, you only want to enable this option when you're not using the Insert key to toggle typing modes, or you'll end up with a whole new type of confusing behavior from Word.
Advanced, scroll down to the Cut, copy, and paste section. If you click to enable the check box for Use the Insert key for paste, in the future you can press Insert to paste copied text and graphics rather than clicking the Paste button or pressing Ctrl+V. Of course, you only want to enable this option when you're not using the Insert key to toggle typing modes, or you'll end up with a whole new type of confusing behavior from Word.
Typing replaces selected text
In most Windows programs, when you select text and begin typing, the selected text is replaced by the new text you type. Note that I'm not talking about Overtype being controlled by the Insert/Overtype toggle that you can display on the status bar or assign to the Insert key.
Word has a different mode of editing that is an available option. When text is selected and you type new text, the selection isn't deleted. Instead, Word unselects it and shoves it to the right.
If you find that you often accidentally delete text you've selected, you might want to deliberately turn off the Typing replaces selected text choice in Word options. More often, however, users mistake this feature for Insert/Overtype, and turn it off assuming that they're turning Overtype off. Then, when Overtype doesn't stop, users forget the exact Options change they made, so they don't know that the simple fix is turning the Typing replaces selected text option back off.
Here's where to find this option to turn it on and off:
- Click File Options Advanced.
- At the top under Editing options, click the Typing replaces selected text check box. Clearing the check box turns off the behavior where Word lets you overtype the selection, while checking it ensures that new text is inserted and existing text moves right.
- Click OK.
NOTE
Many users prefer to keep their hands on the keyboard and use a lot of keyboard shortcuts. With dozens of keyboard shortcuts available in Word, it takes a while to become familiar with them all. There's a shortcut for discovering the key combination for any command. See Chapter 29, “Keyboard Customization,” to learn more.
Formatting control covers up Live Preview
Live Preview can save you a lot of time because you can point to various choices to see the impact, rather than having to repeatedly open a gallery or drop-down list and make different choices. In most cases, Live Preview works like a charm. However, in some instances, the Live Preview can cover up the text or object that you're trying to preview in the document. There are two temporary fixes for this:
- Resize the gallery or drop-down list. Some drop-down lists, such as the Font drop-down list in the Font group of the Home tab, have a resizing control with four dots at the bottom, as shown in Figure 4.6. Galleries such as the Style gallery may have three dots in the lower-right corner when you open them. Use the dotted control to drag up to resize the drop-down list or gallery so that you can see the Live Preview in the text. With this method, you will have to scroll the list or gallery more to preview additional choices.
The dots at the bottom of a drop-down list or corner of a gallery indicate you can drag up to resize it and expose more of the document for Live Preview.

- Scroll the document and try again. If the overlap between the menu or gallery is slight, press Esc to close the menu or gallery. Scroll the document text down so that the selected area where Live Preview appears is below the open menu or gallery. Of course, this method has the limitation that it doesn't work for text and images at the top of the first page of the document, because you can only scroll down to the point where the top of the first page appears.
If you don't find Live Preview helpful, you can turn it off. In File ![]() Options
Options ![]() General, remove the check next to Enable Live Preview in the top section, User Interface options. If you still want to preview fonts before applying them, you can use the Font dialog box instead of the Font drop-down list. Its Preview box shows you how the selected text will appear with the highlighted font applied, as shown in Figure 4.7. Select text, and then open the Font dialog box by clicking the dialog box launcher in the Font group of the Home tab on the Ribbon.
General, remove the check next to Enable Live Preview in the top section, User Interface options. If you still want to preview fonts before applying them, you can use the Font dialog box instead of the Font drop-down list. Its Preview box shows you how the selected text will appear with the highlighted font applied, as shown in Figure 4.7. Select text, and then open the Font dialog box by clicking the dialog box launcher in the Font group of the Home tab on the Ribbon.
Some of Word's remaining dialog boxes provide formatting previews.

Clearing formatting
The section “Updating styles” in Chapter 3, “Working Smarter, Not Harder, in Word,” introduced you to the Prompt to update style option on the Advanced tab of the Word Options dialog box. When that feature is enabled and you apply direct formatting to text to which you've previously applied a style, Word opens a dialog box asking if you want to change the styles.
Direct formatting has another, perhaps unexpected, behavior with relation to styles. For example, let's say you apply the Heading 1 style to a line of text, and then you apply bold to a single word within the heading. Later, you select the line of text and change it to the Heading 2 style. If you expected that Word would remove the bold formatting and apply the style to all of the text on the selected line, you'd be wrong. The direct formatting trumps the style in most instances.
NOTE
One sometimes exception to the above rule occurs with character styles. For example, it you apply bold to a word in a paragraph, place the insertion point in that word, and then choose a character style from the Styles pane, the character style formatting will override the direct formatting. You'll learn more about working with the different types of styles and formatting in Chapters 5 through 7.
You have to clear direct formatting such as bold or italic to revert to the style's settings. First, select the text. If you've modified paragraph formatting, such as changing the line spacing or indention, press Ctrl+Q, which is by default assigned to the ResetPara command. If you've modified character formatting, such as applying bold or changing the font, press Ctrl+Space, which is assigned to ResetChar.
Sometimes you might want to remove all of the formatting for a paragraph altogether. If you click the dialog box launcher in the Styles group of the Home tab, the Styles pane (or Styles task pane) opens. As shown in Figure 4.8, the top choice in its list of styles is Clear All. Clicking it reverts the text to the Normal style and removes any paragraph formatting for the paragraph holding the insertion point. To also remove direct formatting, select the formatted text and then click Clear All.
Revert text to the Normal style with the Clear All choice.

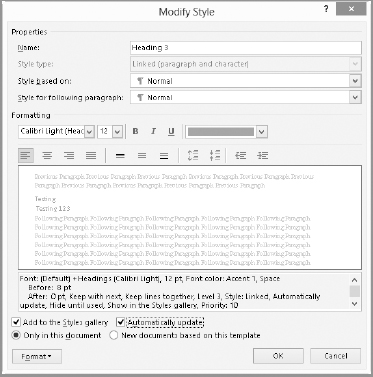
On the other hand, you can set up Word to automatically update a style to include any direct character or paragraph formatting you apply:
- Click the dialog box launcher in the Styles group of the Home tab. The Styles pane opens.
- Right-click the style to auto update, and click Modify. The Modify Style dialog box opens.
- Click the Automatically update check box to check it. See Figure 4.9.
- Click OK.
Check the Automatically update check box to have Word automatically redefine the selected style when you make direct formatting changes.
NOTE
You also can display the Modify Style dialog box via the Apply Styles pane. Press Ctrl+Shift+S, select the style from the Style Name drop-down list, and then click Modify.
CAUTION
Word will not let you automatically update the Normal style, because so many styles ultimately are based on Normal.
Mouse selection
Have you ever tried to use the mouse to select everything in a paragraph except for the paragraph mark? Perhaps you want to replace what's typed but want to keep the current paragraph formatting and style. But when you use the mouse to try to leave the paragraph mark unselected, Word jumps right past that last character and selects the paragraph mark as well.
You can make this behavior stop:
- Click File Options Advanced.
- At the top under Editing options, click the Use smart paragraph selection check box to clear it.
- Click OK.
TIP
With a more precise optical mouse, common today, it is possible to omit the paragraph mark even when smart paragraph selection is turned on. Another workaround for smart paragraph selection is to press Shift+Left Arrow to nudge the selection one character to the left after selecting with the mouse. Smart paragraph selection applies only to selection using the mouse.
Cut and paste sentence and word behavior
Have you ever copied a sentence and then pasted it at the end of another sentence and ended up with no space between the period and the beginning of the pasted sentence, and too much space at the end? Smart cut and paste deals with this problem, by inserting a space between the period and the beginning of the pasted sentence automatically. However, if you're accustomed to compensating for the missing space yourself, Word's automatic behavior can be a nuisance, and you can turn it off.
- Click File Options Advanced.
- Scroll down to display the Cut, copy, and paste options.
- Beside the Use smart cut and paste check box, click the Settings button. The Settings dialog box shown in Figure 4.10 opens.
You can fine-tune smart cut and paste behavior in this dialog box.

- Click the Adjust sentence and word spacing automatically check box to clear it.
- Click OK twice to close both the Settings and Word Options dialog boxes.
Tackling View Annoyances
Clutter or missing tools onscreen can put a crimp in how quickly you work in Word. In this section you learn how to quickly stop some of the most common view annoyances.
Nonprinting indicators/formatting marks
You can display nonprinting formatting indicators and marks onscreen to help diagnose formatting issues in a document. However, most users prefer to hide those marks when they're not needed, because they can make the document harder to read for editing. In particular, many users find the paragraph mark bothersome and distracting. The Show/Hide setting is enabled within the document. This means that if you receive and open a document created by another user, it might have the unwanted nonprinting characters displayed in it.
I like having as much visual information as possible when I'm writing, but if you want to stop this behavior, here's how: press Ctrl+Shift+8 (Show/Hide) to toggle these nonprinting marks off and on. You can also toggle them on and off by clicking the ¶ (Show/Hide) button in the Paragraph group of the Ribbon's Home tab.
If all of the marks don't go away, you'll need to examine the settings a bit more carefully. If individual marks are independently enabled, clicking the Show/Hide tool won't have any effect. Click File ![]() Options
Options ![]() Display to see the settings shown in Figure 4.11. The Show/Hide toggle affects only marks that aren't independently checked. Any that are independently checked stay on regardless of the overall toggle.
Display to see the settings shown in Figure 4.11. The Show/Hide toggle affects only marks that aren't independently checked. Any that are independently checked stay on regardless of the overall toggle.
If any individual marks are checked here, they can't be toggled with Ctrl+Shift+8 or the Show/Hide button.

Missing Ribbon tabs
When you get into certain advanced features, you'll need to work with two Ribbon tabs that may be hidden: the Developer and Add-Ins tabs. The Developer tab is hidden by default. The Add-Ins tab will normally appear whenever you load an add-in with a tab, but if it doesn't appear, that means that it's been turned off. Here's how to display and hide these two tabs and others as needed:
- Click File Options Customize Ribbon.
- In the Main Tabs list at the right side of the Word Options dialog box, click to check and uncheck tabs as needed. When checked here, a tab appears on the Ribbon. Unchecked tabs do not appear.
- Click OK.
Dealing with Online versus Local Help Content
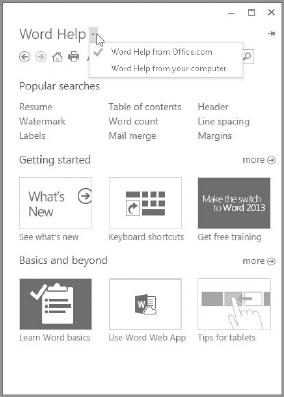
By default, if you're online, Word's Help system assumes that you'd prefer to access Help using online services. It's nice to know that the Help system can search online as a last-ditch effort if your own local Help can't find an answer. However, it's not necessarily good that it's the first ditch and not the last. If you are on a slow wireless connection in a public location, are working somewhere where you don't have online access, or are still on a dialup connection, Help will work more slowly than when using the installed Help information offline.
In any event, you can tell Word to use your own local offline Help. To set the source of Word Help, press F1 to display Word Help. Click the drop-down arrow beside Word Help, shown in Figure 4.12. To force Word to use only the local Word Help files, choose Word Help from your computer. If your system was somehow temporarily disconnected from the Internet and you need to reconnect Help, choose Word Help from Office.com.
Use Word's local offline Help files when your Internet connection is slow or limited.
Activation Blues
Are your Ribbons faded and unavailable? Are you unable to save new files? If so, then it's possible that your version of Word has not been activated. Word requires activation. If you're using a trial version, you have to pay to activate the software. Even if you're using a purchased version, you still have to activate; normally you will be prompted to activate it the first time you start the program and can just follow the prompts to do so. After a trial period, if you don't activate Word, it goes into “reduced functionality” mode.
To determine whether activation is the source of your woes:
- Click File Account. On the right side of the screen, under Product Information Office, a yellow Activation Required box will appear if Word is not activated.
- Click the Change Product Key link.
- Type your product key, and click Install and then OK.
- Follow the prompts in the Microsoft Office Activation Wizard that appears.
If activation isn't the problem, Word may have a corrupted Normal.dotm template (or other global add-in) or corrupted registry entries. Visit http://word.mvps.org/ and search for “troubleshooting” for additional help.
NOTE
The Office 2013 apps are also available by subscription under the Office 365 brand. It's set up so that the system administrator can install and activate groups of users in a single operation. If you find that your work installation of Word isn't activated for some reason, contact your company's IT troubleshooter for Help.
Automatic Annoyances
Word makes certain text and formatting changes automatically by default. These automatic changes might work for you—or not. This section shows you how to reclaim your ability to create your text yourself.
Bullets, numbers, boxes, and borders
Word sometimes senses that you're typing a bulleted or a numbered list and uses its AutoFormat As You Type feature to help you. For example, if the insertion point is at the beginning of a new paragraph and you press Tab, type an asterisk (Shift+8), and press Tab again, Word converts the asterisk to a bullet and applies the List Paragraph style to the paragraph. Similarly, if you press Enter after a paragraph, type a number of underline characters, and press Enter again, Word converts your underline characters into a border line beneath the paragraph.
You can tell Word what to AutoFormat and what not to.
- Click File Options Proofing.
- Click the AutoCorrect Options button. The AutoCorrect Options dialog box appears.
- Click the AutoFormat As You Type tab. See Figure 4.13. This tab controls automatic corrections. The AutoFormat tab's settings, on the other hand, apply when you display and use the AutoFormat command. For more about the differences between these two features, see “AutoFormat versus AutoFormat as You Type” and “Working with the AutoFormat Command” in Chapter 11, “Cleaning Up with AutoCorrect and AutoFormat.”
- Click to check and uncheck features as needed. For example, under Apply as you type, you can uncheck the Automatic bulleted lists and Automatic numbered lists check boxes to have Word stop automating those types of lists.
- Click OK twice to close both dialog boxes.
You can enable or disable more than a dozen AutoFormat Actions.

Capitalization
Word makes some automatic corrections to capitalization that may not be what you want. For example, it assumes you want the first word in every sentence to be capitalized and caps it if you fail to do so. This might not be what you want in all circumstances, such as if you're writing poetry or typing in a list of parts or products that you want to appear in lowercase. You also can turn off this behavior in Word:
- Click File Options Proofing.
- Click the AutoCorrect Options button. The AutoCorrect Options dialog box appears.
- Click the AutoCorrect tab if needed. See Figure 4.14.
- Click to check and uncheck the second through sixth check boxes as needed. For example, clear the Capitalize first letter of sentences check box if you want to control sentence capitalization.
- Click OK twice to close both dialog boxes.
You can enable or disable automatic capitalization on the AutoCorrect tab.

Summary
In this chapter you've learned how to control features and defaults that can trip up your ability to work quickly and effectively in Word. Among other things, you've learned how to do the following:
- Disable or enable the drawing canvas, change the default Wrap Text setting used for some graphic objects, and reset a graphic to its default formatting
- Overcome a number of editing annoyances, including by gaining control over the Insert key, clearing direct formatting so you can change styles, and controlling how Word pastes sentences from the Clipboard
- Control whether nonprinting characters appear and display Ribbon tabs that were turned off
- Save time and improve Help performance by using the built-in offline Help system
- Determine whether a lack of activation is the source of Word's nonperformance
- Control a number of Word's automatic formatting and capitalization behaviors