
INTERVIEWS
WHEN SHOULD YOU CONDUCT INTERVIEWS?
THINGS TO BE AWARE OF WHEN CONDUCTING INTERVIEWS
PREPARING TO CONDUCT AN INTERVIEW
DATA ANALYSIS AND INTERPRETATION
Introduction
Interviews are one of the most frequently used user requirements gathering techniques. In the broadest sense, an interview is a guided conversation in which one person seeks information from another. There are a variety of different types of interviews you can conduct, depending on your constraints and needs. They are flexible and can be used as a solo activity or in conjunction with another user requirements activity (e.g., following a card sort).
In this chapter, we discuss when to use interviews, things to be aware of when conducting interviews, how to prepare for and conduct an interview, as well as how to analyze the data. We spend a good deal of time concentrating on constructing interview questions and how to interact with participants to get the best data possible. These processes are critical to a successful interview. Finally, we close this chapter with our own lessons learned and an illustrative case study by Microsoft.
When Should You Conduct Interviews?
Many usability activities do not provide you with the opportunity to have detailed discussions with users (e.g., group task analyses, surveys). Interviews can be leveraged anytime in the user-centered design (UCD) lifecycle when you want to obtain detailed information from individual users (e.g., to understand the biggest challenges users face in their work and how they would like to work differently). Interviews are excellent for innovation. If you are looking to develop a new product or service, interviews allow you to conduct an outcomes analysis and retrieve the kind of detailed feedback from users necessary for product innovation.
Interviews can also help you prepare for another usability activity. Perhaps you do not know enough about the domain and tasks in order to run a group task analysis (see Chapter 11, page 458); or you can conduct a series of open-ended interviews to identify the most frequent responses to questions in order to build a closed-ended survey (see Chapter 8, page 312); or you may use the results of the interviews to design questions for a wants and needs analysis (see Chapter 9, page 370). Finally, you can conduct interviews following another usability activity to better understand your results (e.g., why participants responded a certain way on your survey).
The end result of a set of interviews is an integration of perspectives from multiple users. It is your best opportunity to understand and explore a domain and current usage in depth. If you conduct interviews with multiple user types of the same process/system/organization, you can obtain a holistic view.
Interviews, Survey, or Focus Group?
An interview is not appropriate if you are looking for information from a large sample of the population. One-on-one interviews can take significant time to conduct and more resources than a survey (see Chapter 8, page 312). There may be times when you need to collect large samples of data to feel more confident that the results you have obtained can be applied to the user population as a whole (not just the people you have interviewed). If you are in need of a large data set, surveys are a better option. (Refer to Figure 7.1 for a checklist of questions to determine whether interviews or surveys are best for your study.) However, interviews provide detailed information that you could not capture in a survey. You are able to follow-up on responses and clarify participants’ statements, which isn’t possible in a survey.

Figure 7.1 Checklist to determine whether an interview or survey is best for your study (Alreck & Settle 1995)
A focus group is another alternative if you are looking for multiple points of view in a shorter period of time (see Chapter 12, page 514). A focus group can create synergy between participants and enable you to conduct brainstorming. In an interview, you can spend more time understanding a single participant’s needs, thoughts, and experiences as compared to a focus group. You can also cover more topics and do not have to worry about participants influencing each other’s responses. In a focus group, you are typically limited in the number of questions you can ask and the depth of discussion with each participant because you want to hear from each participant equally.
In conclusion, use a survey when (a) you need a large number of responses, (b) questions can be answered adequately from a selection of options, and (c) you want to cover a large geographic region in a short period. Use a focus group when (a) you need data from several participants in a short period, (b) you want to cover only a few questions without a lot of depth from each participant, and (c) the topics are not sensitive or likely to be influenced by the opinions of others. But in cases where you want a lot of detail from end users and large numbers of participants is not of primary importance, interviews cannot be beaten (see Figure 7.2).

Interviews, focus groups, and surveys are all very valuable user requirements methods. Be clear about your objectives and the kind of data you are seeking and choose the activity that best suits your needs.
Things To Be Aware of When Conducting Interviews
As with all user requirements activities, there are some factors that you should be aware of before you jump into the activity. In the case of interviews, these include bias and honesty.
Bias
It is easy to introduce bias into an interview. A skilled interviewer will know how to word questions that do not encourage a participant to answer in a manner that does not reflect the truth. This takes practice and lots of it. Later, we discuss in detail how to avoid introducing bias into the wording of your questions (see page 265) and into your interactions with participants (see page 271).
Honesty
Individuals who are hooked on performance metrics, or who question the value of “anecdotal” data, may frown upon interviews. Sometimes people ask how you know a participant is telling the truth. The answer is that people are innately honest. It is an extremely rare participant who comes into your interview with the intention of lying to you or not providing the details you seek.
However, there are factors that can influence a participant’s desire to be completely forthcoming. Participants may provide a response that they believe is socially desirable or more acceptable rather than the truth. This is known as social desirability. Similarly, a participant may describe the way things are supposed to happen rather than the way things actually happen. For example, a participant may describe the process he or she uses at work according to recommended best practice, when in actuality the participant uses shortcuts and workarounds because the “best practice” is too difficult to follow – but the participant does not want to reveal this. Make it clear that you need to understand the way he or she actually works. If workarounds or shortcuts are used, it is helpful for you to understand this. And of course, remind the participant that all information is kept confidential – the employer will not receive a transcript of the interview.
A participant may also just agree to whatever the interviewer suggests in the belief that it is what the interviewer wants to hear. Additionally, a participant may want to impress the interviewer and therefore provide answers that increase his/her image. This is called prestige response bias. If you want the participant to provide a certain answer, he or she can likely pick up on that and oblige you. You can address these issues by being completely honest with yourself about your stake in the interview. If you understand that you have a stake in the interview and/or what your personal biases are, you can control for them when writing questions. You can also word questions (see “Write the Questions,” page 262) and respond to participants in ways that can help mitigate these issues (e.g., do not pass judgment, do not invoke authority figures). You should be a neutral evaluator at all times and encourage the participant to be completely honest with you.
Be careful about raising sensitive or highly personal topics. A survey can be a better option than interviews if you are seeking information on sensitive topics. Surveys can be anonymous, but interviews are much more personal. Participants may not be forthcoming with information in person. For more discussion on this topic, see “Asking the tough questions,” page 281.
If the participant is not telling the complete truth, this will usually become apparent when you seek additional details. A skilled interviewer can identify the rare individual who is not being honest, and disregard that data. When a participant is telling a story that is different from what actually happened, he or she will not be able to give you specific examples but will speak only in generalities.
Outcomes Analysis
In brainstorming sessions, focus groups, and interviews, users are sometimes asked for solutions to problems or challenges they identify. Unfortunately, users are often not well-versed in the technical requirements to implement such solutions (emergent technologies), and they are limited by their own personal experience. To deal with this issue, you can conduct interviews in the form of “outcomes analysis.” The sidebar on page 253 describes what outcomes analysis is and how to use it.
A company’s Research & Development (R&D) department should be charged with the responsibility for developing new, innovative solutions – not the customers. Giving the responsibility of innovation to your customers can result in several problems (Ulwick 2002):
![]() The development team will make small, iterative changes to the product, rather than drastic, pioneering changes because participants do not have the technical knowledge to suggest such radical improvements
The development team will make small, iterative changes to the product, rather than drastic, pioneering changes because participants do not have the technical knowledge to suggest such radical improvements
![]() Since people are limited by their experiences, participants will typically suggest features or changes available in your competitors’ products that are not in yours. These additions may not drastically improve your product but it will simply bring you up to par with your competitors – something you could have done with a simple competitive analysis (see Chapter 2, Before You Choose an Activity, “Competitors” section, page 37).
Since people are limited by their experiences, participants will typically suggest features or changes available in your competitors’ products that are not in yours. These additions may not drastically improve your product but it will simply bring you up to par with your competitors – something you could have done with a simple competitive analysis (see Chapter 2, Before You Choose an Activity, “Competitors” section, page 37).
![]() Participants may have needs they are not even aware of, so leaving innovation to what users report can leave entire areas of potential innovation undiscovered.
Participants may have needs they are not even aware of, so leaving innovation to what users report can leave entire areas of potential innovation undiscovered.
![]() Most users leverage less than 10% of a software product’s overall capability. By adding more and more features to a product simply because participants brainstormed them (as they were asked to do) may cause users to resent paying additional money for a product full of features they don’t actually need or use.
Most users leverage less than 10% of a software product’s overall capability. By adding more and more features to a product simply because participants brainstormed them (as they were asked to do) may cause users to resent paying additional money for a product full of features they don’t actually need or use.
Limiting your questions to participants to the outcomes they need to achieve and allowing the developers to create the solutions can prevent the problems listed above. There are five steps to this process:
Prior to the interviews, deconstruct the processes or tasks users do associated with your product or service. This could be done via a group task analysis (see Chapter 11, page 458). As with any user requirements technique, recruit only true end users and strive for a diverse user population.
The interviewer must understand the difference between outcomes and solutions and ask the appropriate probes to weed out the solutions while getting to the outcomes (see example below). Participants should discuss every aspect of the process or task they complete when using your product or service. The interviewer will have to take descriptions by participants, translate them into hypothesized outcomes, and then validate them with participants. About 75% of the participants’ desired outcomes can be identified in the first two-hour interview (Ulwick 2002). Another 15–20% can be captured in a second interview and another 5–10% in the third interview.
Participant: “All the flight times presented on a Palm 7.” [Solution]
Interviewer: “Why would you like the flight time presented on a Palm 7? What would that help you do?” [Probe for outcome]
Participant: “I travel a lot so I need to see when flight times change and I take my Palm 7 with me everywhere.” [Outcome]
Interviewer: “So you would like to have access to flight times from anywhere?” [Rephrasing to confirm outcome]
Participant: “Exactly.” [Confirmation]
Following the interviews, make a comprehensive list of all the captured outcomes and categorize them by steps in the process or activity users complete.
Rate the outcomes for importance and satisfaction
Send out a survey listing the outcomes identified in the interviews to as many end users as possible. Ask them to rate each outcome in terms of importance and their satisfaction that each outcome is currently being met (e.g., Likert scale with ratings of “not at all important” to “very important” and “not at all satisfied” to “very satisfied”). Compute a score for each outcome using the following formula:
The “opportunity score” provides a more accurate result than traditional gap analysis. Gap analysis simply subtracts satisfaction from importance. It does not take into account the magnitude of importance of an outcome. See the example below:

Gap analysis would give both these outcomes the same score (4.2), neglecting the fact that getting the lowest price is considerably more important to users than speaking with a travel agent. If TravelSmart.com spent the same amount of resources on a solution to address both outcomes, users would not be more pleased (or well-served) with the resulting product than if the company had put more resources into delivering the lowest price.
Use the outcomes to jump-start innovation
Now that you have opportunity scores for each desired outcome, you know where R&D, marketing, and development should be spending their resources. In addition to developing new concepts for evaluation, you can use the results to identify whether different segments of your user population put different weights on each outcome. Perhaps it appeared initially that your user population was homogeneous in their desired outcomes, but once you examined the opportunities by user type you realized that your user population values each outcome differently. This can help you better position your product and target each user type appropriately. You may even find areas of product development that will not get you the bang for your buck everyone expected, and identify new areas of innovation that no one ever considered (even the end users!).
Preparing to Conduct an Interview
Now that you understand what interviews are and when to conduct them, we are going to discuss how to prepare for one. This includes selecting the type of interview to conduct, wording the questions, creating the materials, training the interviewer, and inviting observers.
First, Table 7.1 is a high-level timeline for you to follow when preparing for an interview. These are approximate times based on our personal experience and should be used only as a guide. It could take longer or less time for each step depending on a variety of factors – such as responsiveness of the development team, access to users, and resources available.

Before you begin any user requirements activity there are a number of things that you must be familiar with. Because these elements are common to all user requirements activities, they have been covered in the earlier chapters – but now is a good time to double-check the list. If you are not familiar with one of the items you can refer to the earlier chapter to brush up or familiarize yourself with that element.
Chapter 1: Introduction to User Requirements
![]() Get stakeholder buy-in for your activity (see page 14)
Get stakeholder buy-in for your activity (see page 14)
Chapter 2: Before You Choose an Activity
Chapter 3: Ethical and Legal Considerations
Chapter 4: Setting up Facilities for Your User Requirements Activity
![]() Create or acquire a facility for your activity (see page 106)
Create or acquire a facility for your activity (see page 106)
Chapter 5: Preparing for Your User Requirements Activity
![]() Develop an activity proposal (see page 146)
Develop an activity proposal (see page 146)
![]() Determine the time of day and duration of your session (see page 155)
Determine the time of day and duration of your session (see page 155)
![]() Recruit participants (see page 156)
Recruit participants (see page 156)
![]() Develop an activity protocol (see page 191)
Develop an activity protocol (see page 191)
![]() Pilot your activity (see page 193)
Pilot your activity (see page 193)
Chapter 6: During Your User Requirements Activity
![]() Record and take notes during your activity (see page 226)
Record and take notes during your activity (see page 226)
Identify the Objectives of the Study
When developing questions for interviews, it is easy to add more and more questions as stakeholders (i.e., product team, management, partners) think of them. That is why it is important for everyone to agree upon the purpose and objectives of the study from the beginning. This should be included in your proposal to the stake-holders and signed off by all parties (refer to Chapter 5, Preparing for Your User Requirements Activity, “Creating a Proposal” section, page 146). As you and the stakeholders determine the type of interview to conduct and brainstorm questions for the interview, use the objectives of the study as a guide. If the type of interview suggested or the questions offered do not match the objectives that have been agreed upon, the request should be denied. This is much easier to do once the proposal has been signed off, rather than trying to get the agreement halfway through the process.
Select the Type of Interview
There are three main types of one-on-one interview:
They vary by the amount of control the interviewer places on the conversation.
In an unstructured interview, the interviewer will begin with talking points but will allow the participant to go into each point with as much or little detail as he/she desires. The questions or topics for discussion are open-ended, so the interviewee is free to answer in any manner, and the topics do not have to be covered in any particular order.
A structured interview, on the other hand, is the most controlled type. The interview may consist primarily of closed-ended questions and the interviewee must choose from the options provided. Open-ended questions may be asked, but the interviewer will not delve into the participant’s responses for more detail or ask questions that are not listed on the script. This type of interview is similar to conducting a survey verbally and is used by organizations like the Census Bureau and Bureau of Labor Statistics.
A semi-structured interview is clearly a combination of the structured and unstructured types. The interviewer may begin with a set of questions to answer (closed-and open-ended) but deviate from that set of questions from time to time. The interview does not have quite the same conversational approach as an unstructured one.
When determining the type of interview to conduct, keep the data analysis and objectives of the study in mind. By first deciding the type of interview you plan to conduct, you know the type of questions you will be able to ask. As with any method, there are pros and cons to each type of interview (see Table 7.2). Make sure that all stakeholders understand these, and that everyone is in agreement about the way to proceed.

Interviews via phone or in person?
Regardless of the type of interview you select, you have the option of conducting the interviews in person or over the phone. Although it is more convenient for both participant and interviewer to conduct the interviews via the phone and skip the travel time, there are a few disadvantages to conducting phone interviews.
![]() One study found that participants on the telephone ended the interviews before participants in face-to-face interviews did (Johnson, Hougland, & Clayton 1989). It can be difficult to keep participants on the phone for more than 20 minutes.
One study found that participants on the telephone ended the interviews before participants in face-to-face interviews did (Johnson, Hougland, & Clayton 1989). It can be difficult to keep participants on the phone for more than 20 minutes.
![]() Participants were more evasive, agreed with the interviewer more quickly, and were more hesitant to reveal sensitive information about themselves.
Participants were more evasive, agreed with the interviewer more quickly, and were more hesitant to reveal sensitive information about themselves.
![]() If you are cold-calling participants (i.e., not a pre-scheduled interview), the biggest challenge may be keeping the participant’s attention. If you do not have the participant in a quiet location, it is easy for their co-workers or children to come in during your interview for a “quick” question.
If you are cold-calling participants (i.e., not a pre-scheduled interview), the biggest challenge may be keeping the participant’s attention. If you do not have the participant in a quiet location, it is easy for their co-workers or children to come in during your interview for a “quick” question.
![]() You cannot watch the participant’s body language, facial expressions, and gestures, which can provide important additional information.
You cannot watch the participant’s body language, facial expressions, and gestures, which can provide important additional information.
![]() Phones can be perceived as impersonal and it is more difficult to develop a rapport with the participant and engage him/her over the phone. Web conferencing tools are available so that you may show artifacts to participants if appropriate, but you still cannot gain the personal connection over the phone and computer.
Phones can be perceived as impersonal and it is more difficult to develop a rapport with the participant and engage him/her over the phone. Web conferencing tools are available so that you may show artifacts to participants if appropriate, but you still cannot gain the personal connection over the phone and computer.
Figure 7.3 is a nice checklist that can help you determine whether a phone interview is appropriate or not.
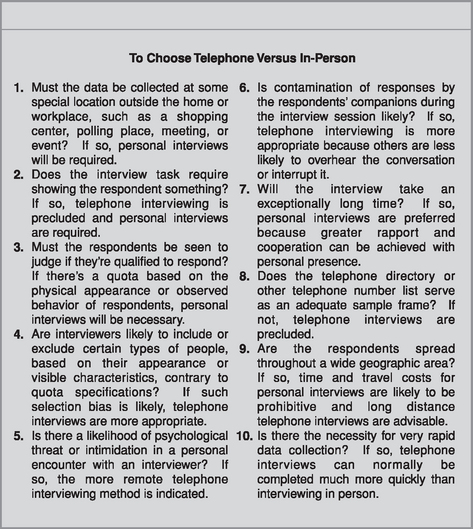
Figure 7.3 Checklist to determine whether a phone interview is appropriate for your study (Alreck & Settle 1995)
Decide Now How You Will Analyze the Data
Whether you are asking closed-ended or open-ended questions, there are tools available to help you analyze your data. For a discussion of how to analyze open-ended questions, see “Data Analysis and Interpretation” (page 293). For a discussion of how to analyze closed-ended questions, refer to Chapter 8, Surveys, page 312.
Most people do not analyze interview data electronically. If you choose to do so, you need to allow time to purchase the software and learn how to use it. We strongly advise entering sample data from your pilot interviews into the tool and analyzing it (refer to Chapter 5, Preparing for Your User Requirements Activity, “Piloting Your Activity” section, page 193). This will help to determine whether the tool will meet your needs, or whether you need to adjust the questions.
Write the Questions
It is now time to identify all the questions to ask. You may want to do initial brainstorming with all stakeholders (members of the product team, the usability group, marketing). You will likely end up with questions that are out of the scope of the proposed activity, or questions that are best answered by other activities. You may also end up with more questions than you could possibly cover in a single interview. If this is the case, you will either need to conduct multiple sessions or trim down the number of questions to fit into a single session.
The next step is to word the questions so that they are clear, understandable, and impartial.
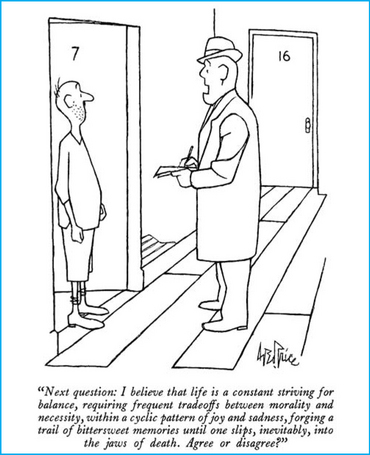
© The New Yorker Collection 1989 George Price from cartoonbank.com. All Rights Reserved
Brevity
Questions should be kept short – usually 20 words or less. It is difficult for people to remember long or multiple-part questions. Break long, complex questions into two or more simple questions.
Clarity
Avoid double-barreled questions that address more than one issue at a time. Introducing multiple issues in a question can be confusing. The example below addresses multiple issues: the frequency of traveling, the frequency of booking travel online, and the purpose for booking travel online. These should be asked separately.
Vague questions, too, can cause difficulty during an interview. Avoid imprecise words like “rarely,” “sometimes,” “usually,” “few,” “some,” and “most.” Individuals can interpret these terms in different ways, affecting their answers and your interpretation of the results.
A final challenge to creating clear questions is the use of double negatives. Just as the name implies, double negatives insert two negatives into the sentence, making it difficult for the interviewee to understand the true meaning of the question.
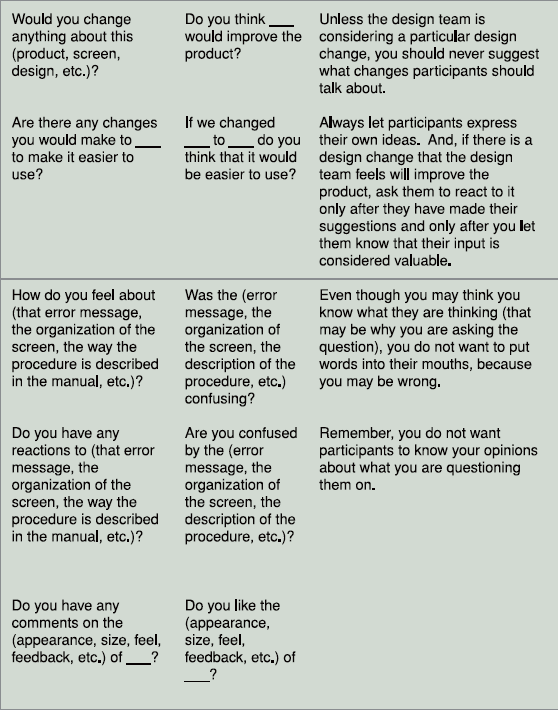
Avoiding bias
As we mentioned earlier, there are a number of ways in which you might introduce bias into questions. One way is with leading questions. These assume the answer and may pass judgment on the interviewee. They are designed to influence a participant’s answers.
Leading questions are rather obvious and easy to pick up on. Loaded questions are subtler in their influence. They typically provide a “reason” for a problem in the question. This frequently happens in political campaigns to demonstrate that a majority of the population feels one way or another on a key issue.
The question above suggests that the reason for increasing travel costs is increased security costs. It is clear how the interviewer in the first (wrong) question would like the participant to answer. This is also an example of a question based on a falsepremise. The example implies that the government has not paid for additional security costs and should now start to do so. These types of question begin with a hypothesis or assumption that may not be fully accurate or can be easily misinterpreted. Not only is this type of question unethical, but the data you get in the end are not valid.
The final type of bias is interviewer prestige bias. In this case, the interviewer informs the interviewee that an authority figure feels one way or another about a topic and then asks the participant how he or she feels.
Predicting the future
Do not ask participants to predict the future. Usability specialists, designers, marketers, and product managers are all guilty at some point of asking potential or current users to predict whether they would like a specific product feature or not. Until people have actual experience with a service or feature, they may not know what works for them or what they may actually like.
The “wrong” question above would be a problem if the participant was unfamiliar with instant messaging. In that case, you would want to speak in broader terms and ask the participant to discuss communications methods with which he/she is familiar.
Rather than asking participants to predict the future or develop a solution to a perceived problem, it is best to limit your questions to desired outcomes. This interviewing technique is known as “outcomes analysis” (see discussion on page 253). What are the current issues users are encountering, and what is the goal or outcome they would like to achieve?
Inaccessible topics
You have screened your participants against the user profile but you still may encounter one who cannot answer all of your questions. A participant may not have experience with exactly what you are asking about, or may not have the factual knowledge you are seeking. In these cases, be sure a participant feels comfortable saying that he or she does not know the answer or does not have an opinion. Forcing a participant to choose an answer will only frustrate the participant and introduce error into your data.
Begin the interviews by informing participants that there are no right or wrong answers – if they do not have an opinion or experience with something, they should feel free to state that. Keep in mind that interviewees are often eager to please or impress. They may feel compelled to answer and therefore make a best guess or force an opinion that they do not actually have. Encourage them to be honest and feel comfortable enough to say they cannot answer a particular question.
Depending on memory
Think about the number of times you have booked a rental car in the last three years. Are you confident in your answer? Interviewers and surveys often ask people how frequently they have done a certain task in a given period. If the question seeks information about recent actions or highly memorable events (e.g., your wedding, college graduation), it probably won’t be too difficult. Unfortunately, people are often asked about events that happened many years ago and/or those that are not memorable.
What is key is the importance or salience of the event. Some things are easily remembered because they are important or odd and require little effort to remember them. Other things are unmemorable – even if they happened yesterday you would not remember them. In addition, some memories that seem real may be false. Since most participants want to be “good” interviewees, they will try hard to remember and provide an accurate answer, but memory limitations prevent it. Under-reporting of events or inaccurate reporting frequently happens in these cases.
In addition to memory limitations, people have a tendency to compress time. This response bias is known as telescoping. This means that if you are asking about events that happened in the last six months, people may unintentionally include events that happened in the last nine months. Over-reporting of events will result in these cases.
To help mitigate these sources of error you should avoid questions covering unmemorable events. Focus the questions on salient and easy-to-remember events. You can also provide memory aids like a calendar. Finally, if you are truly interested in studying events over a period of time, you can contact participants in advance and ask them to track their behaviors in a diary (see Chapter 13, Field Studies, “Incident diaries” section, page 588). This means extra work for the participant, but the data you receive from those dedicated individuals who follow through will likely be far more accurate than from those who rely on memory alone.
Other types of wording to avoid
Avoid emotionally laden words like “racist” and “liberal.” Personal questions should be asked only if absolutely necessary, and then with much tact. This includes questions about age, race, and salary. Figure 7.4 describes how to identify questions that might be perceived as threatening.

Figure 7.4 Checklist to determine whether a question might be perceived as threatening (Alreck & Settle 1995)
Jargon, slang, abbreviations, and geek-speak should be avoided unless you are certain that your user population is familiar with this terminology. Speaking in the user’s language is important (as long as you understand it). And of course, take different cultures and languages into consideration when wording your questions (refer to Chapter 5, Preparing for Your User Requirements Activity, “Recruiting International Participants” section, page 184). A direct word-for-word translation can result in embarrassing, confusing, or misinterpreted questions.
Figure 7.5 provides a checklist of dos and don’ts in question wording.


Test Your Questions
It is important to test your questions for clarity and validity (i.e., are you really asking what you think you’re asking). If you are conducting an unstructured interview, test your list of topics or talking points. Begin with members of your team who have not worked on the interview so far. The team members should be able to summarize the type of information you are looking for in a question. If the co-worker incorrectly states the information you are seeking, you need to clarify or reword the question. Find someone who understands survey and interview techniques to check your questions for bias.
Once the questions have passed the test of co-workers, conduct the interview with a couple of actual participants. How did the participants react to the questions? Did they answer your question, or did it seem like they answered another question? Was everything clear? Were you able to complete the interviews within the allotted time frame?
Players in Your Activity
In addition to end users, you will require three other people to run the sessions. In this section we discuss the details of all the players involved in an interview.
The participants
We recommend interviewing approximately six to ten participants of each user type, with the same set of questions. This is a general guideline and there are several factors to take into consideration.
One factor to consider is the diversity of the user population. If you believe that a particular user type is homogeneous, you can interview fewer participants (five to six) because the results will be extremely similar. But you must be careful not to generalize too soon from a small set of interviews. If you have the resources and you are continuing to learn new insights with each user, it is useful to conduct additional interviews. Alternatively, if your subject matter is complex and/or highly varied in potential response, or if you believe that a particular user type is quite diverse, you should interview more participants (ten or more) to understand the variety of opinions and experiences present. Obviously, if you are unsure about the diversity of your user group, you can begin with a small number of interviews and continue to recruit participants until you feel you have gained a full understanding. Once you begin to hear the same responses over and over with very little new information, you can stop interviewing new participants.
The final thing to consider is the number of user types you have. You will likely find it more beneficial to conduct a few interviews with each user type rather than many interviews with only one user type. Only you know what resources you have available to conduct your studies, so you must weigh the resources available with the questions you need to answer.
There is no magic formula for determining the number of participants to interview – the final answer is: “it depends.” (Refer to Chapter 2 to learn about identifying your users, creating a user profile, page 43.)
The interviewer
The task of the interviewer is to elicit responses from the participant, examine each answer to ensure that he or she understands what the participant is really saying, and then paraphrase the response to make sure that the intent of the statement is captured. In addition, the interviewer needs to know when to let a discussion go off the “planned path” into valuable areas of discovery, and when to bring a fruitless discussion back on track. The interviewer needs to have sufficient domain knowledge to know which discussions are adding value and which are sapping valuable time. He or she also needs to know what follow-up questions to ask on-the-fly to get the details the team needs to make product decisions.
We cannot stress enough how important it is for interviewers to be well-trained and experienced. Without this, interviewers can unknowingly introduce bias into the questions they ask. This will cause participants to provide unrepresentative answers or to misinterpret the questions. Either way, the data you receive are inaccurate and should not be used. People new to interviewing may wish to take an interviewing workshop – in addition to reading this chapter – to better internalize the information. (See Appendix B, page 688 for a list of individuals/companies offering training courses.)
We recommend finding someone who is a skilled interviewer and asking him/her to review your questions. Then practice interviewing him/her. The more you practice this skill, the better you will become and the more confident you can be in the accuracy of the data you obtain. Co-interviewing with a skilled interviewer is always helpful.
Finally, although we all hate to watch ourselves on video or listen to ourselves on a tape recorder, it is helpful to watch/listen to yourself after an interview. Even experienced interviewers fall into bad habits – watching yourself on tape can make you aware of them and help break them. Having an experienced interviewer watching or listening to the tape with you helps because he or she can point out areas for improvement.
The note-taker
You may find it useful to have a co-worker in the same room or another room who is taking notes for you. This frees you from having to take detailed notes. Instead you can focus more of your attention on the interviewee’s body language and cues for following up. (Refer to Chapter 6, During Your User Requirements Activity, “Recording and Note-taking” section, page 226 for more details on capturing the data.)
The videographer
Whenever possible, video record your interview session. (Refer to Chapter 6, During Your User Requirements Activity, “Recording and Note-taking” section, page 226 for a detailed discussion of the benefits of video recording.) You will need someone to be responsible for making the recording. In most cases, this person simply needs to start and stop the tape, insert new tapes as needed, and keep an eye out for any technical issues that arise.
Inviting Observers
As with other usability techniques, we do not recommend having observers (e.g., co-workers, product team members) in the same room as the participant during the interview. If you do not have the facilities to allow someone to observe the interviews from another room, but you do want stakeholders to be present, it is best to limit the observers to one or two individuals. Any more than this will intimidate the person being interviewed. The observers should be told explicitly, prior to the session, not to interrupt the interview at any time.
It is up to you if you would like to leave time at the end of the interview for observers to ask follow-up questions. However, the questions observers ask should follow the same guidelines discussed above (e.g., avoid bias, keep them brief). Since you cannot control what the observers say, we recommend asking them to write questions on paper and then pass them to you at the end of the session. You then have the opportunity to reword a loaded or double-barreled question. Or you can work with the observer prior to the session to devise a set of follow-up questions that they may ask if time permits. This works well in cases where you do not have the domain knowledge to ask and follow up on technical questions.
Activity Materials
You will need the following materials for an interview (the use of these will be discussed in more detail in the next section):
Conducting an Interview
You are now prepared to conduct an interview. In this section, we walk you through the steps.
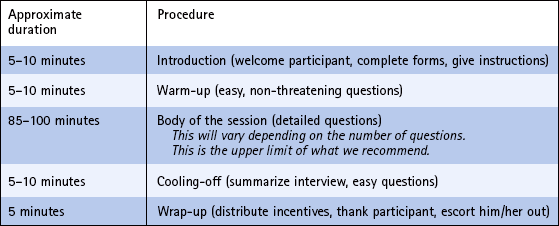
First, Table 7.3 covers in general the sequence and timing of events to conduct an interview. It is based on a two-hour session and will obviously need to be adjusted for shorter or longer sessions. These are approximate times based on our personal experience and should be used only as a guide.
Interviewing is a skill and takes practice. You should observe the five phases of an interview and monitor the interviewing relationship throughout.
The Five Phases of an Interview
Whether the interview lasts ten minutes or two hours, a good interview is conducted in phases. There are five main phases to be familiar with.
The introduction
This should not be too long. If it is over ten minutes, you are probably giving the participant too many instructions and other things to remember. Begin by introducing yourself and any observer(s) in the room. If there are people watching in another room, mention their presence in generic terms. Next, state the purpose of the interview and why the participant has been asked to participate. Be sure to ask permission to audio or video record the session. Explain any confidentiality agreements and consent forms that must be signed. This is the first opportunity you have to encourage participants to answer honestly and feel free to say when they cannot answer one of your questions. Don’t forget to thank the participants for coming. The following is a sample introduction:
“My name is Jane Doe and I work for TravelSmart.com. Thank you for coming in today! We will spend the next hour talking about your experience booking travel online.”
“I understand that you are a current customer of TravelSmart.com and that you signed up for our Customer Participation Program. We would like to learn how we could improve our site to better suit our customers’ needs.”
“We have a couple members of the product development team in another room watching this session, and – if you do not mind – I would like to make a recording. This will allow me to go back at a later time and review your comments so that I am not distracted from our conversation by taking notes.”
“I am not a member of the product team. I am a neutral evaluator, so nothing you say today will hurt my feelings. Your honest opinions can only help us improve our product. If you do not have an opinion or cannot answer any of the questions I ask, please feel free to say so.”
“Since this product is not on the market yet, you will need to sign a non-disclosure agreement in which you promise not to discuss this product with anyone until it is put on the market, or until two years from now.”
“You are free to leave at any time. Please stop me at any point if you have questions.”
Warm-up
Always start an interview with easy, non-threatening questions to ease the participant into the interview. You can confirm demographic information (e.g., occupation, company), how the participant first discovered your product, etc. You may even allow the participant to vent his or her top five likes and dislikes of your product. The participant should focus his/her thoughts on your product and forget work, traffic, the video cameras, and so on. This is best done with easy questions that feel more like a conversation, and less like a verbal survey or test.
Five to ten minutes may be sufficient for the warm-up, but if the participant is still clearly uncomfortable, this could be longer. However, do not waste the participant’s time (and yours) with useless small talk. The warm-up should still be focused on the topic of the interview.
Body of the session
Begin with general questions and move into more detailed ones. This should be the bulk (about 80%) of your interview time with the participant.
Cooling-off
Your interview may have been intense with very detailed questions. At this point, you may want to pull back and ask more general questions or summarize the interview. Ask any follow-up questions in light of the entire interview. Five to ten minutes should be sufficient.
Wrap-up
You should demonstrate that the interview is now at a close. Some people like to do this by closing a notebook and putting away their pens (if they were taking notes), changing their seat position, or turning off the tape recorder. This is a good time to ask the participant whether there are any questions for you. Thank the person for his/her time, and compensate the participant for their time and expertise, as agreed beforehand.
Your Role as the Interviewer
Interviewing can be an intense activity for the interviewer. Even though the participant is providing the information you are seeking, you cannot be a passive interviewer. You know the information you are seeking and it is your job to help the participants provide that information. “Active listening” means that you must judge if each response has adequately addressed your question, be on the lookout for areas of deeper exploration, and monitor the interviewing relationship throughout.
Do not interrupt
One of the biggest mistakes in interviewing is interrupting the participant. Don’t let your enthusiasm for the topic or time constraints make you forget your manners. You never want to complete participants’ thoughts for them or put words in their mouths. Give each participant time to complete his/her thought. If you do not have enough information after adequate silence, then follow-up with another question or restate the participant’s answer (see “Reflecting,” page 288). Of course, if the participant is struggling with a word and you are sure you know what the participant is trying to say, offer the word or phrase the participant is searching for, especially if the participant says, “It’s on the tip of my tongue. Do you know what I’m talking about?”
Keep on track
It is easy for unstructured interviews to go off track. The participant may go into far more detail than you need but not know that. A participant may also digress to topics that are outside the scope of the study. It is your job to keep the participant focused on the topic at hand and move on to the next topic when you have the information needed. Below are some polite comments to get participants back on track or to move them on to a new topic:
“I can tell that you have a lot of detail to provide about this but, because of our time constraints, I need to cover a new topic. If we have time at the end, I would like to come back to this discussion.”
“That’s really interesting. I was wondering if we could go back to topic XYZ for a moment…”
“I’m sorry, I am going to interrupt you for a moment. A moment ago, you were discussing XYZ. Can you tell me more about that?”
Silence is golden
Another big mistake in interviewing is attempting to fill every silence. An interviewee may need to think about whether a particular answer is appropriate or how to word it. A participant may also wonder how much detail you are looking for. In that case, he or she will likely provide a brief answer and then wait to see whether you move on. If you do not, the participant has been “given permission” to provide more detail. Some people recommend counting to ten before either moving on to the next question or probing for more detail. However, this extended silence can be uncomfortable for both you and the participant. Counting to five should provide adequate time for the participant to continue without inserting uncomfortable silence. Also, pay attention to the participant’s body language (e.g., sitting forward, poised to make another statement) to determine whether he/she has more to say.
It is possible to go too far with your pauses and risk giving participants the silent treatment. That is why acknowledgment tokens are so important. Acknowledgment tokens are words like “oh,” “ah,” “mm hm,” “uh huh,” “OK,” and “yeah” that carry no content. Since they are free of content, they are unobtrusive and require almost no processing by the participant, so he or she can continue unimpeded with a train of thought. These devices reassure participants that you hear them, understand what is being said, and want them to continue. Speakers expect a reaction from listeners, so acknowledgment tokens complete the “conversational loop” and keep the interviewing relationship a partnership, rather than a one-way dialog. Tokens like “mm hm” and “uh huh” are called “continuers” because they are not intrusive or directive. Tokens like “OK” and “yeah” imply agreement, which you may not want to imply to participants, revealing your personal opinions (Boren & Ramey 2000).
Remain attentive
Have you had the experience where someone has been talking for the past several minutes and you have no idea what he/she has been saying? If you are tired or bored, it is easy to zone out. Obviously, this is a faux pas in any conversation but particularly so in an interview. If you are tired or bored, there is a good chance that the participant is too.
Take a break at a logical stopping point. This will give you a chance to walk around and wake up. Evaluate how much you have engaged the participant in the interview. If this is an unstructured interview, you should be engaging the participant frequently for clarification, examples, and reflection (refer to these topics below). If it is a highly structured interview, the interviewee’s answers should be short, followed by your next question. In either case, you should be engaging in the interview (without interrupting the participant, of course). After the break, take a moment to ask the interviewee to briefly summarize his/her last response. This will help the interview pick up where it left off and get you back on track.
If you have conducted several interviews on the same topic before, it is easy to assume that you have heard it all. What new information could the sixth participant provide? If you think you already know the answers to the questions, you can find yourself hearing what you want to hear or expect to hear, and thereby miss new information. Every participant has something unique to provide – although it may not be significant enough to warrant additional interviews. If you have conducted several interviews and feel confident that you have gained the required information, do not recruit additional participants. However, once the participant is in the door, you owe him/her the same attention that you gave the very first participant. Keep an open mind and you will be surprised at what you can learn.
Asking the tough questions
Sometimes you may need to ask questions that are embarrassing or cover sensitive topics. As we mentioned earlier, this is best done via surveys; but if you think there is a need to ask a difficult question in an interview, wait until you have developed a rapport with the participant. When you ask the question, explain why you need the information. This lets the participant know that you are asking for a legitimate reason and not just out of curiosity. The participant will be more likely to answer your question and relieve any tension. For example:
“This next question is about the range your salary falls in. I’m asking this only because we believe that people who fall within specific salary ranges are sometimes more or less likely to book their travel online. To help us understand this, we are asking everyone about their salary range – if they feel comfortable. Would you mind stating which of the following ranges your salary falls in?”
Using examples
No matter how hard you try to make your questions clear, a participant may still have difficulty understanding exactly what you are asking. Sometimes rewording the question is not sufficient and an example is necessary for clarification. Since the example could introduce bias, you want to do this as a last resort. Having some canned examples for each question and then asking co-workers to squ those examples for bias will help immensely.
Give the interviewee a moment to think about the question and attempt to answer it. If it is clear that the participant does not understand the question or asks for an example, provide one of the canned examples. If the participant still does not understand, you could either provide a second example or move to the next question.
Watch for generalities
Interviewees will often speak in general terms because they believe it is more useful to provide summary descriptions or typical situations rather than specific examples. This is usually the result of a generalized question (see below):
If you are looking for specific, detailed answers, do not ask generalized questions. Ask for significant events. Since the best indicator of the present is the past, ask the interviewee to describe a particular past event that best exemplifies the situation. Keep in mind our earlier discussion about memory limitations and telescoping (see page 268). Below is a sample interview asking for a significant event:
Do not force choices
Do not force opinions or choices from participants. If you ask an interviewee to make a choice from a list of options, but he/she says that it does not matter, or all of them are fine, you could probe to learn more about each option. By asking the participant to verbalize (and therefore think more about) each option, he or she may then show more of a preference for one option over others. However, if the participant states that all options are equal, do not force him/her to make choice. Likewise, if the participant states that he/she does not have an opinion on something, forcing him/her to elaborate will only generate annoyance (see example below).
Interviewer: “Which of the following customer rewards would you most like to receive when booking a certain number of trips with TravelSmart.com?”
![]() 10% discount on your next plane ticket
10% discount on your next plane ticket
![]() Free upgrade on a car rental or plane ticket
Free upgrade on a car rental or plane ticket
Participant: “All of those sound good to me!”
Interviewer: “Do you have a preference for one over the other?”
Participant: “No. They are all about equal.”
Interviewer: “Can you tell me the pros and cons you can see with each option?”
Watch for markers
Sometimes participants throw out markers. These are key events to the participant that you can probe into for more rich information. You should search for more detail only if you believe it will provide relevant detail to your study – and not out of curiosity. Below is an interview excerpt with a marker and appropriate follow-up:
The participant provided the marker of her aunt passing away. That was critical to her. She was stressed out and couldn’t find the information she needed. She wanted someone to personally help her and provide some support, but the website could not do it. Consequently, she now has a strong negative memory of TravelSmart.com and a positive one of the competitor. Following-up on that marker allows us to better understand the context of what happened and why the experience was so difficult for the participant. If the participant drops such a marker inadvertently and does not feel comfortable elaborating on it, he/she will let you know the topic is off-limits.
Select the right types of probe
Your probes for detail should be as unbiased as your initial question to the participant. There are closed-ended and open-ended probes, just like the initial question you asked. A closed-ended probe would be something like: “Were you using Netscape or Internet Explorer?” An open-ended probe might be: “Tell me about the browser(s) you use.” Keep all probes neutral and do not ask the participant to defend his/her choices.
Table 7.4 provides an excellent comparison of different types of biased and unbiased probes, as well as what makes each probe biased.


Some interviewers recommend “playing dumb” to get more detail out of participants. By downplaying what you know, participants will be more explicit and may want to impress you with their knowledge. This may work in some cases, but if you slip and reveal in a question or probe that you know more than you are letting on, the participant can feel betrayed, duped, or patronized. This will clearly harm the interviewing relationship. As a result, we recommend being honest about what you know and understand – but make it clear that the participant is the expert, not you. Your knowledge may be limited and the participant is there to increase your knowledge.
Watch your body language
Your tone and body language can affect the way a participant perceives your questions. Be alert to your biases. Is there an answer to your question that you would like the participant to provide? Is there an answer you expect? Your expectations and preferences can be conveyed in your tone, body language, and the way you phrase questions, probes, and summaries. For example, looking bored or not making eye contact when you disagree, or sitting on the edge of your seat and nodding vigorously when the participant is confirming your suspicions, will clearly reveal your biases. Your biases are even conveyed in the responses that you do not follow up on. Watching yourself on videotape can help you identify those biases. If you are alert to your biases, you can better control them.
Know when to move on
Knowing when to let go is as important as knowing when to follow up. A participant may not be as forthcoming as you would like, or maybe the person is just plain lying. As rare as that is, you should know how and when to move on. Remember: this is an interview, not an interrogation. Even if you suspect that the participant is not being completely honest, continued badgering is as rude as calling the participant a liar. Once it is clear that the participant cannot provide the details you are looking for, drop the line of questioning and move on. If necessary, you can throw out that participant’s data later. For ethical reasons, you must remember to treat the participant with respect, and part of that is knowing when to let a topic of discussion drop.
Reflecting
To verify that you understand what the participant has told you, it is essential to summarize, reword, or reflect the participant’s responses. You are not probing for more detail but confirming the detail you already have. It is not necessary to do this after every response, especially if the response is brief and straightforward as in structured interviews. However, if the participant’s response has been lengthy, detailed, or not completely clear, you should summarize and restate what the participant has said and squ for accuracy. A reflection of the earlier interview excerpt (see page 284) is provided below:
“I just want to make sure that I have captured your experience correctly. You needed to purchase tickets for immediate travel and you were looking for a bereavement discount. You couldn’t find information on bereavement discounts or an agent to assist you at TravelSmart.com, so you went to WillCall.com because you knew they had an agent on call. They were then able to get you the tickets at a discount. Does that summarize your experience correctly?”
Reflections help build rapport by demonstrating that you were listening and understood the participant’s comments. They can also be used to search for more information. The participant may clarify any incorrect information, or provide additional information, when responding to your summary.
At no time should you insert analysis into your summary or in response to a participant’s statement. In other words, do not try to provide a solution to a problem the participant has had, explanations for why the product behaved as it did, or why you think the participant made a certain choice. In the example above, you would not want to inform the participant where she could have found the bereavement discount on your site. You are not a counselor and you should not be defending your product. You are there to collect information from the interviewee – nothing more. Ask for observations, not predictions or hypotheses.
Empathy and antagonism
When you are speaking with someone – even if it is someone you barely know – doesn’t it make you feel better to know that the other person understands how you feel? A skilled interviewer is able to empathize with the participant without introducing bias. Keep in mind that this is not a conversation in the traditional sense; you are not there to contribute your own thoughts and feelings to the discussion. In the earlier example, the interviewer could have shown empathy by stating: “That [bereavement] must have been a difficult time for you.” An inappropriate response would have been: “I know exactly how you feel. When my grandmother passed away, I had to pay an arm and a leg for my plane ticket.” The interview is not about you. You do not have to be a robot, devoid of emotion, in order to prevent bias. Make eye contact and use your body language to show the participant that you are engaged, that you understand what he/she is saying, and that you accept the participant regardless of what he or she has said.
It should be unnecessary to say, but some interviewers actually make the mistake of disagreeing with participants. Just as in sales the customer is always right, in usability the participant is always right. None of your questions, probes, or reflections should insinuate that you disagree with what the participant has said. You do not want to insult the participant and disrupt the remainder of the interview. Even if the interviewee’s understanding of how a product works is incorrect, you do not want to say: “Actually, that’s wrong.” You are there to collect information and your thoughts and opinions are irrelevant. If for the purposes of accurate data collection, you need to correct some factual data the participant has mistaken, find a diplomatic way to provide the correct information.
Transitions
Your questions or topics for discussion should transition smoothly from one topic to another. This will allow participants to continue on a track of thought and the conversation will appear more natural. If you must change to a new topic of discussion and there is not a smooth transition, you can state: “That’s excellent information you’ve given me. While I make a note of it, can you think about how you would <introduce different topic>?.” This lets the participant know that he or she should not be looking for a connection or follow-up from the last question. If the participant believes that you are trying to probe more deeply into the previous topic, he or she may get confused or misinterpret your next question. A simple transition statement gives closure to the last topic and sets the stage for the next one.
Avoid negative connectors like “but” and “however.” These might signal to a participant that he or she has spoken too long or has said something incorrect. The person is likely to be more cautious when answering the following questions.
Monitoring the Relationship with the Interviewee
Like all user requirements activities, interviews are a giving and taking of information. Since it is one-on-one, the relationship is more personal. To get the most out of participants, it is important to monitor the relationship and treat the participant ethically. You want to make sure that the participant is comfortable, engaged, and trusting. If the participant does not feel you are being honest or is wondering what the motivation is behind your questions, he/she will be guarded and will not provide the full details you are looking for.
Watch the participant’s body language
Does the participant seem tense, nervous, bored, or angry? Is he/she looking at the clock or is his/her attention lapsing? Do you feel tense? If so, the participant likely feels tense too. You may have jumped into the detailed, difficult, or sensitive questions before you established a good rapport. If possible, go back to easier questions, establish the purpose and motivations of the study, and be sure that the participant is a willing partner in the activity. If a particular line of questioning is the problem, it is best to abandon those questions and move on. A break may even help. Sometimes a participant is just having a bad day and nothing you say or do will help. At that point, ending the interview can be the kindest act possible for the both of you.
Fighting for control
If you find yourself competing with the participant for control of the interview, ask yourself why. Is the participant refusing to answer the questions you are asking, or is he/she interrupting before you can complete your questions? Just as the interview is not about your thoughts or opinions, it is not up to the participant to ask the questions or drive the interview. At some point, the participant misunderstood the guidelines of the relationship. Begin with polite attempts to regain control, such as:
“Because we have a limited amount of time and there are several topics that I would like to cover with you, I am going to need to limit the amount of time we can discuss each topic.”
If the participant refuses to be a cooperative partner in the interviewing relationship and you do not feel you are obtaining useful information, simply let the participant go on and then write off the data. In extreme cases, it is best for all parties to end the interview early. If you have recorded the session, watch or listen to it with a colleague to see whether you can identify where the interviewing relationship went awry and how you can avoid it in future.
Hold your opinions
Even though the interview is not about you, if the participant directly asks your opinion or asks you a question, you do not want to seem evasive because it could harm the rapport you have established. If you believe your response could bias the participant’s future responses, your reply should be straightforward:
“Actually, I don’t want to bias your responses so I can’t discuss that right now. I really want to hear your honest thoughts. I would be happy to talk about my experiences after the interview.”
If you are sure the question and your response will not have an effect on the remainder of the interview, you can answer the question but keep it brief.
Dos and Don’ts
We have provided a lot of recommendations about how to conduct a successful interview. For easy referral, some of the key tips are summarized in Figure 7.6.

Data Analysis and Interpretation
Data should be analyzed shortly after conducting each interview. As with any activity, the longer you wait to get to the analysis, the less you will remember about the session. The notes will be more difficult to interpret and you will have to rely heavily on the recordings. The more you have to rely on the recordings, the more time it will take you to analyze the data. Hold a debrief session as soon as possible with your note-taker and any other observers to discuss what you learned. Review the recording to fill in any gaps or expand on ideas if necessary, and add any additional notes or quotes. If the session is still fresh in your mind it will not take as long to review the recording.
You can either wait until you have conducted all the interviews before analyzing the data, or you can do preliminary analysis following each interview. We recommend the latter because it can give you insights for future interviews. You may want to delve into more detail on questions, or remove questions that are not providing value. And as any usability professional can attest to, stakeholders often ask for results before a study is complete. It can help if you have something more substantial to give them than just a few interesting quotes that stand out in your mind.
Categorizing
If you are conducting structured or semi-structured interviews, you can begin by tallying the responses to closed-ended questions. For example, how many people so far have selected each option in a multiple-choice question, or what is the average rating given in a Likert scale question? Chapter 8 has a detailed discussion of closed-question data analysis (see Chapter 8, Surveys, “Data Analysis and Interpretation” section, page 348).
If you are conducting unstructured interviews, you can begin by identifying potential categories. What is the range of responses you are getting to each question? What is the most frequent response? Regardless of the type of interview, you can select some illustrative quotes to represent each category of response.
Affinity Diagram
An affinity diagram is probably the most useful method for analyzing interview data. Similar findings or concepts are grouped together to identify themes or trends in the data. A detailed discussion of what an affinity diagram is, how to create one, and how to analyze the data from one is provided in Appendix F, page 714. This data analysis technique applies to other methods as well, such as focus groups and field studies.
Qualitative Analysis Tools
Several tools are available for purchase to help you analyze qualitative data. They look for patterns or trends in your data. Although these tools hold a lot of potential, none of the seasoned usability professionals we have spoken with have used these tools. If you would like to learn more about the available tools, what they do, and where to find them, refer to Appendix G, page 722. As with affinity diagrams, this data analysis technique can be applied to other methods.
Communicate the Findings
In this section we discuss some of the ways in which interview data can be effectively communicated. There are a few different ways that you can present the data. It all depends on the goals of your study, how your data stacks up, and the method you feel best represents your data. In the end, a good report illuminates all the relevant data, provides a coherent story, and tells the stakeholders what to do next.
Preparing to Communicate Your Findings
The specific data that you communicate to product teams can vary depending upon the activity you conducted, but some elements of how you communicate the results are the same regardless of the method. Because these strategies are common to all user requirements activities, they are discussed in detail in Chapter 14, Concluding Your Activity, page 636. We recommend that you read that chapter prior to relaying your results to your stakeholders. Topics discussed include:
Over Time
Your interview may cover a period of time, such as asking a travel agent to describe his/her day from the first cup of coffee in the morning through turning off the computer monitor at the end of the day. Or you may ask someone a series of questions that cover the first six months of training on the job.
If your questions cover a period of time, it makes sense to analyze the data along a timeline. Use the results from your initial categorization to start filling in the timeline. In our travel agent example, what is the first thing that the majority of travel agents do in the morning? What are the activities that fill their days? Then use individual anecdotes or details to fill in gaps and provide interesting information that does not fit neatly into a category. It can be those additional details that provide the most value.
By Topic
Your questions may not follow a timeline but simply address different topics related to a domain or user type. In these types of interview, you may wish to analyze and present the data per question. Provide the range of answers for each question and the average response. Alternatively, you can group the data from multiple questions into larger categories and then discuss the results for each category. An affinity diagram is most helpful in these types of interviews to identify higher-level categories, if they exist (see Appendix F, page 714).
By Participant
If each participant and his/her results are widely different, it can be difficult to categorize the data. This may be the result of difficulties with your user profile and recruiting, or it may be intentional in the case where you want to examine a variety of user types. It may make more sense to summarize the results per participant to illustrate those differences. Similarly, you may choose to analyze the data per company (customer), industry, or some other category membership.
Vehicles for Communicating Your Results
As with any of the usability techniques described in this book, you may wish to archive the methods and results of your study in a usability report, along with an Executive Summary to provide a quick synopsis of the results. (Refer to Chapter 14, Concluding Your Activity, page 652 to learn more about reporting usability results.) The following are some additional methods for communicating your results:
![]() Create a poster that summarizes the results in either a time-based or topic-based manner. Include particularly illuminating quotes to make it more interesting, and remind the audience that these results are from the mouths of real users.
Create a poster that summarizes the results in either a time-based or topic-based manner. Include particularly illuminating quotes to make it more interesting, and remind the audience that these results are from the mouths of real users.
![]() Use the results to build or improve your personas and scenarios (see Chapter 2, Before You Choose an Activity, “Learn About Your Users” section, page 41).
Use the results to build or improve your personas and scenarios (see Chapter 2, Before You Choose an Activity, “Learn About Your Users” section, page 41).
![]() Identify follow-up activities that can be built based on the results of your interviews (e.g., a survey).
Identify follow-up activities that can be built based on the results of your interviews (e.g., a survey).
![]() Create a table of recommendations that summarizes the issues uncovered and recommendations for next steps (see Table 7.5). This table should be easy to quickly scan and understand. It may not be as easy to construct as if you had conducted a usability test, but it is still possible. The best recommendation may be “Investigate further.” Without that recommendation, however, the product team may stall and have no idea how to proceed.
Create a table of recommendations that summarizes the issues uncovered and recommendations for next steps (see Table 7.5). This table should be easy to quickly scan and understand. It may not be as easy to construct as if you had conducted a usability test, but it is still possible. The best recommendation may be “Investigate further.” Without that recommendation, however, the product team may stall and have no idea how to proceed.

Lessons Learned
We conducted a series of interviews at hospitals in Houston, Texas and Cardiff, Wales. We interviewed doctors, nurses, and other staff members throughout the hospitals. We kept small notebooks with us to jot down important points to follow up, but we relied almost exclusively on audio recorders. Unfortunately, during transcription we discovered one tape from each hospital was blank. There is no way to know what happened, but those interviews are lost forever. Squ and resqu your equipment. Is the light on, indicating that it is recording? Is the tape progressing? Monitor the time you have been recording. If it is a 30-minute tape, it had better flip over or stop at the 30-minute mark. If not, you haven’t been recording the entire time. Also, replay sections of the tape during breaks. If you find that the audio was not recorded, the conversation should be fresh enough in your mind that you can jot down a few notes to fill in the blanks. If you’re very lucky, you may be able to interview the participant again.
Pulling It All Together
We began by discussing the best uses for interviews and the different types of interviews (structured, unstructured, and semi-structured). Proper wording of questions in interviews was then discussed in detail. If the questions in an interview are constructed poorly, the results of your study will be biased or will not provide the information you need. We also discussed how to conduct an interview, including the five phases of an interview, your role as an interviewer, and recording the data from the interviews. Finally, methods for analyzing the data and presenting your results were discussed.
The results from your interviews can be incorporated into documentation such as the Detailed Design Document. Ideally, additional user requirements techniques should be used along the way to capture new requirements and verify your current requirements.
Preparing and Conducting On-site Interviews
Donna Andrews, Microsoft Corporation
The MSN8 Dashboard is a way for users to keep personally relevant links and real-time information available on their desktop (see Figure 7.7 on page 300). It contains a set of “tiles” from which users can select – such as “stocks” and “weather” – to see real-time information, or “movies” to navigate to particular movie sites on the Internet. For a new, similar feature in a future version of Windows, we were interested in whether the Dashboard, or a different, internal product called Sideshow, provided more useful and usable model for users.

Sideshow offered a similar user interface to Dashboard (a bar that sits lengthwise at the edge of the screen – for convenience I will call them both “bars”) but offered different content, a different method of choosing and adding content, and a different interaction model. The feature team decided to set up a “trial period study” in which participants compared Sideshow and Dashboard over a period of months, and then interview the participants about their experiences.
Reasons for Choosing the Semi-structured Interview
We chose a trial period and semi-structured interviews for several reasons. First of all, because the purpose of Dashboard and Sideshow is to allow users to remain peripherally aware of personally important information at all times, a lab study was inappropriate. Each bar comes with a variety of tiles that the user can choose from, and the user can choose to install as many or as few of those on the bar as they wish. Participants would need ample time to find the types of tiles available in each bar, decide which might be relevant or interesting, and learn to customize the user interface at will. A trial period also provided users a chance to use the interface in the manner it was intended – at periodic intervals and in very short bursts of attention – potentially a few seconds at a time, rather than in a short, concentrated period of time.
Secondly, the purpose of both bars is to provide information at a quick glance. It would be extremely difficult to “observe” participants using the bars because each “use” might last only a few seconds, and come at long intervals. In addition, there would be no way to know which tiles were being viewed, which information available in that tile was being gleaned, and what value the information provided the user once it had been viewed. Furthermore, since the bar is always available and visible, it may provide some peripheral awareness benefits that would be entirely unobservable by us but might be consciously realized by users over a period of time.
Finally, we were as interested in participants’ reactions to the bar as we were in what aspects of the bar they used and how often they used it. Their impressions, observations, and ideas could be extremely valuable in helping us to understand how to shape the new product but are literally impossible to observe. The only way to get at that type of information is to allow the users to experience the product first-hand in their own environments, and then encourage them to speak freely about their experiences.
There are drawbacks to the type of trial period study used here. Participants’ statements about their use of the bars had to be taken at face value. Sometimes participants had trouble remembering the specifics of a situation that had happened weeks previously, or were unable to recount clearly the troubles they had early on once they had surmounted any “learning curve” issues.
Therefore it was decided that the best method for gathering user requirements would be to allow participants to use each bar on their own, in whatever way they found most suitable, and conduct an interview after a set period of using each one.
Study Setup
Seven people participated in the study. Participants were recruited through the Microsoft Usability recruiting pool and were screened to be members of the seven “personas” created by the feature team (refer to Chapter 2, Before You Choose an Activity, “Step 2: Personas” section, page 47). We made three visits to each participant.
![]() During the first visit we installed the first bar (three used Dashboard first and four used Sideshow first) and conducted a semi-structured interview about computer use as well as their use of and interest in other forms of digital technology (e.g., digital photos, digital media). This interview was written and conducted by a Project Manager in the usability group and was not part of the structured interview process detailed here.
During the first visit we installed the first bar (three used Dashboard first and four used Sideshow first) and conducted a semi-structured interview about computer use as well as their use of and interest in other forms of digital technology (e.g., digital photos, digital media). This interview was written and conducted by a Project Manager in the usability group and was not part of the structured interview process detailed here.
![]() The second visit was approximately eight weeks later, to give participants time to learn how the product worked, customize it, and get used to using it; and also to give me time to complete a full round of visits and write up the data before beginning another. At the second visit, I returned with one or two members of the product team (or occasionally, members of related or partner teams – program managers, developers, testers, product designers, and writers all attended), and interviewed participants about their use of the first bar. After that interview the first bar was uninstalled and the second one was installed.
The second visit was approximately eight weeks later, to give participants time to learn how the product worked, customize it, and get used to using it; and also to give me time to complete a full round of visits and write up the data before beginning another. At the second visit, I returned with one or two members of the product team (or occasionally, members of related or partner teams – program managers, developers, testers, product designers, and writers all attended), and interviewed participants about their use of the first bar. After that interview the first bar was uninstalled and the second one was installed.
![]() After another period of approximately eight weeks, we made our third and final visit. Again participants were interviewed. Since eight weeks is a long time between visits, I gave participants a small notebook to record any experiences, thoughts, or comments that they wanted to remember to share when I returned. Several used the notebook; others made notes on their computer. One participant provided us with six to eight pages of typed notes and ideas at each visit.
After another period of approximately eight weeks, we made our third and final visit. Again participants were interviewed. Since eight weeks is a long time between visits, I gave participants a small notebook to record any experiences, thoughts, or comments that they wanted to remember to share when I returned. Several used the notebook; others made notes on their computer. One participant provided us with six to eight pages of typed notes and ideas at each visit.
I chose to do a “within subjects” style design, having all participants use both bars, because with only seven participants we didn’t feel we would be able to draw strong enough conclusions from a “between subjects” design. We were afraid that if participants saw only one bar, they would all “like” the bar they used. Since it is something of a new concept, with nothing to compare it to, users might not be as critical as we wanted them to be. It was felt that giving them experience with both styles of bar might spark their critical interest and imagination more, and make them better able to express preferences for the types of things they found useful or irrelevant, convenient or annoying.
All participants were compensated at each visit with an item of Microsoft software.
Planning and Writing the Interview
I asked the team designing Sideshow to brainstorm a list of questions they wanted user information on. I already had a fairly complete list of questions I anticipated asking, but asking for input and participation in the planning created an interest in the project among the team, and buy-in that the results would be useful and “worth waiting for.”
I combined the team’s questions with my own and wrote a final list of questions. I couched the questions explicitly in terms of the characteristics of the two bars in the study, so that I could ask the same questions about both bars and get comparable information about each. For example, one of the questions the feature team wanted to ask was “What types of information should we show in our product?” I translated this into a series of questions that could be answered about each individual bar. Here is an example of this.
The careful reader will have noticed that the questions in this list have a significant amount of overlap. The tiles that got used most were likely to be the tiles that were either the most useful or the most enjoyable. The tiles that participants took the time to remove from the bar were likely to be neither useful nor enjoyable. The reason for creating questions that might have overlapping answers or references was that it allowed me, as the interviewer, to ensure that nothing was overlooked in the interview process.
On the other hand, asking a series of overlapping questions directly would undoubtedly cause participants to repeat themselves. I therefore included a “general” question (in this case, “Tell me what you think about all the different tiles you have on the bar.”). By asking this general question first, I was able to get answers to many of the more specific questions without having to ask them directly, and follow up with any questions the participant had not touched on.
Also, asking a more general question allows the interviewer to get a sense of what the participant thinks is important. In many cases, this may not be the same information the interviewer or the product team considers important. Understanding participants’ priorities helps the team consider whether they are asking the right questions and prioritizing correctly.
In the end, I had nine general questions, with anywhere from three to twenty more specific, sometimes overlapping, questions.
Interview Preparation
In preparation for conducting the interviews, I created an “interview outline.” Each page of the packet had only one general question and its related questions. The rest of the page was left blank for note-taking. Main headings were the general questions and subheadings were the detailed questions, the answers to which could comprise the answer to the more general question. By keeping questions on a similar topic together, and keeping each topic on a separate page, it was easy to see at a glance whether any aspects of the topic had not been addressed yet and I needed to ask follow-up questions.
Conducting the Interviews
All the interviews were conducted at the participants’ homes, in close proximity to the computer on which the user interface in question was installed. This allowed me and accompanying team members to see the bar – to see what parts they had added, what information they were monitoring, and the manner in which they had organized the bar – and to use it as a reference for the interview. This last was especially valuable, as participants often did not know technical names for the areas or features they wanted to refer to. Having the bar visible made it easier for participants to point to or even re-enact situations they had difficulty explaining. It also served as a “memory jog” for participants’ answers. The interview differed from a “contextual inquiry” in that I did not ask the participants to “use the bar” while I watched, merely to recount their experiences with using it.
I was very interested in learning participants’ subjective reactions to both of the products they tried. A very real danger of interviewing is that by focusing too strictly on the predetermined questions the interviewer may overlook information participants offer on their own, because it may not fit into our prepared set of questions. In order to avoid this, I began each interview with a very general question that allowed the user to be as general or as specific as he or she wanted. The question I asked was a sort of “role play” question, in which I asked the participant to imagine that I was a friend who had just noticed this feature on the person’s desktop, and asked him or her to explain to the friend what it was. This allowed participants to single out whatever aspects of the user interface or functionality were important to them. I followed this up by asking the general questions from my outline, and then specific questions only when I wanted more information.
Another danger I wanted to avoid was leading the participants in such a way that they told me what they thought I wanted to hear, rather than what they really thought. One benefit of individual interviews over focus groups is that generally individual participants feel freer to speak their mind because they are not influenced by outspoken members of the group. However, if the interviewer asks questions that suggest a personally held opinion, this benefit can be nullified as the participant attempts to be agreeable – a natural human desire. In order to avoid leading participants, the general questions were all phrased less as questions and more as a direction to “tell me about” a particular feature. For example, rather than asking “Did you like the bar?”, I asked: “Tell me what you thought of the bar.” Such a question merely asks for an opinion without betraying my own.
I was very glad to have members of the feature team accompany me on these visits, but this could occasionally present problems, chief among them being physical space. Several of the participants had their computers in rather small rooms; it was sometimes a juggle to find chairs for all of us, and in at least one case a team member had to stand for most of the two-hour visit. I tried to make sure I took only one companion on visits when I knew the quarters would be cramped, but sometimes two team members felt they simply “had to” come on that particular visit, either for scheduling reasons or because they were interested in a specific “persona.” When I confirmed with the participant the day before I always let them know how many people would be joining me, so there would be no surprises.
Before the visit, I briefed the team members going with me on how I planned to conduct the interview, and asked them to write down any questions they came up with and hold them until the end, because it was possible that the question would be answered along the way. I did this not because I wanted to stifle my companions, but to avoid overwhelming the participant with the feeling of being interrogated. When we arrived, I would introduce the people with me (including their job titles), and explain that they were very interested in the participant’s opinions. While I set up the camera, the team members would chat with the participant, asking about his or her job and family, and often discussing artifacts in the room such as pictures. By the time we began the interview, a comfortable atmosphere had been established and we never felt we had any problems with participants feeling intimidated.
All visits were videotaped. Taping of all interviews is an absolute must because even the best listeners and note-takers can benefit from hearing the interview again later. A good-quality audiotape is often sufficient for this. In our case, video allowed us to capture not only the participants’ comments but also see what parts of the bar they were referring to when they spoke. Participants often use deictic words such as “this one” when describing things, and without the video to be able to know exactly what they were referring to it would have been virtually impossible to reconstruct what they were talking about. Even so, it was sometimes necessary for me to ask the participants to point to the portion of the bar they were referring to, in order to really understand their answers.
Asking Clarifying Questions
During each interview, there were times when participants’ comments were unclear. A participant might start talking about a feature sounding very favorable and then finish sounding quite unfavorable. Or, a participant might seem to say that she had succeeded in accomplishing something with the bar but a moment later seem to say exactly the opposite. Sometimes comments were simply vague. These are common situations in all interviews.
When this happens, the interviewer may feel that he or she shouldn’t ask for clarification, at the risk of making the participant feel to blame for the lack of clarity. In fact, asking for clarification can send a very favorable signal to the participant. It indicates that the interviewer is listening carefully, and that the participant’s ideas are worthy of comment, discussion, and follow-up. Of course, for our own understanding of user issues also, it is very important to ask the participant to clarify. If an interviewer is too shy to ask for clarification, he or she runs the risk of jumping to incorrect conclusions about user needs for the product or feature.
In this study I used two ways of asking for clarification, both of which were useful. One was to “summarize” what I understood the participant to mean. I began by saying something like “Ah, this is interesting, let me see if I’ve got this right,” and then paraphrased what the person had said. This method has the potential side-effect that the participant may feel uncomfortable disagreeing if in fact you haven’t grasped the correct meaning, but I found participants quite willing to correct errors in my summary.
Another method I used was to ask the participant for specific examples. This method was especially useful when contradictions appeared to arise. Sometimes I asked the participant to recount an example from his or her experience; other times I asked them to show me by reproducing the experience for me.
Taking Notes
Taking notes during an interview is a tricky process. No matter how organized one is, or how good at interpreting user comments, the note-taking procedure can be overwhelming – especially during a lengthy interview (each of these lasted approximately 90 minutes). I am not sure that I have yet found the most useful method for taking notes, and there were certainly many pitfalls in the procedure adopted. In this section I outline the method used and why I chose to take notes in this manner. I also describe the problems that arose, and suggest some possible remedies.
I recorded answers longhand on the page that contained the questions as I asked them. When I asked a question, I recorded the outline number for that question and then wrote the participant’s response. In theory, this allowed me to easily link answers to the questions. What I discovered, though, was that all participants followed a “train of thought” that didn’t conform to my nice outline. Often they would start out answering my question but end up answering a question I hadn’t asked yet, or even elaborating on something that really related more to a question I had asked earlier. Therefore an answer that I might have labeled “4c” might detail some information that I wanted to include as part of an answer to 5a or 2b. When a response “wandered” onto the topic of another question, I initially tried quickly to find the question number that they seemed to be answering, but I soon gave this up because it took too long and took my attention away from what the participant was saying. After a few unsuccessful attempts to tie answers to the right questions during the interview, I abandoned the idea and just wrote comments as they came, and only actively looked for the “right” place to record answers when I was ready to ask a new question. After the interview was over, I could re-read the answers and comments and tie them to the questions to which they were most relevant.
Many usability engineers prefer to type notes directly on a laptop computer if they have one. This has the benefit of saving a step – notes do not have to be typed up later. I chose not to do so for several reasons. First of all, the screen space available on a laptop is small, and I needed to be able to view both my questions and participants’ answers as I typed them. Secondly, although I type quickly, my accuracy is fairly low; and having to backspace or delete in order to make typed notes even remotely coherent adds long amounts of “blank space” to the interview. Finally, the logistics of dealing with both the video camera and a laptop in what was often a very confined space may seem a small thing but it can often be aggravating. Any one of these hurdles may be minor and easily overcome for the interviewer who is a better window manager, a better typist, or a better manager of paraphernalia. For me, however, the overhead was too high, so I chose to take notes the old-fashioned way.
As much as possible, I took notes verbatim, in order to keep myself from trying to interpret too much on the spot, and to be sure that I didn’t miss anything. This was sometimes difficult as participants spoke quickly, so I developed many shorthands and symbols for the various features of the user interface and actions related to it that participants repeated often (such as capital “B” for bar, capital “T” for tile, up and down arrows for turning the bar on and off, etc.). One problem was that vague or unclear comments unnecessarily became part of my notes. As much as possible, I stopped writing as soon as I felt the need to clarify something, and began again as soon as I was sure I had understood the answer or comment. A benefit of the verbatim notes was that I had plenty of “quotes” from participants to share with the product team and to spice up the report.
Of course it was inevitable that I occasionally missed a comment. When that happened, I quickly looked at my watch and wrote down the exact time. I could then go back to the videotape and go straight to that portion of the tape to find what I had missed. I also encouraged team members who accompanied me on these visits to take their own notes, as a back-up. However, I found their notes were generally confined to design ideas or fixes that they noticed as the interview progressed and were usually related specifically to their job, rather than notes on the actual interview, and so these were of limited value to me. On the other hand, I did find it very useful to debrief after each visit with the team members who had gone, to compare notes and memories and discuss our key take-aways from the session. This again increased the buy-in of the team and helped us all to understand more the experience they had heard about first-hand.
Tying Up Loose Ends
I didn’t want the final interview to seem “anti-climactic,” leaving the participants with no sense of how much they had helped us or how we were using their information. In order to give the participants (and myself) a sense of closure to the whole study, I took several pictures with me on the last visit showing possible designs for the Windows bar feature, which incorporated some of their ideas and comments. After the regular interview, I showed these to the participants and got their reactions to the designs. All the participants appreciated the “sneak peak” and, I think, felt pleased to see how their experiences had been translated into concrete designs.
Analysis
Analyzing qualitative data is a time-consuming process, no matter how you do it. Software packages exist which are meant to aid in qualitative analysis (QA), but these packages are often cumbersome, require more time to learn than the researcher is able to devote, and in many cases do not significantly improve the researcher’s ability to produce a quality report.
In this study, I chose to make use of the features in Microsoft Word that allow you to find instances of text, and to copy and paste. The first step, however, was to transfer the notes from my longhand pages to a Word document. While this may seem a time-consuming and unnecessary step that could be bypassed by simply typing notes from the start rather than writing them, forcing oneself to retype every note has clear benefits. First of all, it required me to review every word of the notes, allowing me to think about the context in which the comments were made and interpret the significance of the comments. Secondly, it allowed me to find patterns in responses that I might have overlooked otherwise, which allowed me to cross-reference answers between different questions and between different participants. The act of typing up my notes provided an excellent review of the interviewing during which I drew fresh inferences and conclusions.
I typed each comment under the question to which it was most related, and if the participant had wandered and addressed a different issue, I copied it under that question too. I created separate interview reports for each participant, and called these the “participant data.”
I also took the comments from the individual interview reports and created a “summary” document that included the answers from all seven participants. For example, under the question “What did you like about the sidebar” I listed all seven participants’ answers (next to their names, and always in the same order). This allowed me to look at all answers to any question and decide whether there was a common theme or trend running through all participants’ comments. I had one set of answers for the Dashboard, and another set for Sideshow. I called this the “question data.” When writing up the report for the product feature team, this organizational method proved much more useful, as I could glance at a given question and tell immediately how many participants had answered in similar ways.
Every time I thought I saw a pattern to participant responses, I wrote it down in very general terms (e.g., “Participants liked the stocks tile” or “Participants had more trouble adding tiles to one bar than the other”). I copied relevant quotes from the summary document and pasted them under these general statements, refining the general statements to be more specific as I continued to comb through the data (e.g., “5 out of 7 participants”). These general statements and the supporting comments became the basis of my report.
The Results
The data we obtained in this study helped us make decisions about how a feature in a future version of Windows similar to Sideshow or the Dashboard should work. We found that participants expressed preferences for some aspects of each bar. For example, both bars use “flyout” windows to display additional information, but the windows in Sideshow were considered much more useful than those in the Dashboard. On the other hand, the Dashboard’s mechanism for adding and removing tiles from the bar was more intuitive than Sideshow’s.
However, not everything that participants said they liked made it into the plans for the upcoming feature. For example, six of the participants expressed a preference for Sideshow’s “hover and show” method of displaying the flyout windows over the Dashboard’s “click and show” method. On the other hand, the hover method caused everyone to experience occasional instances of flyouts appearing when they weren’t wanted, either because the mouse accidentally strayed to the right side of the screen, or because the participant was trying to access the right edge of a document with the mouse (usually to use the scrollbar) and accidentally called up the flyout window. Despite the fact that most participants said they preferred the hover interaction, the ubiquitous nature of unwanted flyouts and the fact that at least one participant found this irritating enough to say she didn’t like the hover interaction led the team to the conclusion that for the public at large the hover interaction would cause too much interference with other tasks, and so the decision was made to adopt the Dashboard’s click interaction model.
Lessons Learned
![]() Begin with general questions and follow-up with specific questions. Asking specific questions first may lead the participant into talking about only what he or she thinks you want to hear about.
Begin with general questions and follow-up with specific questions. Asking specific questions first may lead the participant into talking about only what he or she thinks you want to hear about.
![]() Don’t feel you need to ask every question on your list. Let the participant talk, and then follow up with those that are essential.
Don’t feel you need to ask every question on your list. Let the participant talk, and then follow up with those that are essential.
![]() Videotape everything, if possible. Audiotapes are insufficient in situations where participants constantly refer to things with vague references. Be sure to get permission.
Videotape everything, if possible. Audiotapes are insufficient in situations where participants constantly refer to things with vague references. Be sure to get permission.
![]() Involve your product team early and often. Encourage team members to accompany you and debrief after each visit with those who do. This will increase their buy-in to the need for research. Also, understanding what they are taking away from the interview will help you understand their priorities better.
Involve your product team early and often. Encourage team members to accompany you and debrief after each visit with those who do. This will increase their buy-in to the need for research. Also, understanding what they are taking away from the interview will help you understand their priorities better.
![]() Understand your own note-taking skills in deciding whether or not to type or write. Taking notes on the laptop may save a step, but slow or inaccurate typing drags down the interview. Additionally, the second step of typing up notes is a great double-squ.
Understand your own note-taking skills in deciding whether or not to type or write. Taking notes on the laptop may save a step, but slow or inaccurate typing drags down the interview. Additionally, the second step of typing up notes is a great double-squ.
Acknowledgments. I wish to express my sincere thanks to Shannon Kallin who initially conceived of and began planning this study but was unable to see it to completion. Thanks also to J. J. Cadiz, Gavin Janke, Andrew Brenner, Tracey Lovejoy, and Kent Sullivan.