Use the EDM wizard

After you click Add on the New Item dialog, Visual Studio will display the first page of the Entity Data Model Wizard. Of course, you could cancel out of the Wizard and do everything manually, but I’ve never seen a good reason to do so. The Wizard is easy to use and does a good job of building the basic model. As you’ll see, you can always fine-tune things afterward.

First up, the Wizard will ask you whether you want to choose a database or just open an empty model. We’re using the Database First workflow, so accept the default choice and click Next.
If you’ve done any database work in Visual Studio, the next couple pages of the Wizard will look familiar to you.
After you click Next on the Choose Model Contents page of the Wizard, it will ask you to choose your data connection. Since this is the first time we’ve used this database, click the New Connection... button.

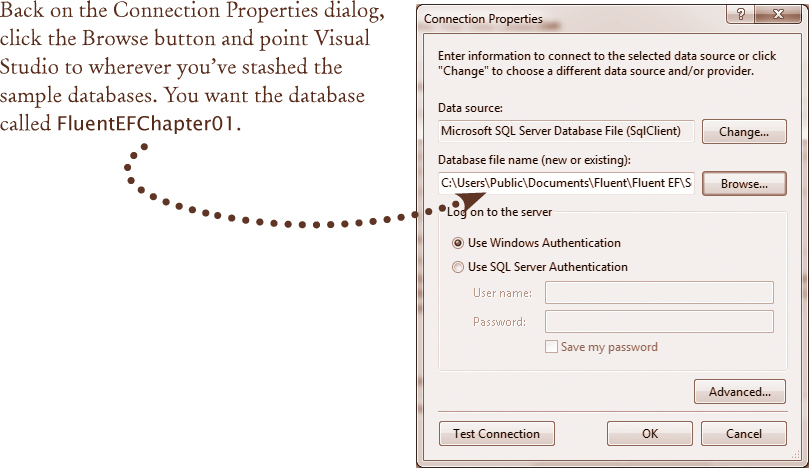
Like the Data Connection dialog, the Connection Properties dialog might have some default values. Since I can’t know what they might be, click the Change... button next to the Data Source field.


I know of two things that can cause this process to fail with a message that the database is in use (there might be more—there’s a reason I’m not a database administrator).
If you’ve attached the database to an instance of SQL Server, you’ll need to either detach it or select the server as the data source, rather than selecting a file the way we did.
If it took you more than one try to get this far, Visual Studio might have gotten itself confused. That’s easy to fix. Cancel out of the dialog and then close and reopen Visual Studio. Reopen the project and start back with Step 2 on page 50.
Once you have your connection working, click OK and the wizard will return you to the Connection Properties page. Make sure you have the checkbox labeled “Save entity connection settings in App.Config as” selected. The wizard will default to naming the setting <Database>Entities, but you can call the setting anything you like.
Click Next.

After you choose Next, Visual Studio will display this slightly scary dialog warning you that the file isn’t part of the current project. If you choose Yes here, Visual Studio will make a copy of the physical file in the project directory and update the connection string to point to the copy. If you choose No, the connection string will continue to point to the sample file you downloaded. For our purposes, it doesn’t really matter which option you choose, but of course it’s something you’ll need to think about when you’re deploying a real application.

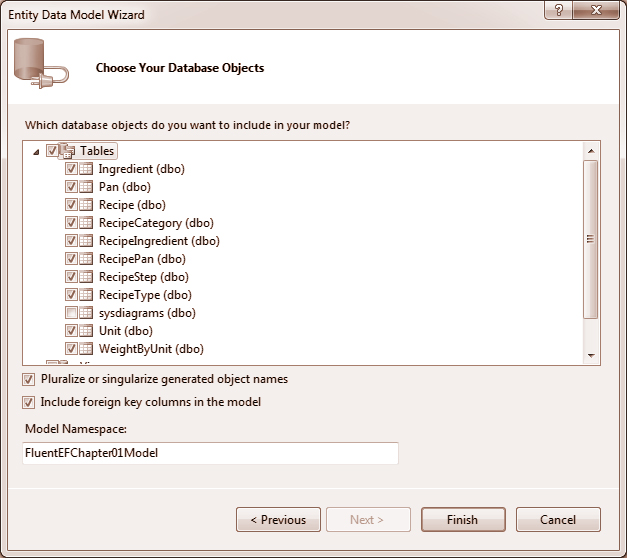
On the last page of the Wizard you choose the database objects you want to include in the model. Our sample database only has one table that we don’t want in the model, so click the Tables checkbox to select all the tables and then deselect sysdiagrams.
Click Finish, and Visual Studio will chug away for a few seconds while it builds the model.
Ta da! You’ve built your first model. Only it’s kind of hard to look at, isn’t it? You can rearrange the entities by just dragging them around. Why don’t you do that so that it looks like the model on the next page?
If you accidentally double-click on one of the entity boxes, Visual Studio will think you want to rename it and turn the entity name into a textbox. If that happens, just press ESC.

