13.5. ASP.NET 3.5 Resource Files
When you work with ASP.NET 3.5, all resources are handled by a resource file. A resource file is an XML-based file that has a .resx extension. You can have Visual Studio 2008 help you construct this file. Resource files provide a set of items that are utilized by a specified culture. In your ASP.NET 3.5 applications, you store resource files as either local or global resources. The following sections look at how to use each type of resource.
13.5.1. Making Use of Local Resources
You would be surprised how easily you can build an ASP.NET page so that it can be localized into other languages. Really, the only thing you need to do is build the ASP.NET page as you normally would and then use some built-in capabilities from Visual Studio 2008 to convert the page to a format that allows you to plug in other languages easily.
To see this in action, build a simple ASP.NET page as presented in Listing 13-10.
Example 13-10. Building the basic ASP.NET page to localize
<%@ Page Language="C#" %>

<script runat="server">

    protected void Button1_Click(object sender, EventArgs e)
    {
Label2.Text = TextBox1.Text;
}
</script>
<html xmlns="http://www.w3.org/1999/xhtml">
<head runat="server">
<title>Sample Page</title>
</head>
<body>
<form id="form1" runat="server">
<div>
<asp:Label ID="Label1" runat="server"
Text="What is your name?"></asp:Label><br />
<br />
<asp:TextBox ID="TextBox1" runat="server"></asp:TextBox>
<asp:Button ID="Button1" runat="server" Text="Submit Name"
onclick="Button1_Click" /><br />
<br />
<asp:Label ID="Label2" runat="server"></asp:Label>
</div>
</form>
</body>
</html> |
As you can see, there is not much to this page. It is composed of a couple of Label controls, as well as TextBox and Button controls. The end user enters her name into the textbox, and then the Label2 server control is populated with the inputted name and a simple greeting.
The next step is what makes Visual Studio so great. To change the construction of this page so that it can be localized easily from resource files, open the page in Visual Studio and select Tools ![]() Generate Local Resource from the Visual Studio menu. Note that you can select this tool only when you are in the Design view of your page. It will not work in the Split view or the Code view of the page.
Generate Local Resource from the Visual Studio menu. Note that you can select this tool only when you are in the Design view of your page. It will not work in the Split view or the Code view of the page.
Selecting the Generate Local Resource from the Tool menu option causes Visual Studio to create an App_LocalResouces folder in your project if you already do not have one. A .resx file based upon this ASP.NET page is then placed in the folder. For instance, if you are working with the Default.aspx page, the resource file is named Default.aspx.resx. These changes are shown in Figure 13-8.
Figure 13-8. Figure 13-8

Right-click on the .resx file and select View Code; notice that the .resx file is nothing more than an XML file with an associated schema at the beginning of the document. The resource file that is generated for you takes every possible property of every translatable control on the page and gives each item a key value that can be referenced in your ASP.NET page. If you look at the code of the page, notice that all the text values that you placed in the page have been left in the page, but they have also been placed inside the resource file. You can see how Visual Studio changed the code of the Default.aspx page in Listing 13-11.
Example 13-11. Looking at how Visual Studio altered the page code
<%@ Page Language="C#" meta:resourcekey="PageResource1" %>
<script runat="server">
protected void Button1_Click(object sender, EventArgs e)
{
Label2.Text = TextBox1.Text;
}
</script>
<html xmlns="http://www.w3.org/1999/xhtml">
<head runat="server">
<title>Sample Page</title>
</head>
<body>
<form id="form1" runat="server">
<div>
<asp:ScriptManager ID="ScriptManager1" runat="server">
</asp:ScriptManager>
<asp:Label ID="Label1" runat="server" Text="What is your name?"
meta:resourcekey="Label1Resource1"></asp:Label><br />
<br />
<asp:UpdatePanel ID="UpdatePanel1" runat="server">
<ContentTemplate>
<asp:TextBox ID="TextBox1" runat="server"
meta:resourcekey="TextBox1Resource1"></asp:TextBox>
<asp:Button ID="Button1" runat="server" Text="Submit Name"
OnClick="Button1_Click"
meta:resourcekey="Button1Resource1" /><br />
<br />
<asp:Label ID="Label2" runat="server"
meta:resourcekey="Label2Resource1"></asp:Label>
</ContentTemplate>
</asp:UpdatePanel>
</div>
</form>
</body>
</html> |
From this bit of code, you can see that the attribute meta:resourcekey has been added to each of the controls along with an associated value. This is the key from the .resx file that was created on your behalf. Double-clicking on the Default.aspx.resx file opens the resource file in the Resource Editor, which you will find is built into Visual Studio. This editor is presented in Figure 13-9.
Figure 13-9. Figure 13-9
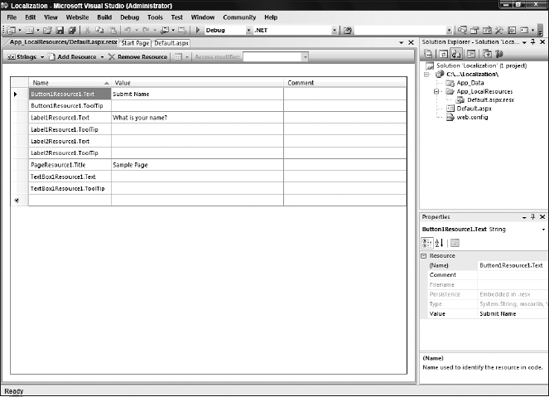
In the figure, note that a couple of properties from each of the server controls have been defined in the resource file. For instance, the Button server control has its Text and ToolTip properties exposed in this resource file, and the Visual Studio localization tool has pulled the default Text property value from the control based on what you placed there. Looking more closely at the Button server control constructions in this file, you can see that both the Text and ToolTip properties have a defining Button1Resource1 value preceding the property name. This key is used in the Button server control you saw earlier.
<asp:Button ID="Button1"
 runat="server" Text="Submit Name"
 meta:resourcekey="Button1Resource1" />
You can see that a meta:resourcekey attribute has been added and, in this case, it references Button1Resource1. All the properties using this key in the resource file (for example, the Text and ToolTip properties) are applied to this Button server control at runtime.
13.5.2. Adding Another Language Resource File
Now that the Default.aspx.resx file is in place, this is a file for an invariant culture. No culture is assigned to this resource file. If no culture can be determined, this resource file is then utilized. To add another resource file for the Default.aspx page that handles another language altogether, you copy and paste the Default.aspx.resx file into the same App_LocalResources folder and rename the newly copied file. If you use Default.aspx.fi-FI.resx, you give the following keys the following values to make a Finnish language resource file:
Button1Resource1.Text   Lähetä Nimi
Label1Resource1.Text    Mikä sinun nimi on?
PageResource1.Title     Näytesivu
You want to create a custom resource in both resource files, using the key Label2Answer. The Default.aspx.resx file should have the following new key:
Label2Answer Hello
Now you can add the key Label2Answer to the Default.aspx.fi-FI.resx file, as shown here:
Label2Answer Hei
You now have resources for specific controls and a resource that you can access later programmatically.
13.5.3. Finalizing the Building of the Default.aspx Page
To finalize the Default.aspx page, you want to work with the Button1_Click() event so that when the end user enters a name into the textbox and clicks the Submit Name button, the Label2 server control provides a greeting to him or her that is pulled from the local resource files. When all is said and done, you should have a Default.aspx page that resembles the one in Listing 13-12.
Example 13-12. The final Default.aspx page
<%@ Page Language="C#" meta:resourcekey="PageResource1" %>

<script runat="server">

    protected void Button1_Click(object sender, EventArgs e)
    {

        Label2.Text = GetLocalResourceObject("Label2Answer") + " " +
           TextBox1.Text;

    }

</script>

<html xmlns="http://www.w3.org/1999/xhtml">
<head runat="server">
    <title>Sample Page</title>
</head>
<body>
    <form id="form1" runat="server">
    <div>
        <asp:ScriptManager ID="ScriptManager1" runat="server">
        </asp:ScriptManager>
        <asp:Label ID="Label1" runat="server" Text="What is your name?"
         meta:resourcekey="Label1Resource1"></asp:Label><br />
<br />
<asp:UpdatePanel ID="UpdatePanel1" runat="server">
<ContentTemplate>
<asp:TextBox ID="TextBox1" runat="server"
meta:resourcekey="TextBox1Resource1"></asp:TextBox>
<asp:Button ID="Button1" runat="server" Text="Submit Name"
OnClick="Button1_Click"
meta:resourcekey="Button1Resource1" /><br />
<br />
<asp:Label ID="Label2" runat="server"
meta:resourcekey="Label2Resource1"></asp:Label>
</ContentTemplate>
</asp:UpdatePanel>
</div>
</form>
</body>
</html> |
In addition to pulling local resources using the meta:resourcekey attribute in the server controls on the page to get at the exposed attributes, you can also get at any property value contained in the local resource file by using GetLocalResourceObject(). When using GetLocalResourceObject(), you simply use the name of the key as a parameter, as shown here:
GetLocalResourceObject("Label2Answer")You could just as easily get at any of the controls property values from the resource file programmatically, using the same construct:
GetLocalResourceObject("Button1Resource1.Text")With the code from Listing 13-12 in place and the resource files completed, you can run the page, entering a name in the textbox and then clicking the button to get a response, as illustrated in Figure 13-10.
Figure 13-10. Figure 13-10
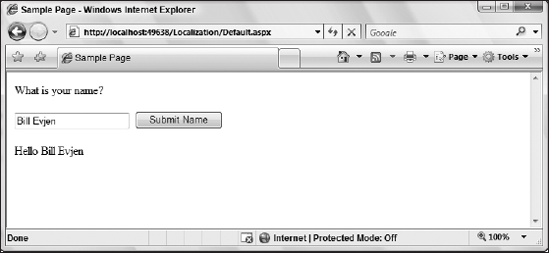
What happened behind the scenes that caused this page to be constructed in this manner? First, only two resource files, Default.aspx.resx and Default.aspx.fi-FI.resx, are available. The Default.aspx.resx resource file is the invariant culture resource file, whereas the Default.aspx.fi-FI.resx resource file is for a specific culture (fi-FI). Because I requested the Default.aspx page and my browser is set to en-US as my preferred culture, ASP.NET found the local resources for the Default.aspx page. From there, ASP.NET made a check for an en-US–specific version of the Default.aspx page. Because there is not a specific page for the en-US culture, ASP.NET made a check for an EN (neutral culture) specific page. Not finding a page for the EN neutral culture, ASP.NET was then forced to use the invariant culture resource file of Default.aspx.resx, producing the page presented in Figure 13-10.
Now, if you set your IE language preference as fi-FI and rerun the Default.aspx page, you see a Finnish version of the page, as illustrated in Figure 13-11.
Figure 13-11. Figure 13-11

In this case, having set my IE language preference to fi-FI, I am presented with this culture's page instead of the invariant culture page that was presented earlier. ASP.NET found this specific culture through use of the Default.aspx.fi-FI.resx resource file.
You can see that all the control properties that were translated and placed within the resource file are utilized automatically by ASP.NET, including the page title presented in the title bar of IE.
13.5.3.1. Neutral Cultures Are Generally More Preferred
When you are working with the resource files from this example, note that one of the resources is for a specific culture. The Default.aspx.fi-FI.resx file is for a specific culture — the Finnish language as spoken in Finland. Another option would be to make this file work not for a specific culture but instead for a neutral culture. To accomplish this task, you simply name the file Default.aspx.FI.resx instead. In this example, it really does not make that much difference because no other countries speak Finnish. It would make sense for languages such as German, Spanish, or French. These languages are spoken in multiple countries. For instance, if you are going to have a Spanish version of the Default.aspx page, you could definitely build it for a specific culture, such as Default.aspx.es-MX.resx. This construction is for the Spanish language as spoken in Mexico. With this in place, if someone requests the Default.aspx page with the language setting of es-MX, that user is provided with the contents of this resource file. However, what if the requestor has a setting of es-ES? He will not get the Default.aspx.es-MX.resx resource file; instead he will get the invariant culture resource file, Default.aspx.resx. If you are going to make only a single translation into German, Spanish, or another language for your site or any of your pages, you want to construct the resource files to be for neutral cultures rather than for specific cultures.
If you have the resource file Default.aspx.ES.resx, then it won't matter if the end user's preferred setting is set to es-MX, es-ES, or even es-AR — the user will get the appropriate ES neutral culture version of the page.
13.5.4. Making Use of Global Resources
Besides using only local resources that specifically deal with a particular page in your ASP.NET application, you also have the option of creating global resources that can be used across multiple pages. To create a resource file that can be utilized across the entire application, right-click on the project in the Solution Explorer of Visual Studio and select Add New Item. In the Add New Item dialog, select Resource file.
Selecting this option provides you with a Resource.resx file. Visual Studio places this file in a new folder called App_GlobalResources. Again, this first file is the invariant culture resource file. Add a single string resource, giving it the key of PrivacyStatement and a value of some kind (a long string).
After you have the invariant culture resource file completed, the next step is to add another resource file, but this time name it Resource.fi-FI.resx. Again, give this resource file a string key of PrivacyStatement and a different value altogether from the one you used in the other resource file.
The idea of a global resource file is that you have access to these resources across your entire application. You can gain access to the values that you place in these files in several ways. One way is to work the value directly into any of your server control declarations. For instance, you can place this privacy statement in a Label server control, as presented in Listing 13-13.
Example 13-13. Using a global resource directly in a server control
<asp:Label ID="Label1" runat="server" Text='<%$ Resources: Resource, PrivacyStatement %>'></asp:Label> |
With this construction in place, you can now grab the appropriate value of the PrivacyStatement global resource, according to the language preference of the end user requesting the page. To make this work, you use the keyword Resources followed by a colon. Next, you specify the name of the resource file class. In this case, the name of the resource file is Resource because this statement goes to the Resource.resx and Resource.fi-FI.resx files in order to find what it needs. After the particular resource file to use, the next item in the statement is the key — in this case, PrivacyStatement.
Another way of achieving the same result is to use some built-in dialogs within Visual Studio. To accomplish this task, highlight the server control you want in Visual Studio from Design view so that the control appears within the Properties window. For my example, I highlighted a Label server control. From the Properties window, you click the button within the Expressions property. This launches the Expressions dialog and enables you to bind the PrivacyStatement value to the Text property of the control. This is illustrated in Figure 13-12.
Figure 13-12. Figure 13-12

To make this work, highlight the Text property in the Bindable properties list. You then select an expression type from a drop-down list on the right-hand side of the dialog. Your options include AppSettings, ConnectionStrings, and Resources. Select the Resources option, and you are asked for the ClassKey and ResourceKey property values. The ClassKey is the name of the file that should be utilized. In this example, the name of the file is Resource.resx. Therefore, use the Resource keyword as a value. You are provided with a drop-down list in the ResourceKey property section with all the keys available in this file. Because only a single key exists at this point, you find only the PrivacyStatement key in this list. Make this selection and click the OK button. The Label server control changes and appears as shown earlier in Listing 13-13.
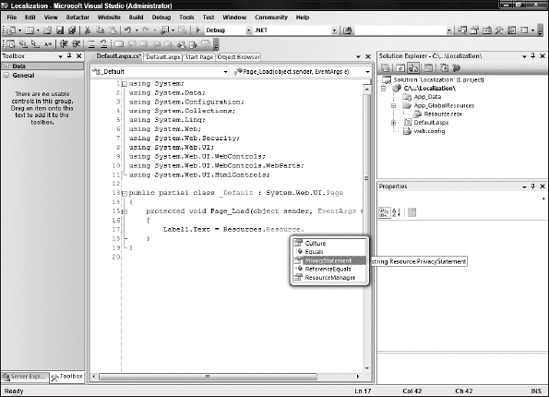
One nice feature is that the resources provided via global resources are available in a strongly typed manner. For instance, you can programmatically get at a global resource value by using the construction presented in Listing 13-14.
Example 13-14. Programmatically getting at global resources
Label1.Text = Resources.Resource.PrivacyStatement; |
In Figure 13-13, you can see that you have full IntelliSense for these resource values.
Figure 13-13. Figure 13-13