
12.3. Understanding Postbacks with Web Parts
When you are working with Web Parts in ASP.NET, it is important to understand how much traffic goes back and forth across the wire. To watch the traffic directly, download Fiddler at www.fiddlertool.com and have this tool open when you build and run the page from Listing 12-1.
At first, you will notice that none of the traffic of your page is showing up in the Fiddler tool (use with IE). This is due to the fact that you are working locally using localhost. To correct this, add a period directly after the localhost (or 127.0.0.1) so that your URL is similar to the following:
http://localhost.:3405/WebSite1/Default.aspx
Obviously, the port number you are working with (mine is 3405) will be different. Once you add the period, click refresh in the browser to start seeing the traffic being monitored. Figure 12-3 provides a sample of what a recoded page in Fiddler looks like.
Now when you take any action on the page, as you would expect, these actions cause a postback and the entire page is once again returned to the browser. You will also notice that there is the dramatic page flicker going on because of the postback. This request and response is presented here in Figure 12-4 as viewed in Fiddler.
When you click the Design mode link, the page changes to allow you to move Web Parts around the page. Even changing modes causes the entire page to be reposted. When in the Design mode, you can change the order of the parts as they appear in each of the WebPartZone areas. Not only can you change the order in which Web Parts appear in a zone, but you can also move Web Parts from one zone to another. If you add the capability to enter the Design mode through the drop-down list that you can put on your page, you can easily provide the end user with the same ability to move Web parts around. Simply entering Design mode allows this type of movement.
The Design option changes the page so that the user can see the zones defined on the page, as illustrated in Figure 12-5.
Figure 12-3. Figure 12-3
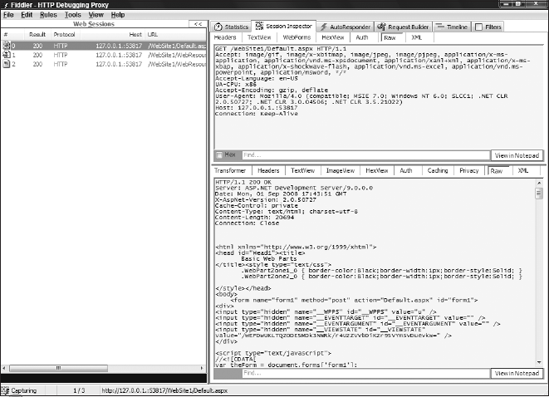
Figure 12-4. Figure 12-4
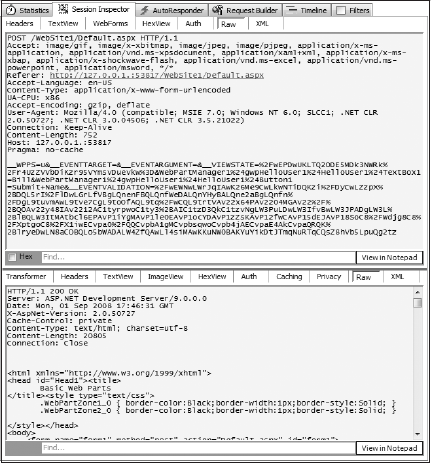
Figure 12-5. Figure 12-5
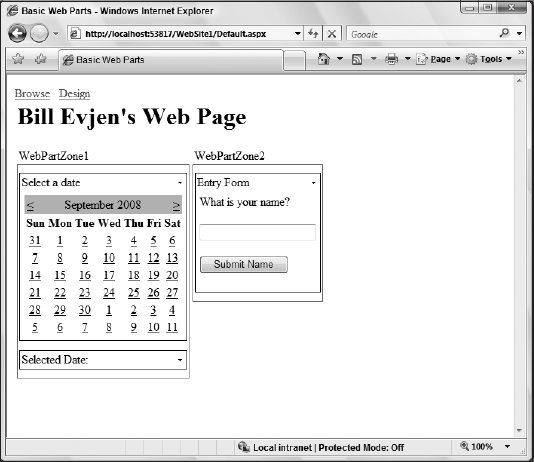
From this figure, you can see the two zones (WebPartZone1, and WebPartZone2). At this point, the end user can select one of the Web Parts contained in one of these zones and either change its order in the zone or move it to an entirely different zone on the page. To grab one of the Web Parts, the user simply clicks and holds the left mouse button on the title of the Web Part. When done correctly, the crosshairs, which appear when the end user hovers over the Web Part's title, turn into an arrow. This means that the user has grabbed hold of the Web Part and can drag it to another part of the page.
While the user drags the Web Part around the page, a visual representation of the item appears (see Figure 12-6). In this state, the Web Part is a bit transparent and its location in the state of the page is defined with a blue line (the darker line shown at the top of WebPartZone2). Releasing the left mouse button drops the Web Part at the blue line's location.
After the end user places all the items where he wants them, the locations of the items on the page are saved for later use. When he reopens the browser, everything is then drawn in the last state in which he left the page. This is done on a per user basis, so any other users browsing to the same page see either their own modified results or the default view if it is a first visit to the page. The user can then leave the Design view by clicking the Browse button on the page.
Even when Web Parts are moved from one location on the page to another, this information about how the end user wants to personalize the page is stored in the database and another request is sent to the server.
This is where AJAX can make the story a lot better than it is, as presented here.
Figure 12-6. Figure 12-6
