
8.1. Authenticating Users
Some applications require you to log in, whereas others are open to the public. Others have a mixture of protected and open content. Despite several large scale efforts to provide a single login scheme that can be shared across multiple sites, nothing has really emerged yet as a de facto standard. I still seem to be forgetting logins and passwords for various applications. Until there is a universal login that everyone trusts, developers manage user accounts on their own.
ASP.NET supports several schemes for authenticating users. You can use Windows user accounts, you can use a custom authentication store, or you can leverage ASP.NET forms authentication.
8.1.1. Authenticating Windows Users
In the default configuration, the ASP.NET authentication mode is set to Windows. An object called a WindowsPrincipal is assigned to each request for a user authenticated against a Windows machine or domain account. The permissions of this WindowsPrincipal are used in checking against the operating system. File system and resource restrictions that are in effect for the user are enforced by Windows based on the WindowsPrincipal. The setting can be modified in the web.config file for the application.
<configuration>
    <system.web>
        <authentication mode="Windows" />
   </system.web>
</configuration>
When a site doesn't require any credentials, the user is referred to as the anonymous user. The anonymous user is any user that is accessing the site without authentication. There is still a WindowsPrincipal object assigned to the request, but it is associated with a low-privileged Windows user account.
ASP.NET doesn't do the authentication directly for Windows Authentication. It is the IIS Web server that does the authentication. IIS supports impersonation and passes the identity on to ASP.NET for each request. The default configuration for IIS is to use the built-in account without impersonating the specific user using the application. In Figure 8-1 you see the Computer Management console for IIS 7.0, where the anonymous user can be set for the site or for the application. This is where you switch from using the IUSR account to the Windows authenticated user.
A default install of Windows does not enable Windows Authentication. To enable this support, open the Control Panel and launch the Windows Features dialog from the Programs applet. The menu option is shown in Figure 8-2.
The authentication mode can also be set to None to skip the attachment of the WindowsPrincipal object to the request. This does not affect how IIS authenticates the user. IIS will still enforce the login configuration, but ASP.NET will not carry delegated credentials while executing the request. The permissions the user has for accessing Windows resources will be limited to the permissions that have been granted to the IUSR account. That is the IdentityPrincipal base type that will be assigned to the request.
<configuration>
    <system.web>
        <authentication mode="None" />
   </system.web>
</configuration>
Figure 8-1. Figure 8-1
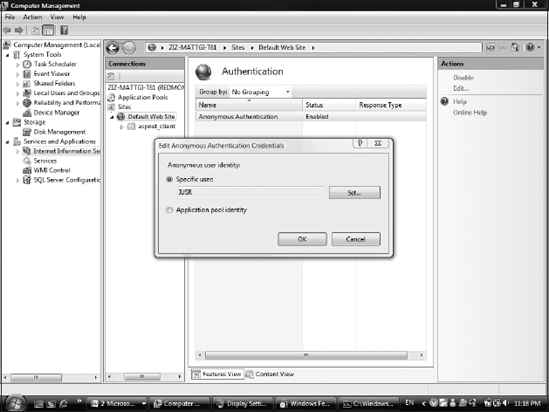
Figure 8-2. Figure 8-2

ASP.NET and IIS authentication schemes work together to provide a rich infrastructure than can carry across both static and dynamic content and be enforced by underlying Windows permissions.
8.1.2. Using Forms Authentication
On a corporate intranet site, the use of Windows Authentication provides seamless integration with Active Directory. But to authenticate users without requiring Windows accounts, ASP.NET provides Forms Authentication.
When using Windows Authentication, Internet Explorer negotiates for the prompting and transmission of credentials automatically. Forms Authentication can be configured to make login requirements automatic as well. Forms Authentication gets its name from the fact that the user typically provides his or her username and password in an HTML form. The form is submitted to the server where the authentication occurs. Forms Authentication allows a site to easily have thousands of users without ever requiring the overhead of managing Windows accounts within the host domain. There is a tradeoff though: you can't use Windows access control lists to restrict file and resource access, so you must be mindful of what resources you access when processing a Web request on behalf of a user. If a file is marked as restricted to members of a special Windows group the IUSR account has been granted access, Windows will not know that you want to be selective about which Forms Authentication users are able to access it.
8.1.3. Configure Forms Authentication
There are several steps required in configuring Forms Authentication. First, modify the web.config file of the. To enable Forms Authentication, set the mode attribute of the authentication element to Forms:
<configuration>
    <system.web>
        <authentication mode="Forms" />
   </system.web>
</configuration>
This isn't the only default value that needs to be changed. Just as IIS allows anonymous users, ASP.NET also allows anonymous access to applications. To force users to authenticate, you must also add authorization information to the web.config file to disallow anonymous users.
The web.config file shown in the following code denies access to anonymous users, while allowing all authenticated. This is done using special wildcard characters. The anonymous user is represented by the question mark, and all authenticated users are associated with the asterisk. Be careful not to confuse these symbols! And note that the class of authenticated users means all authenticated users. You will see shortly how to be more selective about which users.
<?xml version="1.0"?>
<configuration>
  <appSettings/>
  <connectionStrings/>
  <system.web>
    <authentication mode="Forms">
      <forms cookieless="UseCookies" />
    </authentication>
    <authorization>
<deny users="?"/>
<allow users="*"/>
</authorization>
</system.web>
</configuration>It's a good practice to place the deny elements before the allow elements in your web.config. ASP.NET will stop examining these clauses when it first finds a match element. If a subsequent deny clause prevents access, it might be too late.
With this configuration, ASP.NET will now look at every request to the application, and if they have not authenticated, they will be redirected to the loginURL specified in the forms element of configuration. In this example, no loginURL is given, so the default is to use login.aspx page. Figure 8-3 shows the redirect that happens as a result of an anonymous user requesting a page called SecuredPage.aspx from the application.
Figure 8-3. Figure 8-3
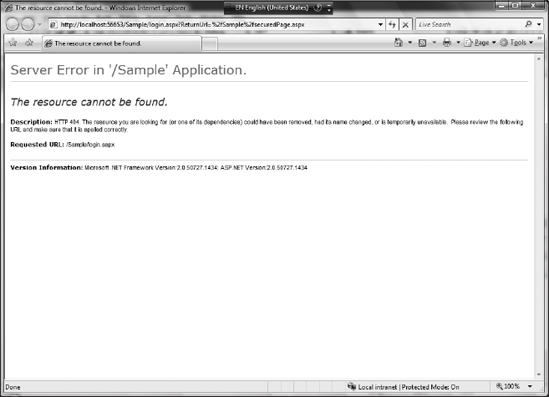
Notice that the error indicates that the requested URL was login.aspx. But the request was made for SecuredPage.aspx. Because the user was not authenticated, they were redirected to login.aspx. In the URL displayed in the browser address bar, you can see that the querystring contains a ReturnURL key-value pair, where the value is the original URL that was requested.
ASP.NET includes a control to easily display a login UI. Figure 8-4 shows a login page using just a single ASP.NET Login control.
Figure 8-4. Figure 8-4

The basic styling information was provided by selecting one of the AutoFormat options for the control in Visual Studio. This can be seen in the page code in Listing 8-1. When the user submits the form, the Authenticate event is invoked. For the example, I have hardcoded a username and password. For completeness, I should remind you that hardcoding passwords is a bad practice.
Example 8-1. Login.aspx
<%@ Page Language="C#" %>

<!DOCTYPE html PUBLIC "-//W3C//DTD XHTML 1.0 Transitional//EN"
"http://www.w3.org/TR/xhtml1/DTD/xhtml1-transitional.dtd">

<script runat="server">

    protected void Login1_Authenticate(object sender, AuthenticateEventArgs e)
 {
        if (("WroxUser" == Login1.UserName) && ("passw0rd" ==
Login1.Password)) {
            FormsAuthentication.RedirectFromLoginPage("WroxUser", false);
        }
}
</script>
<html xmlns="http://www.w3.org/1999/xhtml">
<head runat="server">
<title>Login Page</title>
</head>
<body>
<form id="form1" runat="server">
<div>
<asp:Login ID="Login1" runat="server" BackColor="#F7F7DE"
BorderColor="#CCCC99"
BorderStyle="Solid" BorderWidth="1px" Font-Names="Verdana" Font-
Size="10pt"
onauthenticate="Login1_Authenticate">
<TitleTextStyle BackColor="#6B696B" Font-Bold="True"
ForeColor="#FFFFFF" />
</asp:Login>
</div>
</form>
</body>
</html> |
After the user provides credentials and is validated at the server, ASP.NET returns her to the page she was originally targeting. In addition to providing the basic login functionality in a control, ASP.NET also has controls for creating users, changing passwords, displaying the login state, and even recovering a forgotten password. The user information can be stored automatically in a database configured by running the aspnet_regsql tool. You can also configure your own back end for storing user information and perform custom authentication.
8.1.4. Custom Authentication
When authenticating users, you can leverage the built-in membership provider or provide a custom provider. The SQLMembershipProvider works with a published database schema against a SQL Server back end. It can even be used with the free desktop version of the database. To build a custom membership provider, you override the abstract MembershipProvider class and provide a custom implementation. Listing 8-2 is an excerpt from a custom membership provider (WroxMembershipProvider.cs). This allows you to decide what action will be taken to validate a user.
Example 8-2. WroxMembershipProvider.cs
namespace Wrox.Samples {
    using System;
    using System.Web;
    using System.Configuration.Provider;
    using System.Web.Security;
    using System.Collections;
using System.Collections.Specialized;
public class WroxMembershipProvider : MembershipProvider {
public override void Initialize(string name, NameValueCollection
config) {
base.Initialize(name, config);
}
public override bool ValidateUser(string username, string password) {
return ((username == "WroxUser") && (password == "passw0rd"));
}
public override bool UnlockUser(string userName) {
throw new System.NotImplementedException();
}
}
} |
The code in Listing 8-2 does not override all of the members of the abstract members as you would need to when providing a custom membership provider. In reality, you would want to use some better security practices than hardcoding usernames and passwords, as in the ValidateUser method earlier. It is a best practice to apply a one-way hash to the user's password and store that in the database instead. You can't decrypt the password and send it to the user. When a password is lost, you have to create a new replacement, but this practice minimizes the risk of someone discovering the password by compromising the storage. To use the custom provider, you add the provider and specify that you want your provider to be used by default in the web.config file:
<membership defaultProvider="SampleProvider">
   <providers>
     <add name="SampleProvider" type="Wrox.Samples.WroxMembershipProvider"/>
   </providers>
</membership>
8.1.5. Authenticating in JavaScript
Now that you've seen how ASP.NET provides several options for authenticating users, let's look at options for accessing these services using Before using the Microsoft AJAX Library to authenticate users from JavaScript code running in the browser, you have to enable it. By default, the JavaScript services are not enabled. These services are off by default to keep all unneeded services disabled, which is a best practice from a security standpoint. A service can't be compromised if it is not enabled. You have to opt in to use these services.
<configuration>
  <system.web.extensions>
    <scripting>
      <webServices>
        <authenticationService enabled="true" requireSSL="false"/>
      </webServices>
</scripting> </system.web.extensions> </configuration>
More information on the configuration elements can be found at www.asp.net/ajax/documentation/live/ConfiguratingASPNETAJAX.aspx#microsoftweb. In addition to enabling the Authentication Service, you can specify whether to honor requests that are made without using SSL encryption. Similarly, other ASP.NET services are disabled for script access by default. Once enabled, the Sys.Services.AuthenticationService namespace will be available for use in the browser by all ASP.NET AJAX pages in the application that include a ScriptManager component. JavaScript code can then call back to the ASP.NET Authentication Service without requiring a full postback. You can avoid the redirect to a login page by authenticating users inline with JavaScript.
Listing 8-3 (from Membership.aspx) is a page with JavaScript code that uses the Authentication Service. It performs an out-of-band call to the login method to check the user's credentials, using the custom membership provider. The pageLoad function wires up an event handler for the Login button. The handler code then retrieves the username and password from textboxes on the page. It also declares variables for optional parameters. The isPersistent parameter is used to declare whether the authentication ticket issued should be maintained by the browser after the user closes it for use in a later session. If not set to true, the ticket will be discarded when the browser closes.
The customInfo and redirectUrl parameters are also optional. Whatever is passed in the customInfo argument will be relayed to the callback functions after the authentication is complete. redirectUrl, when provided, indicates the page that the user should be sent to when the authentication check is complete. The other two arguments to the login method are the completed and failed callback functions. You pass the name of functions that should be called when the login call completes or fails. It's important to note that the completed callback is invoked when the call to the Authentication Service completes, even if the result is a failed login attempt. The failed callback is called only if the credentials provided do not validate. Failed means the credentials were bad, not that the service call failed.
Example 8-3. Membership.aspx
<!DOCTYPE html PUBLIC "-//W3C//DTD XHTML 1.0 Transitional//EN"
"http://www.w3.org/TR/xhtml1/DTD/xhtml1-transitional.dtd">
<html xmlns="http://www.w3.org/1999/xhtml" >
<head runat="server">
    <title>Membership Page</title>
</head>
<body>
    <form id="form1" runat="server">
    <div>

    <asp:scriptmanager runat="server" id="scriptmanager" />
    Username <input type="text" id="username" /><br />
    Password <input type="password" id="password" /><br />
    <input type="button" value="Login" id="login" /><br />

    </div>
    </form>
</body>
<script type="text/javascript">
function pageLoad() {
$addHandler($get('login'), 'click', loginHandler);
}
function loginHandler() {
var username = $get('username').value;
var password = $get('password').value;
var isPersistent = false;
var customInfo = null;
var redirectUrl = null;
Sys.Services.AuthenticationService.login(
username,
password,
isPersistent,
customInfo,
redirectUrl,
loginCompleted,
loginFailed);
}
function loginCompleted(result, context, methodName) {
if(result) {
alert("Successfuly logged in.");
}
else {
alert("Failed to login.");
}
}
function loginFailed(error, context, methodName) {
alert(error.get_message());
}
</script>
</html> |
ASP.NET allows you to define default handlers to be used for an event instead of specifying them with each call. This has been carried into the JavaScript support for application services as well. Once you have created the JavaScript functions you want to use as the defaults, you can make them the default for the page. The default loginCompletedCallback, logoutCompletedCallback, and failedCallback can all be set in the JavaScript pageLoad function of your page:
var service = Sys.Services.AuthenticationService;
service.set_defaultLoginCompletedCallback( loginCompleted );
service.set_defaultLogoutCompletedCallback( logoutCompleted );
service.set_defaultFailedCallback( authenticationFailed );
You still need to set the defaults on each page where the Authentication Service is going to be used, but you can standardize a set of names as shown here and have those functions defined in a script included in every page.
8.1.6. Accessing User Status
Of course, performing a validation check to authenticate a user is only part of what is needed in a Membership service. You also need to be able to check the current status of a user. If the user is not logged in, the option to login can be presented. And you can avoid trying to get any other data that should be available only to an authenticated user. The get_isLoggedIn function calls the Authentication Service to get the user's current status. In Listing 8-4 (Status.aspx) the user's current status is accessed and displayed as a result of clicking a button on the page.
Example 8-4. ShowStatus.aspx
<!DOCTYPE html PUBLIC "-//W3C//DTD XHTML 1.0 Transitional//EN"
"http://www.w3.org/TR/xhtml1/DTD/xhtml1-transitional.dtd">
<html xmlns="http://www.w3.org/1999/xhtml" >
<head runat="server">
    <title>Membership Status Page</title>
</head>
<body>
    <form id="form1" runat="server">
    <div>
    <asp:scriptmanager runat="server" id="scriptmanager" />
    <input type="button" value="Show Status" id="status" /><br />
    </div>
    </form>
</body>
<script type="text/javascript">
function pageLoad() {
    $addHandler($get('status'), 'click', statusHandler);
}

function statusHandler() {
    var result = Sys.Services.AuthenticationService.get_isLoggedIn();
    if(result === true) {
        alert('You are logged in.'),
    }
    else {
        alert('You are NOT logged in.'),
    }
}

</script>
</html> |
8.1.7. Logging Out
When a user chooses to log out, you may want to redirect her away from the page she is currently viewing. The logout function provides a redirectUrl parameter for this purpose. If the parameter is set, the browser navigates to the redirectUrl when the logout call completes. It is important to note that a page unload handler could interfere with the logout navigation. The unload code would need to be written knowing that logout could be called, and it must allow the redirect to happen. This unload issue is especially important if you have other developers working on the same application. Listing 8-5 (Logout.aspx) adds a button to the Status.aspx page for logging out.
Example 8-5. Logout.aspx
<!DOCTYPE html PUBLIC "-//W3C//DTD XHTML 1.0 Transitional//EN"
"http://www.w3.org/TR/xhtml1/DTD/xhtml1-transitional.dtd">
<html xmlns="http://www.w3.org/1999/xhtml" >
<head runat="server">
    <title>Logout Page</title>
</head>
<body>
    <form id="form1" runat="server">
    <div>
    <asp:scriptmanager runat="server" id="scriptmanager" />
    <input type="button" value="Show Status" id="status" /><br />

    <input type="button" value="Logout" id="logout" /><br />
    </div>
    </form>
</body>
<script type="text/javascript">
function pageLoad() {
    $addHandler($get('status'), 'click', statusHandler);

    $addHandler($get('logout'), 'click', logoutHandler);
}

function statusHandler() {
    var result = Sys.Services.AuthenticationService.get_isLoggedIn();
    if(result === true) {
        alert('You are logged in.'),
    }
    else {
        alert('You are NOT logged in.'),
    }
}


function logoutHandler() {
    var redirectUrl = 'Logout.aspx';
    var userContext = null;
    Sys.Services.AuthenticationService.logout(redirectUrl, logoutCompletedCallback,
 logoutFailedCallback, userContext);
}

function logoutCompletedCallback(result, context, methodName) {
    alert('Logged out.')

}

function logoutFailedCallback(error, context, methodName) {
    alert(error.get_message());
}

</script>
</html> |
The completion callbacks all have the same set of parameters. The first parameter is the result. This is the return value of the service method being called. If the method returns a Boolean, the result will be the Boolean that is returned. If it returns void, as the Logout function does, the result argument will be null.
Now you can avoid sending users through a series of redirects to log in and out. The ASP.NET AJAX Extensions make it easy to authenticate users, check their status, and log them out from any page!
8.1.8. User Profile Data
ASP.NET has a feature that allows you to track various kinds of data for each user easily. You can think of is a persistent version of the ASP.NET session state storage mechanism. It is often used to remember per user default or preference selections between sessions, such as the particular styling theme a user likes, or even default values for forms. The profile service can be configured to store data only for authenticated users or it can support anonymous users as well.
You define the name and types of the data that you want to store using the Profile service, using the web.config file for the application. You can then set and retrieve the specific data values from code. Although the Profile feature is similar to the Session object, it goes beyond it in several key ways. By default, the data is stored in the built-in database available to ASP.NET applications, so it is automatically persisted between user sessions. Session data is not persisted — it is stored in memory by default, but even if you choose to utilize SQL Server to hold session data, it will always be lost at the end of the user's current session.
Profile data is strongly typed, making it easier to utilize in code and avoid some common developer errors. Session data is only treated as the primitive object type and must be converted by you to the original type for each use, leading to possible runtime exceptions if the wrong type is used by mistake. ASP.NET provides the aspnet_regsql.exe tool, which can be used to configure a back-end SQL server with the tables necessary to store the profile information. The Profile information can also be made available in a server farm deployment scenario, since the database is always used as the persistence medium instead of holding values in memory.
8.1.9. Defining Profile Data
The first step in using the Profile feature is to establish the names and types of the data that you want to track. The following section from a web.config file declares five properties to be tracked as Profile data for each user. Note that in addition to the name and type, you can control whether the data is tracked for anonymous users. This is useful when a subset of users may authenticate themselves in parts of the application and you want to store information for only that group. You can bypass storing data for anonymous users. Conversely, maybe you have some personalization features that you specifically want to open up to anonymous users. Therefore, if the same anonymous user visits your site again, he will see that you were able to remember some facts about him, even though he didn't create a user account. Also, notice that you can define what type of serialization to utilize for storing the data as is done with the Artists.
<profile enabled="true" defaultProvider="SampleProvider">
      <providers>

        <add name="SampleProvider" type="Wrox.Samples.WroxProfileProvider" />
      </providers>
      <properties>
<add name="Genre" type="System.String" allowAnonymous="true" />
<add name="Artists" type="System.Collections.ArrayList"
allowAnonymous="true" serializeAs="Binary" />
<add name="LastAlbumPurchased" type="Album" allowAnonymous="true"/>
<group name="FavoriteAlbum">
<add name="Artist" type="System.String" allowAnonymous="true" />
<add name="Title" type="System.String" allowAnonymous="true"/>
</group>
</properties>
</profile>At the top level, you can have either items or groups. Groups are just a way to organize related items. A group doesn't imply any additional functionality and is used just as a coding convenience. The Title and Artist are in the FavoriteAlbum group. By grouping items together, you get nesting semantics, which can be especially helpful if there are a lot of Profile properties because IntelliSense can help you find the item you're looking for. If you don't use groups and the list of Profile items is long, you may have to scroll through a lot of items to find what you want. Figure 8-5 shows that the Profile items become available in the Source editor and IntelliSense helps you select the desired items and groups.
Figure 8-5. Figure 8-5

The type specified for the LastAlbumPurchased is just listed as Album, which does not exist in the .NET Framework. It is defined in a class located in the App_Code directory of the application. It is a simple class that tracks the artist, title, and year of release, as shown in Listing 8-6 (Album.cs). Because the default serialization works fine for this class and its basic types, nothing special is required to configure or use it.
Example 8-6. Profile.aspx
using System;

public class Album
{
    private String _artist;
    private String _title;
    private int _releaseYear;

 public Album() {
 }

    public String Artist {
        get {
            return _artist;
        }
        set {
            _artist = value;
        }
    }

    public String Title {
        get {
            return _title;
        }
        set {
            _title = value;
        }
    }

    public int ReleaseYear {
        get {
            return _releaseYear;
        }
        set {
            _releaseYear = value;
        }
    }
} |
8.1.10. Accessing Profile Properties
Once the properties are defined, you can access them directly from the Profile intrinsic on any page. The Profile intrinsic is the object available in any ASP.NET page for retrieving and setting the properties for the current user that have been defined as part of the profile in the configuration. Another nice aspect of the Profile feature, as compared to using session state storage, is the strongly typed nature of the data. In this example, an integer and string are stored in Session state. Because Session state treats everything as an object, the integer and strings have to be explicitly cast to the desired type when they are read.
Session["count"] = 96;
Session["where"] = "anywhere";
count = (int)Session["count"];
where = (string)Session["where"];
If you were to declare the count and where variables are as profile properties, the code becomes much easier to read and write.
Profile.Count = 96;
Profile.Where = "anywhere";
int count = Profile.Count;
string where = Profile.Where;
Listing 8-7 (Profile.aspx) is a sample .aspx page showing profile storage in action. It links to other pages that show the current values of the profile properties by loading them from the profile storage and displaying them in the browser. There is also a page that makes updates to the profile.
Example 8-7. Profile.aspx
<%@ Page Language="C#"%>
<script language="C#" runat="server">
protected override void OnLoad(EventArgs e) {
    Profile.FavoriteAlbum.Artist = "Phish";
    Profile.FavoriteAlbum.Title = "Rift";
    Profile.Genre = "Other";
    Profile.Artists.Clear();
    Profile.Artists.Add("Phish");
    Profile.Artists.Add("The Chemical Brothers");
    Profile.Artists.Add("Bryan Ferry");
    Profile.LastAlbumPurchased.Artist = "The Chemical Brothers";
    Profile.LastAlbumPurchased.Title = "Push The Button";
    Profile.LastAlbumPurchased.ReleaseYear = 2006;
}
</script>
<!DOCTYPE html PUBLIC "-//W3C//DTD XHTML 1.0 Transitional//EN"
 "http://www.w3.org/TR/xhtml1/DTD/xhtml1-transitional.dtd">

<html xmlns="http://www.w3.org/1999/xhtml" >
<head runat="server">
    <title>Untitled Page</title>
</head>
<body>
    <form id="form1" runat="server">
    <div>
    <asp:HyperLink runat="server" NavigateUrl="~/ShowProfile.aspx">
Show Profile</asp:HyperLink>
    <asp:HyperLink runat="server" NavigateUrl="~/PreLoadedProfileItems.aspx">
PreLoaded Profile Items</asp:HyperLink><br />
<asp:HyperLink runat="server" NavigateUrl="~/LoadProfileItems.aspx">
Load Profile Items</asp:HyperLink><br />
<asp:HyperLink runat="server" NavigateUrl="~/SaveProfileItems.aspx">
Save Profile Items</asp:HyperLink><br />
</div>
</form>
</body>
</html> |
When this page is requested, the profile is populated with some music information, which is just hardcoded in the page's Page_Load event handler. Clicking the Show Profile link takes you to a page (ShowProfile.aspx). This page in Listing 8-8 accesses profile data and displays it. In this example, we aren't doing anything very interesting with the data, but it serves to show that the profile data is managed for you automatically that retrieves these same property values from the profile and renders them to the browser.
Example 8-8. ShowProfile.aspx
<%@ Page Language="C#"%>
<script language="C#" runat="server">
protected override void OnLoad(EventArgs e) {
    string favoriteArtist = Profile.FavoriteAlbum.Artist;
    favoriteAlbumArtist.Text = artist;

    string album = Profile.FavoriteAlbum.Title;
    favoriteAlbumTitle.Text = favoriteTitle;

}
</script>
<!DOCTYPE html PUBLIC "-//W3C//DTD XHTML 1.0 Transitional//EN"
 "http://www.w3.org/TR/xhtml1/DTD/xhtml1-transitional.dtd">

<html xmlns="http://www.w3.org/1999/xhtml" >
<head id="Head1" runat="server">
    <title>Untitled Page</title>
</head>
<body>
    <form id="form1" runat="server">
    <div>
        <asp:Label ID="favoriteAlbumArtist" runat="server" /><br />
        <asp:Label ID="favoriteAlbumTitle" runat="server" /><br />
    </div>
    </form>
</body>
</html> |
8.1.11. Accessing Profile Data from the Browser
So far, the examples have shown how to set up and use the Profile feature on the server. These are all tasks that can be done with ASP.NET 3.5. With ASP.NET AJAX, however, you can also access the profile information directly from JavaScript code running in the browser! The profile properties and groups have already been defined in the application's configuration file. But this alone does not make the profile data available remotely. You also have to explicitly opt in to the ability to use the Profile feature from the browser. This is done in the system.web.extensions section of the web.config file. With the authorization feature, it was only necessary to enable the service for remote access. For profile data, in addition to setting enabled to true for the profileService element, you need to elaborate which properties to make available. The read and write access permissions are controlled independently so that you can further control how the profile data is used. If you know that you won't need to modify profile values on the client, you should omit the writeAccessProperties.
<system.web.extensions>
 <scripting>
   <webServices>
   <profileService enabled="true"
       readAccessProperties="Genre, Artists, FavoriteAlbum.Artist,
FavoriteAlbum.Title, LastAlbumPurchased"
         writeAccessProperties="Genre, Artists, FavoriteAlbum.Artist,
FavoriteAlbum.Title, LastAlbumPurchased" />
     </webServices>
   </scripting>
 </system.web.extensions>
ASP.NET AJAX adds a new handler for access to the Membership and Profile Services. For IIS versions earlier than 7, or for IIS7 running in the Classic mode, this setting is in the httpHandlers configuration section under system.web:
<system.web>
      <httpHandlers>
      <remove verb="*" path="*.asmx"/>
      <add verb="*" path="*_AppService.axd" validate="false"
type="System.Web.Script.Services.ScriptHandlerFactory, System.Web.Extensions,
Version=1.0.61025.0, Culture=neutral, PublicKeyToken=31bf3856ad364e35"/>
      </httpHandlers>
      </system.web>
And for the IIS7 using the new Integrated mode, the setting is in the system.webserver section in the handlers element:
<system.webserver>
    <handlers>
      <remove name="WebServiceHandlerFactory-ISAPI-2.0"/>
      <add name="ScriptHandlerFactoryAppServices" verb="*" path="*_AppService.axd"
preCondition="integratedMode"
           type="System.Web.Script.Services.ScriptHandlerFactory,
System.Web.Extensions, Version=1.0.61025.0, Culture=neutral,
PublicKeyToken=31bf3856ad364e35"/>
    </handlers>
    </system.webserver>
The configuration is now in place. You have defined a set of profile properties, enabled the service for remote access, and declared the properties to be readable and writeable. Now you need a page that accesses the Profile store from JavaScript.
8.1.12. Preload Profile Properties
The set of data being stored in the profile can be quite extensive. It would be wasted overhead to send all of the profile information down to the browser in the original page rendering if there's only a small chance that you'll need it all. The default is not to preload any profile properties, but this isn't ideal for the pages where you know you will need at least some profile data. The ScriptManager's ProfileService element has a LoadProperties attribute that allows you to specify what properties should be made available initially and sent down with the first page rendering.
In this example, Genre and Artists would be available in the initial page rendering. Client script could make use of them without making any calls to the server to get more data. However, access to any other profile data still requires going back to the server:
<asp:ScriptManager runat="server" ID="scriptManager">
    <ProfileService LoadProperties="Genre, Artists" />
</asp:ScriptManager>
The preloaded properties can be accessed directly from the properties object of the ProfileService object, which is part of the Microsoft AJAX Library:
var artists = Sys.Services.ProfileService.properties.Artists;
There is no requirement to provide callback functions or to pause and wait for an asynchronous call to the server to return the data for the preloaded properties. Listing 8-9 (PreLoadedProfileItems.aspx) is a page that adds a button and binds a click handler to it. The handler then shows the Genre and Artists Profile properties declared for preloading.
Example 8-9. PreLoadProfile.aspx
<!DOCTYPE html PUBLIC "-//W3C//DTD XHTML 1.0 Transitional//EN"
"http://www.w3.org/TR/xhtml1/DTD/xhtml1-transitional.dtd">
<html xmlns="http://www.w3.org/1999/xhtml" >
<head runat="server">
    <title>PreLoaded Profile Items</title>
</head>
<body>
    <form id="form1" runat="server">
    <asp:ScriptManager runat="server" ID="scriptManager">
        <ProfileService LoadProperties="Genre, Artists" />
    </asp:ScriptManager>
    <div>
    <input type="button" id="showProfile" value="Show Profile" />
    </div>
    </form>
</body>
<script type="text/javascript">
function pageLoad() {
$addHandler($get('showProfile'), 'click', showProfile);
}
function showProfile() {
var genre = "Favorite Genre : " + Sys.Services.ProfileService.properties.Genre;
alert(genre);
var artists = Sys.Services.ProfileService.properties.Artists;
var message = "Favorita Artists:
";
for(var index = 0; index < artists.length; index++) {
message += artists[index] + "
";
}
alert(message);
}
</script>
</html> |
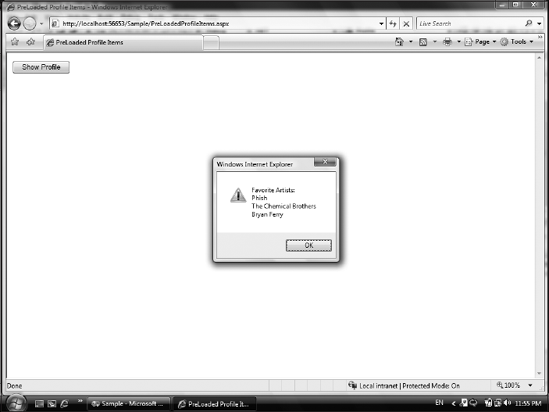
Figure 8-6 shows the Artists displayed by the browser. The ArrayList on the server is translated into a JavaScript object, where the individual elements of the ArrayList are accessed through the object's indexer.
Figure 8-6. Figure 8-6
8.1.13. Load Profile Properties
All of the Profile properties you might want to access while the page is running do not have to be preloaded. As long as they are declared in the web.config file as accessible remotely, Profile properties can be loaded on demand at any time. However, when making a call to retrieve those properties that were not preloaded, you need to provide a callback function, since there's no way to predict how long that data-fetching operation will take. You can also make a call back to the server to refetch preloaded values, in case their value may have been changed since the page was loaded.
There are four arguments to the load method of the ProfileService. The first argument is an array of the names of the properties to be retrieved. The second is the callback function for completing the call. The third is the error callback. The last argument is for any user context data that should be passed to the completion events.
Sys.Services.ProfileService.load(
    ["FavoriteAlbum.Artist", "FavoriteAlbum.Title"],       loadCompletedCallback,
      failedCallback,
      null );
It is not necessary to pass anything for the userContext parameter unless you want to tell your callback function something extra about this particular call. In this example, I include the fourth parameter with a null that is actually redundant. JavaScript implies a null value for any parameter that you aren't required to provide. I like to be explicit about it, as doing so helps me make fewer mistakes by thinking through what is needed and what is not. It's also easier to come back to this code and add some context data in place of the null because I can see where that value should go.
The arguments to your completion callback function are the result of the call to the server method, the userContext that was passed to the load function, and the name of the method that was called. In this case, the result is the count of properties that were loaded.
function loadCompletedCallback(result, context, methodName) {
    alert("Retrieved " + result + " profile properties.");
}
The AJAX error object passed to the failed callback provides access to the type of exception that occurred and its error message. You can also get the stack trace in effect at the time the exception occurred:
function failedCallback(error, context, methodName) {
    var message = error.get_exceptionType() + "
" +
        error.get_message() + "
" +
        error.get_stackTrace();
    alert(message);
}
The page in Listing 8-10 (LoadProfileItems.aspx) has two buttons: one for loading profile data and the other for displaying it. It binds the event handlers to the button click events in the pageLoad method. It also adds an error handler to display more detailed information if something goes wrong. Displaying a stack trace may be helpful during development, but when the application is deployed, the end user won't be able to do anything useful with the information, so more robust and user-friendly error recovery should be added before final production deployment.
Example 8-10. Profile.aspx
<!DOCTYPE html PUBLIC "-//W3C//DTD XHTML 1.0 Transitional//EN"
"http://www.w3.org/TR/xhtml1/DTD/xhtml1-transitional.dtd">
<html xmlns="http://www.w3.org/1999/xhtml" >
<head runat="server">
    <title>Load Profile Items</title>
</head>
<body>
    <form id="form1" runat="server">
    <asp:ScriptManager runat="server" ID="scriptManager">
        <ProfileService/>
    </asp:ScriptManager>

    <div>
    <input type="button" id="loadFavorite" value="Load Favorite" /><br />
    <input type="button" id="showFavorite" value="Show Favorite" />
    </div>
    </form>
</body>

<script type="text/javascript">
function pageLoad() {
    $addHandler($get('showFavorite'), 'click', showFavorite);
    $addHandler($get('loadFavorite'), 'click', loadFavorite);
}

function showFavorite() {
    alert("Favorite Album
" +
        Sys.Services.ProfileService.properties.FavoriteAlbum.Title +
        " by " +
        Sys.Services.ProfileService.properties.FavoriteAlbum.Artist);
}

function loadFavorite() {
    Sys.Services.ProfileService.load(["FavoriteAlbum.Artist",
"FavoriteAlbum.Title"], loadCompletedCallback, failedCallback, null);
}

function loadCompletedCallback(result, context, methodName) {
    alert("Retrieved " + result + " profile properties.");
}


function failedCallback(error, context, methodName) {
    var message = error.get_exceptionType() + "
" +
        error.get_message() + "
" +
        error.get_stackTrace();
    alert(message);
}
</script>
</html> |
8.1.14. Saving Profile Data
When profile data is updated in the browser, it needs to be saved back to the server to be persisted for later use. The signature of the save function is the same as that of the load function. The first argument now indicates which set of Profile properties should be saved. If you don't include a set of properties, all of the properties on the client will be sent. This can be overkill if only a few are actually in need of being updated:
function saveFavorite() {
    var profile = Sys.Services.ProfileService;
    profile.properties.Artists[0] = $get('favoriteArtist').value;
    profile.save(["Artists"], saveCompletedCallback, failedCallback, null);
}
When working with custom types, like the Album example, there are a few additional requirements to be aware of. The Profile Service counts on the custom type having a parameterless constructor and property setters for each custom type that it creates. This is a standard requirement in order to deserialize data. The Profile Service doesn't make other assumptions about how to deserialize data beyond requiring a list of name-value pairs for creating the type. To create an Album object to be saved in the profile, Artist, Title, and ReleaseYear are specified along with the values. The syntax can seem a little odd at first, but the simplicity avoids the need for any custom serialization:
function addLastPurchased() {
    var profile = Sys.Services.ProfileService;
    profile.properties.LastAlbumPurchased =
       { Artist: "Irina", Title: "ala riko kaavaa", ReleaseYear: "2001" };
    profile.save(
        ["LastAlbumPurchased"],
        saveCompletedCallback,
        failedCallback,
        null );
}
When updating the properties of a custom type that was already loaded, the name-value pair syntax is not necessary. The properties of custom objects are accessed in the same way as common .NET Framework types. You can access the property directly on the Profile property:
var lastArtistPurchased =
Sys.Services.ProfileService.properties.LastAlbumPurchased.Artist;
Or you can access the profile's version of the custom type and pass the name of the property as an indexer argument. This would be most useful if the name of the property were being extracted from a JavaScript variable.
var albumTitle =
Sys.Services.ProfileService.properties.LastAlbumPurchased["Title"];
The key thing to remember when working with custom types that are part of the profile is that in the JavaScript representation, no custom serialization or advanced type conversion occurs. Instead, the properties are reflected as simple types when sent down to the browser. And when they are sent to the server, they are treated as name-value pairs, where the name indicates the property accessor to invoke, and the value is the argument to pass to the property setter. Listing 8-11 (SaveProfileItems.aspx) is a page that displays Profile information, allows the user to modify the first element of the Artists array, and updates the last album purchased in a button's click event handler.
Example 8-11. SaveProfileItems.aspx
<!DOCTYPE html PUBLIC "-//W3C//DTD XHTML 1.0 Transitional//EN"
"http://www.w3.org/TR/xhtml1/DTD/xhtml1-transitional.dtd">

<html xmlns="http://www.w3.org/1999/xhtml" >
<head runat="server">
    <title>Save Profile Items</title>
</head>
<body>
    <form id="form1" runat="server">
    <asp:ScriptManager runat="server" ID="scriptManager">
        <ProfileService LoadProperties="Artists, LastAlbumPurchased" />
    </asp:ScriptManager>
    <div><b>Favorite Artist : </b><input type="text" id="favoriteArtist" /><br />
    <input type="button" id="saveFavorite" value="Save" /><br /><br />
    <asp:Label runat="server" ID="artists" /><br /><br />
    <input type="button" id="addLast" value="Add Album"/>
    <asp:Label runat="server" ID="lastArtistPurchased" />
    </div>
    </form>
</body>
<script type="text/javascript">
var favoriteArtist = "";

function pageLoad() {
    $get('favoriteArtist').value =
Sys.Services.ProfileService.properties.Artists[0];
    $addHandler($get('saveFavorite'), 'click', saveFavorite);
    $addHandler($get('addLast'), 'click', addLastPurchased);
    updateLabel();
}

function updateLabel() {
    var theArtists = Sys.Services.ProfileService.properties.Artists;
    var theLabel = "";
    for(var i = 0; i < theArtists.length; i++) {
        theLabel += theArtists[i] + "<br />";
    }
    $get('artists').innerHTML = theLabel;
    $get('lastArtistPurchased').innerHTML =
Sys.Services.ProfileService.properties.LastAlbumPurchased["Artist"];
}

function saveFavorite() {
    var profile = Sys.Services.ProfileService;
    profile.properties.Artists[0] = $get('favoriteArtist').value;
    profile.save(["Artists"], saveCompletedCallback, failedCallback, null);
}
function addLastPurchased() {
var profile = Sys.Services.ProfileService;
profile.properties.LastAlbumPurchased =
{ Artist: "Irina", Title: "ala riko kaavaa", ReleaseYear: "2001" };
profile.save(
["LastAlbumPurchased"],
saveCompletedCallback,
failedCallback,
null );
}
function saveCompletedCallback(result, context, methodName) {
updateLabel();
alert("Saved " + result + " profile properties.");
}
function failedCallback(error, context, methodName) {
var message = error.get_exceptionType() + "
" +
error.get_message() + "
" +
error.get_stackTrace();
alert(message);
}
</script>
</html> |
Profile data, whether made up of simple types or complex custom types, can now be accessed easily from JavaScript code in the browser. You can retrieve and update data on the fly without a full postback of the page.