
Setting up user authorization under QlikView is generally referred to as section access, named after the statement that initiates the authorization section of the script. In section access, fields are loaded with details on which user is allowed which access rights. These fields are loaded in the same way as any other field in QlikView and can be sourced from an inline table, database, or external file.
Besides using an inline table, database, or external file, there is also the option of storing and maintaining section access information under QlikView Publisher. Logically, this is no different than storing a table file with section access information in a (semi-)shared folder or, for example, on SharePoint. The data is loaded into the QlikView document as a web file.
Let's start with a simple exercise that protects our QlikView document with a username and password:
- Press Ctrl + E to open the Edit Script window.
- Go to File | Save Entire Document As in the menu.
- Save the file as
Airline Operations SA.qvw. - Now that we've created a separate copy of the file, select the Hidden Script tab.
- Go to Insert | Section Access | Inline from the menu.
- In the Access Restriction Table Wizard dialog click on the Basic User Access Table button and click on OK.
- In the Inline Data Wizard dialog, enter the data from the following table:
ACCESS
USERID
PASSWORD
ADMIN
ADMIN
ADMIN123
USER
USER
USER123
- Click on OK to close the Inline Data Wizard dialog.
The following script should have now been generated:
Section Access;
LOAD * INLINE [
    ACCESS, USERID, PASSWORD
    ADMIN, ADMIN, ADMIN123
    USER, USER, USER123
];
Section Application;
As we can see, the script is started with the Section Access statement, which indicates to QlikView that we will be loading user authorization data. This data, ACCESS, USERID, and PASSWORD, is loaded in the next step using an inline table. The script is ended with the Section Application statement, indicating that QlikView should return to the regular application script.
We used a hidden script tab to create our section access. When using regular script, any user with privileges to view the script has full access to either the user credentials in plain text (when using an inline table), or to the location of the access files (when using an external table file). By using a hidden script, we can limit who will be able to see the section access script, adding an extra layer of security.
Another thing that you may have noticed is that all field names and field data are written in uppercase. While technically this is not necessary for data loaded from an inline table, any data loaded in section access from an external source must always be in uppercase. For the sake of consistency, it is a good idea to always load all data in uppercase in the section access area.
Now that we've seen how a basic section access example is set up, let's see if it works by following these steps:
- Save the document by selecting File | Save Entire Document in the menu.
- Click on OK to close the Edit Script dialog.
- Close QlikView Desktop by selecting File | Exit in the menu.
- Reopen QlikView and the
Airline Operations SA.qvwfile. - In the User Identification input box, enter
admin. - In the Password input box, enter
admin123.
If everything was set up ok, you should now be back in the document. Feel free to repeat these steps and enter wrong usernames and passwords to verify that QlikView will deny access to the document.
Note
QlikView will only verify your user credentials once during each session. You can verify this by closing the document and reopening it, without exiting QlikView Desktop. QlikView will not ask for your username and password the second time. Only when you completely close and reopen QlikView Desktop will you be asked for your credentials again. This is important to remember when changing and testing section access.
Access rights can be defined based on (a combination of) various criteria. In the previous example we used the ACCESS, USERID, and PASSWORD fields, but as we saw in the
Access Restriction Table Wizard dialog, there are more options, as seen here:
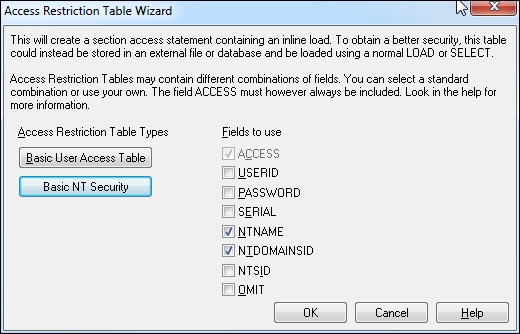
These options, and their description, are listed in the following table:
Note that just about any combination of fields is allowable. For instance, if just NTNAME and PASSWORD is defined, the domain user will need to be logged on correctly and provide the password associated with their domain account in section access. Also, it is valid to just have USERID, so only a name needs to be given to get access, regardless of domain user, and there will be no prompt for a password.
In the next section, we'll look at how we can use section access to restrict the data that users can see.
Besides the fields listed in the previous section, we can associate additional fields with the security fields to reduce the set of data that individual users have access to. Let's follow this example and see how we can limit the flight type (and associated flights) that are available to different users:
- Open the Edit Script dialog and select the Hidden Script tab.
- Update the inline
Section Accesstable so it contains the following information:ACCESS
USERID
PASSWORD
%FLIGHTTYPE
ADMIN
ADMIN
ADMIN123
*
USER
DF
DF123
DOMESTIC_FOREIGN
USER
DU
DU123
DOMESTIC_US
USER
IF
IF123
INTERNATIONAL_FOREIGN
- Next, place the cursor after the
Section Applicationstatement. - Go to Insert | Load Statement | Load Inline in the menu.
- In the Inline Data Wizard, select Tools | Document data.
- In the Import Document Data Wizard window, select the field Flight Type.
- Make sure that Values to import is set to All Values and click on OK.
- Add Flight Type as a column header, and add a second column header for %FLIGHTTYPE.
- Fill the table so it looks like the following table:
%FLIGHTTYPE
Flight Type
DOMESTIC_FOREIGN
Domestic, Foreign Carriers
DOMESTIC_US
Domestic, US Carriers Only
INTERNATIONAL_FOREIGN
International, Foreign Carriers
INTERNATIONAL_US
International, US Carriers Only
- Click on OK to close the Inline Data Wizard dialog.
The resulting script should look like this:
Section Access;
LOAD * INLINE [
    ACCESS, USERID, PASSWORD, %FLIGHTTYPE
    ADMIN, ADMIN, ADMIN123, *
    USER, DF, DF123, DOMESTIC_FOREIGN
    USER, DU, DU123, DOMESTIC_US
    USER, IF, IF123, INTERNATIONAL_FOREIGN
];
Section Application;

LOAD * INLINE [
    Flight Type, %FLIGHTTYPE
    "Domestic, Foreign Carriers", DOMESTIC_FOREIGN
    "Domestic, US Carriers Only", DOMESTIC_US
    "International, Foreign Carriers", INTERNATIONAL_FOREIGN
    "International, US Carriers Only", INTERNATIONAL_US
];
In this script, we've created the %FLIGHTTYPE field. This field exists in both the section access part of the script as well as in the actual data model, thereby acting as a bridge field between these two sections. Through association, we can now limit what a particular user can access within the data model.
You may notice that for the ADMIN user, we used an asterisk (*) instead of a %FLIGHTTYPE value. When we use an asterisk, it means that the user gets access to all values listed in the reduction field. In this case, that means that ADMIN gets access to the DOMESTIC_FOREIGN, DOMESTIC_US, and INTERNATIONAL_US flight types, but not to the INTERNATIONAL_FOREIGN flight type, since that is not listed in the section access table.
If we want the ADMIN user to be able to access the INTERNATIONAL_FOREIGN flight type as well, we will need to add an additional line referencing the INTERNATIONAL_FOREIGN flight type to the section access inline table. Let's do that now:
Note
In this exercise, we reduce the data model based on a single field. To reduce the data model on multiple fields, we can simply add another reduction column to the section access table and add a bridge field to the data model.
One important caveat to be aware of in this scenario is that the reduction will be performed over the intersection of all fields. If, for example, we give a user access to the Domestic, US Carriers Only flight type and to the Jet engine type, the user will only be able to see domestic flights carried out by US carriers using a jet-powered aircraft. Any flights that were made using another engine type will be excluded.
Although we have now finished the script part of setting up section access with reduction fields, we will need to make a few more changes before we can see the results. Let's head over to the frontend.
We will need to tell QlikView to perform an Initial Data Reduction when opening the document. When using initial data reduction, QlikView removes all of the data the user does not have access to, based on the authorizations in section access.
Let's follow these steps to set up initial data reduction for our document:
- Open the Document Properties window by pressing Ctrl + Alt + D.
- Go to the Opening tab, and select the Initial Data Reduction Based on Section Access checkbox.
- Make sure that the Strict Exclusion checkbox is checked.
- Check the Prohibit Binary Load checkbox (seen in the following screenshot).
- Click on OK to close the Document Properties dialog.
- Go to File | Save in the menu to save the document.

We have now set up the document to, upon opening, exclude all of the data that the user does not have access to. Let's have a closer look at the options that we set in the Document Properties:
- Initial Data Reduction Based on Section Access: This option enables initial data reduction for the document.
- Strict Exclusion: When set, QlikView denies access to users whose data reductions fields cannot be matched to values in the data model. This does not apply to
ADMINusers, who will instead get access to the entire data model. It is recommended to always enable this option to prevent unwanted access to data within the document. - Prohibit Binary Load: When set, it is not possible to load the document into another QlikView document using a binary load. It is recommended to always enable this setting unless you are using a multitiered data architecture that uses binary loads, for example, when using QlikMarts.
When a document containing section access is loaded into another document using binary load, the new document will inherit the section access of the original application. Take a minute to try logging in as the DUDF and IF users and see how the data is reduced to show only the authorized flight types. After that, reopen the document and log in as the ADMIN user, we'll need the privileges to make our next changes.
While looking at the filds in the Access Restriction Table Wizard, you may have noticed that there is one field that is a little different from the others: the OMIT field. While all of the other fields are used to identify a user, the OMIT field is used to remove fields from the data model for the specified user.
In the next exercise, we will create a new user, NOCARRIER, and will remove the Carrier Name field for this user. Let's follow these steps:
- Open the script editor by pressing Ctrl + E and select the Hidden Script tab.
- Update the section access
INLINEtable by adding theOMITfield. - Set the value of the new
OMITfield to null for all existing users, by adding a comma (,) at the end of eachADMINandUSERline. - Add a new user at the bottom of the list by entering the following script:
USER, NOCARRIER, NOCARRIER123, *, Carrier Name.
- Go to File | Save Entire Document to save the document.
- Click on the Reload button to reload the script.
The resulting script should look like this:
Section Access;
LOAD * INLINE [
    ACCESS, USERID, PASSWORD, %FLIGHTTYPE, OMIT
    ADMIN, ADMIN, ADMIN123, *,
    ADMIN, ADMIN, ADMIN123, INTERNATIONAL_US,
    USER, DF, DF123, DOMESTIC_FOREIGN,
    USER, DU, DU123, DOMESTIC_US,
    USER, IF, IF123, INTERNATIONAL_FOREIGN,
    USER, NOCARRIER, NOCARRIER123, *, Carrier Name
];
We've created a new user, NOCARRIER, whose password is NOCARRIER123. This user has access to all flight types, but cannot see the Carrier Name field.
We'll test if this works according to plan, but this time we will use another method. Let's follow these steps:
- Keep your current QlikView application (the program) and document open.
- Start a second copy of QlikView from the start menu or your quick launch shortcut.
- If you get an Auto Recover Files Found warning, click on Close to close it.
- Go to File | Open and select the
Airline Operations SA.qvwfile. - When prompted for a user id and password, enter
NOCARRIERandNOCARRIER123respectively.
If everything went well, we should see that the Carrier Name listbox is empty, and that the field is marked as (unavailable).
By opening a second copy of the QlikView software and testing our file in that, we've significantly reduced the risk of getting locked out of our document. If anything is wrong, we can just revert back to the document that we did not close after saving and make the required changes to section access before repeating the process to try again. Using this approach is highly recommended.
Tip
Association works in section access too
So far we have been using a single table to store our section access data. However, we can use multiple, associated tables as well.
For example, when we want to OMIT multiple fields for a single user, we need to add each field on a separate line. We can do this within the single table that we've been using so far. However, a better alternative is to remove the OMIT field from the first table and create a second, associated table that contains the USERID and OMIT fields.
Now that we've seen how we can limit who has access to our document, and what they can see, we will now look at how we can restrict what users can do within the document in the next section.