
In this section, we will go through the steps required to extract data into a QlikView document. The extraction process through which we pull data into the QlikView document consists of:
- Connecting to the database
- Querying the database
- Reloading the QlikView script
We will provide two examples of data extraction using two different data sources:
- A Microsoft Access database
- A table file
Our first example will demonstrate how to extract data from an MS Access database. It will be a good example since the connection process is very similar to that used when connecting to most major DBMSs. We will be using one of the drivers discussed in the previous section, and covering the steps required in the entire process.
Drivers for MS Access databases are often installed, by default, with the Windows OS. The default drivers are built for 32-bit architectures, but that won't be a problem for us since, as pointed out earlier, QlikView can make use of any 32-bit driver.
Connectivity to an MS Access database is provided by Microsoft either through ODBC or OLE DB drivers. At this point, we must decide which of the two types of driver we want to use. Since the connection setup via the OLE DB driver is more straightforward, we will opt for that method. However, we will take a moment to briefly describe the configuration process for ODBC drivers.
In order to create the ODBC configuration, we need to go to the ODBC Data Source Administrator window. Access this window via Control Panel | Administrative Tools | Data Sources (ODBC).
Once in the ODBC Data Source Administrator window, we'll go to the System DSN tab so that the configuration we set is visible for any user of the machine, and then we'll click on Add…, as shown in the following screenshot:

Tip
Accessing a 32-bit ODBC Data Source Administrator from a 64-bit machine
If you are using a 64-bit machine and need to configure a 32-bit ODBC driver, you will need to access ODBC data source administrator from a different location. Go to the %systemdrive%WindowsSysWoW64 folder and launch the Odbcad32.exe file. Otherwise, only 64-bit drivers will be available to configure.
The Create New Data Source window appears, which is where we will be able to select the driver we want to use, as shown in this screenshot:

After clicking on Finish, the configuration window will appear. Depending on the driver you select, the configuration and parameters required for the connection will vary. However, the configurations for almost all drivers on this, and all of the following dialog windows, are very simple, with self-explanatory fields.
After configuration, an ODBC connection can be used from QlikView in the same manner as the OLE DB connection, just by selecting ODBC instead of OLE DB when creating the connection string, which is described in the following section.
Let's now continue with our example using the OLE DB driver. If you followed the process just described, click on Cancel to follow the OLE DB procedure instead.
The connection string is basically a set of instructions and specifications with which QlikView will establish the communication with the database. It contains the database name or network location, the driver name, as well as the credentials with which we will access the database (username and password), if needed.
The connection string is created from QlikView, so the next thing we will do is open the QlikView document Airline Operations.qvw that we created earlier in Chapter 3, Seeing Is Believing. We will add new tables to the data model, this time extracting them from MS Access, to continue exploring how QlikView's built-in extraction capabilities work.
Once the QlikView document is opened, go over to the Edit Script window (Ctrl + E or File | Edit Script…). We've already worked briefly with this window, and this time, we will make use of the Database section in the Data tab.
Activate the Airports tab and position the cursor on the last line, below the existing Load statement. From the Database section, select OLE DB from the drop-down menu, and click on the Connect… button, shown in the following screenshot:

Note
The Force 32 Bit checkmark is used to specify that QlikView should look for 32-bit drivers, instead of looking for 64-bit drivers, installed on the computer. It is relevant for both ODBC and OLE DB drivers.
If you need to use a 32-bit driver then please mark this option before clicking the Connect… button so that QlikView uses the correct connection engine. In all cases in which the 64-bit driver is available, it is advisable to use that instead, since using 32-bit drivers might significantly reduce performance over the 64-bit equivalent.
The Data Link Properties window, which is composed of several tabs, will appear. The first tab (Provider) shows a list of all the available OLE DB drivers. Here, we will select Microsoft Jet 4.0 OLE DB Provider. Once selected, click on Next to move to the Connection tab, in which we will specify the database file we want to connect to, as shown in the following screenshot:

Click on the browse (…) button, placed between number 1 and number 2, to select the database file we have stored in the Data FilesMDBs folder.
Since the database file does not require logon credentials, we will leave the User name and Password fields blank. The Blank password checkmark should be selected as well.
We will now click on Test Connection to make sure the connection is established. A message will indicate if the test went well and, if so, we may now click on OK. If not, we need to make sure the configuration is correct and verify that the database file is accessible.
Note
Scrambling user credentials
For databases that require logon credentials, the username and password will be stored in the connection string either as plain text or as scrambled text. To store them as scrambled text, select the Scramble User Credentials checkbox, in the Settings tab of the tool pane in the Script Editor window before generating the connection string.
After clicking on OK, you should see the newly generated connection string as part of the script.
It is possible to have several connection strings in the same QlikView document. This allows you to pull data from different sources. Each time a new connection string is found during the script execution, the previous connection is automatically disconnected. We can also use the disconnect; statement to explicitly drop the previous database connection before connecting to the next one.
Note
Connection string portability
In some circumstances, we might need to create several QVW files for extracting several tables from a particular database. An elegant and administration-friendly approach is to store the connection string in a text file, residing in a folder that is reachable from your QVW files. Import this connection into every QVW via an include statement (from the Edit Script window, go to Insert | Include Statement). The benefit of this approach is that, if the connection string changes, you only need to modify it in one place, and all of the corresponding QVW files will automatically use the updated connect statement.
Now that we have established communication with the database via our connection string, we can begin retrieving data from it using the SQL. QlikView makes it easy for us to create the SELECT statements to build our queries.
The SELECT statement is used to pull data from the database into our QlikView document, and tells the DBMS the specific set of data we want. We could just type it manually, but instead we will use the Create Select Statement dialog in order to find the table we want to read as well as the fields we need, and automatically populate the required QlikView script.
Since we've already created the connect statement, we can go ahead and click on the Select button from the Data tab. The Create Select Statement dialog window will appear. This window is used to specify the database, table, and fields we want to load. After we click on OK, the corresponding SELECT statement will be generated.
Let's look at the components of this particular window so that we know what each option does. The following screenshot shows the Create Select Statement dialog window:

We can split the window into three horizontal panes. In the top pane, we specify where the tables we want to read are located. We have a Database drop-down field and an Owner field of this database. We also have three buttons to the right, in this top pane:
- Connect…: This button lets you create another connection. It is rarely used since the current window is usually opened after a connection is already created.
- Driver…: This button provides some information about the driver you are currently using.
- Support…: This button opens a pop-up window, which may or may not contain data, but it is intended to provide information about the database.
In the middle pane, we can choose what will become the core of our SELECT statement: the table and fields we will read.
On the left side of this middle pane, we have several checkmarks that will allow us to filter the list of tables we see to the right. We can select to see only Tables, Views, both, and so on. Once we apply the appropriate filter, we can move on to pick the table we need. Note that the list is alphabetically ordered, so you can type the first letter of the table you want to find, to automatically scroll to the section where the tables whose names begin with the specified letter are listed, and then scroll further down until you find it.
After highlighting the table, we can move on to the next section of this middle pane, which is the list of fields which the selected table contains. In this section, we have an additional option which is the ability to sort the listed fields by Text Order or by the Original Order on which they are stored in the database.
Note that we will always see a star symbol at the top of the list. We can highlight this "wildcard" character if we want to pull all of the fields contained in the table. In case we want to load only a few, but not all of the fields, we can do that by highlighting each of them individually and not with the star symbol.
We can also click on Show Icon for Key Fields, if we want to identify the fields that are defined as key fields in the database.
And finally, we have the bottom pane, which at the same time is divided into several tabs. Let's go through each of them briefly:
- Script: This tab will give a preview of what the wizard will create based on our selections from the panes above:
- To the right, we have additional options to specify how we want the script to be generated (Column, Row, or Structured). We can also add a Preceding Load, which lists the resulting fields individually and makes them available for QlikView-side operations.
- We also have an Add… button; it basically allows the creation of several
SELECTstatements involving several tables at the same time without needing to click on OK and return to the Create Select Statement window for each one.
- Table: This tab is used to view general information about the selected database table.
- Columns: This tab will provide specific information about the properties of the fields that make up the table.
- Preview: This tab will show a preview of the table, consisting of the first few rows.
- Blobs: This tab provides the ability to bundle objects contained in a Binary Large Object (Blob) field into the QlikView application. This feature is only supported when using an ODBC connection (OLE DB is not supported for this).
Even though the Access database contains all the dimension tables used in the airline operations data model and more, we will only extract the tables corresponding to the origin and destination airports and incorporate them into our application.
Using the Create Select Statement wizard described earlier, create the SELECT statement to extract the Origin Airports table with both the %Origin Airport ID and Origin Airport fields. Make sure to create a script in the form of, column with each field name listed in preceding load for us to manipulate it further, if needed.
The following screenshot shows the configuration we need in the Create Select Statement dialog for this particular example:
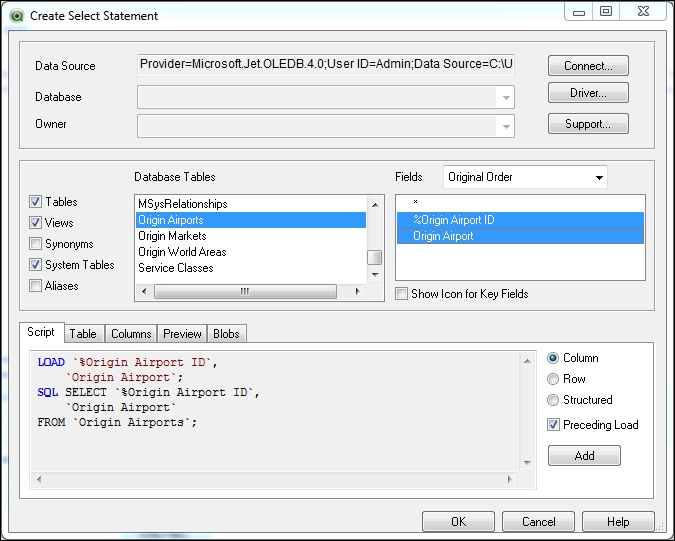
The resulting script is as follows:
LOAD '%Origin Airport ID',
  'Origin Airport';
SQL SELECT '%Origin Airport ID',
  'Origin Airport'
FROM 'Origin Airports';
Did you notice how we didn't use the star symbol when selecting the list of fields to retrieve, even when we needed to pull all fields? This is a best practice, to ensure that only the required fields are returned by the query, and no more. Suppose, for example, that a new field is added to the source table. If we used the star symbol to query the database, we would automatically retrieve this new field even when it's not necessary for our data model, wasting valuable bandwidth in the process.
Follow the same process to add the script needed to load the Destination Airports table.
We now have a query to execute, and need to reload the script to actually pull the data into our QlikView document (and into RAM for as long as the QlikView document is open). We can select File | Reload, press Ctrl + R, or click on the Reload button from the toolbar.
After this, as we've seen previously, a Script Execution Progress window, shown as follows, appears and shows feedback about the loading process. It also tells us after reading a table how many rows it fetched, among other things.

By default, the close checkmark, at the bottom-left of the window, is enabled. It tells QlikView to close the progress window immediately after finishing the script execution. It is sometimes useful to disable this property, so we can get an overview of the entire process after it is finished. You can either uncheck the option right from this window or change the parameter via Settings | User Preferences | Keep Progress Open after Reload. You will know that the script execution has ended when the Close button becomes enabled. Click on Close to dismiss the dialog.
Since we executed the reload operation from the Edit Script window, the Sheet Properties dialog appears immediately after script execution, with the Fields tab active by default. As we saw in Chapter 3, Seeing Is Believing, through this window we can add fields to our workspace in the form of listboxes and start reviewing what we got from the query we ran.
Click on OK to dismiss the Sheet Properties dialog window.
If we press Ctrl + T at this moment, Table Viewer will appear and we will be able to see the resulting data model. The data model now consists of the tables we added previously, in Chapter 3, Seeing Is Believing, and the two tables we added from the MS Access database.
The following screenshot shows the resulting data model:

Table Viewer is a great tool to analyze the data model and check table associations. In the next chapter, we will describe in more detail how we can take advantage of it.
After reviewing Table Viewer, click on OK to dismiss it, and make sure to save the changes we made to the application before moving on to the next section.