
Chapter 5 detailed the process of creating sites and site collections but only briefly mentioned My Sites. My Sites are created just like any SharePoint site except that they are intended to be accessed only by you and whomever else you decide should have access. SharePoint users can create and manage their own personal My Sites within the larger site collection structure and customize them for their individual use. Consider it a SharePoint site just for you.
The vast majority of SharePoint is built on the principle of collaboration between users and teams, and My Site can be used to gather together all of your projects, tasks, documents, and links. If you are involved in several teams or team projects, your SharePoint resources can be scattered across the site collection. Use your My Site to gather all of that information together and then organize it in a way that makes sense to you.
You can personalize My Site and then allow guests to access some of your information so they can learn more about your experience and qualifications or work with you on a project. You can also assign Privacy Groups to lists and libraries and control who has access to what on your My Site. This is like living by yourself in your house and inviting your neighbors over, but letting them see only the living room, kitchen, and bathroom.
Content Providers in SharePoint can use your My Site as a way to supply you with targeted information, depending on which groups you belong to. These providers are usually some form of management, such as your own supervisor, the managers of Human Resources, and other relevant departments.
When your My Site is created, it contains two parts by default: the private My Home site, which starts with a private home page, and the public My Profile site, which contains content that can be seen by others.
You do not have absolute control of your My Site. The main SharePoint site owner and administrators can determine the general look and feel of all My Sites, but you can add Web Parts and data. Management groups in your organization can create other sites called Personalization Sites within your My Site and fill them with specific information. Each Personalization Site appears as a tab on your My Site. For example, your company’s public relations department may create a personalization site that displays all of the press releases and broadcast newsletters involving your projects.
That said, you are the administrator of your private My Home site and can tailor it to suit your personal needs and goals within SharePoint, as well as restrict access to some of the public information in My Profile.
Before getting into the nuts and bolts of My Sites, let’s take a tour of the available features and how you can use them.
You can use the Colleagues Web Part to keep track of team members, partners, and anyone else you regularly work with. When you use this Web Part, you can find out whether an individual has reported to work for the day and the activities she is involved in, such as a meeting or a phone call. You can be reminded of such details as when it’s a team member’s birthday or anniversary and be informed of major events, such as when she changes departments or are promoted.
Your My Site has a separate My Links page, which you can use to add and organize links to any web site. You can collect links by project name or some other criteria and filter the links with Privacy Groups. Then only those groups you allow can see certain collections of links.
Configure a workflow for your documents so you can keep track of which have been submitted for approval, which were approved or rejected, the rationale for the decision, and tasks related to documents.
You can use the Documents Web Part on your My Site to link to any document you have ever created or modified on any SharePoint site in the site collection. You can also view any tasks assigned to you related to these documents. My Site is set up by default to show all the documents you are connected to on up to five sites in the site collection. You can add more sites if needed.
When you create a document in a Microsoft Office application, such as Word 2007, you can save that document to any of the document libraries on your My Site. By default, your My Site has four document libraries:
My Pages
My Pictures
Private Documents
Shared Documents
Any documents you save in the Shared Documents library automatically appear on the public page of your My Site; however, only you have access to documents saved in Private Documents. To save a document on your My Site from an Office 2007 program, click the My Site Places link in the application you used to create the document.
In addition to documents, you can also use your My Site Public page to share other kinds of information. Anything you add to your public page becomes part of your profile, including any text and photos. You can post a list of your interests, projects, and a biography. Additionally, your manager can post information on your public page using Active Directory or LDAP and deploy database information such as your name, department, and work group.
You can filter information on your public page using Privacy Groups. This lets you provide your work phone number to everyone and allows you to show your mobile or home phone numbers only to certain groups. This is helpful in situations where only your work group is allowed to call or page you about a work situation.
The SharePoint search feature can be used to find people by the information included on their public site and profile. For example, let’s say you have listed that you are proficient in the Perl and Python programming languages in either the Interests or Skills section on your public page. Another member of the site collection searching for someone knowledgeable in those languages could use the search feature to locate you.
You can also be located by your group affiliations, nonwork interests, and who you work with, as long as that information has been listed on your My Site. For example, if you are a member of the perlmonks.com discussion group and someone else in the site collection was interested in learning about them, they could locate you using search and then email you some questions.
In Chapter 9 and Chapter 10, you learned about creating and managing Document and Meeting Workspaces. You can create separate workspaces on your My Site as well, including a blog, a records repository, a team site, and a wiki site. You can use a Meeting Workspace to gather all of your materials in preparation for a meeting you are hosting. You can also create and use a Document Workspace to check out and work on a local copy of a document you are preparing, and then check the copy back into your team’s document library.
A Document Workspace or library on your My Site also lets you track different versions of your documents.
Tip
This option is available only if you have set up your library to track versions. See Chapter 9 and Chapter 13 for more information on setting up versioning.
Use this feature to track the history of a document, such as the number of major and minor versions that exist, who edited different versions of the document, and any comments made about the document by those who edited it.
Tip
You can track both major and minor versions of a document in a library, but you can track only major versions in a list.
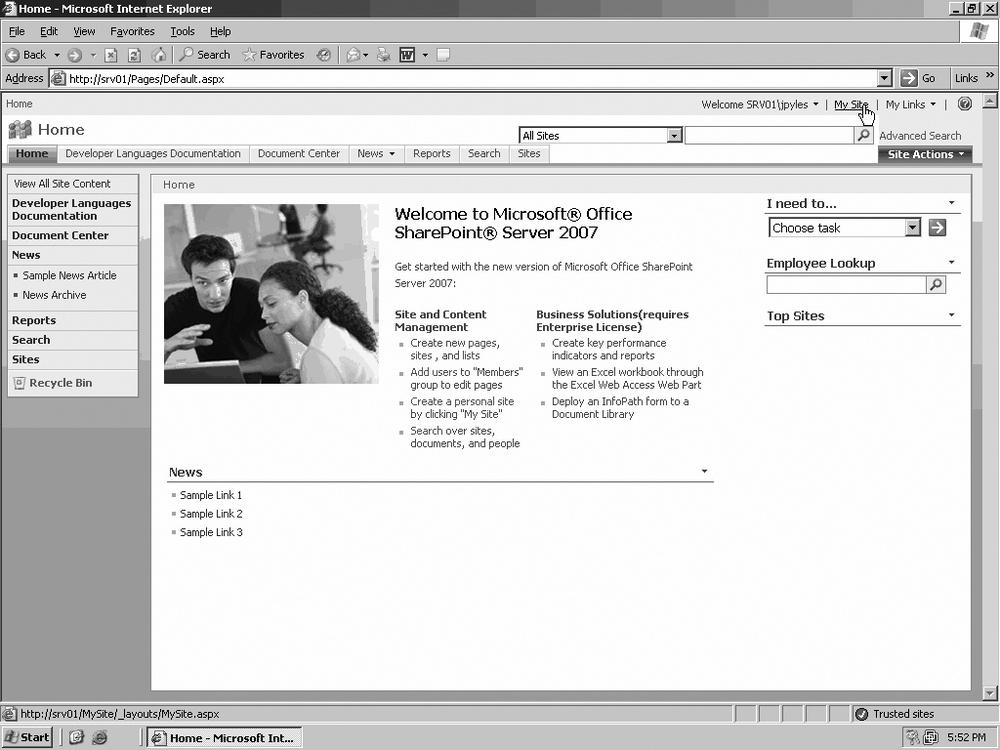
The first step in working with your My Site is to access it. While logged onto a SharePoint site, click on the My Site link in the top-right portion of the web page, as seen in Figure 21-1.
The first time you click the My Site link, SharePoint creates your new My Site on the fly. This might take a few moments. Once the creation process is completed, your default My Site opens, as shown in Figure 21-2.
At this point, although your personal My Site is open, it doesn’t contain any specific information about you, except your username in the title banner. You’ll have to add whatever data you want your My Site to contain.
You can add information to your My Site site that lets others know about your qualifications and interests:
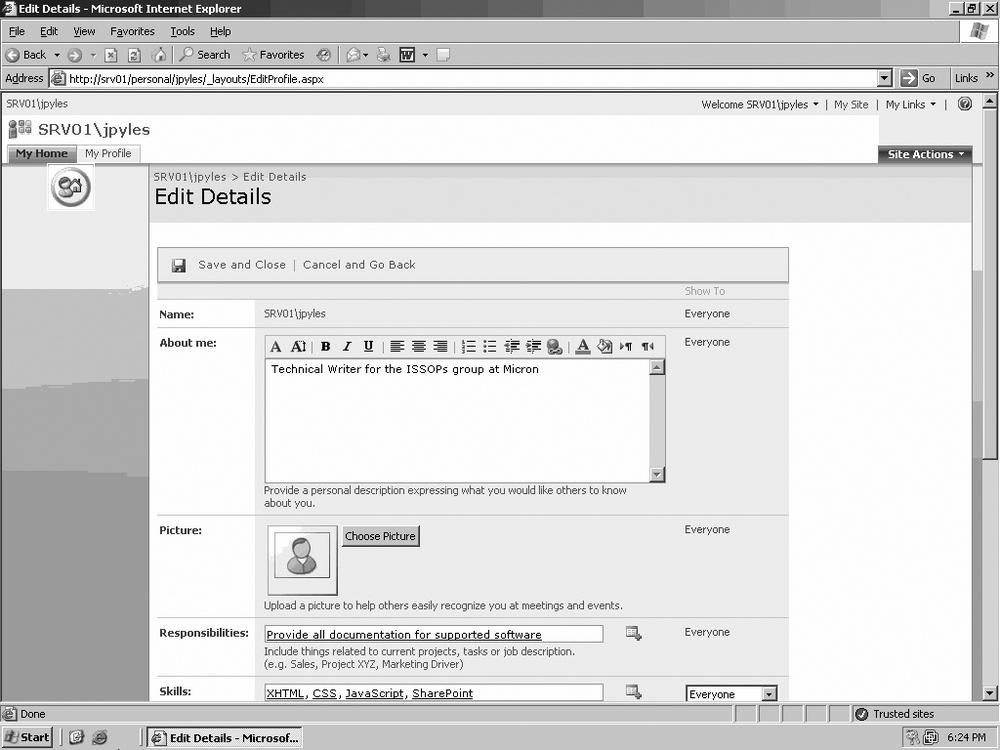
On the My Site, click the “Describe yourself” link.
On the Edit Details page in the About Me field, type a brief description about yourself.
In the Picture section, click the Choose Picture button if you want to browse, locate, and upload a photo of yourself.
In the Responsibilities section, either type in or browse for a description of your job responsibilities and roles.
In the Skills section, type in any professional or personal skills you possess.
In the Past Projects section, type in the names of projects you’ve completed.
In the Interests section, type in any of your professional or personal areas of interest.
In the Schools section, enter any of the universities or other academic institutions you’ve attended.
In the Birthday section, add your birth date.
If you have an assistant, add or browse to that person’s name in the Assistant section.
In the Mobile Phone section, add your mobile phone number.
In the Fax section, add your fax number.
In the Home Phone section, add your home phone.
Tip
Notice in the Show To column, the default values are Everyone. In the drop-down menus of some sections, you can change this value. You can set Privacy Groups on your personal information so that not everyone visiting your My Site can view your information. See the “Configuring Privacy Groups in My Site” section, later in this chapter, for details.
Scroll to the top, and click Save and Close.

A sample Edit Details page is shown in Figure 21-3.
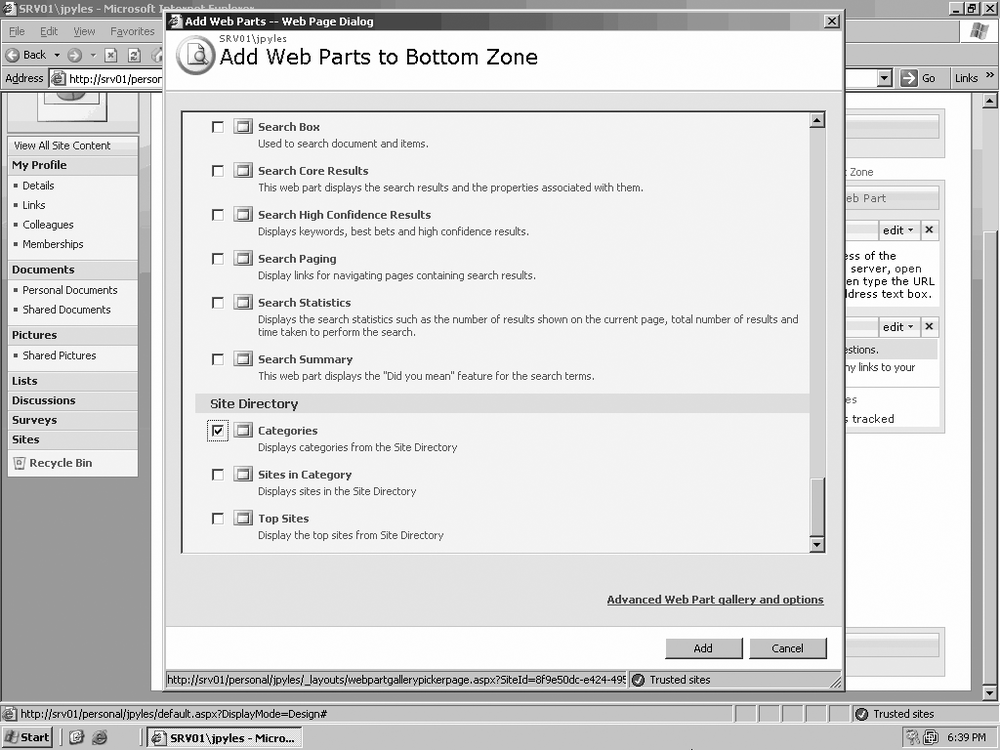
You can add a Web Part to a My Site page just like on any other Web Part page in SharePoint:
On My Site, click “Customize this page” to open it in Edit Mode.
On the desired Web Part field, click the “Add a Web Part” link.
In the Add Web Parts box, click the checkbox by the Web Part you want to add (Figure 21-4), and then click Add.
The Web Part will be added to your My Site site.
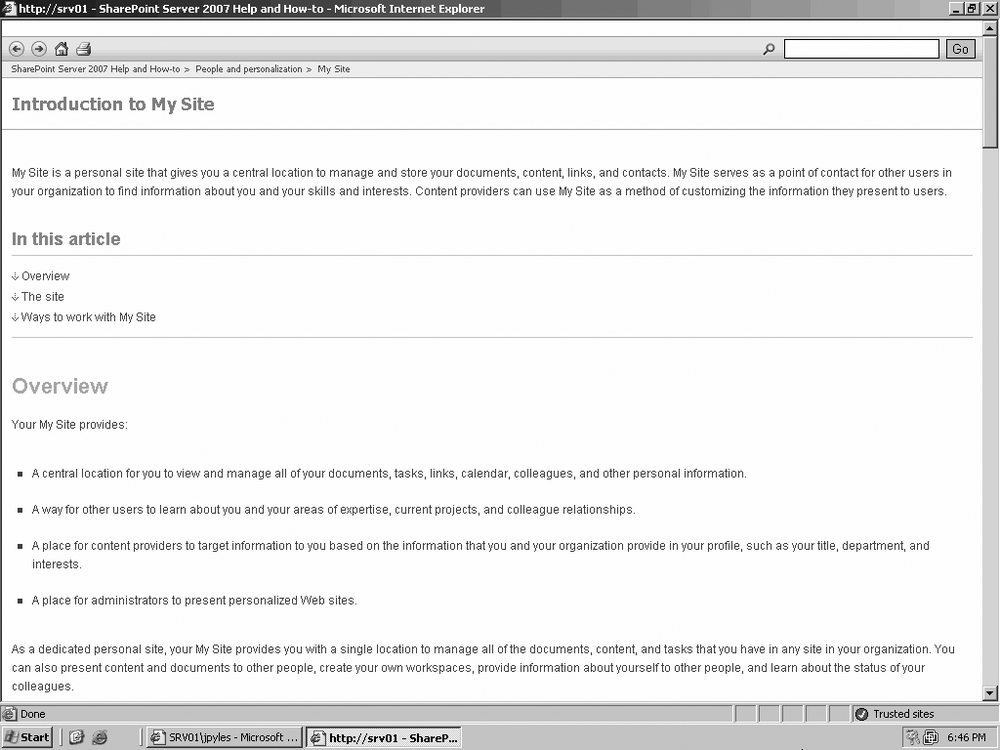
If you want to locate tips for managing your My Site, do the following:
On My Site, click “Learn more about My Site.”
When the “Introduction to My Site” page opens, maximize it to see the entire contents, as in Figure 21-5.
When you are done reading, close the page.
You may want to create a site tab that links to another site from your My Site in order to view documents and tasks related to the site. You can do this both for sites you belong to and for sites of which you are not a member. Once the site and link have been created, you can reach that site from your My Site with a single click.
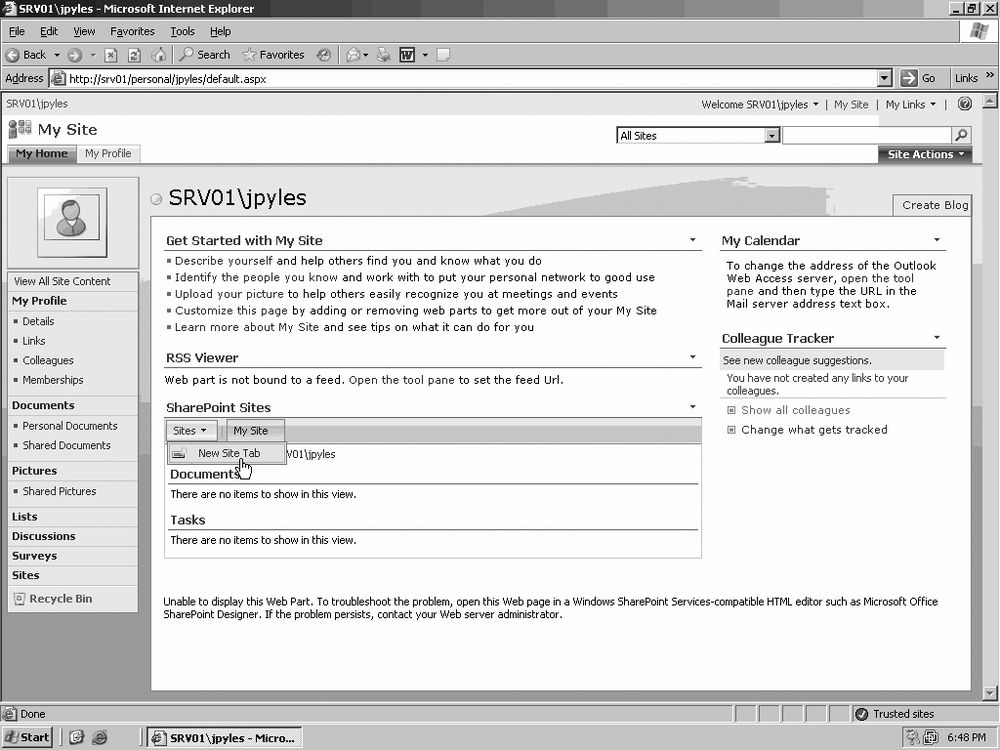
On the SharePoint Sites Web Part in your My Site, click Sites and then click New Site Tab, as in Figure 21-6.
In the “Create a new site tab” dialog box, click the “Select site from Memberships” list.
Select the site on the menu, and then click Create.
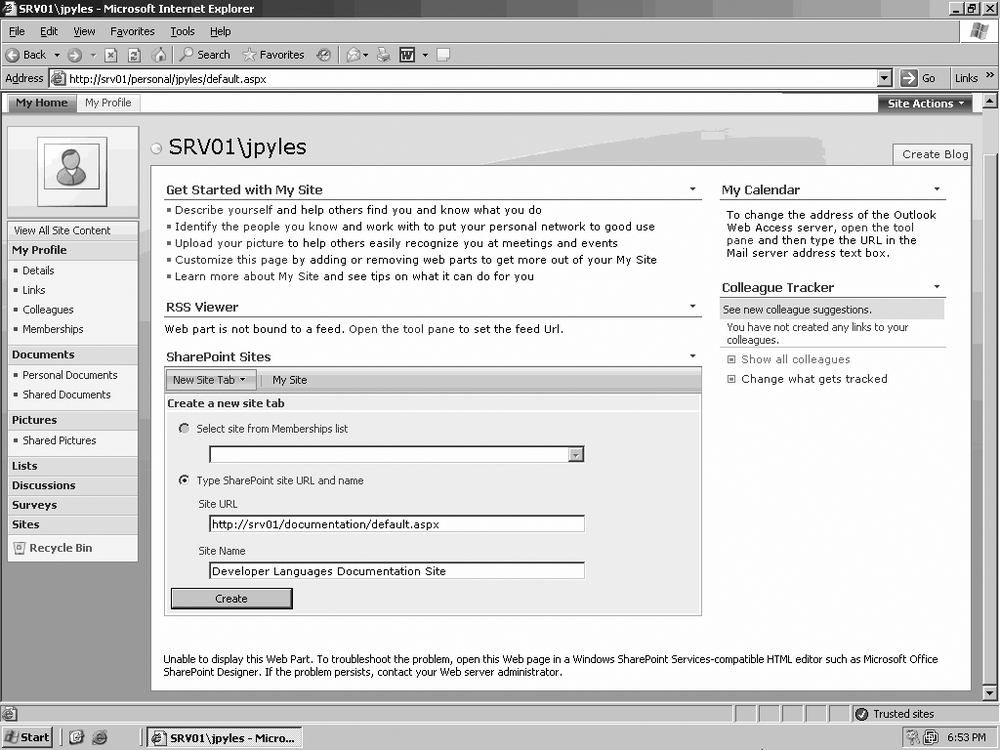
On the SharePoint Sites Web Part in your My Site, click Sites and then click New Site Tab.
In the “Create a new site tab” dialog box, click “Type SharePoint site URL and name.”
Under Site URL, type or paste in the URL of the site that you want to add in the available field.
Under Site Name, type the name that you want to appear on the tab and then click Create, as in Figure 21-7.
The new site tab will appear in the My Site Web Part bar, as in Figure 21-8.
You can manage documents, tasks, and other information and material in your My Site, as you read earlier in the “Using Your My Site” section. The material in this section takes you through the steps involved in different aspects of My Site management.

As mentioned earlier in “Storing and Sharing Documents,” documents you have stored on up to five sites in the site collection are displayed on your My Site by default. If you would like to see documents from additional sites, you must add those views manually. You do not have to be a member of a site in order to add a view of that site:
On your My Site, click Site Actions and select Edit Page from the menu.
In the Sites Web Part, click Edit and select Modify Shared Web Part.
In the tool pane under View, in the “Number of tabs to show before More” field, replace the default value of 5 with the number of sites you want to display, as seen in Figure 21-9.
Click OK, and when you are back on the My Site page, click Exit Edit Mode.
Use this process to add as many site tabs to your SharePoint Sites Web Part bar as you need. If you add a large number of tabs, you may have to scroll left or right in order to see all of them, depending on your screen resolution.

As with any other list, you can filter what information is displayed to different groups. Here’s how you show or hide a site on the SharePoint Sites Web Part bar:
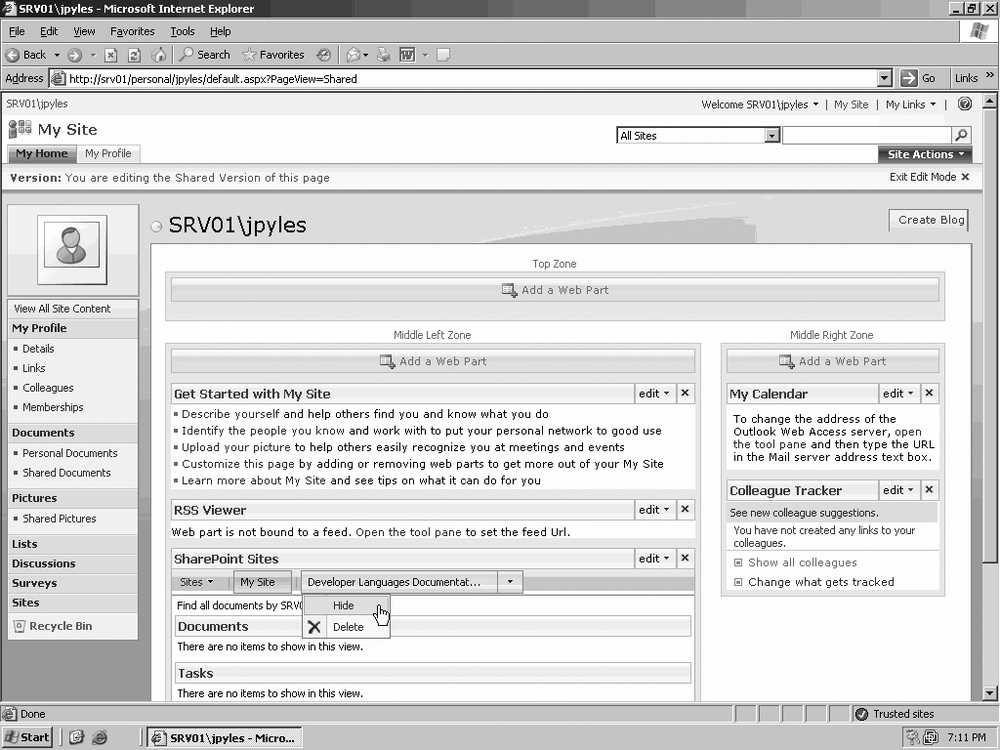
On your My Site, click to the right of the site name you want to show or hide, and then click the Sites menu.
To hide the site tab, click Hide; to show a hidden site tab, click the site’s name. See Figure 21-10 to locate the Hide option.
You can hide site tabs you do not want others to see, but you can also permanently delete a tab from your SharePoint Sites Web Part bar.
On your My Site, click to the right of the site name you want to delete, and then click the Sites menu.
Click Delete. (Refer to Figure 21-10 for the location of the Delete option.)
If you are a member of the site you deleted, the site link will be moved to the Membership section of your My Site public page. If you are not a member of the site, it is permanently deleted from your My Site.
To view tasks assigned to you on a particular site, either click that site’s tab on the SharePoint Sites Web Part bar or click Sites and select the particular site from the list. See the result of this action in Figure 21-11.
When the site page opens, in the Tasks Web Part, click the name of a task or item link to open it.
Click Edit Item to open it in Edit Mode.
View and edit the task as necessary, as in Figure 21-12, and click OK to finish.
Click on the My Site link to return to your My Site.
You can allow or deny access to your My Site site by any member of the larger site or site collection. This does not mean that everyone you allow to see your My Site will have the same view of it as you do. You can assign privacy groups to different pieces of information on your My Site so that those groups have different views.


You can use Privacy Groups to filter the view of your site for different groups. This allows you to hide some or all of your personal information, depending on how you use those groups. There are five different default privacy groups you can set to either view or hide personal information:
- Everyone
The Everyone group contains only those names or groups you have given permissions to access your site, not the general members of the SharePoint site or site collection.
- My Colleagues
This group contains your direct reports, your manager, and your peers; however, you can add anyone else to this group.
- My Manager
This contains the name of the person to which you directly report.
- My Workgroup
This group also contains your direct reports, your manager, and your peers by default; however, you can use the “Add Colleagues to My Workgroup” option to add anyone in your My Colleagues group to your My Workgroup group.
- Only Me
This option lets you make your personal information visible only to you. To enable it, do the following:
On your My Site in Quick Launch, click Details.
Next to the item you want to restrict (Interests, for example) in the Show To column, click one of the group names listed previously. See an example in Figure 21-13.
On the Edit Details toolbar, click “Save and Close.”

Not only can you restrict views of your personal information on the public page—such as birthdays, interests, phone numbers, and skills—you also can restrict views to other information:
- Colleagues
You can configure which groups can see individual members of your My Colleagues group.
- Content Targeting
You can limit who can see the targeted content you receive from your manager.
- Links and Lists
Limit views of links or lists, particularly if they are not directly work-related.
- Search Results
Restricting views of your information to certain groups may result in an interest or membership not being linked to you in the search results. For example, if your membership to a non-work club is set to Only Me, it will not turn up in a search involving your name or memberships.
After you restrict a view by group, you can test it and see how that group sees your My Site information:
On your My Site, on your My Profile page, click “As seen by” at the top of the page, and select the group view you want to test. The My Workgroup view is illustrated in Figure 21-14.
Return to either Everyone or Only Me to end the test and continue working on your My Site.
As previously mentioned in the section “Restricting Views of your My Site,” the default members of your My Colleagues list are your direct reports, your manager, and your peers. You can add other members to this list and then restrict views of this list based on Privacy Groups. There are plenty of other options for managing your My Colleagues list.
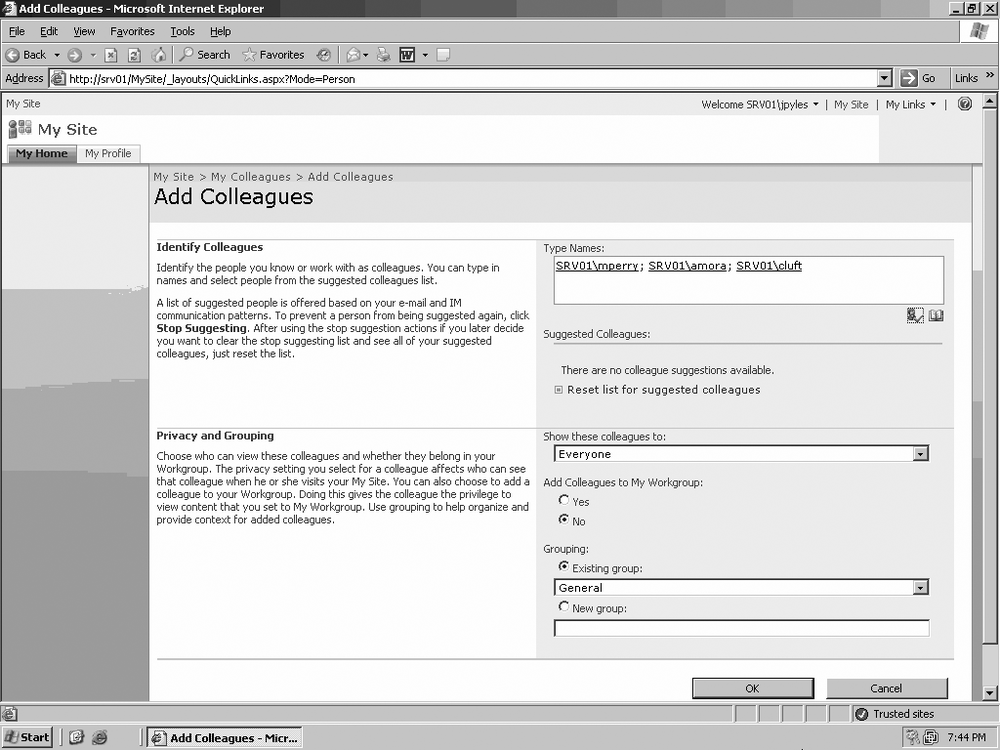
On your My Site, click Colleagues in Quick Launch. Alternatively, if you are just getting started, under “Get Started with My Site,” click “Identify the people you know.”
On the My Colleagues list toolbar, click Add Colleagues.
On the Add Colleagues page, in the Identify Colleagues area, do one of the following:
To add the name of someone you know, type the user’s name in the Type Names field, as in Figure 21-15, and click the “check names” icon.
To search for a user’s name, click the Browse button next to Type Names. When the Select People dialog box appears, type some part of the user’s name in the field, as in Figure 21-16. Click the magnifying glass to start the search. Look through the search results until you find the name of the desired user, and click Add.
After the names have been added, as in Figure 21-17, to filter who can see the new member’s name in the My Colleagues list, type the name of one of the privacy groups in the “Show these colleagues to” field.
If you want to add the new member to your My Workgroup list, click Yes under Add Colleagues to My Workgroup.
To add the new member to a group organized by project or role, under Grouping you can either click on “Existing group” and select a group from the list or choose “Create group” and type the name of the new group in the available field.
Tip
See the upcoming exercise “Organizing Colleagues Using Functional Groups” for more information.
Users must be present in the User Profile Store before performing this action. Normally, SharePoint 2007 and the earlier 2003 version automatically detects the nearest Domain Controller and imports the user’s profile from Active Directory, an LDAP Server, or a Business Data Catalog. However, if SharePoint is unable to locate the appropriate source when you try to add users to your My Colleagues list, the action will fail.


One of the handiest features in My Colleagues is the ability to keep track of specific events involving the people you work with. Here is a list of the alerts you can set up for anyone in your My Colleagues list:
- Anniversaries
This is arguably the most important alert in the list. You can track any annual event using this alert. Set this alert and never again forget a birthday or anniversary.
- Blog Changes
Use this alert to track when a new post has been made to a colleague’s blog.
- Membership Changes
This alert lets you track when a person’s membership in any SharePoint list changes. Examples are when a member either joins or leaves a workgroup or site.
- New Documents
Receive an alert when a member adds a new document to SharePoint.
- Out of Office
Use this option if you want to be notified when a colleague is out of the office. You will receive the alert whenever your colleague enables the Out of Office feature in Microsoft Exchange from their email client.
- Profile Property Changes
This setting lets you receive an alert when some information in the member’s My Profile changes, such as job title or direct report.
Warning
If you are not in a privacy group on your colleague’s My Site that is allowed to view some or all of these options, you will not receive alerts related to the hidden options.
On your My Site at the bottom of the Colleague Tracker Web Part, click “Change what gets tracked?”
Select one or more of the previously listed options to start receiving alerts.
So far you’ve organized people as Colleagues and members of your Workgroup; however, you may find it useful to group colleagues by other criteria. For example, maybe you are working on a special project with just a few people in My Colleagues, or perhaps you are working with different combinations of people in My Colleagues on multiple projects. Grouping members by project would be more helpful then having to pick them out of your My Colleagues list every time you wanted to reference a particular team.
You can group people in any way you want, not just by project. Some examples are grouping by role, function, title, department, and so on. Here’s the process of creating a group:
On your My Site, click Colleagues in Quick Launch.
Select the desired colleagues on your My Colleagues page.
Click Edit Colleagues on the toolbar.
Under Grouping, click on Select Group and either click the group you want or select New Group and type the name of the new group in the available field.
The selected colleagues will be added to the group. You can delete a group by reversing the process and removing all colleagues from a group. Once you empty the group, it will be automatically deleted.
In any company with a fluid employee base, colleagues may be frequently added and deleted from your My Colleagues list. Here’s how to perform the latter action:
On your My Site, click Colleagues in Quick Launch.
Select the desired colleague or colleagues on your My Colleagues page.
In the toolbar, click Delete.
Out of the box, Microsoft Office SharePoint Server 2007 comes with the single, default template for all My Sites. Microsoft is developing several role-based My Sites templates so that, depending on your job function in your organization, you can customize your My Site to more effectively represent your role.
The specific construction of each role-based template is the result of the Microsoft Dynamics Customer Model, which identifies the various tasks of each job role in an organization. Thus, each template contains lists, libraries, and charts that are specific to the tasks that role performs.
As of this writing, there are two role-based templates available for download from Microsoft:
- Controller-Financial Analyst
The general design of this template is based on this role’s perceived tasks and goals, such as tracking corporate performance, budget projections, growth projections, and communicating with investors, management, and partners.
- Sales Account Manager
The design of this role-based template is based on this role’s perceived tasks and goals, such as tracking performance metrics, managing quarterly revenue, assessing customer satisfaction, and monitoring revenue augmentation.
Microsoft has announced that the following role-based templates will be released when available:
Administrative Assistant
Customer Service Manager
HR Manager
IT Manager
Marketing Manager