
Microsoft Office SharePoint Server can be a great asset to your organization, but without the proper security considerations, it could cause problems within your organization or in extreme cases, become a devastating liability. This chapter covers the various mechanisms available for protecting your SharePoint site.
SharePoint security relies heavily on a breadth of topics outside the scope of this book, such as Windows Server 2003, Microsoft SQL Server, and network security, among others. Resources for additional information will be provided, however it is important to remember throughout the design, implementation, management, and administration of your SharePoint site that the security of your site does not exist in a vacuum. Numerous influences outside of SharePoint affect the security of your site collection and SharePoint.
As you go through the process of designing and implementing your SharePoint site, resist the “let’s make it work and secure it later” mentality that’s so common in many organizations. If you don’t have time to properly implement security during implementation, you certainly won’t have time to fix it all later. You will be in a position of either having to try to secure a system already in production or discovering that SharePoint has already been compromised from the outside or from internal users.
A secure implementation of Office SharePoint Server 2007 starts with a design conducive to security.
Microsoft’s security guidance for Office SharePoint Server categorizes sites into four specific environments, and this chapter will use these as the basis for describing specific, security-oriented server deployments.
This type of deployment generally consists of a small farm with two or three servers, and its users are restricted to one team or department in your organization. Microsoft states that this type of deployment is not hosted by the primary IT team in the organization; however, some organizations will have deployments of this type that are hosted by IT. This type of deployment has slightly lesser security requirements than other types of deployments because generally everyone who can access the site is authorized to access any of the information on the site. Many of the default security settings are intended for this type of environment, so securing this type of deployment usually requires less effort than the other types.
Microsoft refers to an internal IT-hosted deployment as one that provides services for multiple teams and departments within the organization. The security requirements for this type of deployment are typically more stringent because usually teams and departments are not authorized to access at least some information from other teams or departments due to the sensitive nature of the information.
An external secure collaboration environment is a server or farm accessible from the Internet to outside users. These users may be employees or contractors of your organization, or customers, resellers, suppliers, or business partners. These sites may also include some level of anonymous access in some circumstances—for instance, if your external secure site is an extension of your organization’s public web site. In general, an external secure collaboration environment should not have any level of anonymous access enabled, to avoid disclosing sensitive information. However, in some environments, this may be desirable and an acceptable risk.
An external anonymous access environment is one accessible from the Internet where outside users can access content on the site without authenticating. This is generally used as a public web site.
For details and checklists on specific security guidance for each environment, see the TechNet article “Choosing your security environment” at http://technet2.microsoft.com/Office/en-us/library/753fc3f6-e888-4bb6-ab67-288df065c2511033.mspx?mfr=true.
Network topology design for your Office SharePoint Server farm is an important consideration. Usually this will be of most concern for sites accessible from the Internet, and occasionally for team or department sites.
Sites that are accessible from the Internet have more stringent topology design requirements than internal sites. Frontend servers servicing requests from the Internet should be located in a Demilitarized Zone (DMZ). A DMZ is a dedicated network segment, usually located off of a third interface of your perimeter firewall, where servers providing services to Internet hosts are homed (Figure 22-1). The purpose of a DMZ is to protect these servers as much as possible, recognizing that these servers are at a higher risk of being compromised, and providing protection to the internal network in case a DMZ host is compromised.
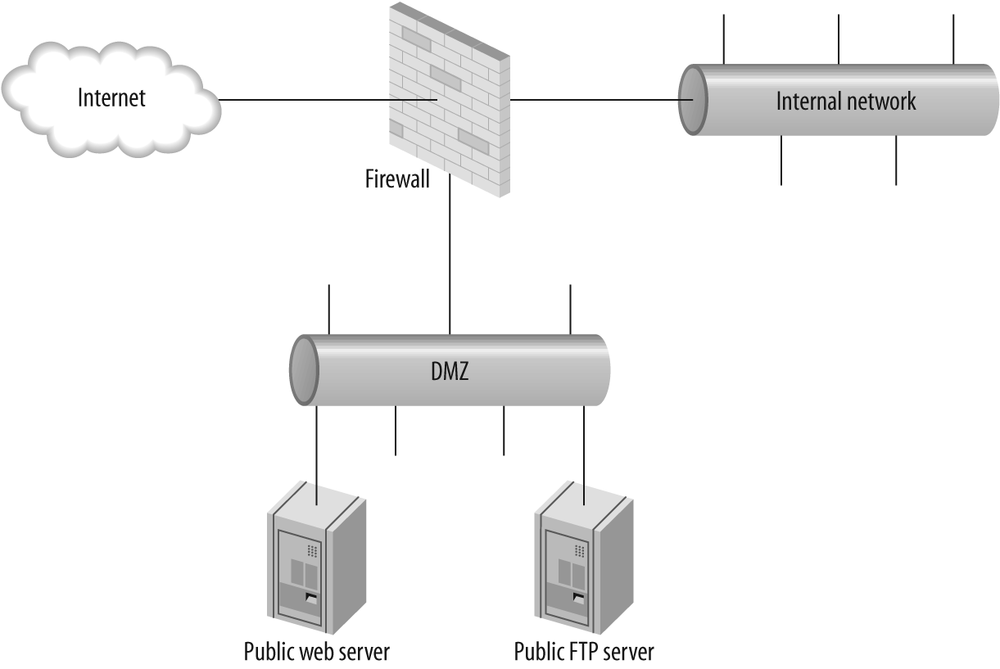
For Office SharePoint Server deployments, you may wish to implement a second DMZ to host the machines in your farm that are not directly accessible to outside users, such as your SQL Server and any application servers that potentially include search or indexing (Figure 22-2).
DMZ-less design. Every publicly accessible Office SharePoint Server environment should reside in a DMZ segment. However, in some small organizations with only a single server, like a Microsoft Small Business Server implementation, this may not be feasible for financial reasons. It may be desirable to make a site hosted on a multipurpose server on the internal network available externally. In these instances, if the risk and impact of an attacker compromising the entire internal network through this server is not a serious concern, the organization may choose to go without using a DMZ when considering the cost of a dedicated server deployment. This should be avoided in all but the smallest networks, and should never be used in a security-conscious environment.

Single or multiple DMZ design. Whether to implement one, two, or more DMZ segments depends on the security requirements of your environment. A single DMZ containing all servers in your Office SharePoint Server farm should be considered a minimum requirement. Segregating servers that are not directly accessible to users (such as your SQL Servers) and application servers (such as search and indexing) provides a greater level of protection for these servers, which need not be accessible directly to Internet users. If a web frontend server is compromised, additional DMZ segments may help limit the exposure to your database and application servers, and possibly prevent them from becoming compromised as well.
DMZ performance considerations. Putting a firewall between your servers will reduce the network performance between those servers. The level of performance impact depends mostly upon the performance capabilities of your firewall. For highly trafficked farms, a firewall has the potential to cause performance degradation for users of your site. This is not likely to affect most environments, but it is something to keep in mind when designing a high-traffic site. Always ensure the firewall is adequately sized to provide the required level of performance.
For certain limited team or department sites, segregating the servers from other portions of the network may be desirable. Some departments in larger organizations that require a high degree of confidentiality and data protection have a dedicated network segment for that group and do not allow other parts of the network access to that segment. If the team or department using the site has its own dedicated segment, you should place the Office SharePoint Servers it will use in that protected segment as well.
In designing your site and server topology, you will want to consider whether segregating data into multiple isolated servers or farms is the best approach for your deployment. This will mostly depend on the type of content and information your site will contain, and the users who will have any level of access to the site. Your security considerations for an external anonymous access site will differ considerably from an internal team or department site, for example.
The appropriate approach to determining your server design is to first perform at least a basic risk assessment. Outline what information will be stored on the site, its value, the likelihood of someone trying to gain unauthorized access, and the consequences of someone gaining unauthorized access. The results of this assessment will help you determine the appropriate level of effort and expense to put toward securing the assets on your site.
If your SharePoint site will be accessible to users outside your organization—whether they are business partners, vendors, suppliers, customers, or anonymous users—you need to be extremely vigilant in designing and implementing security properly. If you have sensitive content that only internal users are authorized to access on the site, you should strongly consider deploying an internal server or farm with a separate site accessible only to internal users. This negates the potential of disclosing that information to outside users through human error in configuring security, or through newly discovered security vulnerabilities that may arise.
Internal sites generally do not pose the same level of security risk as externally accessible sites. However, that’s not to say they don’t require consideration of potential security risks during site design. The same primary security risks also apply to internal sites—human error in security configuration, and the risk of newly discovered security vulnerabilities that may arise in the future. Generally, the latter is of less concern on an internal site, but the former is just as much of a potential issue, if not more so. If your site will contain highly sensitive information to which only some internal users require access, you should consider deploying a dedicated server or farm and a dedicated site for that sensitive information.
Microsoft has secure topology design checklists available on TechNet, and you should follow these as closely as possible:
| http://technet2.microsoft.com/Office/en-us/library/007ecb03-5808-495a-bb724f0641eaf8f21033.mspx?mfr=true |
They provide a condensed list of the topology design considerations covered at length in this chapter, as well as in some of the other referenced materials. Some of these considerations will not be feasible in all environments. For example, some require a farm with multiple servers, which probably will not be feasible in most small environments. Try to follow these checklists to the letter as much as possible, but understand that in certain environments the cost of some of these items will be prohibitive.
Prior to installing Office SharePoint Server 2007 on any servers, you should first harden the servers per Microsoft’s security hardening recommendations.
Warning
When applying security to a server, especially if you aren’t experienced with server hardening, there is a chance you will break something in the process. After applying each change, test to ensure the change functions as intended and that you haven’t broken anything. If you continue securing other things and determine later that something is not functioning properly, it will be much more difficult to determine which step in the process caused the issue.
After installing Windows Server 2003, you should harden your Windows Server installation prior to installing any services or applications. Microsoft has made available the Windows Server 2003 Security Guide, a freely available 250-page document that provides detailed guidance on hardening your Windows Server 2003 systems. Some of the high points of this guide will be covered, but it will be left to you to download the document and review information specific to your deployment:
| http://www.microsoft.com/downloads/details.aspx?familyid=8A2643C1-0685-4D89-B655-521EA6C7B4DB&displaylang=en |
You should never use anything but NTFS on your server filesystems. There is no good reason to use FAT or FAT32 file systems on servers, and their use makes it difficult—and in some circumstances impossible—to maintain a secure server.
Install all available service packs, roll ups, hot fixes, and other available updates from Microsoft Update. This ensures your system is protected from known vulnerabilities.
After addressing these two areas, the Security Configuration Wizard, as outlined in the next section, will assist you in numerous areas of the Windows Server 2003 Security Guide that are not covered in detail within this chapter.
The Security Configuration Wizard (SCW) part of Windows Server 2003 can be installed by going to Add or Remove Programs in Control Panel and clicking Add/Remove Windows Components. You will see it available for installation in that list. After installation, you will find a link to the SCW help file on your desktop, and you can run the SCW from Administrative Tools.
The Security Configuration Wizard helps you reduce the attack surface of your server. The attack surface of a system can be defined as the number of potential ways for an attacker to compromise a server. By reducing the number of running services and applications, limiting network traffic to and from the server to the minimum required ports and protocols, and tightening the configuration of required applications and services, you limit your attack surface and reduce the likelihood of a successful compromise. This process can be done manually, but the Security Configuration Wizard will speed this process considerably.
The SCW includes numerous server role definitions to assist in applying the appropriate level of security to your server based upon its functions. Windows SharePoint Services 2.0 and SharePoint Portal Server are included, but at the time of this writing an extension for Office SharePoint Server 2007 was not yet available. By the time you read this, an update to SCW should be available to assist you in securing your Office SharePoint Server 2007 installation.
For more information on the SCW, refer to Microsoft’s Security Configuration Wizard site:
| http://www.microsoft.com/windowsserver2003/technologies/security/configwiz/default.mspx |
- Windows Server 2003 Security Guide
http://www.microsoft.com/technet/security/prodtech/windowsserver2003/w2003hg/sgch00.mspx
- The Center for Internet Security Windows Server 2003 Benchmark
Internet Information Services (IIS) 6.0 has come a long way, security-wise, from its predecessors. First, it is no longer installed in a default Windows Server installation. Windows 2000 Server installed IIS 5.0 by default, which helped in the proliferation of the Code Red and Nimda worms of 2001. The default configuration in IIS 6.0 is very restrictive, in contrast to IIS 5.0’s default of enabling literally everything. Lastly, Microsoft devoted significant focus and resources to security throughout the development of IIS 6.0, in an effort to prevent it from becoming the security nightmare that IIS 5.0 became. This effort has proven to be quite successful; while IIS 5.0 had a long list of serious security vulnerabilities over the years, IIS 6.0 has a pretty solid track record to date.
If you are interested in a more in-depth review of the security changes in IIS 6.0, see this article from SecurityFocus on IIS 6.0 security:
| http://www.securityfocus.com/infocus/1765 |
Since IIS 6.0 was developed with a significant focus on security and comes secure by default, you can move on to the next section, right? Not so fast! There are still a few quick, easy things you can do to ensure your IIS environment is as secure as possible.
Do not install any subcomponents of IIS that are not required for your site to function. Every installed subcomponent is a potential attack vector for an intruder. The less you have installed, the less you need to secure and the fewer possibilities for your system to be compromised. Table 22-1 lists all the available IIS subcomponents and whether they are required for Office SharePoint Server 2007. Table 22-2 lists the sub-components of the World Wide Web Service under IIS.
Table 22-1. IIS subcomponents
|
Component |
Required? |
|---|---|
|
Background Intelligent Transfer Service (BITS) Server Extensions |
No |
|
Common Files |
Yes |
|
File Transfer Protocol (FTP) Service |
No |
|
FrontPage 2002 Server Extensions |
No |
|
Internet Information Services Manager |
Yes |
|
Internet Printing |
No |
|
NNTP Service |
No |
|
SMTP Service |
If site is mail-enabled, yes; otherwise, no |
|
Yes |
If possible, you should put your inetpub directory as well as your Office SharePoint Server installation on a dedicated partition rather than the system partition (generally the C: drive). IIS 5.0 suffered from numerous directory traversal vulnerabilities, as have many web applications. A directory traversal vulnerability allows a user to access files outside the intended web accessible folder (inetpub) by allowing them access to the entire partition where this folder is located. As a high-profile example, a directory traversal vulnerability in IIS 5.0 enabled the Nimda worm to infect IIS servers. A patch to fix this vulnerability was available prior to this worm breaking out and is the appropriate means of mitigating such a risk. However, locating the inetpub folder on a separate partition would have prevented this worm from infecting the server, because it required access to cmd.exe and tftp.exe on the system partition.
There are protections in IIS 6.0 and Windows Server 2003 to avoid directory traversal vulnerabilities and to limit the damage if one were discovered, but this is still a good precaution.
If you need to permit anonymous access to your site,
you should ensure the IUSR_ machinename account
does not have write access anywhere on your server’s filesystem.
- IIS 6.0 Security Best Practices
http://technet2.microsoft.com/WindowsServer/en/Library/ACE052A0-A713-423E8E8C-4BF198F597B81033.mspx
- Security Guidance Center for IIS
- Security in IIS 6.0
http://technet2.microsoft.com/WindowsServer/en/Library/354F4539-982A-418CBFE7-4D5155B83F4A1033.mspx
Hardening your SQL Server installation is another important aspect of Office SharePoint Server security, since all of your site content will be stored in your SQL database. The process of securing SQL Server is well documented by Microsoft and would require lengthy explanation. Rather than duplicating this available content, refer to the Securing Your Database Server chapter from MSDN:
| http://msdn2.microsoft.com/en-us/library/aa302434.aspx |
- SQL Server 2005 Security
http://www.microsoft.com/sql/technologies/security/default.mspx
- 10 Steps to Help Secure SQL Server 2000
https://www.microsoft.com/sql/prodinfo/previousversions/securingsqlserver.mspx
- SQL Server 2000 Security Features and Best Practices
https://www.microsoft.com/technet/prodtechnol/sql/2000/maintain/sp3sec00.mspx
- The Center for Internet Security SQL Server Benchmark
Office SharePoint Server 2007 provides new authentication capabilities not found in past versions of SharePoint Portal Server. Previous SharePoint versions could authenticate only with Windows user accounts, either locally on the server or in an Active Directory domain. Although this is ideal for organizations that have already deployed Active Directory and wish to use SharePoint as an intranet solution, it limited SharePoint’s ability to be used as an extranet or public web site solution because organizations generally don’t want to add accounts to their Active Directory for outside users. Office SharePoint Server 2007 offers a new authentication infrastructure that works inside of ASP.NET. This allows for a wide range of new authentication options.
The out-of-the-box supported authentication capabilities of Office SharePoint Server are LDAP, Microsoft SQL Server, and Active Directory (single domain only). Additional capabilities are available through ASP.NET authentication providers. For further information on ASP.NET authentication providers, refer to the following link:
| http://msdn2.microsoft.com/en-us/library/eeyk640h.aspx |
The Windows authentication provider supports two methods of authenticating users, NTLM and Kerberos.
The default method of Windows authentication in Office SharePoint Server 2007 is NT LAN Manager (NTLM). It offers the best compatibility, as it is compatible with pre-Windows 2000 versions of Windows and requires less configuration. However, it is not the recommended method of authentication because of the benefits of Kerberos.
Kerberos is the preferred method of Windows authentication for sites running all Windows 2000 and newer clients and servers. Kerberos is faster and more secure than NTLM, but requires some planning and configuration to utilize. For more information on implementing Kerberos as your Windows authentication provider, refer to the following site:
| http://www.microsoft.com/windowsserver2003/technologies/security/kerberos/default.mspx |
The forms authentication provider in Office SharePoint Server 2007 enables you to authenticate users to four authentication providers: Microsoft SQL Server, an LDAP server, Active Directory, and Web Single Sign On (SSO) with Active Directory Federation Services. Additional providers can be used, including other database servers such as Oracle, MySQL, and PostgreSQL, as well as files such as Microsoft Access and flat-text or XML files.
SQL Server authentication is commonly used for users outside your organization who do not have accounts in your Active Directory domain. Using this authentication provider enables you to create accounts for outside users without giving them any rights to your Active Directory domain.
The LDAP authentication provider enables you to authenticate users off of an LDAP server. You may use this for external users, or for internal users if your primary directory service is not Active Directory. This also can be used to authenticate your SharePoint users off of a directory hosted by a non-Windows server, including Unix, BSD, Linux, and any other operating system capable of running an LDAP server.
You may wish to utilize forms authentication even when Active Directory is your authentication provider. The most common use of Active Directory forms-based authentication is where internal users need access to a site from outside the organization’s network. It may also be used in combination with other providers to provide Active Directory authentication for your internal users, and as another means of authentication for external users.
Active Directory Federation Services (ADFS) is a new feature in Windows Server 2003 R2 that enables organizations to securely share a user’s identity information across the boundaries of your organization’s network. ADFS allows an organization to utilize its Active Directory infrastructure to provide controlled access to resources, without the security risk and operational challenges of configuring and maintaining trust between the separate Active Directory forests and separate networks.
ADFS can be a secure, convenient solution to allowing employees of business partners to authenticate to your network using their Active Directory credentials on their employer’s network. Tables 22-3 and 22-4 list some resources.
Table 22-3. Active Directory Federation Services (ADFS) resources
|
Resource title |
Resource link |
|---|---|
|
Overview of Active Directory Federation Services (ADFS) in Windows Server 2003 R2 |
http://www.microsoft.com/WindowsServer2003/R2/Identity_Management/ADFSwhitepaper.mspx |
|
Windows Server TechCenter–Active Directory Federation Services |
Table 22-4. Resources with detailed instructions and information related to forms authentication
|
Resource title |
Resource link |
|---|---|
|
Forms Authentication Samples | |
|
http://blogs.msdn.com/harsh/archive/2007/01/10/formsbased-authentication-in-moss.aspx#1464554 | |
|
Plan authentication settings for web applications in Office SharePoint Server | |
|
SharePointSecurity.com—The Definitive Guide to MOSS Pluggable Authentication Providers |
It is possible to use multiple authentication providers on a single SharePoint site. There are numerous steps involved in this process, documented in detail in this post on the official blog of the Microsoft SharePoint Product Group:
| http://blogs.msdn.com/sharepoint/archive/2006/08/16/702010.aspx |
Client certificates can be used in combination with other authentication providers to provide a higher level of security for your site. The use of client certificates requires an individual certificate for every user, which can easily become an implementation headache on sites with more than a few users. You can think of requiring client certificates as a type of two-factor authentication: the user must have her certificate as well as her username and password to access the site.
For information on enabling the use of client certificates with your SharePoint sites, see the following portion of the IIS 6.0 documentation on use of client certificates:
| http://www.microsoft.com/technet/prodtechnol/WindowsServer2003/Library/IIS/096519f4-3079-4571-9d28-8e5d286c5ab9.mspx?mfr=true |
Single Sign On (SSO) functionality in Windows Server enables you to authenticate users through your SharePoint site to content or data on other servers, without the user having to enter his credentials for each resource that is accessed. If your users will be accessing data from backend servers such as Enterprise Resource Planning (ERP) or Customer Relationship Management (CRM), you should implement SSO so they only have to authenticate once. Rather than duplicate information already available, see Microsoft TechNet’s thorough, detailed guide to Configuring Single Sign On:
| http://technet2.microsoft.com/Office/en-us/library/841080ca-3e3b-4dbc-a08143c29c76b3551033.mspx?mfr=true |
Encryption is another important piece of your Office SharePoint Server security strategy that comes into consideration in three primary areas: site encryption, intra-server encryption, and storage encryption.
By default, Office SharePoint Server 2007 does not employ SSL encryption on its sites. Proper use of SSL on your SharePoint sites offers three benefits: confidentiality, integrity, and authentication:
- Confidentiality
You are likely aware of the fact that employing SSL on a site ensures that if the network traffic is intercepted in transit, it is not legible or open to decryption by an unauthorized party. This is important if you maintain sensitive data on your SharePoint site, especially if it is accessible over the Internet.
There are two additional important benefits of using SSL that are less commonly known.
- Integrity
When using SSL, you and the server are both assured that the network traffic received was not modified in transit. Without the use of SSL, it is possible for traffic to be modified in transit, and there is no way for either party to detect the modification.
- Authentication
Authentication, in this sense of the word, does not refer to a username and password. In the case of SSL, authentication means you are assured of the identity of the remote server. The SSL certificate in use on the server identifies the name of the server to which you are connecting. This is important because an attacker could redirect your users to another server and intercept the user’s authentication credentials, among other possibilities.
Employing SSL encryption on your site requires the use of an SSL certificate. An SSL certificate is generated by a Certificate Authority (CA). Web browsers come preinstalled with a list of trusted CAs, which is a list of companies known and trusted to follow specific stringent guidelines in issuing certificates. Two of the well-known CAs are VeriSign and Thawte, though there are more than 40 trusted organizations built into current versions of Mozilla Firefox and Internet Explorer. Large organizations commonly have an internal CA that is trusted by the web browsers on its internal network.
You can also generate your own SSL certificate. However, certificates that are not generated by a trusted CA will cause a certificate warning in the user’s browser. Aside from the user confusion and support calls this is likely to generate, it also provides very little protection. It is possible to perform a man-in-the-middle attack on SSL connections, rendering the previously mentioned protections useless, and tools such as sslmitm are widely available to assist in accomplishing this. If someone is attempting a man-in-the-middle attack on one of your users, it will generate a certificate warning because the attacker will be using a self-generated certificate. If your users are accustomed to seeing certificate warnings when using your site, they will dismiss it as normal and your SSL will be worthless.
Always use a certificate that will not generate warnings in any of your users’ browsers, and educate your users that if they ever see a certificate warning, they should stop what they are doing and call for help immediately. If users outside your organization will access the site, or you do not have a trusted internal CA, you need to purchase a certificate from a trusted CA. SSL certificates are not nearly as costly as they used to be, but some CAs still charge exorbitant prices. Make sure you compare prices between a few trusted CAs before purchasing. If your site is accessible only to internal users and you have an internal trusted CA, you can generate your SSL certificate from that CA.
SSL encryption can be enabled on your site in the Internet Information Services Manager under Administrative Tools. First, you must prepare the certificate request from which a Certificate Authority will generate your certificate.
Preparing your certificate request. Under Web Sites, right-click on the site you wish to protect, and then click Properties. Click the Directory Security tab. Under “Secure communications,” click the “Server Certificate” button. This will bring up the Web Server Certificate Wizard. At the Welcome screen, click Next.
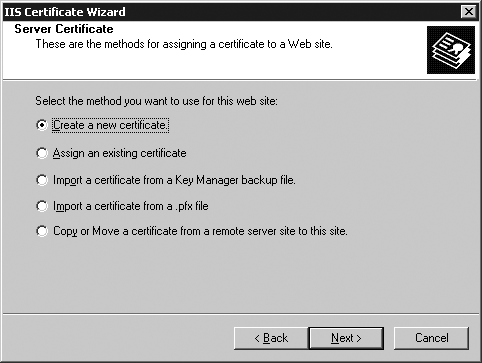
At the next screen, select “Create a new certificate” (Figure 22-3) and click Next.
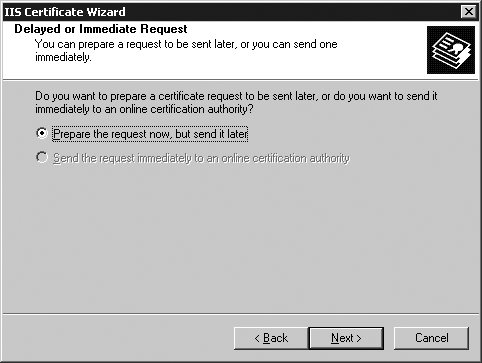
At the “Delayed or Immediate Request” screen, select “Prepare the request now, but send it later” (Figure 22-4) and click Next.
“Name and Security Settings” is the next screen (Figure 22-5). Fill in a name for the certificate (this is cosmetic only; you can leave it at the default), choose a bit length (the default of 1024 is fine), and click Next.

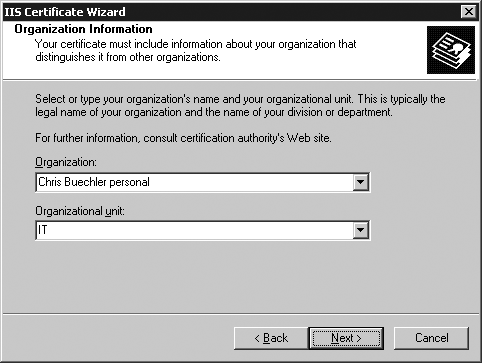
At the Organization Information screen, fill in the name of your organization and your organizational unit (Figure 22-6).
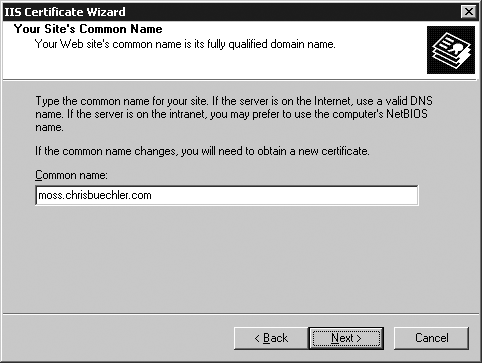
The Common Name screen is next (Figure 22-7). This is very important, because if you enter the wrong common name here, the certificate will always generate security warnings in your users’ browsers. Enter the server name that your users use to connect to your server. If that’s just the server’s NetBIOS name (for example, SHAREPOINT), enter that here. If your users use the Fully Qualified Domain Name (FQDN), enter that here instead (for example, sharepoint.example.com). After filling in the Common Name appropriately, click Next.
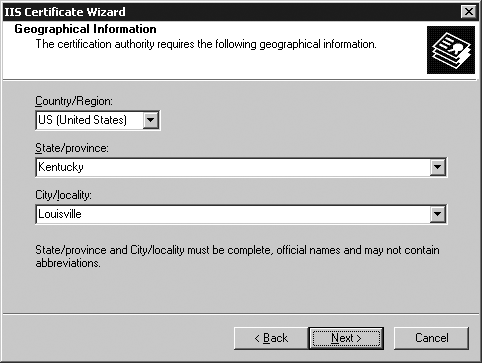
At the Geographical Information screen, fill in your country, state/province, and city/locality (Figure 22-8). Note that these must be the full, official names; no abbreviations may be used.
Next, you will enter the filename to use to store the certificate request (Figure 22-9). Enter a path of your choosing, or accept the default and click Next.
At this point, you will see the Request File Summary screen (Figure 22-10). It will show the information you entered on the previous screens so you can confirm that it has all been entered correctly. After clicking Next, the certificate request will be created.
You have now successfully completed the certificate request wizard. Click Finish to exit it.
You now having a pending certificate request in the web site you selected. If there is a problem with the certificate request you created, you can delete the pending request by clicking the Server Certificate button on the Directory Security tab of the site’s properties page, the same way you initiated the certificate request wizard.

After clicking Next on the initial page of the wizard, you will see the option of deleting the pending request.

Leave the web site properties screen up, as you will be coming back to it as soon as you have your certificate ready for installation.
Obtaining the SSL certificate. Now that you have the certificate request ready, you can obtain the SSL certificate. If you are going to purchase your certificate, I recommend first getting a test certificate from a trusted CA. Numerous CAs provide free test/trial certificates. If you search the Internet for “test SSL certificate,” you will find numerous options.
You can also generate your own SSL certificate (for testing purposes only) with the Certificate Creation Tool available from Microsoft:
| http://msdn2.microsoft.com/en-us/library/bfsktky3(VS.80).aspx |
Once you have your certificate ready for installation, continue to the next section.
Processing the certificate request. Now that you have your certificate, it is time to install it. Click the Server Certificate button again on the Directory Security tab of the properties page of your web site.
Click Next on the Welcome page of the wizard.
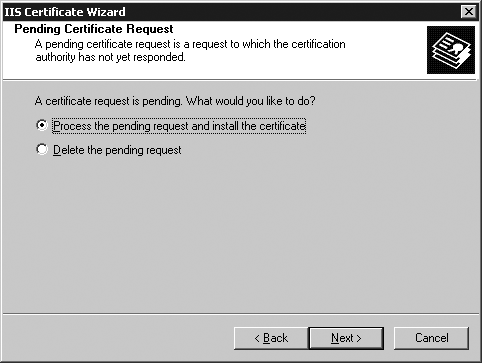
Select “Process the pending request and install the certificate” and click Next (Figure 22-11).
At the next screen, browse to or enter the path and filename of the certificate file you generated or received from the CA, and then click Next (Figure 22-12).
On the SSL Port screen, enter the port this web site should use. In most cases, you will want to accept the default of 443 (Figure 22-13).
The certificate summary screen will now be displayed, summarizing the details of the certificate about to be installed (Figure 22-14). Click Next.
You have now successfully installed the server certificate. Click Finish. Leave the Properties screen open with the Directory Security tab up.
You will now be able to access your site using SSL. By default, SSL is not required, and so you should configure your site to make the use of SSL mandatory. To do so, click the Edit button under “Secure communications” on the Directory Security tab. Check the top checkbox, “Require secure channel (SSL),” and click OK to force users to use SSL when accessing the site.
IPsec is a suite of encryption protocols enabling secure access between hosts and networks. It is commonly used for Internet-based Virtual Private Network (VPN) connections, but it is equally capable of protecting network traffic between two hosts. In environments where protecting intra-server communication is of concern, you will want to consider implementing IPsec between the servers in your farm. This some-what involved process is documented in detail by Microsoft, so rather than duplicating this content, refer to the following URLs:


| http://www.microsoft.com/technet/community/columns/secmgmt/sm121504.mspx |
| http://www.microsoft.com/technet/network/ipsec/default.mspx |

If your servers are storing highly sensitive information, or are located in an environment lacking physical security, you may wish to implement disk encryption. This ensures that if someone physically takes your servers or disks, they cannot access the information they contain.
There are several commercial options for disk encryption, and Microsoft has built encryption functionality into Windows Server 2003 with the Encrypting File System (EFS) functionality. Implementing EFS is a lengthy process, and it is described in detail in the following TechNet article:
| http://www.microsoft.com/technet/prodtechnol/winxppro/deploy/cryptfs.mspx |
There are three levels of administrative rights in Office SharePoint Server 2007: farm/ server, Shared Services Provider (SSP), and site. This granular approach is new to this version of the software. Depending on the segregation of administration responsibilities in your environment, you may wish to configure each of these independently.
Microsoft refers to this level of administrative rights as “tier 1.” This level is usually assigned to your organization’s ITsystem administrators. Those with this level of access rights perform tasks such as managing farm-wide settings and farm topology, creating site collections and new web sites, among other tasks.
Users and groups are assigned this level of access by being a member of the local Administrators group on the farm servers.
Microsoft refers to SSP administrative rights as “tier 2.” This level is commonly assigned to IT administrators in a particular business unit using the SSP, or sometimes will be assigned to the central IT group, depending upon the IT structure of the organization. SSP administrators can manage all the functionality of shared services across a server farm.
Microsoft refers to this level of rights as “tier 3.” Users defined as “site collection administrators” have full control over all web sites in the site collection. This level of access is not always restricted to IT staff. Technically savvy staff in other areas of the organization who will hold responsibilities for managing the site are commonly granted site collection administrative rights.
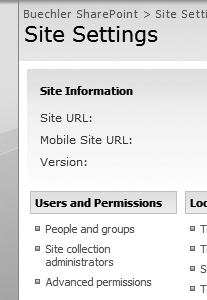
To configure Site collection administrators, click Site Actions anywhere on your site, then Site Settings. Under Users and Permissions, click “Site collection administrators.” Users or groups can be added or removed on this page.
Before delving into details regarding how to assign permissions to your site and the objects within it, let’s review the permissions available, as well as Office SharePoint Server’s groups functionality.
Tip
When assigning permissions, it is important to always use groups. You should never assign any rights to an individual user, even when those rights are unique to that person’s position. Using groups to assign rights—even if initially those groups contain only a single user—is beneficial because it enables you to easily change the person’s level of access if he changes job functions. It also makes it easy to assign those same rights to another person if a similar position is added in the future, and makes it easier to transfer those rights to another user in the case of turnover.
Using groups may require a little more effort and planning up front in some circumstances, but it will almost always save you time and trouble down the road. It also makes it easier to maintain a secure environment.
There are eight levels of permissions available for users and groups in Office SharePoint Server:
These permissions are explained in the following sections. If you are familiar with NTFS filesystem permissions, the available SharePoint permissions are similar, but much more capable.
Full control means exactly what it implies: users with this level of permission can do everything granted by the other permission levels, as well as modify permissions.
The design permission enables users to change the layout of a site, either via a web browser and through Office SharePoint Designer 2007.
The contribute permission allows users to add and change an item or items, depending on the scope of the permission.
The manage hierarchy permission gives users the ability to create sites, edit pages, and list items and documents.
This permission enables users to read the site, page, or other item or items where this permission is granted. This also allows downloading of files available on the site, so they can be used and/or viewed in their native applications.
Restricted read allows users to view pages and documents, but not the rights assigned to those documents. It does not provide the ability to read any previous revisions to those items. This can be useful for things like organization-wide policies and procedures, where you want most users to be able to access only the current accepted version of these items.
View only and read permissions may seem like the same thing, but there is one main difference between the two. If a user has only view-only rights to a file, and a server-side viewer for the file (such as Excel Services) is enabled, the user can only view the file using the server-side viewer and cannot work with the file in its native application. This functionality is not limited to Excel; Word, PowerPoint, and several other file types have server-side viewers.
Limited access permissions are automatically assigned by Office SharePoint Server when you grant a user or group access to an object on your site that is contained in a higher-level object to which the user or group does not have access. This permission level cannot be directly assigned to a user or group.
If none of the built-in permission levels accommodate the rights you need to assign, you can create your own permission levels. These can be modified versions of an existing permission level, or they can be created from scratch.
Except for the full control and limited access permission levels, you can edit all of the other permission levels if the default configuration does not suit the security requirements for your environment. The following document, “Set permissions for publishing,” from Microsoft Office Online, describes the specifics of permission levels, and the process of creating, editing, and deleting permission levels in step-by-step detail:
| http://office.microsoft.com/en-us/sharepointserver/HA101577861033.aspx |
There are four built-in groups in Office SharePoint Server sites: Members, Owners, Visitors, and Viewers. Their associated rights are shown in Table 22-5.
If these do not suit the requirements of your environment, you can modify the default permissions of these groups or create new groups to fit your needs. This is done from the Site Settings page, under the Site Actions menu. On the Site Settings page, click “People and Groups.”
There are six securable object types within SharePoint where you can assign rights to users and/or groups: sites, lists, libraries, folders, documents, and items. The following describes how rights can be assigned at each of these levels to achieve your desired level of security and control over the content of your site.
Site-level permissions provide the basis for access to every other object on your site. They determine who can access the front page of your site and what level of access they have to the site. By default, all content on your site inherits permissions from the site level.
To configure site level permissions, on the front page of your site, click Site Actions, and then Site Settings.
Under "Users and Permissions,” you will see three items: “People and Groups,” “Site collection administrators,” and “Advanced permissions” (Figure 22-15).
People and Groups. After clicking
“People and Groups,” you will see the Quick
Launch list under Groups on the lefthand side of the page (Figure 22-16). The default items in this list are as
follows, where Sitename is the name of your
SharePoint site. These are the default built-in SharePoint groups, as
discussed earlier in this chapter:
SitenameMembersViewers
SitenameVisitorsSitenameOwnersMore…

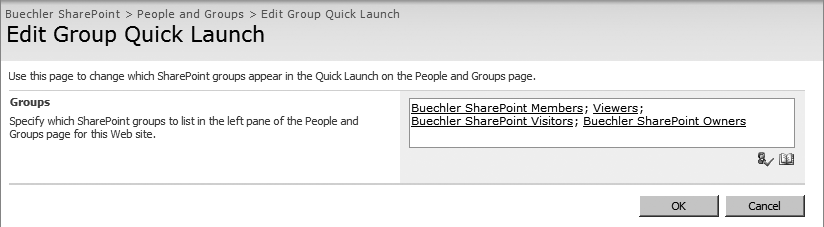
You can configure which items will appear in this Quick Launch list from any page under “People and Groups” by clicking Settings, and then Edit Quick Launch Groups (Figure 22-17).
At this screen you can add or remove groups from the Quick Launch list on the “People and Groups” page (Figure 22-18).
If you remove a group from the Quick Launch list, you can still access it through the “More…” link, which is always available on the Quick Launch list.
Under “Users and Permissions” on the Site Settings page, you will see the Advanced Permissions link. This takes you to a page that lists in detail the users and groups that have been granted permissions on this site, along with the level of access they have been granted. You can add and remove users and groups from the site from this screen, as well as modify their levels of access rights.

To view or edit the permissions of a library, while in the library click Settings, and then Document Library Settings (Figure 22-19).
At the next screen, under “Permissions and Management,” click “Permissions for this library” (Figure 22-20).


At the permissions page, unless the permissions of this library have been previously modified, you will see a message at the top explaining where the existing permissions are coming from: “This library inherits permissions from its parent Web site. To manage permissions directly, click Edit Permissions from the Actions menu.”
For a library that requires differing permissions from its parent web site, click Actions, and then Edit Permissions. You can also manage the permissions of the parent object on the Actions menu.
When you click Edit Permissions on a library that is inheriting permissions from its parent site, you will receive a pop-up warning that you are about to create unique permissions for this library and that changes to the parent site’s permissions will no longer affect this library. Click OK to continue.
Next, you will be looking at the same permissions list as before, except the list now can be edited at this level without affecting permissions at higher levels. If you decide later to revert to inheriting permissions from the parent site, you can do so by clicking Inherit Permissions on the Action menu.
To remove permissions from users or groups, check the user(s) and group(s) for which you want to remove permissions, click Actions, and then select Remove User Permissions (Figure 22-21).
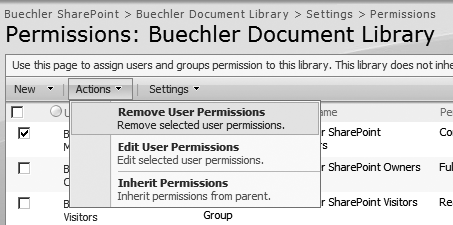
You will be prompted with a pop-up message confirming you want to remove these permissions. Click OK to do so.
You can modify the permissions of listed users or groups by checking the ones you wish to modify, clicking Actions, and then selecting Edit User Permissions (Figure 22-22).

You can check multiple users and groups, but only if you want to assign them all identical permissions.
You can enable or disable access requests for a library by clicking Settings, and then selecting Access Requests on the Permissions page (Figure 22-23).
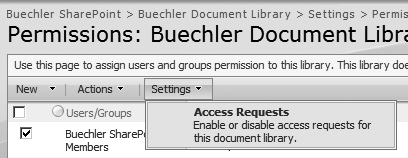
If the checkbox on the Manage Access Requests screen appears dimmed, access requests for this library are disabled.
You can manage folder-level permissions within a library by clicking the drop-down box containing the folder name (without clicking the folder name itself), and then clicking Manage Permissions. By default, all folders inherit permissions from their parent folder or library. The permissions functionality and capabilities are the same as library-level permissions, just at a different scope. Refer back to the library-level permissions section for details on configuring permissions.
You can manage permissions individually at the document level as well. This functionality works the same as the folder-level permissions, so refer back to the previous section for more information.
If your SharePoint site is accessible from the Internet, a great way to provide another layer of security is to use a reverse web proxy. A reverse proxy accepts the HTTP or HTTPS traffic from the Internet, inspects it, and then forwards it on to the actual web server. It can even inspect HTTPS traffic because the SSL certificate resides on the proxy itself. It decrypts and inspects the traffic, and can then re-encrypt it and pass it onto the web server for end-to-end encryption, with application-layer inspection in between.
The ideal choice for reverse proxy with Office SharePoint Server is Microsoft Internet Security and Acceleration (ISA) Server. With ISA Server, users can first be forced to authenticate successfully to Active Directory via web form authentication, prior to any traffic passing through ISA Server to the Office SharePoint Server. This provides the benefit of not allowing traffic from the Internet to touch your SharePoint Server until after the user authenticates.
The following TechNet article describes this involved process in detail. Though it focuses on Windows SharePoint Services, it will work the same with Office SharePoint Server:
| http://www.microsoft.com/technet/isa/2004/plan/isawss.mspx |
When discussing antivirus and SharePoint, there are two types of antivirus protection that come into consideration. First is the usual file-level server antivirus software. Second, because data in your SharePoint site is stored in a SQL Server database rather than in a typical filesystem hierarchy, file server antivirus does not protect you from infected content on your SharePoint site. Microsoft has built a virus scanning API (VSAPI) into SharePoint to allow for easy integration with various antivirus software packages that are specifically designed for Office SharePoint Server. Your preferred antivirus vendor likely has a solution specific to SharePoint that ties into the VSAPI. In order to scan files added to your SharePoint site for viruses, you must have a SharePoint VSAPI antivirus solution.
Whether or not to install file-level antivirus on any of your SharePoint servers typically comes down to corporate policy. Corporate policy usually requires antivirus software on all Windows systems, including all servers, desktop machines, and lap-tops. The conventional wisdom is to install file-level antivirus on every machine; however, depending on your environment, the conventional wisdom may not be so wise.
Antivirus software shouldn’t be looked at as strictly a means of protection; vulnerabilities in antivirus software have been somewhat common as of late, and antivirus is becoming more routinely used as an attack vector. In November 2006, a worm exploiting a vulnerability in Symantec Corporate Edition antivirus products spread across the Internet to a limited number of machines. The flaw was patched six months prior, so up-to-date versions were not vulnerable. This is not the first such case and is not limited to Symantec. Almost every major antivirus and security software vendor has been affected by significant vulnerabilities. The Witty worm in March 2004 is the best-known case. It exploited an unpublished vulnerability in Internet Security Systems firewall software, and spread quickly. It was also highly destructive, overwriting random sectors of the hard drive on the infected systems.
Your Office SharePoint Servers should not have any need to access the Internet directly, even those that are accessible from the Internet, because servers can be Internet-accessible without being able to initiate connections out to the Internet. Updates should come from an internal update server, such as WSUS, and any other required downloads on servers should be downloaded on a workstation and then copied over the network. Updates should always be installed promptly. With no direct Internet access and promptly applied updates, it is extremely unlikely that your server will ever detect a virus, worm, or other malware in its lifetime. Based on past history, it’s almost a certainty that your antivirus software will have some sort of significant security issue within the server’s lifetime.
You will have to determine what is most appropriate in your environment, depending on your organization’s security policy and other internal factors. Just keep in mind that antivirus all by itself doesn’t guarantee secure systems.
The necessity of SharePoint VSAPI antivirus depends on the type of deployment you are planning. If you are planning an externally accessible site where users outside your organization can upload content, a SharePoint antivirus solution should be considered a must, since files coming from computers over which you have no control will be held on your servers and available to internal users and possibly other external users.
If you are hosting an internal-only site and are confident in your client antivirus protection, SharePoint antivirus may be viewed as either a desired additional layer of protection (with the potential for additional server vulnerabilities) or an unnecessary expense.
Given some of the preceding statements on antivirus, I don’t want anyone to be under the impression that I am advocating abandoning the use of antivirus. That’s far from the case. I just want you to realize that antivirus software is not a surefire means of protection, and in some situations has the potential to cause more harm than good.
The following briefly reviews a few additional security-related items you should keep in mind while designing a security strategy for your Office SharePoint Server deployment.
If the network of your SharePoint servers is not properly protected, all the security mechanisms you have in place on your servers and in Office SharePoint Server itself could potentially be subverted. When referring to “network security” in this section, the referenced topics are routers, switches, and firewalls.
Most Office SharePoint Server administrators probably have no control or influence over the network itself. General network security concerns need to be addressed, but are outside the scope of this book, and probably outside the job duties of most Office SharePoint Server administrators.
Your primary network security concern relevant to Office SharePoint Server is the network topology for publicly accessible and team or department sites, as covered earlier in this chapter.
The following MSDN chapter covers network security, including routers, switches, and firewalls, as it applies to protecting web applications:
| http://msdn.microsoft.com/library/default.asp?url=/library/en-us/dnnetsec/html/THCMCh15.asp |
Physical security is another critical component of your overall Office SharePoint Server security strategy. Unless you properly employ strong encryption on all your disk drives, physical access to a server means it is relatively easy to gain administrative rights on that server and access all of the data on the server. This is even more the case when it is possible to physically remove the server from the premises, or even just remove the hard drives and leave the premises with them.
The list of individuals authorized to enter any of your computer rooms should be as restricted as possible. If at all feasible, some sort of biometric authentication should be used for admission (such as a fingerprint scanner, palm scanner, etc.) in addition to a PIN code. Keys and combination locks are undesirable because they are much more difficult to control, and they do not maintain an audit log.
Make sure the room itself is reasonably protected from unauthorized entry. If rooms adjacent to a raised-floor computer room also have raised floor, ensure the wall goes all the way down below the raised floor so people cannot crawl under the floor. If the facility has a drop ceiling, ensure the wall goes all the way up and doesn’t stop at the ceiling tiles. An intruder could easily get above the raised ceiling in the insecure area, go over the wall, and drop into your computer room through the drop ceiling.
Your organization should require mandatory annual security awareness training for everyone with access to your network. You can do everything right from a technical perspective, but if your users are “vulnerable,” all your efforts could be for naught.
The primary areas of focus for basic user awareness training follow. Your needs may differ, depending on your environment:
Social engineering
Creating strong passwords
Proper password security (don’t write them down or give them to anyone else, etc.)
Phishing and related email security practices
Safe web browsing
To provide an additional layer of security on your servers, you may wish to consider a Host Intrusion Prevention System (HIPS) solution. There are several commercially available options with varying feature sets, but in general they do what their name implies—prevent your server from being compromised, at the host level. This can be better than a network-based Intrusion Prevention System (IPS) because the visibility of some things is better from the host’s perspective. In particular, when utilizing encryption of network traffic, a network-based IPS is nearly useless because it cannot see what the network traffic actually contains. In that situation, a HIPS is important if you want effective intrusion prevention. As with antivirus, remember that security software shouldn’t be looked at as only a helpful measure; this software could also contain vulnerabilities that allow the system to be compromised. Make sure you keep all your security software up to date.
You have diligently hardened all your servers and applications and followed all of the security best practices in setting up your farm and sites—so now what? Without proper maintenance, your secure site will not stay that way for long. If someone asks, “Are we secure?” the correct answer is “Let me check” (unless you know you have security issues, in which case feel free to say “No”). Your site and network may be secure at this moment, but things in security change very rapidly and you could be vulnerable minutes or days after an update.
The foremost security concern of Windows Server and Office SharePoint Server administrators should be patch management. Ensuring that security patches for Windows Server, Office SharePoint Server, Microsoft SQL Server, etc. are applied to every server in a prompt fashion will go a long way toward keeping your Office SharePoint Server environment secure.
You should implement a patch management solution to ensure patching is done on a timely and consistent basis. Microsoft offers solutions such as Windows Server Update Services (WSUS) and Microsoft Systems Management Server (SMS), and there are other solutions that handle patch management (among other things) are also available from third-party vendors for a fee.
For further information on WSUS, visit the following URL:
| http://www.microsoft.com/windowsserversystem/updateservices |
You should perform periodic basic vulnerability assessments against all servers that are a part of your farm. A vulnerability assessment can be defined as the process of identifying and quantifying vulnerabilities in a system. A more widely recognized term is "penetration testing.” Though penetration testing and vulnerability assessment are not the same thing, when most people speak of penetration testing what they really want is a vulnerability assessment (see the link to “Penetration Testing versus Vulnerability Assessment” in Table 22-6 for further information).
A basic vulnerability assessment normally consists of running security scanning tools against your servers, which check for things such as vulnerable services or applications, missing patches, weak configurations, and other deviations from generally accepted security best practices. You can perform this basic level of assessment on your own, without a significant security background. Prior to initiating any security testing, it is critically important to have explicit permission in writing from your organization to do so. Attempting to bypass security measures on your network without appropriate prior consent could be grounds for termination of employment or, worse, could land you in jail on computer crime charges.
The Microsoft Baseline Security Analyzer (MBSA), offered by Microsoft as a free download, makes it easy to perform a limited vulnerability assessment without possessing much, if any, security knowledge. You can use MBSA to scan a single server, an IP address range, or an Active Directory domain. You need to run MBSA using an account with administrative privileges on all systems being scanned.
At the end of the scan, MBSA will provide a report on each system detailing the current security posture of the target. Specific actionable items are provided to help you remediate the issues discovered. After you fix the problems found the first time, you should run a second scan to check that everything was properly addressed. Repeat this process until the report comes back clean, or the issues discovered cannot be addressed in your environment for some reason and are deemed an acceptable risk by management.
There is much more to a true vulnerability assessment than what we just covered, and far more than can be covered in this book. If you do not employ security experts internally who are qualified to perform a complete vulnerability assessment, your organization should consider bringing in outside security experts to perform an assessment on an annual basis.
Be careful in selecting a company or individual to perform this work. Many security consultants will do nothing more than run a few tools (such as MBSA) and then simply hand you either a CD of the results or a huge binder with the results printed out, along with a big bill. A qualified security professional will analyze those results, compare results between multiple tools, and determine where to look closer for potential weaknesses that a scanning tool cannot find, along with other things that vary depending on the environment. Following the assessment, a report with specific verified findings you can actually use to improve your security posture should be provided.
Table 22-6 lists some relevant resources for further information on the topics covered in this section.
Table 22-6. Security tool resources
|
Resource title |
Resource link |
|---|---|
|
Microsoft Baseline Security Analyzer |
http://www.microsoft.com/technet/security/tools/mbsahome.mspx |
|
Penetration Testing versus Vulnerability Assessment |
http://www.darknet.org.uk/2006/04/penetration-testing-vs-vulnerability-assessment/ |
|
Open Source Security Testing Methodology Manual |
This chapter covered a wide breadth of topics, much of which cannot be covered in detail in this book. Covering all the linked topics would require a chapter the length of this entire book, and so rather than duplicating existing content in areas not specific to Office SharePoint Server, numerous links have been provided because good step-by-step documentation already exists for these areas. For example, areas such as Windows Server and SQL Server security were not covered in great depth, so things specific to SharePoint security could be covered in more depth.
With the information and references provided in this chapter, you should have no problem implementing and maintaining a secure Office SharePoint Server environment. However, do not overlook the linked resources provided; an effective Office SharePoint Server security strategy and implementation depends on the knowledge provided in those links.