Creating a parameter is similar to creating a calculated field.
There are multiple ways to create a parameter in Tableau:
- Use the drop-down menu next to Dimensions in the data pane.
- Right-click on an empty area in the data pane and select Create Parameter Field.
- Use the drop-down menu on a field, set, or parameter in the data pane and select Create | Parameter...
In the last case, Tableau will create a parameter with a list of potential values based on the domain (distinct values) of the field. For fields in the data pane that are discrete (blue) by default, Tableau will create a parameter with a list of values matching the discrete values of the field. For fields in the data pane that are continuous (green), Tableau will create a parameter with a range set to the minimum and maximum values of the field present in the data.
When you first create a parameter (or subsequently edit an existing parameter), Tableau will present an interface, as shown:

The interface contains the following features:
- The Name will show as the default title for parameter controls and will also be the reference in calculations. You can also add a Comment to describe the use of the parameter.
- The Data type defines the type of data that is allowed for the value of the parameter. The options include integer, float (floating point decimal), string, Boolean, date, or date with time.
- The Current value defines what the initial default value of the parameter will be. Changing this value in this screen or on a dashboard or visualization where the parameter control is shown will change the current value.
- The Display format defines how the values will be displayed. For example, you might want to show an integer value as a dollar amount, a decimal as a percentage, or display a date in a specific format.
- The Allowable values option gives us the ability to restrict the scope of values that are permissible. There are three options for Allowable Values:
- All allows any input from the user that matches the data type of the parameter.
- List allows us to define a list of values from which the user must select a single option. The list can be entered manually, pasted from the clipboard, or loaded from a dimension of the same data type. Adding from a field is a one-time operation. If the data changes and new values are added, they will not appear automatically in the parameter list.
- Range allows us to define a range of possible values, including an optional upper and lower-limit as well as a step size. This can also be set from a field or another parameter.
- In the preceding screenshot, the List of values allows us to enter all possible values. In this example, a list of three items has been entered. Note that the value must match the data type, but the display value can be any string value. This list is static and must be manually updated. Even if you base the parameter on the values present in a field, the list will not change, even if new values appear in the data. You can drag and drop values in the list to record the list.
- With allowable values of List or Range, you'll get a series of buttons that allow you to obtain the list of values or range from various sources. Add from Parameter copies the list of values or range from an existing parameter; Add from Field copies the list of distinct values or range from a field in the data; Paste from Clipboard creates the list of values from the anything you have copied to the system clipboard. Clear All will clear the list of values.
- Click OK to save changes to the parameter or Cancel to revert.
When the parameter is created, it appears in the data pane under the Parameters section. The drop-down menu for a parameter reveals an option to Show Parameter Control, which adds the parameter control to the view. The little drop-down caret in the upper-right corner of the parameter control reveals a menu for customizing the appearance and behavior of the parameter control. Here is the parameter control, shown as a Single Value List, for the parameter created previously:
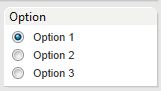
This control can be shown on any sheet or dashboard and allows the end-user to select a single value. When the value is changed, any calculations, filters, sets, or bins that use the parameter will be re-evaluated and any views that are affected will be redrawn.