
Chapter 23. Using Site Maps
In This Chapter
• Using the SiteMapDataSource Control
• Advanced Site Map Configuration
• Creating Custom Site Map Providers
• Generating a Google SiteMap File
• Summary
This chapter jumps into the details of Site Maps. First, you learn how to use the SiteMapDataSource control to represent a Site Map on a page. For example, you learn how to use the SiteMapDataSource control to display a list of all the pages contained in a folder.
Next, you explore the SiteMap and SiteMapNode classes. You learn how to create new Site Map nodes dynamically. You also learn how to programmatically retrieve Site Map nodes and display the properties of a node in a page.
This chapter also examines several advanced features of Site Maps. For example, you learn how to show different Site Maps to different users depending on their roles. You also learn how you can extend Site Maps with custom attributes.
You also learn how to create custom Site Map providers. The first custom Site Map provider—the AutoSiteMapProvider—automatically builds a Site Map based on the folder and page structure of your website. The second custom Site Map provider—the SqlSiteMapProvider—enables you to store a Site Map in a Microsoft SQL Server database table.
Finally, you learn how to generate Google SiteMaps from ASP.NET Site Maps automatically. You can use a Google SiteMap to improve the way that your website is indexed by the Google search engine.
Using the SiteMapDataSource Control
The SiteMapDataSource control enables you to represent a Site Map declaratively in a page. You can bind navigation controls such as the TreeView and Menu controls to a SiteMapDataSource control. You also can bind other controls such as the GridView or DropDownList control to a SiteMapDataSource control.
Imagine, for example, that your website contains the Web.sitemap file in Listing 23.1. Because the default SiteMapProvider is the XmlSiteMapProvider, the SiteMapDataSource control automatically represents the contents of this XML file.
Note
The code samples in this section are located in the SiteMaps application on the website for this book.
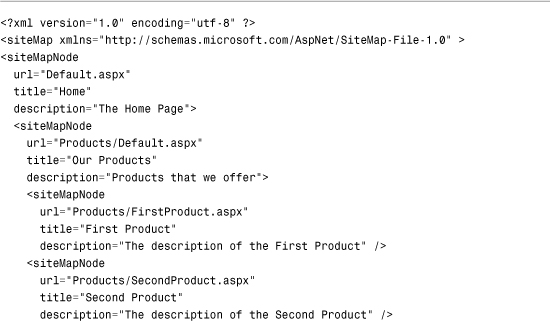
Listing 23.1. Web.sitemap

The Site Map file in Listing 23.1 represents a website with the following folder and page structure:
Default.aspx
Products
FirstProduct.aspx
SecondProduct.aspx
Services
FirstService.aspx
SecondService.aspx
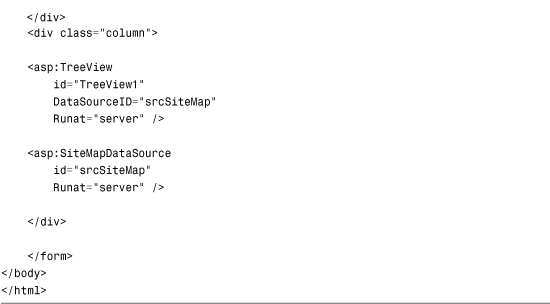
The page in Listing 23.2 illustrates how you can represent a Site Map by binding a TreeView control to the SiteMapDataSource control.
Listing 23.2. Default.aspx

When you open the page in Listing 23.2, all the elements from the Web.sitemap file display in the TreeView control with the help of the SiteMapDataSource control (see Figure 23.1).
Figure 23.1. Displaying a Site Map with a TreeView control.

Setting SiteMapDataSource Properties
The SiteMapDataSource control includes several valuable properties that you can set to modify the nodes that the control returns:
• ShowStartingNode—Enables you to hide the starting node.
• StartFromCurrentNode—Enables you to return all nodes starting from the current node.
• StartingNodeOffset—Enables you to specify a positive or negative offset from the current node.
• StartingNodeUrl—Enables you to return all nodes, starting at a node associated with a specified URL.
The most useful of these properties is the ShowStartingNode property. Normally, when you display a list of nodes with a Menu or TreeView control, you do not want to display the starting node (the link to the home page). The page in Listing 23.3 illustrates how you can bind a Menu control to a SiteMapDataSource that has the value False assigned to its ShowStartingNode property.
Listing 23.3. Services/Default.aspx


When you open the page in Listing 23.3, only the second-level nodes and descendent nodes display (see Figure 23.2).
Figure 23.2. Hiding the starting node.

The StartFromCurrentNode property is useful when you want to display a list of all nodes below the current node. For example, the page in Listing 23.4 is the Default.aspx page contained in the Products folder. It displays a list of all the product pages contained in the folder.
Listing 23.4. Products/Default.aspx

The page in Listing 23.4 contains a BulletedList control bound to a SiteMapDataSource control. Because the SiteMapDataSource control has its StartFromCurrentNode property set to the value True and its ShowStartingNode property set to the value False, all immediate child nodes of the current node display (see Figure 23.3).
Figure 23.3. Displaying the contents of a folder.

Using the SiteMap Class
Under the covers, the SiteMapDataSource control represents the contents of the SiteMap class. The SiteMap class represents an application’s Site Map regardless of whether the Site Map is stored in an XML file, a database, or some other data source. The class is a memory-resident representation of Site Map data.
All the properties exposed by the SiteMap class are shared (static) properties:
• CurrentNode—Enables you to retrieve the SiteMapNode that corresponds to the current page.
• Enabled—Enables you to determine whether the Site Map is enabled.
• Provider—Enables you to retrieve the default SiteMapProvider.
• Providers—Enables you to retrieve all the configured SiteMapProviders.
• RootNode—Enables you to retrieve the root SiteMapNode.
The CurrentNode and RootNode properties return a SiteMapNode object. Because a Site Map can contain only one root node, and the root node contains all the other nodes as children, the RootNode property enables you to iterate through all the nodes in a Site Map.
The Provider property returns the default SiteMapProvider. You can use this property to access all the properties and methods of the SiteMapProvider class, such as the FindSiteMapNode() and GetParentNode() methods.
The SiteMap class also supports a single event:
• SiteMapResolve—Raised when the current node is accessed.
You can handle this event to modify the node returned when the current node is retrieved. For example, the Global.asax file in Listing 23.5 automatically adds a new node when the current page does not include a node in the Site Map.
Listing 23.5. Global.asax
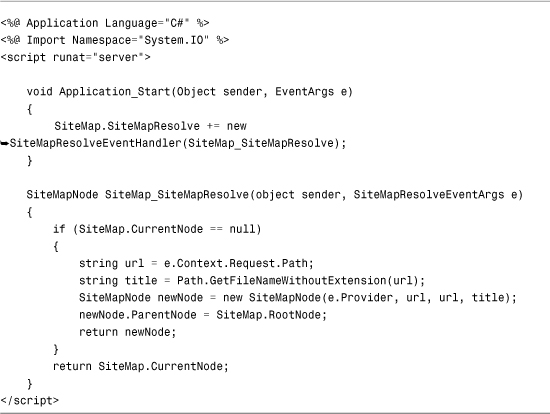
The Application_Start() event handler in Listing 23.5 executes only once when the application first starts. The handler adds a SiteMapResolve event handler to the SiteMap class.
Whenever any control retrieves the current node, the SiteMap_SiteMapResolve() method executes. If there is no node that corresponds to a page, the method creates a new node and returns it.
The About.aspx page in Listing 23.6 is not included in the Web.sitemap file; however, this page includes a SiteMapPath control. The SiteMapPath control works correctly because the About.aspx page is dynamically added to the Site Map when you access the page (see Figure 23.4).
Figure 23.4. Adding nodes to a Site Map dynamically.
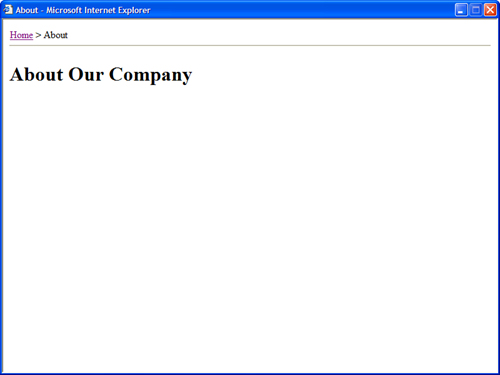
Listing 23.6. About.aspx

Using the SiteMapNode Class
All pages and folders in a Site Map are represented by instances of the SiteMapNode class. The SiteMapNode class contains the following properties:
• ChildNodes—Returns the child nodes of the current node.
• Description—Returns the description of the current node.
• HasChildNodes—Returns True when the current node has child nodes.
• Item—Returns a custom attribute (or resource string).
• Key—Returns a unique identifier for the current node.
• NextSibling—Returns the next sibling of the current node.
• ParentNode—Returns the parent node of the current node.
• PreviousSibling—Returns the previous sibling of the current node.
• Provider—Returns the SiteMapProvider associated with the current node.
• ReadOnly—Returns true when a node is read-only.
• ResourceKey—Returns the resource key associated with the current node (enables localization).
• Roles—Returns the user roles associated with the current node.
• RootNode—Returns the Site Map root node.
• Title—Returns the title associated with the current node.
• Url—Returns the URL associated with the current node.
The SiteMapNode class also supports the following methods:
• Clone()—Returns a clone of the current node.
• GetAllNodes()—Returns all descendent nodes of the current node.
• GetDataSourceView()—Returns a SiteMapDataSourceView object.
• GetHierarchicalDataSourceView()—Returns a SiteMapHierarchicalDataSourceView.
• IsAccessibleToUser()—Returns True when the current user has permissions to view the current node.
• IsDescendantOf()—Returns True when the current node is a descendant of a particular node.
By taking advantage of the SiteMap and SiteMapNode classes, you can work directly with Site Maps in a page. For example, imagine that you want to display the value of the SiteMapNode title attribute in both the browser’s title bar and in the body of the page. Listing 23.7 demonstrates how you can retrieve the value of the Title property associated with the current page programmatically.
Listing 23.7. Products/FirstProduct.aspx

When you open the page in Listing 23.7, the Page_Load() event handler grabs the current SiteMapNode and modifies the Page Title property. The handler also assigns the value of the Title property to a Literal control contained in the body of the page. Finally, the value of the SiteMapNode’s Description property is assigned to a Label control (see Figure 23.5).
Figure 23.5. Retrieving Site Map node properties.

Note
It would make sense to place the code in Listing 23.7 in a Master Page. To learn more about Master Pages, see Chapter 5, “Designing Websites with Master Pages.”
Advanced Site Map Configuration
This section explores several advanced features of Site Maps. For example, you learn how to display different SiteMap nodes, depending on the roles associated with the current user. You also learn how to create multiple Site Maps for a single application. Finally, you learn how you can extend Site Maps with custom attributes.
Using Security Trimming
You might want to display different navigation links to different users, depending on their roles. For example, if a user is a member of the Administrators role, you might want to display links to pages for administrating the website. However, you might want to hide these links from other users.
To display different links to different users depending on their roles, you must enable a feature of Site Maps named Security Trimming. This feature is disabled by default. The web configuration file in Listing 23.8 enables Security Trimming.
Listing 23.8. Web.Config

The configuration file in Listing 23.8 includes a <siteMap> element that configures a new SiteMapProvider named MySiteMapProvider. The new provider enables Security Trimming with its securityTrimmingEnabled property.
After you enable Security Trimming, any pages a user is not allowed to view are automatically hidden. For example, imagine that your website includes a folder named Admin that contains the web configuration file in Listing 23.9.
Listing 23.9. Web.Config
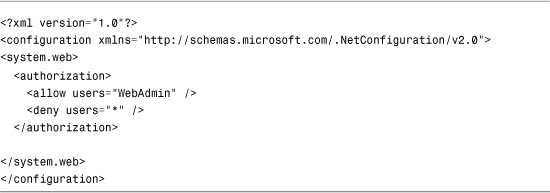
The configuration file in Listing 23.9 prevents anyone who is not a member of the WebAdmin role from viewing pages in the same folder (and below) as the configuration file. Even if the Web.sitemap file includes nodes that represent pages in the Admin folder, the links don’t appear for anyone except members of the WebAdmin role.
Another option is to explicitly associate roles with nodes in a Site Map. This is useful in two situations. First, if your website contains links to another website, you can hide or display these links based on the user role. Second, if you explicitly associate roles with pages, you hide page links even when a user has permission to view a page.
The Web.sitemap file in Listing 23.10 contains links to the Microsoft, Google, and Yahoo websites. A different set of roles is associated with each link.
Listing 23.10. Web.sitemap

The page in Listing 23.11 enables you to add yourself and remove yourself from different roles. Different links appear in the TreeView control, depending on which roles you select.
Listing 23.11. ShowSecurityTrimming.aspx

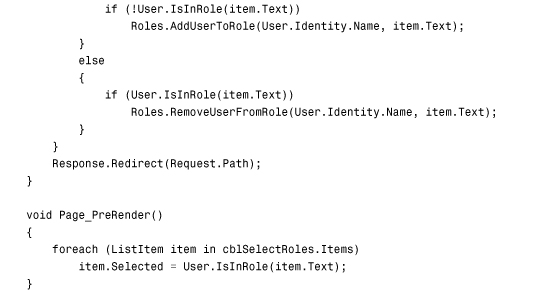


When you first open the page in Listing 23.11, the Page_Load() handler creates three roles—RoleA, RoleB, and RoleC—and adds the current user to each role.
The CheckBoxList control in the body of the page enables you to select the roles that you want to join. Different links to external websites appear, depending on which roles you select (see Figure 23.6).
Figure 23.6. Hiding Site Map nodes by user role.

Merging Multiple Site Maps
To make it easier to manage a large application, you can store Site Maps in more than one location and merge the Site Maps at runtime. For example, if you use the default SiteMapProvider—the XmlSiteMapProvider—you can create multiple sitemap files that describe the navigation structure of different sections of your website.
For example, the Web.sitemap file in Listing 23.12 includes a node that points to another sitemap file.
Listing 23.12. Web.sitemap
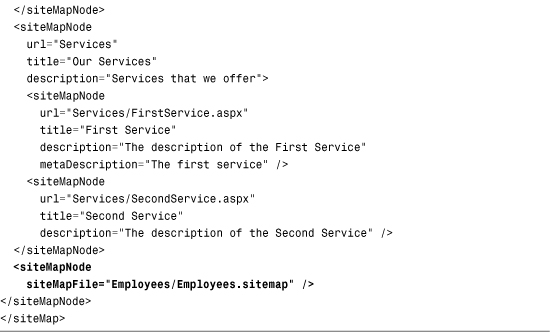
The sitemap in Listing 23.12 includes the following node:
<siteMapNode siteMapFile="Employees/Employees.sitemap" />
This node includes a siteMapFile attribute that points to a sitemap located in the Employees subdirectory of the current application. The contents of the Employees.sitemap are automatically merged with the default Web.sitemap.
The Employees.sitemap is contained in Listing 23.13.
Listing 23.13. Employees/Employees.sitemap

There is nothing special about the sitemap in Listing 23.13. It contains a description of the two pages in the Employees subdirectory.
This is a great feature for working with large websites. Each section of the website can be managed by a different developer. When the website is accessed by a user, the contents of the different sitemaps are seamlessly stitched together.
Note
You also can associate different SiteMapProviders with different nodes in a sitemap file by taking advantage of the provider attribute. For example, a Site Map might be stored in a database table for one section of your website and stored in an XML file for another section of your website.
Creating Custom Site Map Attributes
You can extend a Site Map with your own custom attributes. You can use a custom attribute to represent any type of information that you want.
For example, imagine that you want to associate <meta> Description tags with each page in your web application to make it easier for search engines to index your website. In that case, you can add a metaDescription attribute to the nodes in a Web.sitemap file.
The Web.sitemap file in Listing 23.14 includes metaDescription attributes for the two Services pages.
Listing 23.14. Web.sitemap


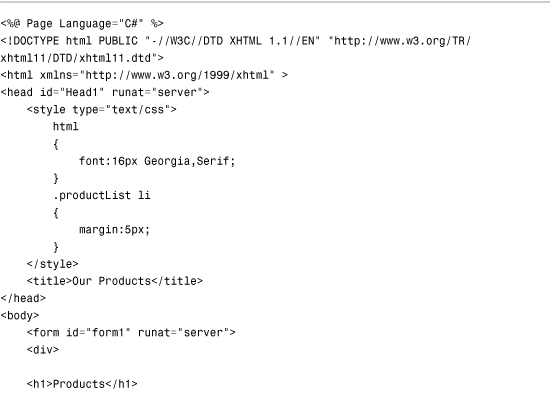
Any custom attributes that you add to a Site Map are exposed by instances of the SiteMapNode class. For example, the page in Listing 23.15 retrieves the value of the metaDescription attribute from the current node and displays the value in an actual <meta> tag.
Listing 23.15. Services/FirstService.aspx

After you open the page in Listing 23.15 in a web browser, you can select View, Source to see the <meta> tag added to the source of the page (see Figure 23.7).
Figure 23.7. Extending a Site Map with a <meta> tag.

It is important to emphasize that you can do anything you want with custom SiteMapNode attributes. You can represent page titles, section titles, product icons, or anything else with a custom attribute.
Creating Custom Site Map Providers
Site Maps use the provider model. This means that you can easily modify or extend the way Site Maps work by creating your own Site Map provider.
In this section, we create two custom Site Map providers. First, we create the AutoSiteMapProvider. This provider automatically builds a Site Map based on the file and folder structure of a website.
Next, we create a SqlSiteMapProvider. This provider enables you to store a Site Map in a Microsoft SQL Server database table instead of an XML file.
Creating the AutoSiteMapProvider
All Site Map providers inherit from the base SiteMapProvider class. If you want to create your own Site Map provider, you can override the methods of this base class.
However, in most cases it makes more sense to derive a custom Site Map provider from the base StaticSiteMapProvider class. This is the base class for the default Site Map provider—the XmlSiteMapProvider—and this class includes default implementations of many of the SiteMapProvider methods.
This AutoSiteMapProvider derives from the StaticSiteMapProvider class. It overrides two methods of the base class: GetRootNodeCore() and BuildSiteMap().
The GetRootNodeCore() method returns the root node of the Site Map. The BuildSiteMap() method is the method actually responsible for building the Site Map.
The AutoSiteMapProvider is contained in Listing 23.16.
Listing 23.16. App_Code/AutoSiteMapProvider.cs


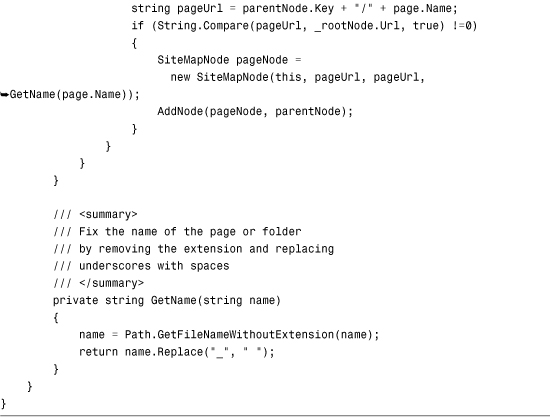
Almost all the work in Listing 23.16 happens in the BuildSiteMap() method. This method recursively iterates through all the folders and pages in the current web application creating SiteMapNodes. When the method completes its work, a Site Map that reflects the folder and page structure of the website is created.
You should notice two special aspects of the code in Listing 23.16. First, file dependencies are created for each folder. If you add a new folder or page to your website, the BuildSiteMap() method is automatically called the next time you request a page.
Second, the constructor for the AutoSiteMapProvider class creates a list of excluded files. For example, this list includes the App_Code and Bin folders. You do not want these files to appear in a Site Map. If there are other special files that you want to hide, you need to add the filenames to the list of excluded files in the constructor.
After you create the AutoSiteMapProvider class, you need to configure your application to use the custom Site Map provider. You can use the configuration file in Listing 23.17 to enable the AutoSiteMapProvider.
Listing 23.17. Web.Config

The configuration file in Listing 23.17 configures the AutoSiteMapProvider as the application’s default provider.
You can try out the AutoSiteMapProvider by requesting the Default.aspx page from the AutoSiteMapProviderApp Web application contained in the source code on the book’s website. This application does not include a Web.sitemap file. The Site Map is automatically generated from the structure of the website (see Figure 23.8).
Figure 23.8. Displaying an automatically generated Site Map.

Creating the SqlSiteMapProvider
For certain applications it makes more sense to store a Site Map in a database table than an XML file. In this section, you can see the creation of the SqlSiteMapProvider, which stores a Site Map in a Microsoft SQL Server database.
To use the SqlSiteMapProvider class, you must create a SQL database table named SiteMap. Furthermore, the SiteMap database table must look like this:

Each row in the SiteMap table represents a particular Site Map node. The relationship between the nodes is represented by the ParentId column. The row that represents the root node has a ParentId column with the value null. Every other row is either a child of the root node or the child of some other node.
The code for the SqlSiteMapProvider is contained in Listing 23.18.
Listing 23.18. App_CodeSqlSiteMapProvider.cs


Like the custom Site Map provider that was created in the previous section, the SqlSiteMapProvider derives from the base StaticSiteMapProvider class. The SqlSiteMapProvider class overrides three methods of the base class: Initialize(), GetRootNodeCore(), and BuildSiteMap().
The Initialize() method retrieves a database connection string from the web configuration file. If a database connection string cannot be retrieved, the method throws a big, fat exception.
Almost all the work happens in the BuildSiteMap() method. This method loads the contents of the SiteMap database table into an ADO.NET DataTable. Next, it recursively builds the Site Map nodes from the DataTable.
There is one special aspect of the code in Listing 23.18. It uses a SQL cache dependency to automatically rebuild the Site Map when the contents of the SiteMap database table are changed.
To enable SQL cache dependencies for a database, you must configure the database with either the enableNotifications tool or the aspnet_regsql tool. Use the enableNotifications tool when enabling SQL cache dependencies for a SQL Express database table, and use the aspnet_regsql tool when enabling SQL cache dependencies for the full version of Microsoft SQL Server.
Note
To learn more about configuring SQL cache dependencies, see Chapter 29, “Caching Application Pages and Data.”
To enable SQL cache dependencies for a SQL Express database named SiteMapDB that contains a table named SiteMap, browse to the folder that contains the SiteMapDB.mdf file and execute the following command from a Command Prompt:
enableNotifications "SiteMapDB.mdf" "SiteMap"
You can configure your website to use the SqlSiteMapProvider class with the Web configuration file in Listing 23.19.
Listing 23.19. Web.Config

The configuration file in Listing 23.19 accomplishes several tasks. First, it configures the SqlSiteMapProvider as the default Site Map provider. The provider includes a connectionStringName attribute that points to the connection string for the local SQL Express database named SiteMapDB.
The configuration file also enables SQL cache dependency polling. The application is configured to poll the SiteMapDB database for changes every 5 seconds. In other words, if you make a change to the SiteMap database table, the Site Map is updated to reflect the change within 5 seconds.
You can try out the SqlSiteMapProvider by opening the Default.aspx page included in the SqlSiteMapProviderApp web application on the website that accompanies this book. If you modify the SiteMap database table, the changes are automatically reflected in the Site Map (see Figure 23.9).
Figure 23.9. Displaying a Site Map from a Microsoft SQL database.

Generating a Google SiteMap File
Google provides a free service, named Google SiteMaps, that you can use to monitor and improve the way that Google indexes the pages on your website. For example, you can use Google SiteMaps to discover which Google search queries have returned pages from your website and the ranking of your pages in Google search results. You also can use Google SiteMaps to view any problems that the Google crawler encounters when indexing your site.
You can sign up for Google SiteMaps by visiting the following URL:
http://www.google.com/webmasters/sitemaps
To use Google SiteMaps, you must provide Google with the URL of a Google SiteMap file hosted on your website. The Google SiteMap file is an XML file that contains a list of URLs you want Google to index.
The Google SiteMap XML file has the following format:

The Google SiteMap file contains a simple list of <url> elements that contain <loc> elements representing the location of the URL and <lastmod> elements representing the last modified date of the URL.
Note
The Google SiteMap file also can contain <changefreq> and <priority> elements. The <changefreq> element indicates how frequently a URL changes, and the <priority> element represents the priority of a URL relative to other URLs in your site. These elements are optional and are ignored here.
You can generate a Google SiteMap file automatically from an ASP.NET SiteMap. The HTTP Handler in Listing 23.20 generates a Google SiteMap that conforms to Google’s requirements for a valid SiteMap file.
Listing 23.20. PublicSiteMap.ashx
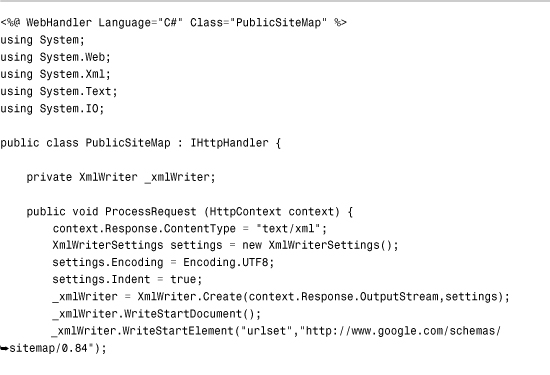
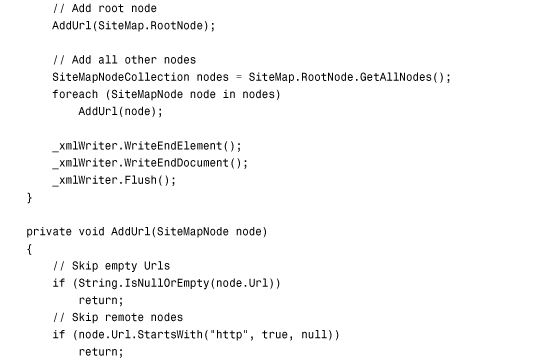


The HTTP Handler in Listing 23.20 generates an XML file by iterating through each of the nodes in an ASP.NET Site Map. The XML file is created with the help of the XmlWriter class. This class generates each of the XML tags.
Note
You can think of an HTTP Handler as a lightweight ASP.NET page. You learn about HTTP Handlers in Chapter 31, “Working with the HTTP Runtime.”
The file in Listing 23.21 contains the XML file returned by the PublicSiteMap.ashx handler when the Handler is called from the sample application contained on the website that accompanies this book. (The file has been abridged to save space.)
Listing 23.21. PublicSiteMap.ashx Results

When you sign up at the Google SiteMaps website, submit the URL of the PublicSiteMap.ashx file when you are asked to enter your SiteMap URL. The Google service retrieves your SiteMap from the handler automatically.
Summary
In this chapter, you learned how to work with Site Maps. The first section discussed the SiteMapDataSource control. You learned how to declaratively represent different sets of nodes in a Site Map with this control.
Next, the SiteMap and SiteMapNode classes were examined. You learned how to create new Site Map nodes dynamically by handling the SiteMapResolve event. You also learned how to programmatically retrieve the current Site Map node in a page.
The next section discussed several advanced features of Site Maps. You learned how to display different Site Map nodes to different users depending on their roles. You also learned how to merge SiteMap files located in different subfolders. Finally, you learned how to extend Site Maps with custom attributes.
We also built two custom Site Map providers. We created an AutoSiteMapProvider that automatically builds a Site Map that reflects the folder and page structure of a website. We also created a SqlSiteMapProvider that stores a Site Map in a Microsoft SQL Server database table.
Finally, you learned how to use ASP.NET Site Maps with Google SiteMaps. In the final section of this chapter, you learned how to create a custom HTTP Handler that converts an ASP.NET Site Map into a Google SiteMap so that you can improve the way that Google indexes your website’s pages.