
Chapter 6
Getting Started: Initial Setup
Even if you already have a Google Analytics account, I recommend that you review this chapter; it contains important considerations for structuring your data. This chapter is all about getting the basics right—creating an account in the right place (stand-alone or linked to AdWords), tagging your pages, becoming familiar with the concept of multiple profiles, and ensuring that you track AdWords visitors and import the concomitant impression and cost data for such visitors. If you are with an agency or hosting provider, you need to bear in mind a couple of additional points, which are described in this chapter.
In Chapter 6, you will learn:
- To create your Google Analytics account and add the tracking code to your pages
- To back up your web traffic data to a local server
- To use profiles in conjunction with accounts
- To use roll-up reporting and collecting data into multiple accounts
- To set up agency client accounts
- To link Google Analytics with Google AdWords, AdSense, Webmaster Tools and Feedburner data
- To track mobile visitors to your site
- To answer common implementation questions
Creating Your Google Analytics Account
Opening a Google Analytics account and performing a base setup is straightforward. An initial setup enables you to receive data that you can use to begin to understand your website traffic. The time required to do this varies depending on your expertise and familiarity with HTML, your website architecture, and the level of access you have to your web pages. Setting up one website can take as little as an hour or as long as a full working day.
However, it is important to manage your expectations. The initial collection of data is only the first step in understanding your visitor traffic. Configuring your Google Analytics account to your specific needs (see Chapter 7, Chapter 8, and Chapter 9) is what will give you the most insight. Nonetheless, collecting the base data first will give you initial information with which you can fine-tune your setup, so it’s important to get the foundations right.
You can open a Google Analytics account in one of two ways. If you have an AdWords account, it makes sense to do it there so that your campaigns can automatically be tracked and cost and impression data imported. Click the Tools And Analysis tab at the top of your AdWords account area, as shown in Figure 6-1a. If you do not have an AdWords account, visit the stand-alone version at www.google.com/analytics and begin the sign up, as shown in Figure 6-1b. These versions of Google Analytics are identical and you can switch between the two. That is, if you manage AdWords, you can still use the stand-alone version.
If you use the stand-alone version, note that the email address you use to create the account is your Google login. A Google login account is a registered email address for a single sign-on for any Google-hosted service. It gives you access to Google Analytics and other Google services such as AdWords, Gmail, Google Groups, personalized search, your personalized home page, and more. If you’ve used any of these services before, you already have a Google login. If you have multiple Google logins, choose the one you most frequently use. That way you will be automatically signed into Google Analytics if you have previously signed in to another Google service.
AdWords Users—a Special Case
If you have a Google AdWords account, it is important to create your Google Analytics account from within the AdWords interface. This enables you to quickly and easily link the two—that is, automatically import your AdWords cost data and be able to log into Google Analytics via your AdWords account interface. You will also be able to log in via the stand-alone interface if you wish.
If you have created a stand-alone Google Analytics account first and then wish to link to your AdWords account, ensure that your AdWords administrator login address is also a Google Analytics administrator. Then when you click the Analytics tab within AdWords, you will be given the option to link your two accounts.
Figure 6-1: Creating a Google Analytics account from (a) within AdWords or (b) via the stand-alone interface

Gmail Addresses Are Not Recommended
You can register and use any email address, such as your company email address, as your single sign-on Google login. It does not have to be a Gmail account. In fact, it is preferable to use your company email address so that users and administrators are easily identified and managed. The only requirement is that the email must belong to an individual and not a mailing list. Further information is available at www.google.com/accounts.
Once you have your Google login, follow the instructions during the Google Analytics sign-up process. Essentially, there is only one page to complete for opening a Google Analytics account, and that involves providing your basic information and agreeing to the Terms of Service. See Figure 6-2.
Figure 6-2: The one-step Google Analytics account creation process

General Account Information
This is straightforward information to provide with only one item I wish to point out—time zone setting (part A of Figure 6-2). If your account is not connected with an AdWords account, you can adjust your time zone setting whenever you wish, on a per-profile basis (a profile is a report set, discussed later in this chapter in “Using Accounts, Web Properties and Profiles”).
However, if your account is connected to AdWords, then the time zone setting of your AdWords account takes precedence and is applied to your entire Google Analytics account—that is, for all profiles and all web properties. Moreover, once set, it is fixed and cannot be changed—either in AdWords or in Google Analytics. Clearly this has important implications if you are managing Google Analytics for international websites where times zones differ.
If this describes your situation, review the section of this chapter titled “Choosing between Roll-up Reporting and Multiple Profiles or Multiple Web Properties.” If you are operating your website and AdWords account in only one time zone, go ahead and set this here.
Configuring Data-Sharing Settings
Within Google Analytics you have the option of sharing your data with Google (part B of Figure 6-2). By default, Share My Google Analytics Data is selected. As you might expect, by sharing your data with Google, there are some benefits for your account. Note that data is shared with Google only—not any third parties. Two sharing options are available:
- With Other Google Products Only
- Anonymously With Google And Others
According to Google, the first option helps improve the products and services it provides your organization. The rationale is that products such as AdWords, AdSense, Ad Planner Publisher Center, and Website Optimizer can be improved and better integrated within Google Analytics if such data is shared. That is certainly a strong incentive if you use any of those products.
If you choose the anonymous data-sharing option, Google will remove all identifiable information about your website and then combine your data with other anonymous sites in comparable industries. Previously Google offered a Benchmarking report so you could compare yourself with other anonymous and aggregated websites in your sector. That report has been removed and replaced with a quarterly benchmarking newsletter.
Unless you operate in a monopoly situation or have only a small number of competitors, I recommend enabling both data-sharing options. You can always opt out of these at a later date.
Note: You are able to opt in or out from data sharing at any time. However, if you opt out, previously shared data is not removed. Google’s position on privacy is discussed in Chapter 3, “Google Analytics Features, Benefits, and Limitations.”
Accepting the Terms of Service
Once you are comfortable with your data sharing options, ensure that you select the correct country or region (the one closest to you) from the drop-down menu of the User Agreement section (part C of Figure 6-2). This ensures that you are shown the correct terms of service that you agree to in order to complete the account-creation process.
Of course, I advise you to read this carefully—it is actually quite easy to read and to the point (not full of legal jargon). An important part of the Google Analytics terms of service to emphasize is item 7 (US version), which covers privacy. At all times you should be aware that you cannot use Google Analytics to collect any personally identifiable information.
The most important part of the sign-up process is the final setup screen, which identifies your unique tag to be placed on all your pages. This is referred to as the Google Analytics Tracking Code (GATC). It is the use of this single tag to collect visitor data—the exact same tag for every page—that makes Google Analytics so easy to install.
Understanding the Google Analytics Tracking Code
The GATC is a snippet of JavaScript that is pasted into your pages. The code is hidden and acts as a beacon for gathering visitor information and sending it to Google Analytics data-collection servers. An example is given in Figure 6-3.
Figure 6-3: Typical GATC to add to your pages

Note: If your Google Analytics account is already set up, you can access the settings shown in Figure 6-3 from your Profile Settings area.
The purpose of the GATC was schematically described in Figure 3-2 in Chapter 3. Here I discuss the code in a little more detail. Essentially, there are three parts:
(A) Your unique account ID, in the form UA-XXXX-XX This is unique for each Google Analytics account and must be used exactly as quoted or your data will be sent to another account. This can happen accidentally (an implementation typo) or deliberately (people injecting their URL into your reports in the hope you will click through and view their advertising). You can use a filter to prevent the latter, and I discuss this in Chapter 8, “Best Practices Configuration Guide.”
(B) The call of the JavaScript routine _trackPageview This is the workhorse of Google Analytics. Essentially, the line _trackPageview collects the URL of the pageview a visitor loads in their browser, including associated parameters such as browser type, language setting, referrer, and time stamp. Cookies are then read and set, and this information is passed back to Google data-collecting servers. The _trackPageview function is discussed in detail in Chapter 7.
(C) The call of a master JavaScript file from Google servers The master file, ga.js, contains the necessary code to conduct data collection. This file is approximately 18 KB in size, although once it is called it is cached by the visitor’s browser and available for all subsequent pageviews. It is also the exact same file for all Google Analytics accounts. Therefore, if your visitor has recently visited another website that also has Google Analytics installed (highly likely), the ga.js file may not be requested at all because it is already present in their cache.
Although this section of the GATC looks verbose, it is simply detecting whether to load ga.js via a standard HTTP web request or via the HTTPS (encrypted) protocol. This autodetection means you do not have to change anything should your visitors access secure areas of your website, for example, to enter credit card details.
You will notice from the JavaScript shown in Figure 6-3 that the GATC is written in asynchronous code. That is, it’s loaded in parallel with your page. When this method is used, load times for the .js file are improved and any latency reduced.
While you can also load the GATC using the standard (traditional) JavaScript convention, that is, in series with your page, the async method allows for improved tracking accuracy. This is because you can safely place the GATC in the <head> part of your HTML without it interfering with the rest of your page loading. For example, should there be a delay in communicating with Google servers, the async code simply waits until it is ready. However, if the standard (non-async) GATC is used, any delay from Google servers would hold up the loading of the rest of your page. You can get around this by placing the standard GATC at the bottom of your pages, but that creates another caveat—visitors who are quick at clicking to another page will not get tracked if the GATC has not loaded. The use of the async GATC avoids these issues altogether.
The _gaq object is what makes the asynchronous syntax possible. It acts as a queue, which is a first-in, first-out data structure that collects API calls until ga.js is ready to execute them. To add something to the queue, the _gaq.push method is used.
The Anatomy of the GATC
Understanding the details of the JavaScript code of the GATC is not required, or necessary—you simply need to know how to communicate with it. However, I include details here for developers who have an interest in such things. If that does not describe you, feel free to ignore this sidebar!
Using the example shown in Figure 6-3, the anatomy of the code is as follows:
var _gaq - gaq || [];
This line creates a JavaScript array. If _gaq is already defined, the script will continue to use that variable; if not, it creates a new array instead.
_gaq.push()['setAccount','UA-XXXXX-X'] ;
_gaq.push()['trackPageview'] ;
While the master file, ga.js, is loading, two commands are pushed (queued) onto the array. The first sets the account ID where your data will be stored. The second captures the page URL being loaded. When ga.js finishes loading, it replaces the array with the _gaq object and executes all the queued commands. Subsequent calls to _gaq.push resolve to this function, which executes commands as they are pushed.
(function () { ....}) ();
This injects a new script element in the document to load ga.js (where all the tracking and communication with Google happens). This code is immediately invoked as the page loads. This is wrapped inside an anonymous function to avoid any namespace conflicts.
Note: The code examples of this book only consider the async version of the GATC.
Notice in Figure 6-3 that there are alternatives to the GATC depending on your requirements: These are shown in the top tabbed menu as Standard, Advanced, and Custom. Essentially, if you have a single domain name that requires tracking (for example, www.mysite.com), the Standard GATC is what you need. The other variations are for when you have a site where visitors can pass between subdomains (for example, www.mysite.com to helpdesk.mysite.com) or third-party domains (for example, www.mysite.com to www.payment-gateway.com). I cover the Advanced and Custom variations in “Customizing the GATC” in Chapter 7, “Advanced Implementation.”
Migrating from urchin.js to ga.js
Prior to December 2007, the file referenced by the GATC was called urchin.js and contained different code from that of ga.js. If you are still using urchin.js, you should migrate to the newer ga.js code. To get your new tracking code, you’ll need to have administrator access to the Google Analytics account. Follow these steps:
1. Log in to your Google Analytics account.
2. For each profile, click the Settings icon.
3. Click the Tracking Code menu tab.
4. Follow the onscreen instructions for adding the new tracking code (ga.js).
Deploying the GATC—Tagging Pages
Next, all that is required is for you to place the GATC on your pages. This is often referred to as page tagging. If you have a relatively small website in terms of number of pages, you can copy and paste the GATC into your HTML. Alternatively, if you have built your website using a template or content management system (CMS), simply add the GATC to your master template or header file. The recommended placement is just above the </head> tag at the top of the page. This will improve tracking accuracy because the ga.js file will be loaded first. Should there be a delay in communication with Google servers (google-analytics.com), the GATC simply waits until it is available. There is no interference with the rest of your page loading.
Once your pages are tagged, you should start to see data in your account within 4 hours. However, for new accounts, it can take up to 24 hours, so be patient at this stage!
An important aspect of the deployment of your GATC is that it must be pasted onto all of your pages. As described in Chapter 2, “Available Methodologies and Their Accuracy,” missing page tags is a common issue that casts doubt over the validity of your data. Apart from incorrect visitor and pageview counting, you may see your own website listed as a referrer, referrer information may be missing altogether (usually overwritten), there may be overly long or short time onsite and time-on-page metrics, unusual values for bounce rates may be shown, and many other peculiarities may be present.
The greater the percentage of missing page tags, the greater the inaccuracy. As a guide, I aim for a minimum of 98 percent deployment of the GATC. That is, 98 percent of all your pages should have the GATC present for you to have confidence in your reports. Less than this requires investigation. Ninety-five percent is acceptable for large sites where a lot of content may not be available to the visitor (previous design, deprecated content waiting to be removed, and the like), though my point is that deployment must be very high. If you have less than 90 percent deployment, then don’t even bother looking at your reports—fix the problem first. Table 6-1 lists available tools that can help you troubleshoot the deployment of your GATC. Other troubleshooting tools are listed in Appendix B, “Useful Tools.”
Table 6-1: Tools to help troubleshoot your GATC deployment
| Tool Name | Comment |
| WASP (Web Analytics Solution Profiler) | A Firefox plug-in that detects the setting of the GATC cookies plus 300 other analytic tools. Works on a page-by-page (free) or site-scanning (paid) basis: www.webanalyticssolutionprofiler.com. |
| ObservePoint | Paid Software as a Service (SaaS) vendor. Detects the setting of the GATC cookies plus Omniture’s cookies. Works as a site-scanning and monitoring/alert tool: www.observepoint.com. |
| Accenture Digital Diagnostics (formerly Maxamine) | Paid Software as a Service (SaaS) vendor. High-end site diagnostic tool: www.accenture.com/Global/Consulting/Marketing_and_Sales_Effectiveness/Digital/Transformation_Suite/AMSDiagnostics.htm. |
Although having a CMS is a more reliable way to insert your GATC, you still need to ensure that it includes all newly created pages—not always taken into account by default—and any pages that do not use your standard template. If you do not have a content management system, there are alternatives for automatically tagging your pages. Two of these are Apache mod_layout and PHP auto_prepend_file.
Mod_layout is a loadable module (similar in principle to a plug-in) for the Apache web server. It can be used to tag your pages as visitors request them. If you use Apache, ask your development team or hosting provider to install the mod_layout loadable module from http://tangent.org. Once the module is implemented, the Apache web server will automatically insert your GATC on every page it serves. Note that this means exactly that, every page served, so you should add exclusions to those files where the GATC is not required, such as robots.txt, cgi-bin files, and so forth.
A full description of mod_layout is beyond the scope of this book, but an example configuration for your httpd.conf file is given in the following snippet. In this example, two file types are ignored (*.cgi and *.txt) and the file contents of utm_GA.html (the GATC content—as per Figure 6-3) are inserted just above the </head> tag of the HTML page being served:
#mod_layout directives
LayoutMergeBeginTag </head>
LayoutIgnoreURI *.cgi
LayoutIgnoreURI *.txt
LayoutHeader /var/www/html/mysite.com/utm_GA.html
LayoutMerge On
Warning: If your pages use the CAPTCHA method (http://en.wikipedia.org/wiki/CAPTCHA) of generating security images to protect your site from automated form submission, test that your security image still loads. If not, you may need to exclude the embedded file that calls the security image from mod_layout.
If your pages are PHP generated (filenames ending in .php), then you can use the auto_prepend_file directive. This specifies the name of a file that is automatically parsed before the main file. The file is included as if it was called with the PHP require() function. The directive can be included in your php.ini configuration file (therefore applied to all files and hosts on your server) or more specifically in an .htaccess file in your website root directory, as follows:
<IfModule mod_php5.c>
   php_value include_path ".:/usr/local/lib/php"
   php_value auto_prepend_file "/home/www/utm_GA.html"
</IfModule>
In this way, the file utm_GA.html, the file containing your GATC, is automatically prepended to the top of all your PHP web pages—before the HTML <html> tag. Strictly speaking this is not the correct placement; all content should be placed within your <html> and </html> tags. However, the GATC still works, and this method is a useful workaround if you have no immediate alternative available. Note that the full path is used to define the utm_GA.html location. In this way, all subdirectories also receive the GATC without further modification. If you wish to avoid this, define a relative path.
Note: Because auto_prepend_file is applicable only to PHP files, you do not have to exclude non-PHP files such as robots.txt. If other file types do require the GATC, you will need to add this manually. You also do not need to worry about other included PHP files receiving a double page tag. For example, if you use <? include("/includes/navigation.php"); ?> within your pages to build your navigation menu, navigation.php will not be tagged.
If you are a Wordpress user, there are several plug-ins available to help you automatically insert your GATC onto your pages. Similarly, there are plug-ins available for popular content management systems:
http://wordpress.org/extend/plugins/search.php?q=google+analytics
http://drupal.org/project/google_analytics
http://extensions.joomla.org/extensions/site-management/site-analytics/4300
Back Up: Keeping a Local Copy of Your Data
Keeping a local copy of your Google Analytics data can be very useful for your organization. For example, Google currently commits to keeping data for up to 25 months, enabling you to compare monthly reports spanning three years. That is adequate for most users, but what if you wish to retain your data longer? Also, because Google will not pass raw data to third parties, you will need an alternative if your web visitor data must be audited. Publishing sites often require this because third-party auditing is an independent way of verifying their advertiser rate cards for potential advertisers.
The technique is to modify the GATC so that it simultaneously sends your visitor data to your web server logfiles as well as to Google Analytics data-collection servers. This is a one-line modification of the GATC as highlighted:
<script type="text/javascript">
var _gaq = _gaq || [];_
_gaq.push(['_setAccount', 'UA-12345-1']);
_gaq.push(['_setLocalRemoteServerMode']);
_gaq.push(['_trackPageview']);

(function() {
var ga = document.createElement('script'), ga.type =↵
'text/javascript'; ga.async = true; ga.src = ('https:' ==↵
document.location.protocol ? 'https://ssl' : 'http://www') + '.google-↵
analytics.com/ga.js';
var s = document.getElementsByTagName('script')[0];
s.parentNode.insertBefore(ga, s);
})();
</script>
The consequence of this modification is an additional request for a file named __utm.gif from your web server when your GATC is loaded. This is a 1 × 1–pixel transparent image that Google Analytics uses to append its information into your web server logfiles. Create the file for yourself and upload it into your document root, that is, where your home page resides.
Because all web servers log their activity by default, usually in plaintext format, you should see the presence of additional __utm.gif entries in your logfile almost immediately after making this change. These correspond to the visit data as seen by Google Analytics. Also, your web server must log cookie information. If you do not see cookie values in your logfiles, check the specified log format of your web server. A correctly working Apache logfile line entry should appear as follows:
79.79.125.174 advanced-web-metrics.com - [03/Jan/2010:00:17:01 +0000] "GET
/images/book-cover.jpg HTTP/1.1" 200 27905 "http://www.advanced-web-
metrics.com/blog/2008/02/16/accuracy-whitepaper/" "Mozilla/5.0 (Windows; U;
Windows NT 6.0; en-GB; rv:1.9.0.15) Gecko/2009101601 Firefox/3.0.15
(.NET CLR 3.5.30729)"
"__utma=202414657.217961957.1257207415.1257207415.1257207415.1;
__utmb=202414657.1.10.1257207415; __utmc=202414657;
__utmz=202414657.1257207415.1.1.utmcsr=google.co.uk|utmccn=(referral)|
utmcmd=referral|utmcct=/imgres; session_start_time=1257207419839"
Note that this is a single line in your logfile, beginning with the visitor’s IP address and ending with the GATC cookie values.
Defining a Logfile Format for Apache
Apache can be configured to log data in a variety of custom formats. The important part for Google Analytics is the logging of cookie information. I recommend using the full NCSA log format in your httpd.conf file, as shown here:
LogFormat "%h %v %u %t "%r" %>s %b "%{Referer}i" "%{User-↵
Agent}i" "%{Cookie}i"" combined
Note the use of double quotes throughout. In addition, this statement must be a single line in your configuration file.
For Microsoft IIS, the format can be as follows:
2010-01-01 01:56:56 68.222.73.77--- GET /__utm.gif
utmn=1395285084&utmsr=1280x1024&utmsa=1280x960 &utmsc=32-
bit&utmbs=1280x809&utmul=en-us&utmje=1&utmce=1&utmtz=-0500&utmjv=1.3&
utmcn=1&utmr=http://www.yoursite.com/s/s.dll?spage=search%2Fresultshome
1.htm&startdate=01%2F01%2F2010&man=1&num=10&SearchType=web&string=looking
+for+mysite.com&imageField.x=12&imageField.y=6&utmp=/ 200 878 853 93 - -
Mozilla/4.0+(compatible;+MSIE+6.0;+Windows+NT+5.1;+SV1;+ .NET+CLR+1.0.3705;
+Media+Center+PC+3.1;+.NET+CLR+1.1.4322) - http://www.yoursite.com/
In this example, the log entry starts with the visitor’s timestamp and ends with the website hostname.
In both examples, the augmented information applied by the GATC is the addition of utm* name/value pairs. This is known as a hybrid data-collection method and is mentioned in Chapter 2.
Note that there are overhead considerations to keeping a local copy of visitor data, and we discussed these in Chapter 3. Because web server logfiles can get very large very quickly and swamp hard disk space, I generally do not recommend keeping a local copy of your data unless you have a specific reason for doing so. That said, maintaining a local copy of your Google Analytics data does provide you with the option to do the following:
- Maintain greater control over your data—for auditing purposes, for example
- Troubleshoot Google Analytics implementation issues
- Process historical data as far back as you wish—using Urchin software
- Reprocess data when you wish—using Urchin software
Let’s look at these benefits in detail:
Maintain greater control over your data Some organizations feel more comfortable having their data sitting physically within their premises and are prepared to invest in the IT resources to do so. You cannot run this data through an alternative web analytics vendor because the GATC page tag information will be meaningless to anyone else. However, you do have the option of passing your data to a third-party auditing service. Some website owners use third-party audit companies to verify their visitor numbers—useful for content and publishing sites that sell advertising and therefore need to validate their rate cards.
Warning: Be aware that when you pass data to a third party, protecting end-user privacy (your visitors’) is your responsibility, and you should be transparent about this in your privacy policy.
Troubleshoot Google Analytics implementation issues A local copy of Google Analytics visit data is very useful for troubleshooting complex Google Analytics installations. This is possible because your logfile entries show each pageview captured in real time. Therefore, you can trace whether you have implemented tracking correctly—particularly nonstandard tracking such as PDF, EXE, and other download files types and outbound exit links. See Appendix B for more troubleshooting tools.
Process historical data as far back as you wish—using Urchin software As mentioned previously, Google Analytics currently stores reports for up to 25 months (though Google has so far made no attempt to remove older data). If you want to keep your reports longer, you should purchase Urchin software and process your local data as far back as you wish. The downloadable software version runs on a local server and processes your web server logfiles. Urchin also provides complementary reports to Google Analytics, as described in Chapter 3.
Warning: Reports from Urchin software will not align 100 percent with reports from Google Analytics because these are two different data-collection techniques. For example, a logfile solution tracks whether a download completes, whereas a page-tag solution tracks only the onclick event—and these are not always going to be the same thing. Data alignment and accuracy issues are discussed in Chapter 2.
Reprocess data when you wish—using Urchin software With data and the web analytics tools under your control, you can apply filters and process data retroactively. For example, say you wish to create a separate profile just to report on blog visitors. This is typically done by applying a page-level filter—including all pageview data from the /blog directory. For Google Analytics, reports are populated as soon as that profile filter is applied—that is, from that point forward. For Urchin software, you can also reprocess older data to view the blog reports historically.
Note: Urchin, discussed in Chapter 3, is sold and supported exclusively through a network of Urchin Software Authorized Consultants. For a full list of USACs, see www.google.com/urchin/usac.html.
Using Accounts, Web Properties, and Profiles
A Google Analytics profile is a set of configuration parameters that define a report for a particular web property. You need at least one web property and one profile to view your visitor data. Figure 6-3 showed the last step of creating a new Google Analytics account. Following the click of the Continue button, Google Analytics automatically creates your first web property and profile, and this is all you need to get started viewing reports.
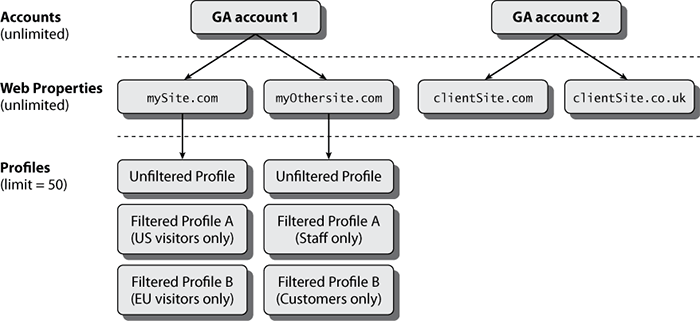
However, as you may have guessed, you can configure Google Analytics to provide reports for multiple web properties and multiple profiles. You may even have access to multiple Google Analytics accounts—for example, in an agency scenario where you look after numerous client accounts. The relationship between the different levels—account, web property, and profile—is shown in Figure 6-4.
Figure 6-4 shows a user having access to two Google Analytics accounts. Each account contains two web properties (websites). A set of Google Analytics reports is generated for each profile. For this example, there are six sets of Google Analytics reports—four of which are created by applying filters on the report data. The structure of each report is identical—it is the data contained within each that will differ. This will depend on the web property and filter to which the report is applicable.
Figure 6-4: The relationship between Google Analytics accounts, web properties, and profiles
For a particular Google Analytics account, users can be granted access to a single profile for a single web property, a group of profiles across multiple web properties, or all web profiles in all web properties.
Account Management Considerations
Ensure that you are aware of the following points for managing your Google Analytics account:
- There is a limit of 50 profiles for any given web property.
- Provide administrative access wisely. If you want to provide administrative access to other users of an account, those users will be able to see and modify all profile data for all websites being tracked in the account.
- You cannot migrate historical data from one account to another. Thus, if you set up an account for a web property and then later want to move tracking to a separate account, you cannot migrate the data from the old account to the new account.
- You cannot transfer profiles or web properties to other accounts. However, you may exchange accounts between users, for example, in an agency scenario where the agency initially configures the account on behalf of the user.
Creating a New Profile
Consider a profile as a configuration setup that defines the report contents for a particular web property. Typically you create additional profiles for your organization when you have different functions or divisions within your business. Having content in multiple languages is an obvious choice for generating additional profiles. It makes sense for such segmented content to have a set of dedicated reports just for their needs. However, if you are an AdWords user and have multiple AdWords accounts, review “Choosing between Roll-up Reporting and Multiple Profiles or Multiple Web Properties” later in this chapter before creating new profiles.
Another scenario for which having additional profiles can be beneficial is a single website with split responsibilities—for example, for customer support as well as product marketing. Customer support usually has a very different objective for the user experience compared with the rest of the website. For example, they may wish to minimize the time on site (customers finding answers they are looking for quickly) and reduce goal conversions (less contact with the expensive call center), whereas the marketing department will wish to increase these for their section. Hence, it is better to have separate profiles for this scenario so the various teams can focus on their objectives.
Tip: Additional profiles are created in order to apply filters to your report data. By definition, filtered profiles have had their data sets altered. To protect yourself from errors and provide an unperturbed reference profile, always maintain a master profile with no filters applied in your account. This is shown in Figure 6-4.
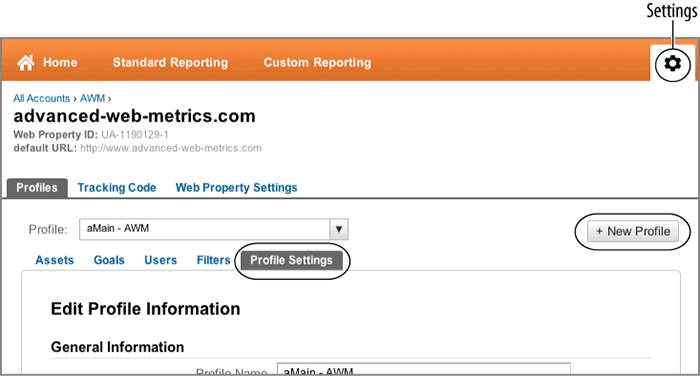
Creating a profile for the same web property requires no changes to your GATC. Using Figure 6-5 as your guide, you create an additional profile for a web property by clicking the settings icon (top right of your screen) and selecting the Profile Settings tab menu. Click + New Profile from the right side of the screen. From here, you simply name your new profile. Use a meaningful name such as “US only visitors” so you will recognize at a glance what information this report set contains.
Figure 6-5: Creating an additional profile
Note that profiles are listed alphabetically by default in Google Analytics. While you can reorder the list with a click, it can be useful to use numbers in your profile names so that they are always listed in your own prioritized order—for example, “01 US only visitors,” “02 EU only visitors,” and so forth. Otherwise the EU profile would appear first by default.
With a separate profile in place, the next step is to apply filters to the data. The use of profile filters is described in the section “Profile Segments: Segmenting Visitors Using Filters” in Chapter 8, “Best Practices Configuration Guide.”
An Important Note on Profile Aggregation
Once you have defined your profiles, you cannot produce an aggregate report at a later date; that is, you cannot roll up the individual profiles. The strategy, therefore, is to produce an aggregate profile first and then use filters to generate the separate profiles. Alternatively, you can add an extra GATC and collect the data into a separate Google Analytics account, as described in the section “Roll-up Reporting” later in this chapter.
Creating a New Web Property
Create a new web property when you have multiple websites that you would like to track in the same Google Analytics account, such as, for example, content targeted at different markets (mysite.com and mysite.ca, or mysite.fr and mysite.nl, and so on). You may also have product-specific websites that belong to the same organization (productA.com, productB.com, and so forth) or operate subdivisions that have their own website. For these scenarios, it makes sense to have a set of dedicated reports within the same Google Analytics account. You achieve this by creating web properties.
Warning: Be sure you have the authority to add additional websites to your Google Analytics account—see “Agencies and Hosting Providers: Setting Up Client Accounts” later in this chapter.
Remember from earlier in this chapter (“General Account Information”) that if your Google Analytics account is connected to a single AdWords account, the time zone setting of your AdWords account is applied to your entire Google Analytics account—that is, for all profiles and all web properties. All AdWords cost data will also be in a single currency. Therefore, before creating a new web property, ensure that you review the section “Choosing between Roll-up Reporting and Multiple Profiles or Multiple Web Properties” later in this chapter.
If you are operating your websites and AdWords account in only one time zone and in a single currency, go ahead with creating your additional web properties. To do this, ensure that you are in the root level of your account settings—click the settings icon at the top right of your browser window, then select your account name in the top left menu links. In Figure 6-5, this is shown as All Accounts AWM. Clicking the account name, AWM in my example, takes you to the root level account settings as shown in Figure 6-6. Click the + New Web Property button, and enter your web property details as shown in Figure 6-7.
Figure 6-6: The root level account settings

Figure 6-7: Creating an additional web property

I recommend that the hostname of the website in question is used as the web property name. For example, for the site http://www.mysite.com, use www.mysite.com. This gives you the option to differentiate subdomains such as m.mysite.com and blog.mysite.com and removes the clutter of http://. Of course, if you do not intend to use subdomains, then use only mysite.com for the web property name.
Creating a New Account
You create a new account when you wish to keep your web properties and profiles separate from each other. This can be because you are an agency with separate client accounts or because your additional web properties operate in different time zones and in different currencies—AdWords or transactional revenue. If the latter case describes your situation, review the section “Choosing between Roll-up Reporting and Multiple Profiles or Multiple Web Properties” later in this chapter before creating new accounts.
To create a new Google Analytics account, go to your account administration area—from the screen shown in Figure 6-6, click All Accounts in the top left menu links. This takes you to the screen shown in Figure 6-8. Then click the + New Account button. You will be taken to the same screen shown in Figure 6-2. Enter the information for the account as you did previously.
Figure 6-8: Creating a new Google Analytics account from within an existing account

Currently the maximum number of accounts you can create from within Google Analytics is 25. However, there is no limit to the number of Google Analytics accounts you can create or have access to.
Roll-up Reporting
Roll-up reporting is not a standard feature in Google Analytics. However, with a little extra coding, you can have stand-alone reports for specific (product- or region-dedicated) websites and a roll-up report to provide a global overview.
Consider the following scenario: You have semi-autonomous country offices that have brand- or product-specific websites suitable for their particular market needs. These sites have their own AdWords account and operate in different time zones and use different currencies (AdWords spend or transactional revenue). Because of these specific needs, it makes sense to have separate, stand-alone Google Analytics accounts for each website. That way, segmentation, referral analysis, and e-commerce revenue (or lead generation) can be analyzed accurately and in detail.
However, global HQ also needs a high-level overview of all web visitor activity. You can achieve this by having a single catch-all Google Analytics account with all data from all websites aggregated together—a roll-up report. So long as the GATC deployment is managed centrally for consistency, this solution provides both autonomy for your country- or product-specific websites and a big-picture reporting view on all website activity for HQ. Each can manage its own reporting needs without affecting the other.
The principle of roll-up reporting is straightforward—you create additional Google Analytics accounts and add multiple GATCs to your web pages. One specifies the individual account, and the other is for the roll-up account. Schematically this is shown here for two websites:
<script>
   1. Track the pageview or event for siteA into its individual account
   2. Track the pageview or event for siteA into the roll-up account
</script>
Although I describe this technique as adding multiple GATCs, a full additional GATC is not added to your pages, just a second tracker object. An actual GATC, with the second tracker object highlighted, is as follows:
<script type="text/javascript">
var _gaq = _gaq || [];_
_gaq.push(['_setAccount', 'UA-12345-1']);
_gaq.push(['_trackPageview']);
_gaq.push(['t2._setAccount', 'UA-67890-1']);
_gaq.push(['t2._trackPageview']);

(function() {
var ga = document.createElement('script'),
ga.type = 'text/javascript'; ga.async = true;
ga.src = ('https:' == document.location.protocol ? 'https://ssl' : ↵
'http://www') + '.google-analytics.com/ga.js';
var s = document.getElementsByTagName('script')[0];
s.parentNode.insertBefore(ga, s);
})();
</script>
Note that I have kept the original format for the default tracker object. That is, it has no name. The second tracker object is named t2. You can choose any names you wish—for example t1, t2 or firstTracker, secondTracker and so forth—though it pays to be as clear as possible.
Deploy this multi-tracker object GATC across all your websites. For each stand-alone website (siteA, siteB, and so on), modify only the default tracker _setAccount line to use your specific UA account number for that website. The roll-up account information, t2, remains the same for each site—in this case UA-67890-1, though of course that needs to be changed to your roll-up account number.
In this way, the folks in the marketing department at global HQ can log into Google Analytics account UA-67890-1 for their roll-up report and filter, segment, or configure as required. Country- or product-specific offices can log into UA-12345-1 and modify as they wish without impacting the global roll-up report.
Note: For a full implementation, you also need to consider e-commerce tracking as well as the impact of numerous caveats that this approach has. This is discussed in more detail in Chapter 9, “Google Analytics Customizations.”
Choosing between Roll-up Reporting and Multiple Profiles or Multiple Web Properties
For the vast majority of implementations, multiple profiles will be the most appropriate choice, such as, for example, if you have one website, use a single AdWords account, and transact in a single currency and time zone. You would create profiles to segment your data—perhaps by location, language, visitor type (customer versus prospect), or website section visited—and for this you need to ensure that any associated e-commerce or AdWords data is shown consistently across all profile reports. Creating profiles by applying filters will enable you to do this efficiently, without any modification of your GATC. By default, all e-commerce and AdWords data is applied to all profiles in your account.
If you have multiple websites but still operate in a single time zone (or at least very similar) and single currency, add your websites as multiple web properties in your Google Analytics account. Create profiles for your web properties as needed.
Roll-up reporting answers very specific requirements of enterprise clients. Use roll-up reporting when you operate in different time zones and currencies and have multiple AdWords accounts. Use roll-up reporting if you have autonomous offices or departments that wish to manage their own reporting needs while you maintain control over data integrity (that is, the GATC deployment across the enterprise) so that all offices can compare apples with apples.
Having a stand-alone Google Analytics account gives each department control over who has account access (such as web and marketing agencies) and provides a set of reports and configurations without the obfuscation of other departments. You also overcome the limit of 50 profiles per web property.
Note that roll-up reporting of accounts is a nonstandard feature of Google Analytics that requires modification of the GATC. This is discussed in more detail in Chapter 9.
Agencies and Hosting Providers: Setting Up Client Accounts
It is tempting to think that Figure 6-4 shows an excellent route for agencies and hosting providers to take on behalf of their clients—that is, have all client reports in one Google Analytics account. However, in accordance with the Google Analytics terms of service (found on www.google.com/analytics), any party setting up Google Analytics on behalf of clients must set up a separate Google Analytics account for each business entity. This is the same way AdWords operates and should therefore be familiar to existing AdWords agencies.
Other limitations include the constraint of 50 profiles per Google Analytics web property. Also, if you import AdWords data, time zone settings and currency labels are fixed for all profiles in your account; if you have an e-commerce setup, by default e-commerce data is applied to all profiles in your account. Clearly, these are undesirable effects. Even with filters in place to counter them, there is always a real possibility that one client’s data will end up in another client’s report. At best, this muddies the metrics; at worst, it’s a breach of your client’s confidentiality.
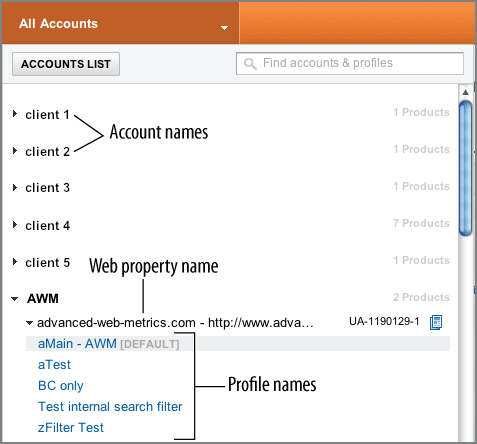
For agencies (or hosting providers) to move efficiently between different client accounts, Google Analytics has a feature similar to the My Client Center feature of AdWords. As long as you use the same Google login for each Google Analytics account you create or manage, you will see a drop-down menu on the left side of your report interface. This lists all the accounts, web properties, and profiles to which you have access, as shown in Figure 6-9.
Figure 6-9: The Accounts area is the equivalent of the My Client Center feature for AdWords.
Note: More information on the My Client Center feature of AdWords can be found here at http://adwords.google.com/support/bin/answer.py?answer=7725.
As described earlier in this chapter, you can create a maximum of 25 accounts from within your Google Analytics account. However, there’s no limit on the number of Google Analytics accounts that can be associated with your Google login. That is, any number of clients can add your Google login email address as their administrator or report viewer, and these will appear in your accounts drop-down menu.
If you need to create more than 25 Google Analytics accounts, set up a secondary Google login for yourself and use it for creating further Google Analytics accounts. Once they’re created, you can then add your primary Google login as an administrator and have the account appended to your Accounts drop-down list.
Integrating with Your AdWords Data
If you’re an online advertiser, chances are good that you are using Google AdWords as part of your marketing mix. AdWords is a way of targeting text ads to visitors who are using the Google search engine by the keywords they use. That way, your advertisement is displayed to people who are actually looking for something related to your product. AdWords are also shown in a similar way on Google partner sites such as Ask.com, AOL.com, and the AdSense network. Importing your AdSense data is discussed later in this chapter for the benefit of AdSense users.
Google AdWords is an extremely effective and efficient way of marketing online because the auction system used is based on how many visitors click your ad rather than just its display. Hence, this method of advertising is referred to as pay-per-click (PPC) or cost-per-click (CPC). Yahoo! Search Marketing, Microsoft adCenter, Miva, and Mirago operate similar advertising networks. Google Analytics can track visits and conversions from all of these.
As you might expect, Google Analytics, being a part of Google, offers enormous benefits when it comes to integrating data from its AdWords pay-per-click network. Getting your AdWords data in is simply a matter of checking two check boxes—one in your AdWords account, the other in your Google Analytics account. These are shown in Figures 6.10 and Figure 6-11 respectively.
Figure 6-10: Setting auto-tagging within your AdWords account
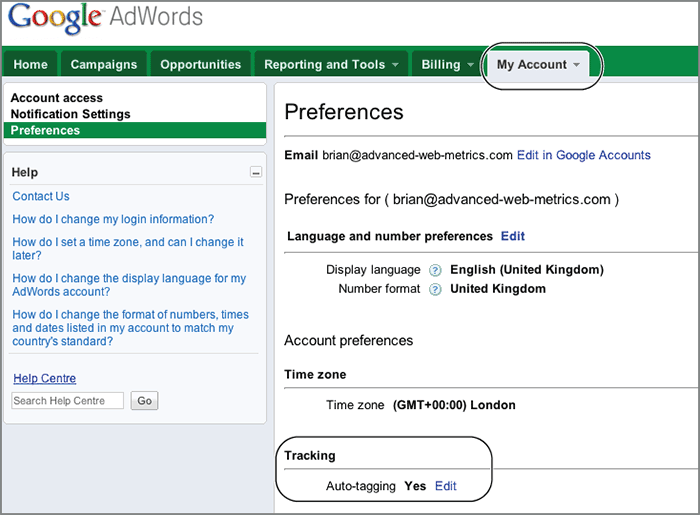
Figure 6-11: Accessing Google Analytics profile settings within AdWords

Before you start, make sure that you’re using a Google login that has access to both your Google Analytics and AdWords accounts and is an administrator login for the Analytics account. From within your AdWords account, follow these steps.
First, set up auto-tagging for your AdWords visitors. This ensures that any click-throughs from your ads are correctly attributed to AdWords:
1. Go to the My Account Preferences area.
2. Click the Edit link under Tracking (see Figure 6-10).
3. Select the box labeled Destination URL Auto-Tagging and then save your changes.
Then import your AdWords account data to allow the display of your AdWords impressions, clicks, and cost data in your Google Analytics reports:
4. Click the Reporting And Tools tab and choose Google Analytics
5. Select the settings icon on the top right (see Figure 6-11). This takes you to the settings screen for your default profile. Select your account name from the menu link on the top left. In this example, this is AWM.
6. Select the Data Sources tab and click the Link Accounts button, shown in Figure 6-12. The result is the pop-up box shown in Figure 6-13.
7. You can then select which profiles will receive the AdWords data. Place a check in the check box by each profile name, and select Continue.
That’s it! All your AdWords data (impressions, clicks, cost) will automatically be imported into your account and applied to the profiles you selected in step 7. If you later change your mind, you can adjust which profiles receive AdWords data in the same Data Sources tab of your account settings. You can even unlink an entire AdWords account from your Google Analytics account.
Figure 6-12: Linking your AdWords account to your Google Analytics account
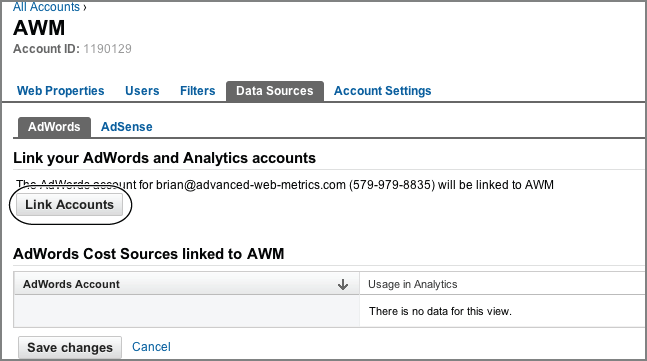
Figure 6-13: Integrating AdWords data on a per profile basis

Imported data is shown in the Advertising AdWords section of your reports (an example AdWords report is shown in Chapter 5, “Reports Explained”). The import of AdWords data is continuous. That is, the data is pulled from your AdWords account whenever you request the report in the user interface.
With auto-tagging enabled (step 3 in place), you will notice an additional parameter showing in the landing page URLs of your AdWords ads should you click through to them. Here’s an example:
www.mysite.com/?gclid=COvQgK7JrY8CFSUWEAodKEEyuA
The gclid parameter is a keyword-specific parameter unique to your account. AdWords appends this for Google Analytics tracking, and it must remain in place when visitors arrive on your website in order for them to be detected as AdWords visitors. If the gclid parameter is missing or corrupted, then the visitor will be incorrectly assigned as “google (organic)” as opposed to “google (cpc).”
Importing Cost Data from Multiple AdWords Accounts
A new Google Analytics feature (from August 2011) allows you to import cost data from multiple AdWords accounts—for example, if you are running separate campaigns for your products or you have separate agencies managing separate campaigns for you. To do so, log in to your other AdWords accounts and repeat the procedure described in steps 1 through 7 in the section “Integrating with Your AdWords Data.”
Note that if you have multiple AdWords accounts in different time zones, you should not combine them into a single Google Analytics account. This is because you need to set one time zone for your entire Google Analytics account. If combined with AdWords, then Adwords automatically takes precedence. This cannot later be changed.
Also, there may be currency implications to consider. That is, you may need to ensure that the currency used in your AdWords account matches the one used in your Google Analytics profile. Make sure you review the section “Roll-up Reporting” in this chapter and consider your options carefully before importing data from multiple AdWords accounts.
Note: As described here, it is straightforward to import data from multiple AdWords accounts into one Google Analytics account and conversely to import one AdWords account data into multiple Google Analytics accounts. However, the actual linking of accounts—that is, being able to log in to your Google Analytics reports from within AdWords—can only take place from one AdWords account.
Testing after Enabling Auto-Tagging
As discussed in “Why PPC Vendor Numbers Do Not Match Web Analytics Reports” in Chapter 2, third-party ad-tracking systems can inadvertently corrupt or remove the tracking parameter required by Google Analytics AdWords tracking. For example, systems such as Adform, Atlas Search, Bluestreak, DoubleClick, and Efficient Frontier use redirection URLs to collect visitor statistics independently of your organization. These may inadvertently break the AdWords gclid. Therefore, after enabling auto-tagging, always test a sample of your AdWords ads by clicking through from a Google search results page.
If the test fails, then contact your third-party ad-tracking provider because there may be a simple fix. For example, your AdWords auto-tagged landing page URL may look like this:
http://www.mysite.com/?gclid=COvQgK7JrY8CFSUWEAodKE
If a third-party tracking system is used for redirection, it could end up as this:
http://www.redirect.com?http://www.mysite.com/?gclid=COvQgK7JrY8CFSUWEAodKE
Notice the two ?—this is invalid because you cannot have two question marks in a URL. Some systems may allow you to replace the second ? with a # so the URL can be processed correctly. This has to be done within the third-party ad tracking system, not within AdWords. Another workaround is to append an encoded dummy variable to your landing page URL, as shown here:
http://www.mysite.com/%3Fdum=1
AdWords auto-tagging will then append the gclid as
http://www.mysite.com/%3Fdum=1&gclid=COvQgK7JrY8CFSUWEAodKEEyuA
so that when you use your third-party ad-tracking system the URL becomes the following:
http://www.redirect.com?http://www.mysite.com/%3Fdum=1&gclid= ↵
COvQgK7JrY8CFSUWEAodKEEyuA
This will work. That is, the URL will retain the gclid parameter for Google Analytics tracking in the correct format. You can then exclude the tracking of the dummy variable in the Google Analytics configuration settings by adding it as an “Exclude URL Query Parameters” (see Figure 8-1 in “Initial Configuration” in Chapter 8).
Note: If you already have parameters in your landing page URLs, you do not need to add a dummy parameter. However, you will need to change your ? to its encoded equivalent, %3F.
Integrating with Your AdSense Data
If you’re an online publisher, you may be using Google’s AdSense product. AdSense is the tool that allows you to display Google ads on your own website, thereby sharing in the click-through revenue. The clever part of AdSense is that the ads displayed on your site are targeted to your content. For the most part these are contextual advertising, though advertisers can also target to specific websites. By these methods, the ads shown are more suited to your audience’s interests. The result is that you focus on building engaging high-quality content, while Google takes care of the technology for displaying relevant advertisements to your readers. For more information about AdSense, see http://adsense.google.com.
Note: AdWords advertisers control whether they wish to display their ads on sites running AdSense. From an advertiser’s perspective, this is known as opting in to the Google Display Network within their AdWords account.
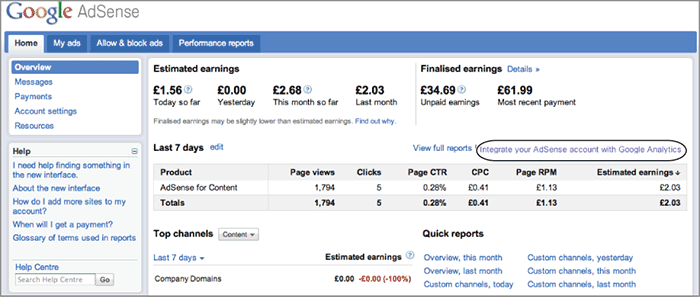
Similar to importing your spend and impression data from AdWords as described in the previous section, you can also import your AdSense earnings, impression, and content performance data. Within your AdSense account Home area, select the link Integrate Your AdSense Account With Google Analytics, shown in Figure 6-14.
Figure 6-14: Integrating AdSense with Google Analytics
The following screen allows you to either create a Google Analytics account or select an existing one. If you choose the latter, ensure that the AdSense account login you are using is also listed as an administrator within your Google Analytics account before proceeding. If you have done this, AdSense then connects to your Google Analytics account and displays its profiles (see Figure 6-15).
Figure 6-15: Selecting Google Analytics profiles to receive AdSense data

Assuming you are managing only a single website domain in your Google Analytics account, select the profiles you wish to import your AdSense data into. Generally, this will be for all your profiles and so no changes are required to your GATC.
If you manage multiple domains, with AdSense displaying ads across your entire network of sites, you will need to decide which domain is the primary domain for your data import. The primary domain does not require any changes to its GATC, but secondary domains will require changes. Therefore, you should choose the most complex GATC profile as your primary domain so that you minimize changes. See also the Help Center article at
www.google.com/support/analytics/bin/answer.py?answer=92625
If you are required to select a primary domain, the following screen will display the code snippets to update your GATC. Finally, click Continue to complete the linking process. Doing so immediately creates a new section in your Google Analytics reports in the Content AdSense section. AdSense data (impressions, clicks, revenue) will automatically be imported into your account.
Bear in mind that the import takes place once per day (usually in the middle of the night Pacific time) and is for the period minus 48 to 24 hours in arrears from 23:59 the previous day. The reason for this delay is to allow time for the AdWords fraud-detection algorithms to work through your account. You should also be aware of data import discrepancies, as discussed in Chapter 2 in the section “Why PPC Vendor Numbers Do Not Match Web Analytics Reports.”
Note: It is currently not possible to import multiple AdSense account data into a single Google Analytics account.
Integrating with Your Webmaster Tools Data
If you are active with search engine optimization (SEO), you will most likely have a Google Webmaster Tools account—www.google.com/webmasters/tools. Google Webmaster Tools allows you to gain an insight into how Google “sees” your site from an organic (non-advertising) point of view; that is, what pages it finds during a Googlebot crawl, errors found, who links to your content, what user queries on its search engine return pages from your site and your ranking for those queries, and a great deal more useful information for optimizing your site. In many ways, Webmaster Tools data is similar to that contained in your AdWords account, but it’s for organic search only.
If you do not have a Webmaster Tools account, simply create one (it’s free!) and then integrate with your Google Analytics account as follows:
1. From the home page on your Webmaster Tools account, click Manage Site next to your website, and then click Google Analytics Property (see Figure 6-16).
Figure 6-16: Integrating Google Analytics from within Webmaster Tools

2. Click the web property you wish to link and save.
Alternatively, within Google Analytics you can visit your web property settings and integrate the Webmaster Tools data (see Figure 6-17). Select the Edit link and click the web property you wish to link and save.
Figure 6-17: Integrating Webmaster Tools from within Google Analytics

Once it’s set up, your Webmaster Tools data will show in your Google Analytics reports in the Traffic Sources Search Engine Optimization section. An example report is shown in Chapter 5.
Feeds are a way for websites large and small to distribute their content well beyond just visitors using web browsers. Feeds provide a method of subscription to a website’s content that is delivered automatically via a web portal, newsreader, or email. For the consumer, subscribing to feeds makes it possible to review a large amount of online content in a short time—they do not need to visit each individual website, or page, to get the updates they are interested in. For the publisher or blogger, feeds provide instant distribution of your content and the ability for readers to subscribe.
From a tracking point of view, the issue is that feed subscribers do not need to visit your website to read your content. Hence no GATC and therefore no tracking of these highly engaged readers takes place (they subscribed, so by definition they are highly engaged), unless, that is, they click through to your website. You encourage this by being clever with how you produce and distribute your content—providing snippets of information in your RSS feed that entice readers to click through to your site for the full article (these are truly engaged visitors!).
However, once on your website and tracked in the normal way, such visitors cannot be correctly attributed to your feed—either the reader itself is not a referrer or, if it is, the specific details of which article drove the visitor to your site are lost. This problem is partially overcome if you use Google’s Feedburner service to distribute your content (http://feedburner.google.com). Essentially, you set Feedburner to automatically modify your feed’s RSS content for you so that click-throughs can be correctly attributed. This is achieved by Feedburner appending campaign parameters to your article title at the point of distribution.
Note: Note my deliberate emphasis on the issue of visitor attribution only being partially overcome by Feedburner. At present, only the article title within your feed receives campaign parameters. Other links within your content do not receive campaign parameters and so any click-throughs from these are likely to be labeled as being direct visitors. This is a current limitation of the Feedburner integration.
Note: The issue of being able to correctly attribute non-standard referral visitors is discussed in Chapter 7, “Advanced Implementation.” Specifically, refer to Table 7-3.
Within your Feedburner account, select your feed and navigate to the Configure Analytics” section (see Figure 6-18). Then activate “Track clicks as a traffic source in Google Analytics” save.
That’s all that’s required. From this point forward, readers of your feed content who click through on your article or page title to your website will be tracked and correctly attributed to Feedburner, with the specific feed detail (article) also reported. You view such visits in your Traffic Sources All Traffic report. Look for feedburner as a campaign source, as shown in Figure 6-19.
If you wish, you can customize the labels used for the attribution by inserting Feedburner’s variables in the campaign tracking parameters. However, the default parameters work sufficiently for most users. Campaign tracking is discussed in Chapter 7.
Figure 6-18: Integrating Feedburner data with Google Analytics

Figure 6-19: Viewing visits resulting from a Feedburner distributed feed

At the end of 2010, smartphones outsold PCs for the first time; 94 million PCs versus 100 million smartphones were sold:
www.guardian.co.uk/technology/2011/jun/05/smartphones-killing-pc
According to a comScore report, nearly 7 percent of all Internet content consumed in the United States in August 2011 was via a mobile device, up +0.6 percent on the previous quarter:
www.comscore.com/Press_Events/Presentations_Whitepapers/2011/Digital_Omnivores
Although still a small percentage, the boundary between desktop and mobile Internet access is rapidly changing, essentially because mobile devices are getting much smarter.
Smartphones today have the same computational power of a desktop from just a few years ago. Their web browsers are very similar to desktop versions and implement the same popular JavaScript engines. Hence, smartphone users can navigate “desktop”-designed websites, and these visitors will be tracked by default in Google Analytics—using a standard GATC implementation. An example mobile visitors report is shown in Chapter 5. The tracking of users interacting with mobile apps is covered in Chapter 12.
Tip: Although smartphone users can navigate your desktop version of your website, you should optimize their experience by having a specific style sheet to cater to them. For example, it can be used to remove unnecessary graphics, simplify navigation items, and reorganize the content of a page so that it is easier to read on a small screen.
Mobile Visitors Have Different Expectations
Clearly a mobile user is also a desktop user; however, when they’re using a mobile device, the same users’ expectations can be very different. For example, by definition mobile users are rarely in an ideal environment to sit, relax, and read content at their leisure on a large, easy-to-view screen with a full ergonomic keyboard. Typical requirements are to quickly find local information—venues, addresses, timetables, contact details.
Mobile connections (and browser rendering) are usually much slower than for desktops, so there is even less patience from the user for slow-loading pages. Battery life and screen standbys (power savers) also contribute to the sense of urgency. Mobile users also rarely close their browser—there is no need to. Hence, time on site and bounce rates can be heavily skewed.
Because of these differences, if mobile website traffic is a significant proportion of your overall traffic volume (say greater than 20 percent), I recommend that you track these visits in a separate profile to your desktop site. This is achieved using a profile filter and is discussed in the section “Profile Segments: Segmenting Visitors Using Filters” in Chapter 8.
Server-Side Tracking for Mobile Sites
As stated earlier, visits from smartphone users are tracked by Google Analytics by default—no changes are required to your GATC or account configuration. This will be the case for the vast majority of website owners. However, some websites need to cater to users of older-generation “feature” phones and their WAP protocol. Such “mobile sites” are built more simply than their desktop counterparts and are lighter on system resources to accommodate the technical limitations of these devices. Consequently, there are two important considerations when tracking a WAP mobile site:
- A mobile website built for feature phones is a very different website (and experience) from your desktop version. Therefore, use a different Google Analytics account or profile for its data collection.
- A regular GATC implementation is not suitable for a mobile site because most feature phones cannot run JavaScript and do not set cookies, both of which are required by the standard GATC. Also, the master tracking file itself (ga.js) is 18 Kb, which is considered heavy for the limitations of a feature phone.
Because of these, Google Analytics can be implemented with a server-side snippet of code that does not use JavaScript and is specifically developed for feature phone tracking. This is referred to as the Google Analytics for Mobile Package—a library ported to PHP, JSP, ASP.NET, and Perl that can be used to track simple traffic from mobile website pageviews. The package, and details of its usage, is available at the following location:
http://code.google.com/mobile/analytics/docs/web/
The following is an example server-side implementation for a page using PHP. There are two steps. First insert the following code before the <HTML> tag:
<?php
// Copyright 2010 Google Inc. All Rights Reserved.
$GA_ACCOUNT = "MO-3635138-14";
$GA_PIXEL = "/ga.php";
function googleAnalyticsGetImageUrl() {
global $GA_ACCOUNT, $GA_PIXEL;
$url = "";
$url .= $GA_PIXEL . "?";
$url .= "utmac=" . $GA_ACCOUNT;
$url .= "&utmn=" . rand(0, 0x7fffffff);
$referer = $_SERVER["HTTP_REFERER"];
$query = $_SERVER["QUERY_STRING"];
$path = $_SERVER["REQUEST_URI"];
if (empty($referer)) {
$referer = "-";
}
$url .= "&utmr=" . urlencode($referer);
if (!empty($path)) {
$url .= "&utmp=" . urlencode($path);
}
$url .= "&guid=ON";
return str_replace("&", "&", $url);
}
?>
Note: The server-side tracking method can be implemented only on dynamic pages—that is, not placed on static HTML pages. This is because the script needs to perform dynamic processing of HTTP headers for referral information and cache-buster parameters.
Then add the server-side generated image snippet into the page source just before the HTML </body> tag:
<?php
  $googleAnalyticsImageUrl = googleAnalyticsGetImageUrl();
  echo '<img src="' . $googleAnalyticsImageUrl . '" />';
?>
Why Not Use Server-Side Tracking for All Tracking Requirements?
For many a web developer, the potential use of server-side code as an alternative tracking method to the client-side GATC is an attractive proposition—visitors do not have to wait for the ga.js file to load, JavaScript does not need to be enabled on the visitor’s browser, and all the tracking code is controlled in house. Google can be used as just a data repository.
However, the Google Analytics for Mobile Package can track only simple pageviews. It cannot track events, custom variables, e-ecommerce data, or social interactions. Therefore, server-side tracking is suitable only for feature phone/WAP sites. Also consider that the limitations just described for the GATC method are actually not that limiting—see the list item “Will tagging my pages with the GATC slow them down?” in the next section.
Common Pre-implementation Questions
Installing Google Analytics, as with any other web analytics tool, requires a commitment from you as a website owner—be it the hiring of expertise to achieve a best practice implementation or the use of your own time in reading this book and doing it yourself. Clearly you will want to know if the Google Analytics tool is right for you before investing in such a process.
Assuming you have already had an initial demonstration of the user interface, the following are answers to common questions I regularly receive from people about to decide on their Google Analytics commitment.
Who uses Google Analytics? The number of Google Analytics users is of the order of millions of accounts. However, in my experience only a very small fraction of these have a best practice implementation. Well-known brands that are Google Analytics users are shown at
www.advanced-web-metrics.com/blog/who-uses-google-analytics
Can I store visitor data locally? Yes. By adding a modification to your GATC, you can store a copy of the information sent to Google Analytics in your own web server log files. This is described earlier in this chapter. However, the data will make sense only if processed using Google Urchin software. Urchin is discussed in Chapter 3.
What visitors cannot be tracked? Google Analytics is able to track all visitors to your website. However, by default there are only four channel groupings, called mediums. These are direct, organic, search (paid and organic), referral. To augment them and to ensure precise measurement, you will need to implement campaign tracking, as discussed in Chapter 7.
What about tracking non-pageviews? In addition to tracking standard pageviews, Google Analytics can track error pages, file downloads, clicks on mail-to links, partial form completion, outbound links, error pages, Flash, and object interactions. This can be via a virtual pageview technique or event tracking. See Chapter 7 for further details.
Can we use an existing tracking tool with Google Analytics? Yes. Google Analytics will happily sit alongside any other page-tagging, logfile, or web analytics solution. As long as there are no JavaScript errors on your web pages, Google Analytics will collect visitor information independently. Similarly, for tracking paid campaigns, Google Analytics variables are simply appended to your existing landing page URLs—regardless of whether another vendor also has tracking variables.
Can we track visitors across different websites? Yes. You can track whether a visitor traverses many website domains owned or managed by you—for example, a visitor passing from www.mysiteA.com to www.mysiteB.com. Typically this happens if you process credit card information with a third-party payment gateway such as WorldPay, PayPal, SecureTrading, or something similar. Tracking across the two sites is achieved by ensuring that the links to the subsequent domains are modified to include a JavaScript function call to either _link (when using an href link) or _linkByPost (when using a form). This is discussed in detail in the section “Tracking E-commerce Transactions” in Chapter 7. Google Analytics cannot be used to track visits across websites that you do not control or manage.
What is the processing limit of Google Analytics? The free version of Google Analytics will process up to 10 million data hits per month per account. A data hit is a pageview, an event, or a transaction item. Generally speaking, unless you have a highly complex event tracking setup, the free limit is good for 10 million pageviews per month—approximately 50,000 visits per day. If you go beyond this you will need to implement data collection sampling, as discussed in Chapter 7.
Google Analytics Premium, the paid-for version, allows for up to 1 billion data hits per month per account. Putting that into perspective, only a handful of users globally receive that amount of traffic. Google Analytics Premium is discussed in Chapter 3.
Can the list of search engines be customized? Yes. Niche search engines or regional specific ones can be added. The defaults can be renamed if you wish. Customizing the list of search engines is discussed in Chapter 9.
Can we track transactions on a third-party payment gateway? Yes, provided you are able to add your GATC to your template pages hosted on the third-party site. Even if you cannot do this, there are workarounds. Ensure that you use either _link (when using an href link) or _linkByPost (when using a form) when linking to the third-party payment gateway website. This is discussed in detail in the section “Tracking E-commerce Transactions” in Chapter 7.
How often does Google Analytics process my data? Putting the feature of real-time reporting aside (discussed in Chapter 5), this depends on the volume of traffic to your site. If visits to your site number fewer than 50,000 data hits per day (hit = pageview + any associated events), reports can be processed within minutes. Between 50,000 and 1 million hits per day and reports are typically 3 to 4 hours in arrears. If you have more than 1 million hits per day, reports are processed once per day. Note that these timings are approximate based on empirical evidence.
If you are running Google Analytics Premium, all processing is guaranteed to be completed within 4 hours. The Premium product is discussed in Chapter 3.
Can I track the login names of my visitors? No. The tracking of personally identifiable information is strictly forbidden in the Google Analytics terms of service. See section 7 (US version) of the terms of service documentation: www.google.com/intl/en/analytics/tos.html.
How does Google Analytics attribute credit for a conversion? By default, credit for a conversion is given to the last clicked referrer. However, the Multi-Channel Funnels report shows all referral paths for a visitor who converts. Multi-channel funnels are discussed in Chapter 5.
Do I own the data in Google Analytics? If you are a user of Google Analytics Premium, your service-level agreement clearly identifies your organization as the owner of the collected data. If you use the free Google Analytics product, this is not the case. From a client perspective, having data ownership typically means the ability to ring-fence data and either delete it or bring it within your own organization should you choose. With the free Google Analytics product, data is replicated and distributed over the entire cloud of Google servers and data centers (estimated at over 1 million machines). Isolating a particular data set is therefore not offered for the free product. The Premium product is discussed in Chapter 3.
How long after creating an account can I expect to see data? Once your pages are tagged, you should start to see data in your account within 4 hours. However, for high-traffic websites, it can take up to 24 hours.
Do we have to modify the GATC in order to cross-segment data? No. Cross-segmentation is built into the Google Analytics product by drilling down into data when clicking links within the various reports. In addition, cross-segment drop-down menus exist in most reports.
Does Google Analytics use first-party cookies, and what happens if the visitor disables them? All Google Analytics data is collected via first-party cookies only. The GATC loads JavaScript into your site from google-analytics.com. Because it is your site that executes the JavaScript, all cookies are first party. You can view them in your browser privacy settings.
If cookies are disabled or blocked by a visitor, their data will not be collected.
Is the AdWords gclid auto-tagging parameter unique? Yes, the gclid parameter is unique for each keyword in your AdWords account.
Can Google reprocess my historical data? Google cannot currently reprocess historical data, so it is important to always have a default catch-all profile with no filters applied in case you introduce an error in your filters and lose data. Filters are discussed in Chapter 8.
How long does Google keep my data? For the standard version of Google Analytics, your data is retained for 25 months. If you use Premium (the paid-for version), data is guaranteed for 36 months. The Premium product is discussed in Chapter 3.
Can we customize the reports and dashboards? Yes. Custom reporting allows you to design one-of-a-kind reports to fit your specific needs. For example, perhaps you would like to see total goal completions by day of the month or view how affiliate sales are going. These are not standard reports in Google Analytics, but you can build them yourself using the custom report interface (see Chapter 9). You can also build your own dashboards either by adding a specific report to your dashboard, or building custom dashboard widgets (see Chapter 5).
Can I schedule a report to be emailed to me or a colleague regularly? Yes, each report has an Email link. The feature includes a scheduler to automate future emailings.
Can I import cost data from third parties? No. At present, importing cost data from third parties is not possible (for example, from Yahoo! Search Marketing or email marketing platforms). Note that all visitors are still tracked in the same way as other visitors are—using campaign variables appended to the landing page URLs. However, cost or impression data cannot be imported. If this is important to you, consider the option of exporting your Google Analytics data into the third-party system via the export API. This is discussed in Chapter 12.
How many goals can I track? By default, you can track up to 20 goals in Google Analytics and group them into categories. A goal can be defined as a pageview URL (or wildcard), an in-page event (or wildcard), a time-on-site threshold such as greater than 60 seconds, or a number-of-pages-per-visit threshold. By creating more profiles, you could also track additional goals. However, if you have numerous goals—for example, you have a PDF library you wish to track—it is better to have a pseudo e-commerce configuration. That is, you trigger a virtual transaction for each goal completed. That way, each goal is considered a product, and the entire e-commerce reporting section of Google Analytics is available to you. See the section “Monetizing a Non-E-commerce Website” in Chapter 11 for further details.
Can I monetize goals? Yes. You can assign a goal value within the goal configuration section of the Admin area of your Google Analytics account. In fact, this is strongly encouraged, particularly for non-e-commerce sites, so that you may see the intrinsic value of your website. Also see “Monetizing a Non-E-commerce Website” in Chapter 11.
Is there a relationship between the Google Analytics map overlay and the geotargeting options available in AdWords? Yes, the geo-IP database used for both services is the same, so you can use the map overlay information presented in Google Analytics to measure existing AdWords geotargeted campaigns or to help target new markets.
Does Flash break Google Analytics? No. Flash actions can be tracked, but it requires your input—that is, you need to implement event tracking within your FLA file. Chapter 7 discusses this in detail.
Can YouTube video plays be tracked? Yes, if the video is embedded into your pages. Tracking is achieved by communicating with the YouTube Player API as discussed in Chapter 7.
Will tagging my pages with the GATC slow them down? The GATC calls the ga.js file, which is approximately 18 KB in size, from Google servers. The ga.js file is the same for every page you tag on your site. Therefore, once a visitor has downloaded the file from their initial pageview, it will be cached on their machine—so no further requests for the file are required. In addition, the ga.js file is the same for all users of Google Analytics. If a visitor to your website has previously visited another website running Google Analytics tracking (highly likely), then the ga.js file will already be cached on their machine or Internet service provider’s caching server. The result is an industry-leading minimal download time for tagging your pages.
In addition the GATC implementation uses asynchronous JavaScript that loads the ga.js file in the background. This means there is no interference with the rest of your page loading.
Are gclids still valid if accounts are not linked? No. If your Google Analytics account is not linked to your AdWords account, AdWords visitors will not be tracked correctly. Therefore, if you use AdWords, you need to link your accounts in order to track visitors correctly.
Will using Google Analytics directly affect the ranking of my natural search results, ad quality score, or ad placement? No. There are a great number of myths, conspiracy theories, and—to be frank—rubbish written about this on various forums and blogs. As a search marketer, Xoogler (ex-Googler), and now web consultant, I have seen both sides of the “Google fence,” and that has been fascinating. I know from my experience as a senior manager at Google that individual website data, from Google Analytics or any other product, is not used to affect your natural search results, ad quality score, or ad placement. Of course, Google wants to improve its products for you—both as a website owner and as a general web user. To that end, aggregate data from multiple sources and across many web properties is used to improve them.
Can Google Analytics track search engine robots? No, not unless the robot can execute JavaScript and set cookies. Most search engine robots cannot do either of these. In particular, Googlebot does not do these and cannot execute the GATC. Similar to the previous question, there are many myths and rumors about Googlebot being able to execute JavaScript. However, as I’m writing this, this is not the case. If you wish to track robot activity, you can use Urchin software, as described in Chapter 3, or for Googlebot specifically, use Google’s Webmaster Central (www.google.com/webmasters). Note that apart from being aware that a robot has visited your website, there is little further information to be gained from analyzing search engine robot activity than what Google’s Webmaster Central can already provide.
In Chapter 6, you have learned the following:
How to get started You learned how to create your Google Analytics account either as part of your AdWords account or via the stand-alone version.
How to deploy the tracking code I explained the functions of the GATC code and how to deploy it; I also showed the help that server-side-delivered page tags can offer in simplifying the process.
How to back up and store data locally You learned how to back up traffic data in your local web server logfiles to give you greater flexibility, and I discussed the options for Google Analytics troubleshooting, auditing, and reprocessing.
The difference between accounts and profiles I showed you how to use accounts, profiles, and roll-up reports and what to consider if you are setting up accounts on behalf of clients as an agency or hosting provider.
How to import AdWords data I demonstrated how to link Google Analytics with your Google AdWords account and the importance of testing the auto-tag feature, especially when using AdWords in conjunction with a third-party tracking tool that employs redirects.
How to import AdSense data You learned how to link Google Analytics with your Google AdSense account.
How to integrate with Feedburner and Webmaster Tools You learned how to link Google Analytics with your Google Feedburner and Webmaster Tools accounts.
How to track mobile visitors You learned how to track visitors from mobile sites that cater to feature phones and that require no extra work if your visitors are only smartphone users.
How to manage expectations You learned the answers to common implementation questions.