
Chapter 7
Advanced Implementation
Now that you understand the basics of getting your web visitor data into Google Analytics, this chapter looks at the more advanced setup considerations you may require. I discuss capturing e-commerce transactions, tagging your marketing campaigns, and tracking events (those actions on your website that are not standard pageviews).
In addition, you’ll learn how to customize the Google Analytics Tracking Code (GATC) for your specific needs. For example, do you want to convert dynamic URLs into something more readable? Do you use multiple domains or subdomains? Do you have nonstandard requirements such as changing time-out settings, controlling keyword preferences, or setting sampling rates? All these scenarios and more are covered here.
In Chapter 7, you will learn:
- To use the _trackPageview function to create virtual pageviews
- To capture e-commerce transactions
- To track online marketing, including social media campaigns
- To track events such as Flash interactions and YouTube plays
- To customize the GATC for your specific needs
_trackPageview: the Google Analytics Workhorse
As discussed in Chapter 6, “Getting Started: Initial Setup,” the final part of the GATC is a call to the JavaScript routine _trackPageview. This is the main function for tracking a page within Google Analytics. _trackPageview sets up all the required cookies for the session and submits the data to the Google servers. Table 7-1 lists the cookies that Google Analytics sets. You can view these values by using the preferences settings of your browser—typically located in your privacy setup.
Table 7-1: The five cookies Google Analytics uses
| Cookie Name | Time to Live, Type | Purpose |
| __utma | 24 months, first-party | Stores domain and visitor identifiers such as, for example, unique ID, time stamp of initial visit, number of sessions to date. |
| __utmb | 30 minutes, first-party | Stores session identifiers. Used to detect session expiration. |
| __utmc | Session, first-party | Created for backward compatibility with urchin.js and is no longer used by ga.js. |
| __utmv | 24 months, first-party | Stores custom label. That is custom variables added with the _setCustomVar function (see Chapter 9). |
| __utmz | 6 months, first-party | Stores campaign variables such as, for example, referrer, keyword (if search engine), medium type (CPC, organic, banner, email). |
When viewing your Google Analytics cookies, you will notice that all values are preceded by a hash of the host.domain name of the host on which the GATC is located on (taken from the document.domain DOM property). The hash value is a fixed-length numerical value that represents your website. For example, a hash of www.mysite.com might be 202414657, and hence a value of the __utmv cookie could be 202414657.staff%20user. Similarly, for www.yoursite.com, the hash could be 195485746, with a __utmv cookie of 1954857467.subscriber%20user. Notice that the hash values are both nine digits in length, despite the domain length being different. This is the purpose of the hash. The domain-hashing functionality in Google Analytics uses this number to check cookie integrity for visitors.
If you have multiple subdomains, such as www.mysite.com and support.mysite.com, and you want to track users who pass across both of them, you need to modify how cookies are set by Google Analytics. Similarly, you also need to make changes if you pass visitors to other third-party domains that you control, such as from www.mysite.com to www.myproductsite.com. These special cases are discussed later in this chapter in the section “Customizing the GATC.”
With an understanding of how _trackPageview works, you can leverage it to track virtual pageviews and file downloads, as discussed next.
Tracking Unreadable URLs with Virtual Pageviews
If you have a site that includes a shopping cart or has more than a few dozen pages of content, chances are good that you are using dynamic URLs. In this context, these are pages generated on-the-fly (that is, the visitor requests them by clicking page links) as opposed to prebuilt static HTML content. This is how a content management system operates.
Dynamic URLs work by using a server-side scripting language, such as CGI-PERL, PHP, ASP, or Python, that pulls nonformatted information into a common design template. Usually, URL parameters define the page content. You can tell if you are using dynamic URLs by your page names. Static URLs have page filenames ending in .htm or .html. Dynamic ones have names that end in .cgi, .pl, .php, .asp, or .py. That does not mean all page names ending in .php are generated dynamically. However, if your website URLs also include a query (?) symbol followed by parameters such as name/value pairs, they are most likely dynamic URLs, as shown in the following three examples:
Example 1—a static URL:
http://www.mysite.com/local/product101.html
Example 2—a dynamic URL with one parameter:
http://www.mysite.com/catalogue/product.php?sku=123
Example 3—a dynamic URL with three parameters:
http://www.mysite.com/catalogue/product.php?sku=148&lang=en§=suede
In the dynamic examples, the query parameters sku, lang, and sect define the content of the page within a design template.
Note: Some web servers may use an alternative to ?, such as #, to define dynamic URL parameters.
For the purposes of Google Analytics, a URL structure is shown in Figure 7-1. The URL is broken down into its constituent parts here:
- Protocol: http://
- Hostname: www.mysite.com
- Directory: /catalogue
- Filename: product.php
- Query parameters: sku=123&lang=en§=leather
- URI: /product.php?sku=123&lang=en§=leather
Figure 7-1: Parts of a URL

For this scenario, the query terms used in the vast majority of cases are completely meaningless to the human reader; they are present in order to communicate with your database. Even if your URLs are static, they may still be meaningless to you, as shown in Example 1 earlier. To help those who are using reports, it is preferable to have reader-friendly URLs where possible. In fact, it can make a huge difference for an analyst’s engagement with your data, bringing clarity and ease of use to the reports.
Google Analytics can generate reader-friendly URLs by rewriting query terms and meaningless path and filenames as product names or descriptions and display them in your reports as virtual URLs, that is, virtual pageviews.
By default, Google Analytics tracks your viewed pages by calling the JavaScript routine _trackPageview in the GATC. As described in Chapter 6, the standard GATC calls _trackPageview without any additional values. As such, Google Analytics records the URI directly from your browser address bar and displays it in the reports as the pageview. You can override this behavior by modifying the _trackPageview call to create virtual pageviews. For example, using the URL in Figure 7-1, these could be:
_gaq.push(['_trackPageview', '/catalogue/products/english/leather/↵
brown tassel shoe']);
_gaq.push(['_trackPageview', '/catalogue/products/english/leather/↵
blue tassel shoe']);
_gaq.push(['_trackPageview', '/catalogue/products/english/suede/↵
high heeled boot']);
The additional quoted string contains the virtual pageview and path. This overrides the default URI value. When virtual pageviews are used, reports become much easier to read and interpret. As long as the additional text begins with a forward slash, virtual pageview names may be organized into any virtual directory style structure you wish. This does not mean all query terms and page URLs should be rewritten—only those that are important in identifying specific pages because some parts may be required for reporting on other information such as internal site search.
You can manually modify the additional text for _trackPageview on each page, or you can use the variables present within your web environment, such as your shopping cart or content management system, to build a more meaningful virtual URL. A good webmaster or web developer will be able to set this up quickly. At the very least, simply using what is already available in the example in Figure 7-1, you could have the following:
_gaq.push(['_trackPageview', '/catalogue/products/eng/leather/↵
prod code 123']);
Clearly, this is not the finished article, but it is a lot more readable to your report users than the original. As stated previously, you should use this technique only to rewrite URLs that are necessary to you. In addition, you should discuss the full consequences with your webmaster. For example, it is not necessary or desirable to rewrite the following:
http://www.mysite.com/search?q=shoes
In this example, the URI relates to an onsite search query that you will want to view in your Site Search reports. Rewriting this will break those reports. If your URL contains a mix of variables, some of which you want to overwrite and some you do not, then include the variables you wish to keep in the virtual pageview. For example, consider the following dynamic URL that contains a Site Search query term plus other dynamic variables:
http://www.mysite.com/search?q=shoes&lang=en §=leather
As a virtual URL, this could be written as follows:
_gaq.push(['_trackPageview', '/products/eng/leather/?q=shoes'),
Here, the original q=shoes query is written back into the virtual pageview, enabling you to view Site Search reports as normal. As with all URLs, if you wish to write query variables in your virtual pageviews, then use the standard convention—a question mark (?) to begin the variable definition and an ampersand (&) to separate multiple name/value pairs.
Note: A consequence of using virtual pageviews is that they will break the In-Page Analytics reports because the page doesn’t exist in the real world. If this feature is important to you, then don’t rewrite your URLs. However, you’ll likely find that the greater clarity virtual pageviews bring to the reporting of complex URLs far outweighs the loss of this feature.
Tracking File Downloads with Virtual Pageviews
By default, Google Analytics will not track your file downloads (for example, PDF, EXE, DOC, XLS, ZIP) because these pages cannot be tagged with the GATC. However, it is easy to track these by modifying the download link on your web pages using the virtual pageview technique just described.
In the following example, the link itself within your web page is modified, not the GATC. Here is the original HTML link that cannot be tracked:
<a href="mydoc.pdf">Download a PDF</a>
This new link is tracked in the virtual /downloads directory:
<a href="mydoc.pdf"
onclick="_gaq.push(['_trackPageview','/downloads/mydoc.pdf']);">
Download a PDF</a>
Tracking Partially Completed Forms with Virtual Pageviews
Virtual pageviews can also be used to track the partial completion of forms. This is particularly useful if you have long (more than 10 fields) or multipage forms, such as registration forms or feedback surveys. Using virtual pageviews in this way enables you to see where visitors bail out before getting to the Submit button. This is achieved using the Funnel Visualization report, as discussed in the section “Goal and Funnel Reports” in Chapter 5, “Reports Explained.”
In order to accomplish this, use the onBlur event handler to modify your HTML form fields as follows:
<form action="cgi-bin/formhandler.pl" method="post" name="theForm">
<input type="text" name="firstname" onBlur="↵
if(document.theForm.firstname.value != ''),_gaq.push(['_trackPageview'↵
, '/forms/signup/firstname'])">

<input type="text" name="lastname" onBlur="↵
if(document.theForm.lastname.value != ''), _gaq.push(['_trackPageview'↵
, '/forms/signup/lastname'])">

<input type="text" name="dob" onBlur="↵
if(document.theForm.dob.value != ''), _gaq.push(['_trackPageview'↵
, '/forms/signup/dob']) ">

<input type="text" name="address1" onBlur="↵
if(document.theForm.address1.value != ''), _gaq.push(['_trackPageview'↵
, '/forms/signup/address1']) ">
.
.
</form>
The if() != '' statement is included to confirm that each form field has content before the virtual pageview is created. Of course, not all form fields will be compulsory to the visitor, so use the if statement appropriately.
Warning: The virtual pageviews tracked in this example are labels that enable you to confirm whether a field has been completed—they are not personal information submitted by the visitor. It is against the Google Analytics terms of service to track personally identifiable information. For more information, see www.google.com/analytics/tos.html.
Virtual Pageviews versus Event Tracking
Using virtual pageviews to track file downloads, or partial form completion, inflates your pageview count because obviously these are not real pageviews. Therefore, consider carefully your use of them.
If the action you are tracking can be considered as analogous to a pageview, then the virtual pageview technique is valid. In my opinion, this is the case for readable file downloads (PDF, DOC, XLS, PPT, and the like) and partial form completion. My hypothesis is that such content is readable in the same way as other HTML pages from your site—the reader is agnostic to the file format and so such virtual pageviews are comparable with all other pageviews on your site.
The alternative approach is to use Event Tracking, as discussed later in this chapter. Events are reported separately from pageviews and so are not easy to compare with pageview content. My recommendation is therefore to use Event Tracking only where the action being tracked is in no way related to a pageview; that is, the visitor is not accessing a page of readable content but instead is, for example, downloading ZIP and EXE files or interacting with a video or animation file. See the section “Event Tracking” later in this chapter for examples.
Tracking E-commerce Transactions
Before describing how to capture e-commerce data, consider the salient points to take into account when collecting visitor transactional data:
Currency formatting and labels The values reported for item price and transaction totals do not respect any currency formatting. For example, the first instance of either a comma or a period indicates a fractional value. Therefore, use 1495.00 (or 1495,00) for the captured amount and not 1,495.00 because the latter would be reported at 1.495. A currency label can be displayed in your reports, such as, for example, $, £, ? (24 currency symbols are available). However, the value is currency agnostic. That is, the currency is purely a label for display purposes.
Google Analytics with multiple currencies Because transaction and item values are currency agnostic (see the previous list item), you need to give special consideration if your website allows visitors to purchase in multiple currencies or if you are running multiple websites with localized currency values.
If you allow purchases in different currencies, capture only one fixed value for Google Analytics and use the appropriate label in your reports. For example, if you sell an item for £39.00, ?49.00, and $59.00, choose only one of these values for Google Analytics, irrespective of what your visitor pays with. Of course, you can perform an exchange rate calculation on each item to unify the currency and then forward this to Google Analytics, but that will confuse your marketing department, which will need to back out exchange rate fluctuations in order to ascertain whether a campaign is successful or not.
Similarly, if you are running multiple websites with localized currency values, then these will not be converted into the single currency label you have set for each profile. Best practice is therefore to use one Google Analytics account for each localized website. This makes sense when you consider that each localized website is also likely to be running in its own time zone and its own AdWords campaigns, where the cost data is also localized. To generate an aggregate report of all local websites, add a second GATC to your pages with transactional data unified to a single currency. Chapter 6 discusses this scenario in more detail in the section “Roll-up Reporting.”
Maintaining your back office systems Google Analytics is not a substitute for your back office or customer relationship management system—there will always be discrepancies between these two data sources. For example, JavaScript-disabled browsers, blocked or deleted cookies, multiple visitor clicks, Internet connection blips, returned orders, implementation mistakes, and so on all add error bars when it comes to aligning web visitor data with order fulfillment systems. As a rule of thumb, counting transactions in Google Analytics usually differs between 5 and 10 percent from other systems. Accuracy considerations are discussed in Chapter 2, “Available Methodologies and Their Accuracy,” in the section “Comparing Data from Different Vendors.”
Instead, use Google Analytics E-commerce reports to measure the effectiveness of your marketing campaigns and your website’s ability to convert a visitor into a customer.
Importing customer data into your CRM system Google Analytics does not collect any personally identifiable information, and it is against the terms of service to attempt to collect such information. However, it is possible to pass Google Analytics cookie data, along with the transaction detail, to your CRM system. In this way, for example, your back office system can contain information on how your customers arrived at your website and how long it took them to make their first purchase and so forth. This is discussed in Chapter 12 in the section “Extracting Google Analytics Information.”
With these points in mind, the first step is to get your visitor transactional data into Google Analytics, and I discuss this process next.
Capturing Secure E-commerce Transactions
Google Analytics supports a client-side data-collection technique for capturing e-commerce transactions. With some straightforward additions to the GATC on your purchase receipt page, you can configure Google Analytics to record transaction and product information. The following is an example GATC to do this:
<script type="text/javascript">
var _gaq = _gaq || [];_
_gaq.push(['_setAccount', 'UA-12345-1']);
_gaq.push(['_trackPageview']);

_gaq.push(["_addTrans",
"1234",                        // unique order ID - required
"Mountain View Book Store",    // affiliation code or store name
"89.97",                       // total value – required
"6.30",                        // tax
"5"                           // shipping
]);

_gaq.push(["_addItem",
"1234",                        // order ID - must match above - required
"DD44-BJC",                    // SKU code (stock keeping unit) - required
"Advanced Web Metrics",        // product name - required
"Web, Technical",              // category name
"29.99",                       // unit price - required
"3"                            // quantity – required
]);

_gaq.push(['_trackTrans']);

(function() {
var ga = document.createElement('script'),
ga.type = 'text/javascript'; ga.async = true;
ga.src = ('https:' == document.location.protocol ? 'https://ssl' : ↵
'http://www') + '.google-analytics.com/ga.js';
var s = document.getElementsByTagName('script')[0];
s.parentNode.insertBefore(ga, s);
})();
</script>
For this example, three additional lines have been added within the GATC:
- The transaction line, as defined by _addTrans, which is a list of comma-separated values delimited by quotation marks
- The product item line, as defined by _addItem, which is a list of comma-separated values delimited by quotation marks
- A call to the JavaScript function _trackTrans, which sends the transaction and item information to Google Analytics
The order of these lines within your GATC is important, so maintain the order shown here on your receipt page.
As shown in the code example, both _addTrans and _addItem can be written on multiple lines for clarity. Conversely, they can also be written on a single line, which may be an easier format for you to use with transactions containing multiple items:
_gaq.push(["_addTrans", "1234","Mountain View Book Store",↵
"89.97","6.30","5"]);
_gaq.push(["_addItem", "1234","ISBN-1118168445",↵
"Advanced Web Metrics","Web","29.99","2"]);
_gaq.push(["_addItem", "1234","ISBN-9780321344755",↵
"Don't Make me Think","Web","29.99","1"]);
For each transaction, there should be only one _addTrans entry. This line specifies the total amount for the transaction and the tax and shipping amounts. For each item purchased, there must be an _addItem line. That is, two purchased items require two _addItem lines, and so forth. Item lines contain the product names, codes, unit prices, and quantities. The variable values required are shown in Table 7-2. You obtain these from your e-commerce shopping system.
Table 7-2: E-commerce parameter reference guide
| Variable | Description |
| Transaction Line Variables | |
| order-id | Your internal, unique order ID number |
| affiliation | Affiliation or store name (optional) |
| total | Total value of the transaction |
| tax | Tax amount of the transaction (optional) |
| shipping | The shipping amount of the transaction (optional) |
| Item Line Variables | |
| order-id | Your internal, unique order ID (must match the transaction line) |
| sku-code | Product stock-keeping unit code (must be unique for each product) |
| product-name | Product name or description |
| category | Category name of the product (optional) |
| price | Unit price of the product |
| quantity | Quantity ordered |
If you don’t have data for a certain variable, leave the quotation marks for the variable empty (with no spaces). For example, if you have no affiliate network, shipping is included in the purchase price, and you do not use categories, you would use the following:
_gaq.push(["_addTrans", "1234","","89.97","6.30",""]);
_gaq.push(["_addItem", "1234","ISBN-1118168445",↵
"Advanced Web Metrics","","29.99","2"]);
_gaq.push(["_addItem", "1234","ISBN-9780321344755",↵
"Don't Make me Think","","29.99","1"]);
The Importance of Unique Order IDs
It is important to use unique order IDs (consisting of numbers or text or a mixture of both) for each transaction. Otherwise, separate transactions that have the same order ID will be compounded, rendering the data meaningless. This can happen to you if customers inadvertently multiple-click the final purchase button. For best practice, prevent this behavior. Following is a JavaScript example:
<script>
var firsttime;
function validator(){
 if (firsttime == "Y"){
   alert("Please wait, your payment is being processed.");
   return (false);
 }
 firsttime = "Y";
 return (true);
}
</script>
Paste the above code into the <head> area of your HTML page that contains the final e-commerce checkout link or button. Then within your HTML of the same page, modify your submission form as follows:
<FORM METHOD="POST" ACTION="authorize.cgi" onSubmit= ↵
"return validator()">
The onSubmit event handler will prevent multiple submissions of the form, thus preventing Google Analytics from capturing any duplicate transaction IDs.
If your purchase form already has an onSubmit event handler, append the validator call as follows:
<FORM METHOD="POST" ACTION="authorize.cgi" onSubmit= ↵
"return checkEmail; return validator()">
E-commerce Guidelines
Keep in mind these guidelines when implementing e-commerce tracking.
The SKU code is a required parameter for every item that is added to the transaction. If a transaction contains multiple items and the SKU is not supplied for every item, a GIF request is sent only for the last item added to the transaction for which the SKU is provided. In addition, if your inventory has different items with the same SKU, and a visitor purchases both of them, you will receive data for only the most recently added. For this reason, you should make sure each item you offer has a unique SKU.
If you are implementing e-commerce tracking and using a third-party payment gateway, you will need to configure cross-domain tracking as well. See the section “Transactions via a Third-Party Payment Gateway.”
Transactions via a Third-Party Payment Gateway
If your website initiates a purchase checkout process on a separate store site (for example, if you send customers from www.mysite.com to a payment gateway, such as www.secure-site.com), you need to make additional changes to your web pages. This is because Google Analytics uses first-party cookies for best-practice purposes. As discussed in Chapter 2, only the domain that sets first-party cookies can read or modify them—a security feature built into all web browsers by default. You can overcome this and pass your Google Analytics first-party cookies to your third-party domain with the following two-step method.
- First, you will modify the GATC on all your pages—on both your primary site and all store site pages. This is to allow cookie information to be shared.
- Second, any link or button that causes the visitor to traverse across sites requires modification.
Note: Strictly speaking, the first step is required only on two pages—the ones that pass over and receive the first-party cookies. Typically, this is the last page of the checkout process that occurs on www.mysite.com and the entry page visitors use to complete their checkout on www.secure-site.com. However, by using the same GATC throughout your website, you minimize any potential errors, particularly if you later add further crossover links to your pages; that is, additional ways for visitors to check out via the third-party payment gateway. By defining only one GATC, you provide a simple level of future-proofing your tracking requirements.
Modify your GATC as follows:
<script type="text/javascript">
  var _gaq = _gaq || [];
  _gaq.push(['_setAccount', 'UA-12345-1']);
  _gaq.push(['_setDomainName', 'mysite.com']);
  _gaq.push(['_setAllowLinker ', true]);
  _gaq.push(['_trackPageview']);

(function() {
var ga = document.createElement('script'),
ga.type = 'text/javascript'; ga.async = true;
ga.src = ('https:' == document.location.protocol ? 'https://ssl' : ↵
'http://www') + '.google-analytics.com/ga.js';
var s = document.getElementsByTagName('script')[0];
s.parentNode.insertBefore(ga, s);
})();
</script>
The modified GATC does two things: _setDomainName forces the domain hash of the Google Analytics cookies to be explicitly set to the given string and sets the cookie’s host to be the same value. The use of setAllowLinker then allows cookies to be pushed from one domain to the next.
Warning: In previous editions of this book and in the Google online documentation up until August 2011, _gaq.push(['_setDomainName', 'none']) was the recommended setting. Although it’s now deprecated, if you are already using this, it is important to keep it in place. This is because Google Analytics checks the domain hash when reading cookies directly. If you remove this, cookies from returning visitors will be ignored because the hash values will not match the new cookies set. For this reason, sites that are already set with _gaq.push(['_setDomainName', 'none']) should not be modified.
The second step is to modify the web page on www.mysite.com that calls the third-party gateway site, in one of two ways:
Link method If your website uses a link to pass visitors to the third-party site, modify it to look like this:
<a href="https://www.secure-site.com/?store=parameters"
onclick="_gaq.push(['_link', this.href]); return false;">
Continue to Purchase</a>
With this method, you are passing the Google Analytics cookies to the receiving domain by appending them to the URL string. If you see __utma, __utmb, and __utmc parameters in your third-party landing page URL, then this has worked.
Note: Note the use of return false; here. This ensures that for visitor browsers that have JavaScript disabled, the href link will be followed without error. Of course, if JavaScript is disabled, Google Analytics tracking won’t occur. However, the modified link will still work.
Form method If your website uses a form to pass visitors to the third-party site, then modify the form as follows:
<form method="post" action="http://www.secure-site.com/process.cgi"
onSubmit="_gaq.push(['_linkByPost', this]);">
With this method, the Google Analytics cookies are passed to the receiving domain via the HTTP headers. This will work even for forms with method="GET". You can verify that this has worked by viewing the HTTP headers sent in Firefox using the add-on LiveHTTPheaders (http://livehttpheaders.mozdev.org).
I recommend using the first _link method to test to see whether your setup is correct; that is, you can see your cookie values in your third-party landing page URL. Then switch to the _linkByPost method if required.
What to Do When a Third-Party Gateway Does Not Allow Tracking
If your third-party payment gateway does not allow you to modify its payment pages—that is, add your GATC—you cannot directly capture completed transactions. However, there are workarounds, as detailed in the following sections.
Use a Page Callback
Use a page callback to your website from the third-party gateway site. The callback is a page the visitor is automatically returned to on your site when the transaction completes successfully. Many payment gateways offer this feature.
Provided this page is unavailable to visitors other than via the callback, you can place your e-commerce variables on the same page. They are under your control because the callback page is hosted within your website. An important step of this method is to ignore the third-party site as referrer. By doing so, you maintain the original referrer details in the purchaser’s cookie. Otherwise, all purchasers will show their referrer as being from www.secure-site.com. To avoid this, do one of the following:
- Add a line of code to the GATC of the callback page:
_gaq.push(['_addIgnoredRef', 'secure-site.com']);
This should be placed just before the call to _trackPageview.
- Alternatively, append utm_nooverride=1 to the callback URL:
www.mysite.com/purchase-callback.php?utm_nooverride=1
When you use either of these methods (you can even use both to be double sure), e-commerce data will align closely with that of your third-party gateway company. I recommend this method whenever available. If you cannot use this approach, there are workarounds (as described next). However, seriously consider changing your third-party payment partner. There are numerous solutions that are flexible enough to appreciate that tracking e-commerce performance is an important element of the purchasing process.
Track The Purchaser’s Intent
For a basic approximation of a transaction, use an onClick or onSubmit event handler at the point where visitors are just about to click away to the payment gateway. Using one of these methods, call the _trackTrans function and capture the transaction details. The addTrans and addItem calls also must be configured on the same page.
An example call via a link would be as follows:
<a href="https://www.secure-site.com/?store=parameters" onclick="↵
_gaq.push(['_link', this.href]); return false;">
Continue to Purchase</a>
The obvious caveat with this method is that you are not tracking completed transactions but the intent to complete. Perhaps the visitor’s credit card details are declined, or they change their mind at the last minute before completing payment. Whatever the reason, your Google Analytics E-commerce reports will only be a rough guide to transaction activity and are unlikely to align well with reports from your third-party gateway company.
Create a Server-Side Transaction Hit
A transaction is registered with Google Analytics when the _addTrans function is called from a page. It is also possible to create a transaction data hit by server-side methods, that is, with no pageview required. Essentially, the server processing the confirmed purchase generates the GIF request (data stream) required by Google Analytics.
The GIF request is a long URL request to google-analytics.com containing parameters that define the data sent. Here is an example of part of a GIF request:
http://www.google-analytics.com/__utm.gif?utmwv=4&utmn=769876874&utmhn=example.com&utmcs↵
=ISO-8859-1&utmsr=1280x1024&utmsc=32-bit&utmul=en-us&utmje=1&utmfl↵
=9.0%20%20r115&utmcn=1&utmdt=GATC012%20setting%20variables&utmhid↵
=2059107202&utmr=0&utmp=/auto/GATC012.html?utm_source=www.gatc012.org↵
&utm_campaign=campaign+gatc012&utm_term=keywords+gatc012&utm_content↵
=content+gatc012&utm_medium=medium+gatc012&utmac=UA-30138-1&utmcc=↵
__utma%3D97315849.1774621898.1207701397.1207701397.1207701397.1%3B...
The definitions of the GIF request parameters are available at the following location:
http://code.google.com/apis/analytics/docs/concepts/gaConceptsOverview.html#gifParameters
By populating this URL with the correct parameters for your transaction, your server can register the data with Google Analytics without the need for a confirmation pageview. The downside of this method, however, is that apart from requiring the help of a good web developer, the e-commerce tracking code is hidden from view. That means you will always have to keep that helpful developer close at hand for troubleshooting purposes.
Tracking Negative Transactions
All e-commerce organizations have to deal with product returns at some point, whether because of damaged or faulty goods, order mistakes, or other reasons. It is possible to account for these within your Google Analytics reports by processing a negative transaction. However, I don’t recommend this for two reasons:
Aligning web visitor data with internal systems does not yield perfect results. A negative transaction usually takes place well after the original purchase, therefore in a different reporting period. This is generally more confusing than simply leaving the returned transaction in your reports.
Returns are not representative of your marketing or website effectiveness.
If subsequently I decide I don’t like the shoes and return them, this would be because of the product, perhaps a quality issue. That is separate from the effectiveness of your marketing; just because I return my running shoes does not mean that no further marketing investment should be made for that product.
For completeness, I include how to process a negative transaction here.
First, create an internal-only version of your completed purchase form that can be edited for the negative details. The form should be edited in a text editor and not loaded in a browser at this stage; otherwise, it will trigger the code. To remove an order, edit as follows.
For the _addTrans line:
- Use the same order-id for the transaction as the one used for the original purchase.
- Ensure that the total value is negative.
- Ensure that the tax and shipping variables are negative.
For the _addItem line:
- Use the same order-id for the transaction as the one used for the original purchase.
- Ensure that the price value is positive.
- Ensure that the quantity value is negative.
Process the form details by loading the modified copy of your order receipt page into your browser. This will call the _trackTrans function as if it were a regular purchase.
By this method, you will still be able to see the actual transaction and the duplicate negative transaction when you select the days on which each of these transactions was recorded. However, when you select a date range that includes both the original and the negative transaction, the transaction will not be included in the total revenue reported.
Of all the setup and implementation advice I provide in this book, showing you how to correctly track your marketing activity is probably the most important. Typically, your traffic acquisition costs are greater than the cost to develop and build and maintain your website. Therefore, knowing which marketing campaigns are effective and determining which of them produce a positive return on investment is a key requirement of any web analytics tool.
By default, Google Analytics reports on traffic from three referral types (mediums):
Organic Visits from organic (free) search engine listings such as Google, Yahoo!, Bing, and Baidu
Referrals Visits from people who have clicked a link on another site, such as affilaite1.com, partner2.com, or Facebook.com
Direct Visits from people who have remembered your web address and typed it directly into their browsers
If you do nothing other than install the GATC on your pages, visits from these three referral mediums will show in your reports, along with concomitant information such as the name of the search engine, keywords used (organic), and website address (referral). However, if you use campaign tracking, a much richer report emerges. Figure 7-2 compares the marketing performance of a default report and one where campaign tracking has been implemented. A similar report can be viewed to see how this relates to revenue or goal conversions.
Figure 7-2: Comparing (a) the default marketing report with (b) one that uses campaign tracking

The technique for gaining such rich marketing reports is the use of campaign tracking parameters in your landing page URLs. A landing page is the destination page on which you want visitors to enter your website following a click-through on a referring website. In most cases, you can control what destination page your visitors arrive at (land on) by specifying the URL. For example, if you have a link on a product portal directory that specializes in all things widget, then you may decide to point your link URL to a specific product landing page such as www.mysite.com/widgets.htm as opposed to your generic home page. That way, you improve the experience for visitors who click through by showing them a specific page relevant to their interests.
For the product portal directory example, nothing more is required. You will see how many visitors and conversions are received from that website in your Traffic Sources Sources Referrals report. However, what if you also have a paid banner advertisement on the portal directory? Without the use of campaign tracking parameters in your landing page URLs, you will not be able to differentiate visits from these two visitor types—referral click-throughs and banner click-throughs—because they come from a single source.
Campaign tracking also allows you to correctly track visitors from social network sites such as Facebook and Twitter. This is important because many different conversations may be taking place about your products and brand. Without campaign tracking, all you see in your reports are referral visitors from the social network site in question. With campaign tracking in place, you can track visits from a specific social campaign and even aggregate all social referrals together as a single medium so they can be compared against the performance of other mediums, such as organic, paid search, and email visitors.
Another use of campaign tracking is to track a visitor who does not click a web page to reach your website but instead reaches it, for example, through email marketing or by clicking from within a document such as brochure.pdf because neither a PDF document nor a user’s email program can receive a GATC.
I illustrate all these examples in the following sections. However, you should first understand how to set up your campaign tracking.
Note: With a little lateral thought, you can also apply campaign tracking to track the performance of offline marketing campaigns. This is discussed in Chapter 11, “Real-World Tasks.”
Adding Campaign Parameters to Your Landing Page URLs
The principle and process are straightforward—you append additional Google Analytics parameters to the end of your URLs. Following are two examples (which will be discussed in more detail) of tagging landing pages for use in paid campaigns on the Yahoo! Search Marketing network:
Example static landing page
Original landing page URL:
http://www.mysite.com/widgets.htm
The landing page URL with campaign parameters:
http://www.mysite.com/widgets.htm?↵
utm_source=yahoo&utm_medium=ppc&utm_term=widgets
Example dynamic landing page
Original landing page URL:
http://www.mysite.com/widgets.php?prod=101
The landing page URL with campaign parameters:
http://www.mysite.com/widgets.php?prod=101&↵
utm_source=yahoo&utm_medium=ppc&utm_term=widgets
Note: Do not add campaign parameters to your AdWords campaigns. This is done for you automatically (see “Integrating with Your AdWords Data” in Chapter 6).
Whether you wish to track pay-per-click networks, social media campaigns, banners, links within documents, or email marketing, the same variables are applied in this straightforward way. If you don’t use campaign tracking parameters, visitors from these to your site are still being tracked. However, the referrer information is not known, and so it becomes aggregated with other sources, as shown in Table 7-3.
Table 7-3: Visitor attribution with and without the use of campaign tracking
| Referral | Example Attribution with Campaign Tracking in Place | Attribution without Campaign Tracking |
| Paid search (other than AdWords) | cpc | Labeled as “organic search” with specific campaign information lost. |
| Social network site | social media | Labeled as “referral” and buried in your reports among other referrers. |
| Display ad | banner | Labeled as “referral” and buried in your reports among other referrers. |
| Affiliate | affiliate | Labeled as “referral” and buried in your reports among other referrers. |
| Email marketing | Labeled as “direct” with no information about which particular email generated the visit. If web mail is used, the visit will be labeled as referral. | |
| Links from within documents (e.g., PDFs) | docs | Labeled as “direct” with no information about which particular document generated the visit. |
In Table 7-3, I deliberately use the term example attribution in the column heading because it is you who defines what exact label shows within your reports. For example, by default in the AdWords reports, paid search is listed as medium=cpc (cost-per-click). You may wish to follow this format for your other paid search campaigns or perhaps use ppc (pay-per-click) to differentiate from AdWords.
There are certain links that do not require campaign tracking. For instance, you should not use this method for organic (nonpaid) links from search engines, and it isn’t necessary to use this with links that come from referral sites where your link listing is free, such as web portals—these will correctly show in your referral reports.
Warning: Do not attempt campaign tracking for internal links (links within your website). Doing so will cause Google Analytics to restart the session for the same visitor. That is, the visit will be double-counted with new referrer details, and you will not be able to trace back any subsequent transactions or goal completions to the original referrer. Instead, use custom variables for this purpose, as explained in the section “Labeling Visitors, Sessions, and Pages” in Chapter 9, “Google Analytics Customizations.”
Do Not Use Campaign Tracking for SEO Purposes
For search engine optimization (SEO) purposes, it is important not to use campaign tracking for links that are visible to search engine robots. You do not want to have such URLs indexed by the search engines because they are viewed as different URLs to the same content and therefore appear as duplicates to the search engines—a technique that is considered search engine spam.
Apart from the hazard of your page rankings being penalized as spam, it also is not necessary to do this. Any web page that contains a link to your website will be tracked via Google Analytics by default and the referrer information reported. If you have a special case, you can customize a particular referrer using a rewrite filter. Creating filters is discussed in Chapter 8, “Best Practices Configuration Guide.”
When you are adding campaign tracking to your landing page URLs, there are five Google Analytics parameters to consider, shown in Table 7-4.
Table 7-4: Landing page campaign variables
| Tag Variables | Condition | Description |
| utm_source | Required | Used to identify a particular search engine, newsletter, or other referral source |
| utm_medium | Required | Used to identify a medium such as, for example, CPC, PPC, banner, email, PDF, DOC, or XLS, etc. |
| utm_term | Optional | Used for paid search to note the keywords being targeted for a particular ad |
| utm_content | Optional | Used for version testing to distinguish different content, such as for example, ads that link to the same landing page |
| utm_campaign | Recommended | Used to identify different strategic campaigns from the same source-medium combination, such as, for example, for an email newsletter using “spring promotion” or “summer promotion” |
As previously shown, campaign links consist of a URL address followed by a ? (or & if you have existing parameters) and two or more of your campaign variables. Appending these additional variables to your landing page URLs overrides any browser-detected referral information, that is, document.referrer. It is this that enables Google Analytics to differentiate visitors—for example, between an organic visitor from Yahoo! and a banner visitor from Yahoo! or between a direct visitor and one who clicked an email link. Because up to five variables are allowed, the URLs can appear complicated. To get you started, and to avoid worrying about the exact syntax, use Google’s URL Builder tool at
www.google.com/support/googleanalytics/bin/answer.py?answer=55578
The URL Builder tool creates the campaign-tracked links for you—you simply copy and paste the resultant URL as your ad landing page URL. Once you understand the structure of the campaign-tracked URLs, you may want to switch to using a spreadsheet of these for bulk upload into your pay-per-click account or other management system.
Note: If you are using a third-party ad-tracking system to track click-throughs to your website, your visitors will be passed through redirection URLs. If this describes your scenario, be sure to test your landing page URLs because redirection may break them. You can test by clicking the resultant combined link (ad-tracking link plus campaign-tagged link). See “Testing after Enabling Auto-Tagging” in Chapter 6 for further details.
The examples in the following sections demonstrate the best ways to tag the five most common kinds of online campaigns: banner ads, email campaigns, social media campaigns, paid keywords (pay-per-click), and links within digital documents. Note that each landing page URL is specific to the campaign you create it for—do not use it anywhere else!
Banner Ads
Consider the following hypothetical marketing scenario on the AOL.com website: You have a graphical banner for branding purposes and an organic listing from the nonpaid listings. AOL has informed you that the banner will display only when a visitor searches for the term ”shoes”; in this case the banner campaign is about Sprint shoes. These are two different campaigns that are from the same referral domain name (reported as aol.com) and can refer a visitor to your website.
Using the URL Builder tool, shown in Figure 7-3, you can differentiate visitors from banner click-throughs by supplying the resultant campaign-tracked landing page URL to the person or agency setting up your AOL banner. It is not necessary (or possible) to tag your AOL organic listing because it will be detected automatically.
If you were then to run the same banner ad but on a different website or portal—Yahoo! for example—only the value of utm_source would change (to Yahoo). It’s important to ensure that the other parameters remain the same so the performance of the banner campaign can be compared across all other placements.
Note: Even if your banner is placed on a social media site, such as Facebook, the medium parameter value remains banner so that you can compare the performance of all banners side by side.
Email Marketing
Continuing with the previous example, suppose you also plan to run a monthly email newsletter that begins in July 2012. The newsletter is for the shoe department and concerns a summer promotion. You want to ensure that all click-throughs from the email campaign are tracked in your Google Analytics reports.
Figure 7-3: Campaign tracking banner ad URLs

To add to the mix, your marketing department also wants to compare the effectiveness of changing the product image used in the email. They would like to know whether visits and conversions vary depending on the image used in the sent emails (this is the basis of A/B split testing).
You can track these two email campaigns by using the example landing page URLs shown in Figure 7-4. In both cases, the Campaign Content field is used to differentiate the email formatting. You then supply the resultant campaign-tracked landing page URL to the person setting up your email marketing.
You may have numerous links within the same email message that point to different landing pages on your website. Therefore, you’ll need to adjust each landing page URL accordingly. For example, shoes.htm may become boots.htm. However, the tracking parameters will remain the same.
As for the banner campaign previously described, if you were to send the same campaign email but to a different audience (a different segment of your mailing list database, for example), only the value of utm_source would change (for example, to US_westcoast). The other parameters remain the same so the performance of the email campaign can be compared across all recipient segments.
Figure 7-4: Campaign tracking an email campaign containing a split test: (a) product image 1, (b) product image 2

Social Media
Campaign tracking for social media campaigns is required for two reasons. First, according to public statements from Facebook (www.facebook.com/press/info.php?statistics) and Twitter (http://blog.twitter.com/2010/09/evolving-ecosystem.html), approximately 50 percent of consumers of content on Facebook and Twitter do so via mobile. Assuming these users access the site via the most convenient route—that is, use an app rather than using their mobile web browser—no referral information is available when the reader subsequently clicks through to your website (an app isn’t a web referrer). Second, a click-through to your site may not take place on the social network site on which the link was originally placed—a visitor may reshare your link on another social network of their choice. For example, a URL shared on LinkedIn may be tweeted.
To ensure that you are able to track the impact of your social campaign (or conversation), you append campaign parameters to your landing pages in the usual way, as shown in Figure 7-5.
For the same campaign running across different social media sites, replace the utm_source parameter. Following the example shown in Figure 7-5, if you were to run the same campaign on LinkedIn, then you would replace utm_source=linkedin, and so forth.
URL shorteners are often used on social networking sites, particularly on Twitter, where space is a premium, and sites where it is not possible to hide your campaign parameters within HTML anchor text (that is, when your full URL is displayed in ugly plain text beginning http://). If you use a URL shortener, such as bit.ly, tinyurl.com, or goo.gl, ensure that you add your campaign parameters before you shorten it.
Paid Search
As discussed earlier, Google automatically tags your paid keywords from AdWords campaigns so you don’t have to. However, campaigns running on other paid networks do require tagging. Otherwise, a paid visitor will be reported as an organic (nonpaid) visitor with the campaign information lost. Figure 7-6 shows an example URL Builder for pay-per-click Yahoo! Search Marketing visitors.
You supply the resultant tagged landing page URL to the person setting up your pay-per-click campaigns. You should use a similar approach for other pay-per-click accounts that you run—for example, Microsoft adCenter. The only difference is that the Campaign Source field would be set as adCenter (or any phrase you wish to use to identify such visitors).
Figure 7-5: Campaign tracking for social media: (a) Facebook; (b) Twitter
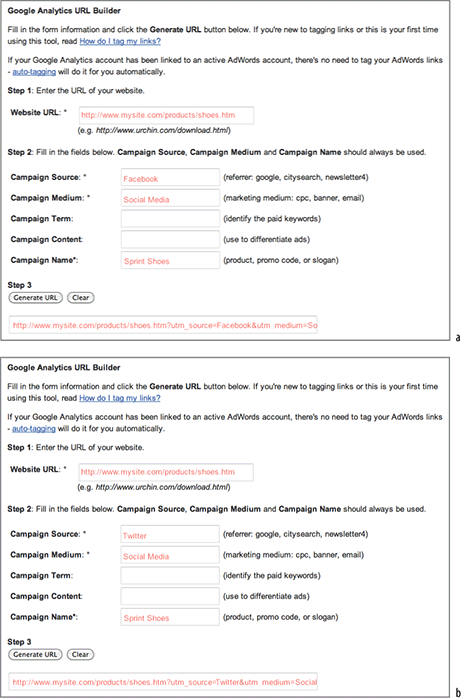
Figure 7-6: Campaign tracking paid search
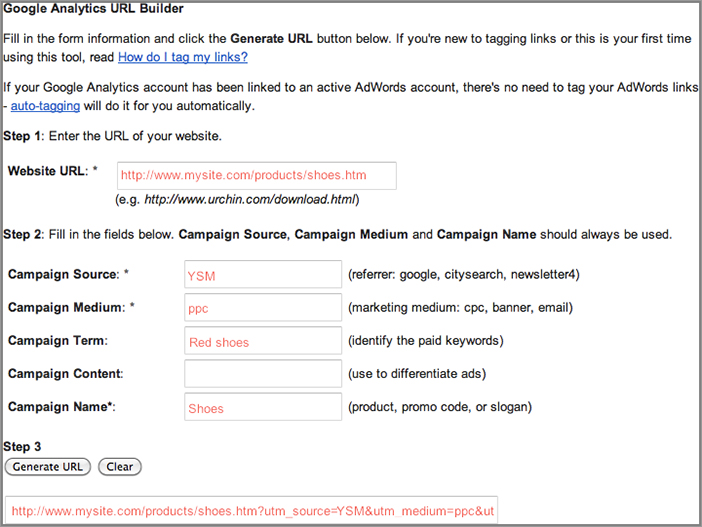
Note: Google AdWords auto-tagging always labels AdWords visitors as medium=cpc (cost-per-click). You may wish to continue this labeling convention for Yahoo! Search Marketing, Microsoft adCenter, and other pay-per-click networks so they are reported together when viewing Medium reports. However, because AdWords is so prevalent for online advertising, I have found it useful to group all other pay-per-click networks as medium=ppc (or any other alternative label) and treat them as if they were a separate medium. This enables them to be compared against AdWords as a whole.
Embedded Links within Digital Documents
If you host non-HTML content on your website, such as catalogue.pdf, spec-sheet.doc, or price-matrix.xls, you probably have links within those documents that point back to your website. By using campaign tracking parameters, you can track visits that result from those documents, which in turn will enable you to monetize your digital collateral. Without this, visitors from your digital documents are labeled as direct—that is, they are grouped together with visitors who typed the URL directly into their browser or bookmarked your site from a previous visit.
Using the method shown in Figure 7-7 ensures that links from your digital collateral are given credit for referring visitors to your website. Supply the resultant landing page URL to the people who create such documents. Alternatively, coach your content creators to use the URL Builder tool themselves. That way, they will be tracking links as an integral part of their content creation and design process.
Figure 7-7: Tagging embedded links within digital collateral

Creating Custom Campaign Fields
If you have been using another tracking methodology or tool, you may have already manually tracked your landing page URLs for paid campaigns, banners, email, and digital collateral. Rather than disregard these or append the additional Google Analytics variables, it is possible to configure Google Analytics to recognize your existing tags. As stressed previously, this is not required for AdWords tracking.
Add the following highlighted code to your GATC, replacing orig_name with the variable name that you are currently using. If no original value exists, then omit that line from your GATC.
<script type="text/javascript">
  var _gaq = _gaq || [];
  _gaq.push(['_setAccount', 'UA-12345-1']);
_gaq.push(['_setCampNameKey', 'orig_campaign']);    // default: utm_campaign
_gaq.push(['_setCampMediumKey', 'orig_medium']);    // default: utm_medium
_gaq.push(['_setCampSourceKey', 'orig_source']);    // default: utm_source
_gaq.push(['_setCampTermKey', 'orig_term']);        // default: utm_term
_gaq.push(['_setCampContentKey', 'orig_content']);  // default: utm_content

_gaq.push(['_trackPageview']);

(function() {
var ga = document.createElement('script'),
ga.type = 'text/javascript'; ga.async = true;
ga.src = ('https:' == document.location.protocol ? 'https://ssl' : ↵
'http://www') + '.google-analytics.com/ga.js';
var s = document.getElementsByTagName('script')[0];
s.parentNode.insertBefore(ga, s);
})();
</script>
At a minimum, orig_source and orig_medium are required. If these are not present in your current landing page URLs, you need to include the Google Analytics equivalents.
Best Practice Tips for Campaign Tracking
What you place in the campaign tracking parameters is exactly what you see in your reports, capitalization and misspellings included, so consistency is important. For example, if you decide on utm_medium=email, this syntax should always be used—not utm_medium=Email, or utm_medium=e-mail—because these will each be shown in your reports separately. Ditto for the other tracking parameter fields. Otherwise you make it difficult to determine the success, or not, of the channel or campaign you are running.
Following on from this, ensure that campaign tracking parameters are readable by the end user, the person(s) who need to interpret the reports.
When running a campaign across multiple marketing channels (mediums), keep the name of the campaign consistent while changing the other parameters. Keeping campaign centric allows you to easily compare the performance of your campaigns as a whole. Consider it the central pivot for your marketing data.
Think of the utm_medium parameter as your roll-up or categorization parameter. That is, keep the number of mediums at a manageable level. My recommendation is that the number of different mediums should not exceed 10, but the number of sources and campaigns will be much larger.
With a fixed number of utm_medium names and a well-defined utm_campaign naming convention, marketers often have difficulty deciding what to use for the utm_source parameter. Think of this as the data source of where your visitors will be coming from when they click on your campaign. In most cases, this will be the name of the website where your campaign is being displayed. The exceptions to this are email marketing and digital documents. For email marketing, your utm_source is the data source you are using, that is, the name of the database table containing the recipients (for example, “US prospects” or “US customers”). For digital documents the source is the filename of the document.
Google Analytics is capable of tracking any browser-based event, including Flash and JavaScript events. Think of these as in-page actions from visitors that do not generate a pageview. However, when considering event tracking, also bear in mind the possibility of virtual pageviews, as discussed earlier in this chapter.
Event activity is reported separately from your pageview activity. The following list includes examples of in-page events:
- Any Flash-driven element, such as a Flash website or a Flash movie player
- Embedded Ajax page elements, such as onClick, onSubmit, onReset, onMouseOver, onMouseOut, onMouseMove, onSelect, onFocus, onBlur, onKeyPress, and onChange
- Page gadgets
- File downloads
- Exit and outbound links
An important consideration when tracking events is the impact on page bounce rates. With no events being tracked, a bounce is a single page visit. This is generally considered a bad experience for the visitor—they came, viewed one page, and left. The theory is that if your site content is good and relevant to the visitor, then surely they will want to read more than one page from you! Hence, pages with high bounce rates are a strong indicator that something is wrong with that process. The caveat to this theory is that you are not writing the perfect one-page article. See “Content Creator KPI Examples” in Chapter 10, “Focusing on Key Performance Indicators,” for further discussion on bounce rates.
Now consider a visitor arriving on a page to view or interact with your Ajax widget or Flash movie. While viewing only a single HTML page, it is entirely possible that a visitor can have a great user experience. Event tracking allows you to measure this because a single page with any triggered event is no longer considered a bounce. You then use other metrics to ascertain if the experience is a good one or not, such as the number and type of events per visit. Of course, if the bounce rate for that page remains high, then you know your widget or Flash movie is not a good match for your visitors.
Bounce rates are popular key performance indicators used for optimizing websites. These are discussed in the section “Content Creator KPI Examples” in Chapter 10 and in the section “Identify and Optimize Poor Performing Pages” in Chapter 11.
Note: Tracked events can be used to define a conversion goal and can also be monetized—either as a whole or on a per-event basis. However, at present it is not possible for a funnel to be defined by an event.
Setting Up Event Tracking
Event Tracking reports are available by default in the Content section of Google Analytics. Therefore, no configuration changes to your account are necessary. However, you are required to modify your page or application to collect event-driven data and populate the reports. To do this, follow these two steps:
1. Define your event reporting structure.
2. For each event, call the _trackEvent function in your web page or application source code.
To understand how to define your events, I describe these steps in reverse order.
The _trackEvent Function
Event Tracking uses standard JavaScript method calls and provides a hierarchy data model of categories, actions, labels, and values. These parameters (Table 7-5) map directly to elements in the Analytics Reports interface.
Table 7-5: _trackEvent parameters
| Parameter | Condition | Description |
| category | Required | The name you supply for the group of objects you want to track. |
| action | Required | A string that is uniquely paired with each category and commonly used to define the type of user interaction for the web object, such as a visitor’s mouse click. |
| optional_label | Optional | A string to provide additional dimensions to the event data. Note that any spaces used in the label parameter must be encoded as %20. |
| optional_value | Optional | An integer that you can use to provide numerical data about the user event, such as time or a dollar amount. |
| optional_nonInteraction | Optional | The nonInteraction setting defines whether an event is treated as non-interaction; that is, not affecting user engagement metrics such as‚ for example, bounce rate. When this is set as true, the event is non-interacting. When left undefined, it defaults to false. |
The following example illustrates how you might use the event tracking method to record a user interaction with a video play link on your page:
<a href="#" onClick="_gaq.push(['_trackEvent','Category-name',↵
'Action-name', 'Label-name', 'Value-integer']);">Play video</a>
Any text-string value can be used for the event parameters, though if optional_value is used, this must be an integer. In practice, the values could be as follows:
<a href="#" onClick="_gaq.push(['_trackEvent', 'Video', 'Play',↵
'Birthday Party']);">Play</a>
In this scenario, the report for events would display Video as the category, Play as the action, and Birthday Party as the label (there is no value in this example). If for some reason you did not wish to count such an event as an interaction, you would use the following, omitting the value parameter:
<a href="#" onClick="_gaq.push(['_trackEvent', 'Video', 'Play',↵
'Birthday Party',,true]);">Play</a>
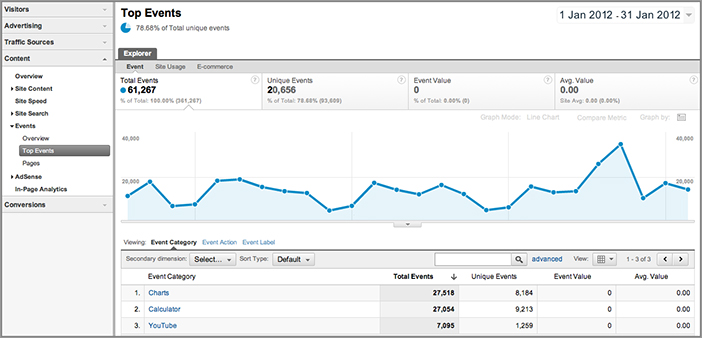
An example Event Tracking report is shown in Figure 7-8.
Figure 7-8: Event Tracking overview report showing three event categories
The _trackEvent Limits
Because events can rapidly accumulate for a visitor’s session (imagine tracking every mouse movement!), there is a limit to the number of events that can be tracked per visit. As I am writing this, the maximum is 500 combined GATC requests—both events and page views.
There is also a limit to the number of events that can be captured at any one time, and this is controlled by the use of tokens. The rate-limiting system starts a user with 10 tokens and awards a new token every 5 seconds. A maximum of 10 tokens can be accumulated. Therefore, sending out a burst of events will exhaust the 10 available tokens immediately and send out only a maximum of one event hit per 5 seconds until the event is slowed down long enough for the user to accumulate more than one token. Therefore, consider the following guidelines:
- Avoid scripting a video to send an event for every second played and other highly repetitive event triggers.
- Avoid excessive mouse movement tracking.
- Avoid time-lapse mechanisms that generate high event counts.
Defining Your Event Reporting Structure
Because of the setup flexibility for event tracking, it is important to first plan your desired reporting structure and then test it before implementing it. As mentioned earlier, this is really your first step once you understand the structure of the event tracking implementation.
In the following examples, I use the interaction of a visitor viewing a movie file to illustrate event tracking because this is a straightforward general concept to follow and helps with comprehending the data structure. The specific case of tracking embedded YouTube videos is described later in this chapter.
Defining Event Categories
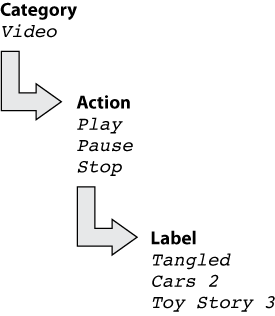
A category represents the root level of the hierarchical structure of event tracking, and you can use this structure in any way to suit your needs. Typically, you will use the same category name multiple times in order to group metrics under a given category. For example, you might track user interaction on two separate controls, Play and Pause, on a single video interface as follows:
_gaq.push(['_trackEvent', 'Video', 'Play', 'Birthday Party']);
_gaq.push(['_trackEvent', 'Video', 'Pause', 'Birthday Party']);
You can also track events for different video files in the same category:
_gaq.push(['_trackEvent', 'Video', 'Play', 'Xmas 2011']);
_gaq.push(['_trackEvent', 'Video', 'Play', 'Xmas 2012']);
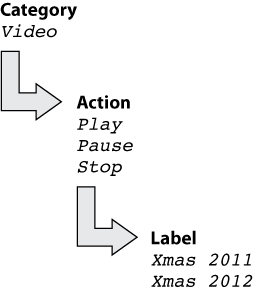
This allows you to see aggregate data for the category Video as well as being able to drill down into action and label details, as schematically shown in Figure 7-9.
Figure 7-9: Schematic hierarchical structure of event tracking
Perhaps you would like to categorize your videos in a different way:
_gaq.push(['_trackEvent', 'Videos 2011', 'Play', 'Xmas']);
_gaq.push(['_trackEvent', 'Videos 2012', 'Play', 'Birthday']);
_gaq.push(['_trackEvent', 'Downloads', 'Click', 'Birthday 2012'),
In this scenario, you can view the total combined event count for all three categories. The Total Events metric counts all categories supplied in your implementation. However, you will not be able to view combined metrics for all videos separately from downloads because detailed event metrics are combined under their respective categories.
Syntax for Event Tracking Parameters
Be aware of the following syntax requirements that apply to all event text parameters (category, action, play):
- If you plan to use the same parameter name in multiple locations on your site, be careful to correctly reference it. For example, if you call your video tracking category Video and later use the plural, Videos, you will have two separate categories for video tracking.
- If you decide to change the parameter name of an object that has already been tracked under a different name, for example, the historical data for the original name will not be reprocessed, and you will have metrics for the same event listed under two categories.
- The text-string values you define for your event parameters are case sensitive. That is, the category Video will be reported separately from video, the action Play will be reported separately from play, and so forth.
Tip: If you manage an e-commerce site with events related to your shopping categories (for example, an introduction Flash animation for each of your store sections), consider matching your event categories to your store categories. This way you will be able to compare the performance of your events on a per-shopping-section basis—a common requirement for e-commerce managers.
Defining Event Actions
Typically, the action parameter defines the interaction or event that you wish to capture from a visitor. Using the video example, these would be as follows:
- Play—button clicks
- Stop—button clicks
- Pause—button clicks
You could also use the following event actions:
- Time—how much of the video is watched, how much of the game is played, how long it takes to add to cart, and so on
- Resize, or zoom—manipulating an image
- Select, change, drag, or drop—manipulating an object such as, for example, a graphing widget
- Click—click-through on a download link or a banner advertisement
Usually, defining the action parameter for Event Tracking is straightforward because in most cases it is the physical action of the visitor’s interaction. The exception in the previous examples is Time.
Importantly, action names can be used to either aggregate or differentiate user interaction. Consider the last example that has an action named Click for both the Downloads category and the Banners category. The Event Actions report will contain all interactions with that same name, that is, no differentiation of clicks for Banners or Downloads. You can view a detailed breakdown of the Click action by category in the next report level. However, the point is that if you use the action Click indiscriminately across your Event Tracking implementation, the usefulness of that segment will be diminished in the reports.
As you probably have realized, the action value of Click, although useful for aggregation reports, is not particularly meaningful. An alternative approach is to differentiate the two types of click actions. For the download link, you could use the document file type as the action parameter. In this way, your reports for the Downloads category would be broken out by file type (PDF, DOC, XLS, and so on), with the filename detail as the label. See Figure 7-10a.
Figure 7-10: Schematic Event Tracking report structure for (a) file downloads and (b) banner click-throughs
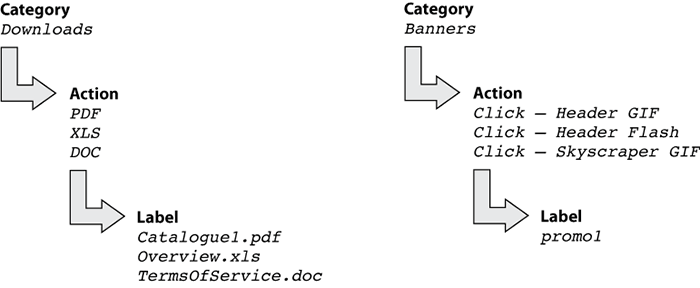
Similarly, for the Banners category, you could use the banner type or version to differentiate the same ad in different formats. In this way you can compare overall banner events with other events as well as distinguish different creative formats, such as animated versus static, for example. See Figure 7-10b.
Both aggregating and differentiating action names have their advantages, and it’s a matter of personal choice which method you use. Generally, it usually comes down to how your business is structured. If you have a video directory, download catalogue, or much library-type content, you will probably wish to differentiate actions—by video genre or file type, for example. If you have a small collection of disparate actions (two Flash demos, one how-to video guide, three download files), then it makes sense to aggregate the actions so that each event performance can be compared against the other.
Unique Events Are Incremented by Unique Actions
Any time a visitor interacts with an object tagged with a particular action name, the initial interaction is logged as one unique event for that action name. Any additional interaction with the same action name for that user’s visit will not contribute to the unique event calculation for that particular action. This is the case even if the visitor leaves that object and begins to interact with another object tagged via the same action name.
This has two significant consequences in the reports. First, suppose a user interacts with the Play action from two unique video players tagged with separate categories. The Event Actions reports for Play will list one unique event even though the user engaged with two unique players. Second, each category’s Action report will list one unique action because there is indeed one unique event per category-action pair.
Defining Event Labels—Optional
With labels, you can provide additional information for events that you want to track, such as the movie title in the previous video examples or the name of a file when you’re tracking downloads. If you have multiple events with the same category and action names, use the label parameter to differentiate.
Defining Event Values—Optional
The event values parameter differs from the others in that it is an integer used to assign a numerical value for a tracked event (all other parameters are text strings). For example, you could use it to provide the play time (how much of a video has been watched in seconds, minutes, or a percentage), load time (how long a page takes to download), or revenue (a monetary value assigned to a triggered event). Examples of these are discussed in upcoming sections.
Defining an Event Non-interaction—Optional
Setting the non-event parameter as true prevents the event from affecting user engagement metrics‚ such as, for example, bounce rate. Although rare, there are cases where you may wish to consider this. For example, you may want to track a visitor’s interaction with an image carousel on a landing page. The visitor clicking forward or backward through the carousel could be an event you wish to track yet you don’t want to affect the bounce rate calculation because the action is not a strong signal of engagement unless the visitor actually selects one of the images.
Note: In recent years there has been a growth spurt of rich Internet applications (RIAs) such as Flash, Flex, Air, and Silverlight. This means that the tracking of events, by any web analytics tool, is still nascent. To keep up-to-date on the technicalities of this feature in Google Analytics, I recommend the online documentation at http://code.google.com/apis/analytics/docs/tracking/eventTrackerOverview.html
Tracking Flash Video and Animation as Events
Unless you have built your entire website content in Flash (why?), most Flash user interactions can be considered events rather than virtual pageviews. However, this is not a hard-and-fast rule. Consider the benefits, or not, of both prior to implementing. Here I explain only how to track Flash user interactions as Google Analytics events. The use of virtual pageviews is discussed earlier in this chapter.
The technique you choose to track Flash events will be determined by two factors:
- What software you use to generate the Flash FLA file; more specifically, the version of ActionScript you use
- The type of Flash development you perform; that is, occasional Flash development as part of a larger website project or development as a dedicated Flash professional
Different Versions of ActionScript
The method for tracking Flash events differs depending on whether you are coding in the legacy ActionScript 2 or the latest ActionScript 3. ActionScript was first included in Flash Player 5, with version 3 introduced in 2006 as part of Flash Player 9 and upward. If you are developing your Flash applications in Flash CS3 or higher, you are using ActionScript 3.
I recommend you use ActionScript 3 wherever possible because it is better designed to handle Flash browser communications and is therefore more robust for event tracking. I consider only ActionScript 3 in this book.
Using ActionScript 3
For this example, I assume you have the standard GATC on your HTML pages and that you are embedding a Flash SWF movie file with a Play button. You wish to track clicks on the Play button as an event with category name Video, action name Play, and label name Toy Story 3.
Essentially there are three steps to follow:
1. Add an external class reference within your FLA file. This is a one-time call:
import flash.external.ExternalInterface
2. Modify the button or link within your FLA file and pass the associated category, action, label, and value parameters to be displayed in the reports:
myBtn.addEventListener(
MouseEvent.CLICK, ↵
ExternalInterface.call(_gaq.push(['_trackEvent', ↵
'Video', 'Play', 'Toy Story 3', '9']));
3. Modify the HTML where the SWF file is embedded:
<object ...
    <param name="allowScriptAccess" value="always" />
    <!--  {...REMAINING OBJECT CONTENT...}   -->
    <embed ...
      allowScriptAccess="always"
      <!--  {...REMAINING EMBED CONTENT...}   -->
    </embed>
</object>
That’s all there is to it. Other Flash buttons can have their events defined in a similar way, such as Stop and Pause. Multiple videos can be tracked by passing different labels. Thus, to track three movies, your video Flash object might be reported schematically as shown in Figure 7-11.
Figure 7-11: Schematic event reporting example
Extending the Flash example further, when the video is placed on the web page, you can use FlashVars parameters to provide label and value input values for your SWF file, making it generic and easy to reuse. FlashVars is the Flash counterpart to a URL query string. That is, it’s a way to pass variables from HTML to a Flash movie. Variables passed via FlashVars are placed into the _root level of the Flash movie, as shown in the following example:
<object classid="clsid:D27CDB6E-AE6D-11cf-96B8-444553540000"↵
codebase="http://download.macromedia.com/pub/shockwave/↵
cabs/flash/swflash.cab#version=7,0,19,0" width="300" height="400">
   <param name="FlashVars" value="label=Toy%20Story%203&value=9" />
   <param name="movie" value="movie1.swf" />
   <param name="quality" value="high" />
   <embed src="movie1.swf" FlashVars="label=Toy%20Story%203&value=9"↵
quality="high" pluginspage="http://www.macromedia.com/go/getflashplayer"↵
type="application/x-shockwave-flash" width="300" height="400"></embed>
</object>
This makes your ActionScript code within the player generic and reusable—you reuse the same code for each movie with the necessary parameters picked up from FlashVars. This is a particularly useful technique if, for example, you have hundreds (or thousands) of video files that you don’t wish to create individual SWF files for.
These variables are stored in the parameters property of the LoaderInfo class associated with the DisplayObject. To utilize these values in your FLA file, use the following format:
myBtn.addEventListener(
MouseEvent.CLICK, ExternalInterface.call(_gaq_push(['_trackEvent', ↵
'Video', 'Play']), root.loaderInfo.parameters.label, ↵
root.loaderInfo.parameters.value));
For the same three movies, your video Flash object might be reported schematically as shown in Figure 7-12.
Figure 7-12: Schematic event reporting example generated by using FlashVars
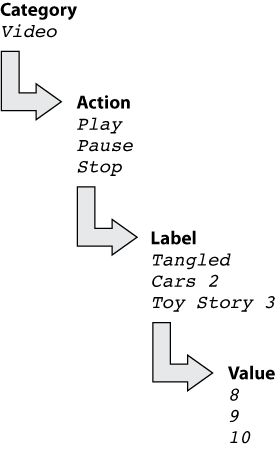
Event Tracking for Flash Professionals
The previous examples allow you to track Flash actions as events on a per-event basis when the need arises. Typically, you use these techniques when you are embedding your SWF file into a page that already contains the GATC. It is the simplest method if you are a webmaster and want to communicate Google Analytics tracking requirements to a third-party Flash designer.
However, if you develop Flash applications full-time yourself, the previous methods of constantly coding each action can become laborious. Therefore, you can use the gaforflash software component available at http://code.google.com/p/gaforflash/. This is an ActionScript 3 API for Google Analytics data collection, developed under an open-source initiative with Adobe Systems Inc. It can simplify the tracking of your Flash content in a number of situations, such as these:
- When you have a large number of embedded Flash files on HTML pages
- When you are creating a stand-alone Flex application or Flash-only site hosted on an HTML page
- When you are distributing your Flex/Flash application where you have no control over where the file will be placed
Note: Currently, Flash tracking is available for any Flash content embedded in a web page. Tracking of data sent from Adobe Air or Shockwave or via the Flash IDE is not supported at this time.
To get started, download and install gaforflash from http://code.google.com/p/gaforflash/. The installation is as straightforward as copying, or importing, the class files (SWC) into the relevant directory where your Flash or Flex installation can read them. Then you will have two ways of tracking your Flash events, Bridge mode or AS3 mode.
Bridge mode is the most common method because it is utilized when a GATC is already embedded within the HTML. It provides a simple wrapper to all the ga.js functions using the ExternalInterface class, as previously described. Everything else is managed from within Flash itself. In Bridge Mode, gaforflash will call ExternalInterface (or getUrl if ExternalInterface is blocked for some reason) in the background. The following code is an example of Bridge mode in use:
import com.google.analytics.AnalyticsTracker;
import com.google.analytics.GATracker;
var tracker:AnalyticsTracker = new GATracker(this, "UA-12345-1",↵
"Bridge", false);
_gaq.push(['_trackPageview','/Movies']);          // track virtual pageview
_gaq.push(['_trackEvent','Video','Play','Toy Story 3', 9]); //  track event
AS3 Mode provides a method of bypassing any Flash-JavaScript communication issues. This is particularly relevant if your SWF file is to be deployed on different domains; that is, sites using third-party content because often such sites do not allow the ExternalInterface method. In AS3 Mode, you do not require a GATC to be present within your HTML—it is an implementation of Google Analytics tracking written entirely in ActionScript. As a result, all Google Analytics interactions are generated from within the Flash object. The following code is an example of AS3 Mode use:
import com.google.analytics.AnalyticsTracker;
import com.google.analytics.GATracker;
var tracker:AnalyticsTracker = new GATracker(this, "UA-12345-1", "AS3",↵
false);
_gaq.push(['_trackPageview','/Movies']);          // track virtual pageview
_gaq.push(['_trackEvent','Video','Play','Toy Story 3', 9]);  // track event
Unless you are developing the same Flash content for deployment on multiple domains, you will most likely use gaforflash in Bridge Mode.
There is a great deal more to gaforflash that is beyond the realm of this book. I hope by scratching the surface I have whetted your appetite for its capabilities. If you are a Flash developer, check out the following location for the latest developments:
http://code.google.com/apis/analytics/docs/tracking/eventTrackerOverview.html
Flash Cookies and Privacy Considerations
In AS3 Mode, Google Analytics cookies are stored with other Flash cookies. However, they are not controlled within a user’s browser but are part of the Flash Player install on your machine, known as Shared Objects. A fuller description is provided at Wikipedia:
http://en.wikipedia.org/wiki/Local_Shared_Object
Because a user’s browser does not control Shared Objects, there are important privacy implications of using this method. Chapter 2, “Available Methodologies and Their Accuracy, and Chapter 3, “Google Analytics Features, Benefits, and Limitations,” discuss the privacy issues of web analytics and Google Analytics, respectively. The key to a best-practice implementation of your tracking methodology is to be transparent in how you handle visitor privacy and provide visitors with clear instructions for how to opt out of such tracking.
From a user’s perspective, Flash Shared Objects can be managed using the Adobe Flash Player Settings Manager at
http://www.macromedia.com/support/documentation/en/flashplayer/help/settings_manager.html
A number of Firefox add-ons, such as BetterPrivacy, can provide similar functionality.
Tracking Banners and Other Outgoing Links as Events
If you publish advertising banners or links on your site that refer visitors to other websites, you have two options for tracking: tracking the click-through as a virtual pageview or tracking the click-through as an event. Both options allow you to monetize the click action; the merits of each are discussed earlier in this chapter in “Virtual Pageviews versus Event Tracking.” In this section I consider only event tracking, with the category defined as Exit Points.
For an animated GIF or other non-Flash banner ad, modify the outgoing link as follows:
<a href="http://www.advertiser-site.com" onClick= ↵
"_gaq.push(['_trackEvent','ExitPoints', 'Click', 'advertisername – Ad ↵
version A', 4]) "><img src="bannerA.gif"></a>
Note that a value of 4 has been assigned to this event, which is a click-through. The equivalent code used within a Flash banner, assigned with a higher monetary value, is as follows:
myBtn.addEventListener(
MouseEvent.CLICK, ExternalInterface.call(_gaq.push(['_trackEvent', ↵
'Exit Points', 'Click', 'advertisername – Ad version B', 5]));
For both examples, it is possible to view and segment the event reports both by the advertiser’s name and the ad version, such as, for example, header banner versus skyscraper.
Note: In addition to the code shown, you will need to set import flash.external.ExternalInterface in your FLA file and allowScriptAccess in your HTML—as described previously in “Tracking Flash Video and Animation as Events.”
However, I prefer to use action names to distinguish object elements. For example, rather than aggregate the event action Click for all outbound link types, go one step further and differentiate between click-throughs on Flash and GIF banners.
For GIF banner event tracking, use this:
<a href="http://www.advertiser-site.com"
onClick="_gaq.push(['_trackEvent','Exit Points', 'Click – GIF banner', ↵
'advertisername – Ad version A', 4])"><img src="bannerA.gif"></a>
Use this for Flash banner event tracking:
myBtn.addEventListener(
MouseEvent.CLICK, ExternalInterface.call(_gaq.push(['_trackEvent', ↵
'Exit Points', 'Click – FLASH banner', 'advertisername – Ad ↵
version A', 5]));
To wrap up this series of outbound click tracking, for an outbound link, use link event tracking:
<a href="http://www.advertiser-site.com"
onClick="_gaq.push(['_trackEvent','Exit Points', 'Click - link', ↵
'linkURL', 1) ">View our Partner</a>
Note: For a Google Analytics plug-in that automatically sets up outbound links found on a page as events, see Appendix B, “Useful Tools.”
Tracking Mailto: Clicks as Events
The mailto: link is another outgoing link that can be tracked in exactly the same way as described previously. I discuss it here separately simply to emphasize the importance of tracking mailto: clicks—particularly for websites that are not e-commerce websites, where any action that can bring a visitor closer to lead generation for you has an intrinsic value. As your sales department follows up on these contacts, you will be able to assess the conversion rate and average order value of such leads and therefore monetize the mailto: onClick event. Modify your mailto: links as follows:
<a href="mailto:[email protected]"
onClick="_gaq.push([_trackEvent','Exit Points', 'Click - email', ↵
'[email protected]']) ">[email protected]</a>
Add a monetary value to this event as desired.
Tracking Embedded Video from YouTube
Videos are commonly shared on the Web via YouTube. YouTube allows you to upload your video content and hosts your files for you as a free service. In additional to sharing content with other YouTube visitors as a potential viral marketing medium, you can embed your YouTube video files back into your own website.
Although you cannot modify the YouTube video player directly with your events, you can interact with YouTube’s player API. The player API allows a site owner to control how videos look and are controlled when embedded on their website. The JavaScript API exposes Play and Pause buttons and the like as external calls to which you can attach events. Although they cannot be extended to track video interactions on www.youtube.com, interactions with the video embedded within your site can be tracked.
Note: As I am writing this, the iFrame player API described in this section is a beta feature that Google has stated represents the next stage of the YouTube Player API. In addition, the iFrame method allows YouTube to display video content in HTML5 format when a Flash player is not available on the user’s device, such as on Apple mobile devices (iPhone, iPad). This is the main advantage of the iFrame player API over the other available API methods.
The following example code is a modification of that shown on
http://code.google.com/apis/youtube/getting_started.html#player_apis
The code embeds a YouTube video (videoeId = a-I5VXDpbSQ) in a page within an iFrame. As highlighted in the code example, two nonstandard calls are made—both setting a Google Analytics event. That is, an event is set when a visitor clicks the video play icon, and another event is set when the video has completed. For both cases, the URL of the actual YouTube video is captured as the event label.
<!-- 1. The <div> tag will contain the <iframe> (and video player) -->
    <div id="player"></div>

    <script>
      // 2. This code loads the IFrame Player API code asynchronously.
      var tag = document.createElement('script'),
      tag.src = "http://www.youtube.com/player_api";
      var firstScriptTag = document.getElementsByTagName('script')[0];
      firstScriptTag.parentNode.insertBefore(tag, firstScriptTag);

      // 3. This function creates an <iframe> and YouTube player after the
      // API code downloads. Change the dimensions and videoId accordingly
      var player;
      function onYouTubePlayerAPIReady() {
        player = new YT.Player('player', {
          height: '200',
          width: '300',
          videoId: 'a-I5VXDpbSQ',
          events: {
            'onReady': onPlayerReady,
            'onStateChange': onPlayerStateChange
          }
        });
      }

      // 4. The API calls this function when the player's state changes.
      // This is where you set Google Analytics event tracking.
      function onPlayerStateChange(event) {
        if (event.data == YT.PlayerState.PLAYING) ↵
{_gaq.push(['_trackEvent', 'YouTube','Play', player.getVideoUrl() )}
        if (event.data == YT.PlayerState.ENDED) ↵
{_gaq.push(['_trackEvent', 'YouTube','Completed', player.getVideoUrl() )}
      }
    </script>
Figure 7-13 shows the results of the YouTube iFrame implementation. In this case it reveals that 30% of visitors who started to watch a video actually viewed it to completion (12,837 + 42,512).
Figure 7-13: YouTube embedded video tracking showing 30% of visitors watching to completion
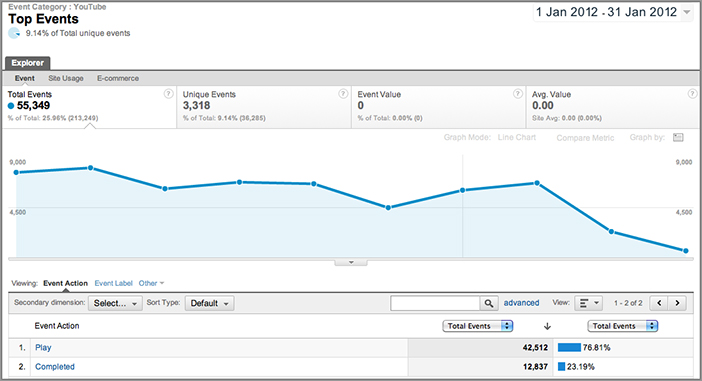
In addition to the actions of Play and Completed, it is possible to capture other YouTube player changes of state, such as, for example, YT.PlayerState.PAUSED, YT.PlayerState.BUFFERING, or YT.PlayerState.CUED. However, I have found little business value in capturing these as events. A metric of interest that is currently not available via the YouTube APIs is the percentage of a video played before the visitor exits the page. Modifying the example code to call a timer function when the video is started and triggering a Google Analytics event when the page is exited (using window.onunload) is straightforward for a good webmaster to achieve. The key is to group timings into buckets—for example, visitors watched 10%, 20%, 30%, and so forth of a video.
As discussed in Chapter 6, in the section “Understanding the Google Analytics Tracking Code,” for the majority of websites, you will not need to make any customizations to your GATC—you will use the example code presented in the Standard tab of Figure 6-3, accessed from the Profile Settings area of your account (click the Check Status link). However, the following sections describe some of the available options you can use should the need arise.
Note: The GATC is updated regularly by Google. As such, the exact syntax of the following examples is likely to change. To keep on top of GATC changes, view the ga.js change log at http://code.google.com/apis/analytics/docs/gaJS/changelog.html
Subdomain Tracking
This is a simple one-line change to your GATC. As such, you can automate the change required by selecting “One domain with multiple subdomains” in your profile Tracking Code settings, as shown in Figure 7-14. The following is a description of why the change is required and what it achieves. You should also consider the filter to differentiate your different subdomains (discussed in Chapter 8).
Figure 7-14: Automated GATC modification for tracking subdomains

Google Analytics uses first-party cookies, which means collected information is associated with your fully qualified hostname—for example, www.mysite.com. Only your fully qualified hostname can read or set its first-party cookies. This is a built-in security feature of all web browsers.
A subdomain is one that is a part of the parent domain. In this example, the parent domain is mysite.com, so www is actually a subdomain of mysite.com. Other example subdomains include secure.mysite.com, store.mysite.com, en.mysite.com, and so on.
Note: Any name can be used as a subdomain name as long as it contains only alphanumeric characters and the hyphen (-). Of course, you can use a subdomain only if your DNS has been configured for it.
The default behavior when you set up Google Analytics is that subdomains are tracked in separate profiles—as described in Chapter 6 in the section “Using Accounts, Web Properties and Profiles.” As a consequence, by default Google Analytics tracks visitors that traverse your different subdomains as referrers. For example, www.mysite.com becomes a referrer of secure.mysite.com. That can be valuable information in itself, but the original referrer (for example, a keyword search on www.google.com), which is captured and reported on www.mysite.com, cannot be transferred into your reports for secure.mysite.com. If this was for a transaction, you would know how your visitors found you (via reports for www.mysite.com) but would have no information on how your customers found you (original referrer lost in reports for secure.mysite.com).
Fortunately, modifying this behavior for your own domains is straightforward. You achieve this by combining all your subdomain data under the one parent domain. To accomplish this, set your parent domain in the GATC so that the Google Analytics first-party cookies can be shared across your subdomains, as highlighted here:
<script type="text/javascript">
  var _gaq = _gaq || [];
  _gaq.push(['_setAccount', 'UA-12345-1']);
  _gaq.push(['_setDomainName', 'mysite.com']);
  _gaq.push(['_trackPageview']);

(function() {
var ga = document.createElement('script'),
ga.type = 'text/javascript'; ga.async = true;
ga.src = ('https:' == document.location.protocol ? 'https://ssl' : ↵
'http://www') + '.google-analytics.com/ga.js';
var s = document.getElementsByTagName('script')[0];
s.parentNode.insertBefore(ga, s);
})();
</script>
Note: This is the same modification if you have sub-subdomains. You do not need to do anything more than calling _setDomainName with your root domain name (mysite.com in my example). By this method, cookies set using _setDomainName as a.com are accessible from a.com, b.a.com, c.b.a.com, and d.c.b.a.com.
This way all subdomains of mysite.com can read, write, or edit the __utm cookies that Google Analytics uses. No further GATC modifications are required. However, as you may have realized, both subdomains are now aggregated, meaning that visits to www.mysite.com/index.html and secure.mysite.com/index.html will show in your reports as the same page—that is, both /index.html. In addition, you will not know how many visits your www site referred to your secure site. Correct these by applying the filter, as shown in Figure 7-15.
Figure 7-15: Filter to differentiate identical subdomain page names

Note: The filter shown in Figure 7-15 will make In-Page Analytics reports inoperable and may require you to modify your goal settings accordingly. However, I find the loss of the In-Page Analytics report is more than compensated by the greater insight that applying this filter provides.
By using this filter, page names will include your subdomains, allowing you to differentiate accordingly. For example, in the Content Site Content Pages report will be www.mysite.com/index.html and secure.mysite.com/index.html, respectively.
The use of filters is discussed in detail in Chapter 8.
Multiple Domain Tracking
As discussed in the previous section, web browsers have built-in security features that prevent the sharing of first-party cookies with other domains. If your website passes a visitor to different parent domains, then this needs special consideration.
Consider the following example: Your main website is www.mysite.com and you host regional variations (language, currency, and so on) on different parent domains such as www.mysite.co.uk. Both sites are tagged with your GATC. By clicking a link from a search results page on www.google.com, for example, a visitor arrives on www.mysite.com. Next, they click the option to select your regional version at www.mysite.co.uk. A conversion is then made on this site.
Note: Google Analytics cannot track visitors traversing the Web to unrelated domains. It can only track visitors across domains that you own or control and to which you can add your GATC.
By default, the visitor converting at www.mysite.co.uk will be reported as a referral visitor from www.mysite.com. The original referral information (search at www.google.com and associated search keywords) is lost because the cookie information cannot follow the visitor to the third-party domain. This is analogous to the situation described earlier for subdomain tracking.
If you maintain separate Google Analytics profiles for these two websites, then all page metrics (time on site, page depth, bounce rate, and so on) will be counted separately—in this example, a one-page visit for www.mysite.com and x – 1 page visits for www.mysite.co.uk. On the other hand, if you have configured data for both websites to be collected into a single profile (that is, you used the same GATC on both domains), then your page metrics will be skewed with overinflated numbers of single-page visits for www.mysite.com. Clearly, this is not the outcome you want.
The solution for tracking visitors across multiple sites is to maintain the session by transferring cookies across the multiple domains. There are two methods of achieving this, depending on how you forward visitors to your other domains—either by a link or via a form submission. These are the same as those discussed earlier (see “Transactions Via a Third-Party Payment Gateway”) because in both cases first-party cookies need to be handed over to a third-party domain.
Regardless of which method you use, you will need to modify your GATC on the pages where a visitor leaves one domain and enters another. In the example given, this would be the home pages of www.mysite.com and www.mysite.co.uk, respectively. However, for this scenario it is common to have multiple pages where this can happen. Therefore, I recommend you make the GATC modification to all pages for all your domains to ensure consistency of your visitor tracking. The modification required for the two websites is shown in the following highlighted code. On www.mysite.com, use this:
<script type="text/javascript">
  var _gaq = _gaq || [];
  _gaq.push(['_setAccount', 'UA-12345-1']);
  _gaq.push(['_setDomainName', 'mysite.com']);
  _gaq.push(['_setAllowLinker ', true]);
  _gaq.push(['_trackPageview']);

(function() {
var ga = document.createElement('script'),
ga.type = 'text/javascript'; ga.async = true;
ga.src = ('https:' == document.location.protocol ? 'https://ssl' : ↵
'http://www') + '.google-analytics.com/ga.js';
var s = document.getElementsByTagName('script')[0];
s.parentNode.insertBefore(ga, s);
})();
</script>
On www.mysite.co.uk, use this:
<script type="text/javascript">
  var _gaq = _gaq || [];
  _gaq.push(['_setAccount', 'UA-12345-1']);
  _gaq.push(['_setDomainName', 'mysite.co.uk']);
  _gaq.push(['_setAllowLinker ', true]);
  _gaq.push(['_trackPageview']);

(function() {
var ga = document.createElement('script'),
ga.type = 'text/javascript'; ga.async = true;
ga.src = ('https:' == document.location.protocol ? 'https://ssl' : ↵
'http://www') + '.google-analytics.com/ga.js';
var s = document.getElementsByTagName('script')[0];
s.parentNode.insertBefore(ga, s);
})();
</script>
The two GATCs are identical except for the different values for _setDomainName. The use of _setDomainName forces the domain hash of the __utm cookies to be set to the string given and sets the cookies’ host to the same value. The next line, _setAllowLinker, allows the cookie name/value pairs to be either transferred or received.
Note: In previous editions of this book and in the Google online documentation up until August 2011, _gaq.push(['_setDomainName', 'none']) was the recommended setting. Although it’s now deprecated, if you are already using this, it is important to keep it in place. This is because Google Analytics checks the domain hash when reading cookies directly. If you remove this, cookies from returning visitors will be ignored because the hash values will not match the new cookies set. For this reason, sites that are already set with _gaq.push(['_setDomainName', 'none']) should not be modified.
As for subdomain tracking, these detailed GATC changes can be automated from your profile Check Status area by selecting Multiple top-level domains, as shown in Figure 7-16.
Figure 7-16: Automated GATC modification for tracking across multiple domains

With your pages modified, you then amend the link, or form, your visitors use to navigate between the domains, as described next.
Method 1: Track a Visitor across Domains When Using a Link
Use this method when you are passing visitors to another domain using a standard hyperlink. Within your web pages, modify all links to your other domains as follows:
<a href="http://www.mysite.co.uk" onclick="_gaq.push(['_link', this.href]);
return false; ">
Go to our UK web site</a>
With this method, the Google Analytics cookies are “pushed” to the receiving domain by appending them to the URL string (HTTP GET). If you see __utma, __utmb, and __utmc parameters in the URL of the landing page, then this has worked.
Note: Note the use of return false; here. This ensures that for visitor browsers that have JavaScript disabled, the href link will be followed without error. Of course, if JavaScript is disabled, Google Analytics tracking won’t occur, but the modified link will still work.
Method 2: Track a Visitor across Domains When Using a Form
Use this method when you are passing visitors to another domain using a form. Within your web pages, modify all form references to your other domains as follows:
<form method="post" onsubmit="_gaq.push(['_linkByPost', this]);">
If you already have an onSubmit validation routine, you append the cross-domain modification to your existing function call as follows:
<form method="post"
onsubmit="validate_routine(this);_gaq.push(['_linkByPost', this]);) ">
With this method, the Google Analytics cookies are “pushed” to the receiving domain via the HTTP headers (HTTP POST). This will work even for forms where method="GET". You can verify if this has worked by viewing the HTTP headers sent in Firefox using the add-on LiveHTTPheaders (http://livehttpheaders.mozdev.org).
The GATC Setup Wizard
The changes illustrated in Figures 7-14 and 7-16 are examples of using the GATC setup wizard. That is, they are changes required to your tracking code that Google Analytics can automatically provide for you—without the need for you to manually edit page code.
In this section, I’ll show you how to track visitors that traverse subdomains or multiple domains. The required changes are all contained within the Standard tab menu of the GATC setup wizard. As you will have noticed, there are also Advanced and Custom menu tabs.
The Advanced menu provides additional instructions that affect your GATC, such as, for example, how to import data from AdWords, how to track paid campaigns for non-AdWords pay-per-click accounts, how to use Urchin in conjunction with Google Analytics, and so forth. These are discussed in the relevant sections of this book. Neither the Standard nor Advanced GATC code can be edited from within the wizard.
The Custom menu is an area where you can manually edit the GATC within the wizard and save it for later reference. For all menu tabs, you can distribute the required code via email. The text supplied for you to do this is obtained by selecting Optional: Email These Instructions.
Tracking Visitors across Subdomains and Multiple Domains
Until August 2011, this was a special scenario when you have visitors traversing both subdomains and third-party domains within their visit. Consider the following example:
- A visitor goes to www.mysite.com.
- Next the visitor clicks a link to blog.mysite.com.
- Then the visitor decides to purchase a product and so clicks the shopping cart link, which sends them off to www.shoppingcart.com/widgets.
Previously this required an additional change to the GATC (_setAllowHash). This is no longer required. Configuring your GATC as described in this section for “Multiple Domain Tracking” will take care of this scenario.
However, although _setAllowHash is now deprecated, if you are already using it, it is important to keep it in place. This is because Google Analytics checks the domain hash when reading cookies directly. If you remove this, cookies from returning visitors will be ignored because the hash values will not match the new cookies set. For this reason, sites that are already set with _gaq.push(['_setAllowHash', 'false']) should not be modified.
Additional Customization Options
The following sections are not intended to cover an exhaustive list of GATC customizations. Rather, they cover the ones most commonly used. Refer to the following online documentation for more customization options:
http://code.google.com/apis/analytics/docs/gaJS/gaJSApiDomainDirectory.html
http://code.google.com/apis/analytics/docs/gaJS/gaJSApiBasicConfiguration.html
http://code.google.com/apis/analytics/docs/gaJS/gaJSApiSearchEngines.html
Controlling Time-Outs
You can control two cookie time-outs from within your GATC: the session time-out and the campaign conversion time-out.
By default, a visitor’s session (visit) times out after 30 minutes of inactivity, so if a visitor continues browsing your website after 31 minutes of inactivity, that visitor is counted as a returning visitor. The original referral information is maintained as long as a new referral source was not used to continue their session.
The 30-minute rule is the unwritten standard across the web analytics industry. However, there may be instances when you wish to change this. Typical examples include when your visitors are engaging with music or video or reading lengthy documents during their visit. The latter is a less-likely scenario because visitors usually print large documents and read them offline. However, music and video sites are common examples in which visitors set and forget their actions only to return and complete another action on your site when the content has finished playing.
If inactivity is likely to last longer than 30 minutes for a continuous visit, then consider increasing the default session time-out as follows:
<script type="text/javascript">
  var _gaq = _gaq || [];
  _gaq.push(['_setAccount', 'UA-12345-1']);
  _gaq.push(['_setSessionCookieTimeout', 3600000]); // set to 1 hour
  _gaq.push(['_trackPageview']);

(function() {
var ga = document.createElement('script'),
ga.type = 'text/javascript'; ga.async = true;
ga.src = ('https:' == document.location.protocol ? 'https://ssl' : ↵
'http://www') + '.google-analytics.com/ga.js';
var s = document.getElementsByTagName('script')[0];
s.parentNode.insertBefore(ga, s);
})();
</script>
Note: In Google Analytics, time is measured in milliseconds. Therefore, 30 minutes = 1,800,000 milliseconds, 1 hour = 3,600,000 milliseconds, and so forth.
Another time-out that you can adjust is the length of time for which Google Analytics credits a conversion referral. By default, the campaign conversion time-out is six months (15,768,000,000 milliseconds), after which the referral cookie (__utmz) expires. For example, you may wish to reduce this value when you are paying a commission to affiliates. You can achieve this as follows:
<script type="text/javascript">
  var _gaq = _gaq || [];
  _gaq.push(['_setAccount', 'UA-12345-1']);
  _gaq.push(['_setCampaignCookieTimeout', 2592000000]); // set to 30 days
  _gaq.push(['_trackPageview']);

(function() {
var ga = document.createElement('script'),
ga.type = 'text/javascript'; ga.async = true;
ga.src = ('https:' == document.location.protocol ? 'https://ssl' : ↵
'http://www') + '.google-analytics.com/ga.js';
var s = document.getElementsByTagName('script')[0];
s.parentNode.insertBefore(ga, s);
})();
</script>
The value of the campaign conversion time-out can also be increased. However, it doesn’t make much sense to go beyond six months due to the increased risk that the original cookie information will be lost, making your conversion referral data less reliable. See “Issues Affecting Visitor Data When Using Cookies,” in Chapter 2.
Note: There is a third time-out value you can control: the visitor cookie. By default, the visitor cookie is set to expire after two years. If you prefer, you can change the expiration date using the following setting within your GATC: _gaq.push(['_setVisitorCookieTimeout',63072000000]);, where the number represents the number of milliseconds in two years. However, I do not see any value in changing this and so do not recommend using it.
Setting Ignore Referrer Preferences
You can configure Google Analytics to treat certain referrers as direct traffic (that is, not as a referral). This is important if visitors are arriving at your site from a third-party domain and you do not want this referrer information to be recorded in your Google Analytics reports. This is a common scenario if you are an e-commerce site and your purchasers are processed via a third-party payment gateway that you are unable to track. It is described earlier in this chapter in the section, “What to Do When a Third-Party Gateway Does Not Allow Tracking.”
Use _addIgnoredRef to treat a referral as direct, as shown here:
<script type="text/javascript">
  var _gaq = _gaq || [];
  _gaq.push(['_setAccount', 'UA-12345-1']);
  _gaq.push(['_addIgnoredRef', 'www.payment-gateway.com']);
  _gaq.push(['_trackPageview']);

(function() {
var ga = document.createElement('script'),
ga.type = 'text/javascript'; ga.async = true;
ga.src = ('https:' == document.location.protocol ? 'https://ssl' : ↵
'http://www') + '.google-analytics.com/ga.js';
var s = document.getElementsByTagName('script')[0];
s.parentNode.insertBefore(ga, s);
})();
</script>
The default behavior of Google Analytics is for direct traffic not to overwrite any existing campaign information. So if a purchaser originally came to your site via a Google organic search with the search term “widget purchase,” this will be maintained and shown in your reports with the direct reference dropped. Only if there is no previous campaign information will direct be written into your reports as the referral source.
Site Speed Sample Rate
Using the Content Site Speed report is discussed in Chapter 5, in the section “Top Standard Reports”. The report is generated from sampled data set at default sample rate of 1 percent. However, the default sample rate may be adjusted using the _setSiteSpeedSampleRate function. Allowed sample rates range from 0 (to disable site speed tracking) to 10 percent (maximum allowed sample rate). This is set as follows:
<script type="text/javascript">
  var _gaq = _gaq || [];
  _gaq.push(['_setAccount', 'UA-12345-1']);
  _gaq.push(['_setSiteSpeedSampleRate', 10]);
  _gaq.push(['_trackPageview']);

(function() {
var ga = document.createElement('script'),
ga.type = 'text/javascript'; ga.async = true;
ga.src = ('https:' == document.location.protocol ? 'https://ssl' : ↵
'http://www') + '.google-analytics.com/ga.js';
var s = document.getElementsByTagName('script')[0];
s.parentNode.insertBefore(ga, s);
})();
</script>
Google Analytics restricts the site speed collection hits for a single web property to either 1 percent of visitors or 10,000 hits per day—whichever is the greater. Unless you have high traffic volumes, for example above 100,000 pageviews per day, I recommend you set _setSiteSpeedSampleRate to its maximum value (10) in order to provide the most accurate site speed report.
Note: The effect of _setSiteSpeedSampleRate only affects the calling page. If you have pages where site speed data collection is important, you can set the value at 10 on these pages, and 0 on less important pages. That way, you stay below the daily threshold of 10,000 visits or 1 percent of visitors.
Anonymize IP Addresses
In some parts of the world, most notably Germany, an IP address is considered personally identifiable information. Therefore, collection of this information is illegal without the explicit consent of each individual. Google Analytics captures IP addresses by default for the purposes of reporting geolocation information, so if you conduct business in Germany you must use the _anonymizeIP function to anonymize your visitors’ IP addresses.
The _anonymizeIP tells Google Analytics to anonymize the information sent by the tracker objects by removing the last octet of the IP address prior to its storage. The function is used as follows:
<script type="text/javascript">
  var _gaq = _gaq || [];
  _gaq.push(['_setAccount', 'UA-12345-1']);
  _gaq.push(['_anonymizeIP']);
  _gaq.push(['_trackPageview']);

(function() {
var ga = document.createElement('script'),
ga.type = 'text/javascript'; ga.async = true;
ga.src = ('https:' == document.location.protocol ? 'https://ssl' : ↵
'http://www') + '.google-analytics.com/ga.js';
var s = document.getElementsByTagName('script')[0];
s.parentNode.insertBefore(ga, s);
})();
</script>
Note that this will slightly reduce the accuracy of geolocation reporting.
Sampling: Controlling Data Collection
By default, Google Analytics collects pageview data for every visitor. However, the Google Analytics terms of service (www.google.com/intl/en/analytics/tos.html) state that the available limit for the free version is 10 million data hits per month—a hit is the summation of all pageviews, events, and transaction items. If your traffic volumes regularly go beyond this limit you have two options: Upgrade to the paid-for version of Google Analytics, called Premium (discussed in Chapter 3) or sample your data collection so that you fall below the terms of service threshold.
Note: Rather than cutting off your data collection when you reach the 10 million hit threshold, Google will politely send you an email asking you to upgrade to the Premium product or introduce data collection sampling. That means the onus is on you to stay within the terms of service. Of course if you ignore the emails, Google may enforce collection sampling from its side or even terminate your account.
Note that the data volume limit is applied at the account level. That means separating out your data into multiple web properties or profiles will not reduce your data volume count. A possible solution is to use the roll-up reporting technique described in Chapter 6. That is using multiple Google Analytics accounts. However, in most cases, if you are exceeding the data threshold, you will need to employ data collection sampling.
To achieve this, specify a sampling collection rate in your GATC using the _setSampleRate function, as shown here:
<script type="text/javascript">
  var _gaq = _gaq || [];
  _gaq.push(['_setAccount', 'UA-12345-1']);
  _gaq.push(['_setSampleRate', '25']);
  _gaq.push(['_trackPageview']);

(function() {
var ga = document.createElement('script'),
ga.type = 'text/javascript'; ga.async = true;
ga.src = ('https:' == document.location.protocol ? 'https://ssl' : ↵
'http://www') + '.google-analytics.com/ga.js';
var s = document.getElementsByTagName('script')[0];
s.parentNode.insertBefore(ga, s);
})();
</script>
A sample rate of 25 percent means that every fourth visitor is counted for Google Analytics tracking. Therefore, if you are receiving around 36 million data hits per month, the sample rate will bring you below the threshold limit.
Data sampling takes place at the visitor level—entire visit activity is dropped, and if the excluded visitor returns to your site later, they will again be excluded. This ensures that there is integrity in trending and reporting even when sampling is enabled because unique visitors remain included or excluded from the sample.
Note: The automatic sampling of report data is discussed in Chapter 5 in the section “Understanding Report Sampling.”
Don’t Look for Small Needles in Giant Haystacks
The data sampling techniques employed by Google Analytics are statistically valid—they originate from standard statistical theory. As with all sampling methods, the sample size is important—the larger it is, the more accurately the sample will reflect the true picture. The use of _setSampleRate is recommended only when you receive more than 10 million data hits per month. Therefore, by definition this is a very large sample size.
However, problems do arise when you attempt to drill down within large data sets to find a much smaller data set—for example, within 10 million pageviews, trying to find visit data that only accounts for a handful of viewed URLs. The analogy is that of finding a needle in a giant haystack. With sampling enabled, there is a possibility of the needle not even appearing in the sample. If you know those pages must exist in the data—perhaps you are testing your own visit activity—you can come to the conclusion that the report is wrong. This is a statistically invalid assumption in the same way that it is invalid to say that such a minute proportion of visit activity can have an impact on your business.
In Chapter 7, you have learned the following:
Leveraging tagging and tracking Having read this far, you will have now completed the following actions:
- Tagged all of your website pages with the GATC
- Tagged your campaign landing pages to capture visitors from email marketing, social media, banners, paid search, and so forth
- Adjusted your setup for tracking file downloads, events, and embedded YouTube video tracking
- Modified your checkout completion page for the capture of e-commerce transactions
With all that in place, your installation is complete. Take an initial look at some of your reports and get comfortable with using them, as described in Part II, “Using Google Analytics Reports.”
Using the _trackPageview function to create virtual pageviews You have learned how to modify the Google Analytics workhorse function to report more meaningful URL names as well as track those not captured by default.
Capturing e-commerce transactions We discussed how to capture transactional information both on your site and if you are using a third-party payment gateway.
Tracking online campaigns You learned how to use campaign variables to identify and differentiate online campaigns from traditional digital marketing and social media.
Tracking in-page interactions as events You can now use the Google Analytics Event Tracking feature to capture actions separately from pageviews, including Flash movie interaction.
Customizing the GATC for your specific needs You learned to modify the default behavior of Google Analytics when your needs are more specialized.