
Chapter 9
Google Analytics Customizations
Out of the box, Google Analytics is a powerful weapon to add to your armory of search marketing, customer relationship, and other business-management firepower. With only a single page tag required to collect data, it is straightforward to set up, and with the addition of some filters, you can really gain insight into your website performance.
If at this stage the reports answer all of your questions, that’s great. However, you may find yourself asking further questions that are not answered by default in your reports. Fear not—you can still achieve a great deal more insight with a little bit of lateral thought; Google Analytics is incredibly flexible in that respect.
In Chapter 9, you will learn:
- To customize the list of recognized search engines
- To label and sessionize visitors for better segmentation
- To track error pages and broken links
- To gain a greater insight into your pay-per-click tracking
- To improve site overlay, conversion, and e-commerce reports
Why Customize an Existing Product?
Google Analytics is a great product, but it does need to cater to the needs of a wide variety of report end users, such as traditional e-commerce sites, to publishers’ sites, blogs, forums, corporate sites, informational sites, and lead-generation sites. Because of this diversity, certain compromises have to be made by the Google Analytics development team, as is the case for any web analytics product, hence the need for a customization chapter to provide potential workarounds for you.
There are four approaches to customizations:
- Build custom reports in the user interface (uses existing data points). This is the method to choose when you can view the data in your reports but it’s cumbersome to get at, with multiple drill-downs and cross-referencing required.
- Modify the GATC (creates new data points). Use this method when the data point is not present in your reports, such as the labeling of visitor types. Because the GATC is written in standard JavaScript, there are numerous ways it can be altered or customized. A good webmaster should be able to do this for you without too much trouble.
- Use filters to rewrite dimensions (modifies existing data points). Filters allow you to manipulate the data, such as combining multiple dimensions by adding referral source information to transaction IDs for example.
- Or a combination of all the above.
Google Analytics customizations help you delve deep into analysis. To do that, you need to think laterally and be creative with applying filters, segments, and so forth. Some examples in this chapter do require a strong understanding of JavaScript and HTML. The examples provided are only a sample of what you can achieve. Feel free to experiment and share your own experiences on the book blog site: www.advanced-web-metrics.com/blog.
Positioning and Updates of GATC Customizations
When modifying the GATC, note that the placement of the code edits is important. Therefore, ensure that you follow the placement instructions carefully. The general rule is that edits to the GATC must take place before the all-important _trackPageview call because it is this call that sends your modifications to the data collection servers (or _trackEvent if you are using that method to capture your customization).
In addition, the exact syntax of the GATC is constantly in flux. Therefore, if you apply these customizations, or build your own, subscribe to the Google Analytics changelog feed at
http://code.google.com/apis/analytics/community/gajs_changelog.html
Updates to the customizations in this chapter will be made available at www.advanced-web-metrics.com/chapter9.
A custom report is a way for you to control the display and organization of the types of information already available in Google Analytics but in a way that is most relevant to you. It’s difficult to describe in print, so I describe four common custom report examples for you to experiment with. The first three customizations are for reports that are not currently available in Google Analytics. The fourth example is an improvement on what is currently shown in Google Analytics for AdWords managers:
- Day parting
- Unique visitors by page
- Affiliate performance
- Improved AdWords layout
Building a custom report is similar to building an advanced segment or advanced table filter. That is, you populate placeholder fields with either the dimension or metric name you wish to display. These are shown in the section “Custom Advanced Segments” in Chapter 8, “Best Practices Configuration Guide,” and in the section “Table Filters (Advanced)” in Chapter 4, “Using the Google Analytics Interface.” If you are unfamiliar with the difference between dimensions and metrics, review those sections first because they allow you to quickly see how to find information. In fact, you may even find what you are looking for without having to create a custom report (as often happens). However, if that is not the case for you, go to the Custom Reports navigation item and select New Custom Report, shown in Figure 9-1.
Figure 9-1: Creating a custom report

Day-on-Day Custom Report
As you will have noticed from viewing almost all Google Analytics reports, the data-over-time chart is an obvious way to see how your data has evolved over a set time period. By combining it with advanced segments and table filters, you can drill down and view signals above the noise. However, the chart is linear. That is, it’s a chart showing day-to-day differences. It does not show how all Mondays compare with all Tuesdays, and so forth. This custom report allows you to do just that so you can compare day-on-day performance. If some of your marketing is scheduled at regular intervals—for example, a weekly email campaign that goes out every Tuesday morning—this custom report will help you understand its impact.
The setup for this report is shown Figure 9-2. In Figure 9-2, note the dual usage of the dimension Day of week. This is deliberate, so that at first you can compare data for all days of the week side by side, as shown in Figure 9-3a. Then, by drilling down on a particular day, you can compare only that day of the week over time—as show in Figure 9-3b.
Note in Figure 9-3 that days of the week are numbered in the reports from 0 to 6, representing Sunday through Saturday.
Figure 9-2: A custom report set up to allow day-on-day comparisons

Figure 9-3: The custom report produced by the setup of Figure 9-2: (a) Days of the week, (b) Wednesdays only

Unique Visitors by Page
As discussed in the section “Data Misinterpretation: Lies, Damned Lies, and Statistics,” in Chapter 2, “Available Methodologies and Their Accuracy,” counting unique visitors for a website is fraught with caveats and therefore results in an inaccurate number. It is why you rarely see reports in Google Analytics that include the unique visitor metric. Instead, where possible use the visit metric. That said, content publishers—sites such as www.nyt.com, www.bbc.com, and www.cnn.com that deliberately encourage regular visits to their site—rely on the use of unique visitors as a success metric. This is because it more closely aligns with their actual readership—people who may visit the site every day or even multiple times per day.
The custom report setup shown in Figure 9-4 allows you to view unique visitor counts next to your content. For this customization, I copied the format of the default Content Site Content Pages report and substituted the metric Unique Visitors for Pageviews. The result is a report that is much more visitor-centric, presenting a better representation of readership than the default Pages report, as shown in Figure 9-5.
Figure 9-4: A custom report setup for reporting content performance on a per-visitor basis
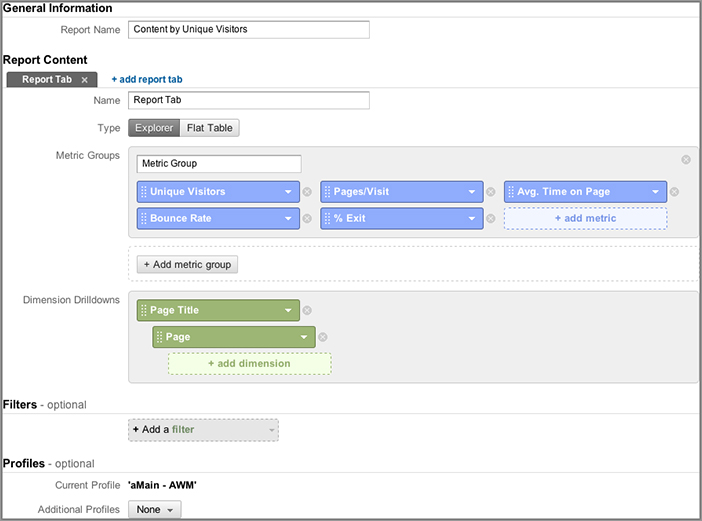
Figure 9-5: Making the Pages report visitor-centric after applying the custom report of Figure 9-4

Affiliate Performance
If you make use of affiliates to drive sales or leads to your website, you can capture the affiliate name as part of your e-commerce tracking. However, at present, reporting of affiliate performance is very limited in Google Analytics. It is only available as a secondary dimension in the E-commerce Transactions report. Because each transaction is reported separately, it is difficult to roll up the performance of all revenue from a particular affiliate. In fact, it is a manual process, and only revenue, tax, and shipping metrics are available.
The custom report shown in Figure 9-6 improves this so that affiliates have a dedicated performance report revealing the total number of transactions and average value (average order value) for each affiliate in addition to their total revenue, as shown in Figure 9-7.
Figure 9-6: A custom report setup for affiliate reporting

Figure 9-7: Affiliate performance report from applying the custom report in Figure 9-6

Note: At present, Google Analytics captures the affiliate name only at the transaction level, not at the purchased item level. That means affiliate performance for specific product items or product categories is not available. The section “Tracking E-commerce Transactions,” in Chapter 7 describes how to capture e-commerce data.
Better AdWords
When you’re viewing the performance of your AdWords campaigns, the default reports of Google Analytics show your campaign and keyword performance under the Clicks menu tab, shown in Figure 9-8. As you can see, the report includes all the AdWords cost and impression data and associated advertising metrics. However, goal and e-commerce data from AdWords visitors is reported separately in its respective menu tabs. Obviously, the separation of cost and return metrics is not ideal and often results in a frustrated clicking back and forth between the various menu tabs.
Figure 9-8: The default AdWords report

A better layout is to report your AdWords data alongside your e-commerce and goal data. The custom report shown in Figure 9-9 illustrates this for e-commerce, and a similar layout can be created for your goals. The combined report is shown in Figure 9-10.
Managing Custom Reports
You can create, edit, share, and delete your custom reports. If you have a large number of custom reports (for example, an agency-type scenario with different customizations per client), group your custom reports into categories. Click the New Category button as shown in Figure 9-1. Creating a custom report is covered in the previous section, and editing it is self-explanatory. I cover only sharing and deleting here.
Figure 9-9: A custom report setup for displaying AdWords data alongside e-commerce data

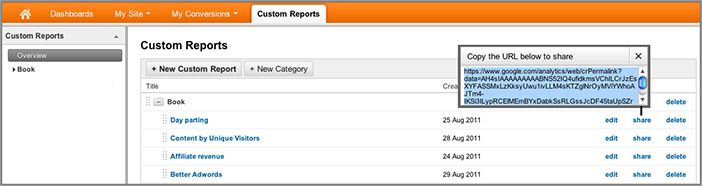
All custom reports are created on a per-user login basis, that is, for your login only. However, what if you are a third-party agency or consultant and you need to provide custom reports to your clients? There are two powerful features that allow you apply your custom report elsewhere:
- Within the custom report Overview section, you can share a custom report. This allows you to copy and paste a link in an email. Once the recipient clicks the link, your custom report will be created within their account, ready for saving and applying to profiles they have access to. Use this method if you do not have access to the Google Analytics account that you wish to apply your custom report to (see Figure 9-11).
- Select Additional Profiles when creating or editing a custom report. This allows you to apply your custom report to any profile you have access to, including profiles within other Google Analytics accounts. This is shown at the bottom of Figure 9-2.
Figure 9-10: AdWords performance report from applying the custom report in Figure 9-9

Figure 9-11: Managing custom reports
Deleting a custom report is also self-explanatory. However, a note of caution—deleting it results in the custom report being deleted from all profiles you have set in your Additional Profiles settings. Unless you are absolutely sure you have no need for a custom report, it is better to remove it from showing in other profiles by unchecking it in the Additional Profiles drop-down list.
Note: The allowed limit is 100 custom reports per user.
Customizing the List of Recognized Search Engines
Google Analytics currently identifies visitors from the following 37 search engines in your reports. The target audience, if specific, is shown in parentheses:
- About
- Alice
- AlltheWeb
- AltaVista
- AOL
- Ask
- Baidu (China)
- Bing
- CNN
- Daum (Korea)
- Ekolay (Turkey)
- Eniro (Sweden)
- Google (all search domains)
- Kvasir (Norwegian)
- Live (now Bing)
- Lycos
- MSN
- Mama
- Mamma
- Mynet (Turkey)
- Najdi (Slovenia)
- Naver (Korea)
- Netscape
- Onet
- Ozu (Spain)
- PCHome (China)
- Search
- Sesam (Norway)
- Seznam (Czech)
- Szukacz (Poland)
- Terra
- Virgilio (Italy)
- Voila (France)
- Wirtulana Polska (Poland)
- Yahoo!
- Yam (Taiwan)
- Yandex (Russia)
Removing Unwanted Search Engines
In the list of search engines, Search is actually a catchall name for all fully qualified domain names containing the word search. For example, in addition to www.search.com, it will match the subdomain search.anysite.com, or even your own internal site search search.mysite.com. In some cases, you may wish to exclude these from the report of search engines. Traffic from sites that are excluded are counted as direct traffic instead. To achieve this, use the _addIgnoredRef() method to remove a website from the referrer list, as in the following example:
_gaq.push(['_addIgnoredRef', 'search.anysite.com']);
A real-world usage of this technique is shown in the section “What to Do When a Third-Party Gateway Does Not Allow Tracking,” in Chapter 7. In that case, the purpose was to ignore the third-party site as a referrer, therefore preserving the original visitor’s referral cookie.
Although Google Analytics adds new recognized search engines to this list regularly, there are a great many more search engines in the world—language- and region-specific search engines as well as niche search engines, such as price comparison and vertical portals (for example, I use a list of over 250 search engines when working for clients that span multiple markets). It is therefore possible to append or completely rewrite the list of recognized search engines, as described in the following sections.
Making Search Engines Region-Specific
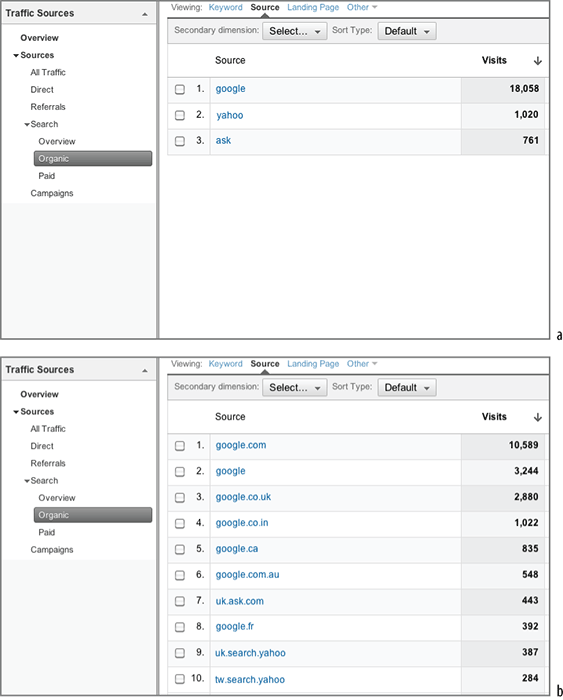
If you manage search engine optimization (SEO) for your organization or clients, regional differences are important. For example, if you are conducting SEO for a North American audience, knowing if visitors come to your site via a search on google.com, google.ca, or google.co.mx can be important to you. And it’s more important in Europe, which is a more fragmented market: google.co.uk, google.de, google.fr, and so forth. It’s the same for the Middle East, Asia, Asia-Pacific, and so on. Essentially, if your SEO is targeting different countries, understanding regional differences is a key requirement of your work.
As listed previously, by default Google Analytics tracks 37 search engines, in aggregate. That means, for example, that all Google domains are tracked as a single entity—google. The same for Yahoo!, Bing, and all other search engines. So you don’t know if a visitor from a Google search came from google.com or google.co.uk, or any other Google/Yahoo!/Bing domain for that matter.
To overcome this limitation, add region-specific domains to your GATC. A before-and-after example of applying this customization is shown in Figure 9-12. As you can see, the increased granularity of search engine data is quite dramatic.
The method for this customization is to add the following line to your GATC for each search engine:
_gaq.push(['_addOrganic', 'new_search_domain', 'query_name', opt_prepend]);
In this line, new_search_domain is the domain name of the search engine and query_name is the parameter label containing the visitor’s query terms; opt_prepend is an optional Boolean parameter, which if set to true means the newly defined search engine is prepended to the default list and if set to false means the search engine is appended to the list (if not set, false is assumed).
There are two straightforward steps to achieve this.
1. Conduct a search on the region-specific search engine you wish to track, such as google.co.uk, and view the resultant URL. For example, searching for “brian clifton” produces the following search results:
http://www.google.co.uk/#hl=en&cp=9&gs_id=q&xhr=t&q=brian+clifton&pf=p
&sclient=psy&newwindow=1&source=hp&pbx=1&oq=brian+cli&aq=0&aqi=g5&aql=
&gs_sm=&gs_upl=&bav=on.2,or.r_gc.r_pw.&fp=87c57dfcd1b2b35=1280&bih=619
Figure 9-12: The (a) before and (b) after effect of separating out regional search engines
2. From this URL, new_search_domain = google.co.uk and the query_name = q. Add the following code to your page GATC:
_gaq.push(['_addOrganic', 'google.co.uk', 'q', true]);
Because the default list of search engines already contains generic entries for google, yahoo, and so on, it is important that regional variations are prepended. That is, opt_prepend should always be set to true. Expanding my regional list, I have the following code:
_gaq.push(['_addOrganic', 'google.co.uk', 'q', true]);
_gaq.push(['_addOrganic', 'google.com.mx', 'q', true]);
_gaq.push(['_addOrganic', 'uk.search.yahoo', 'p', true]);
Note: The exact syntax of new_search_domain is important because it defines the region of the domain. In the preceding example, there is no such domain as yahoo.co.uk, so it is important that you check these. In some cases it may not be possible to be region specific. Bing is one such search engine.
A complete GATC containing these changes would be as follows:
<script type="text/javascript">
  var _gaq = _gaq || [];
  _gaq.push(['_setAccount', 'UA-12345-1']);

  _gaq.push(['_addOrganic', 'google.co.uk', 'q', true]);
  _gaq.push(['_addOrganic', 'google.com.mx', 'q', true]);
  _gaq.push(['_addOrganic', 'uk.search.yahoo', 'p', true]);
  _gaq.push(['_trackPageview']);

(function() {
var ga = document.createElement('script'),
ga.type = 'text/javascript'; ga.async = true;
ga.src = ('https:' == document.location.protocol ? 'https://ssl' : ↵
'http://www') + '.google-analytics.com/ga.js';
var s = document.getElementsByTagName('script')[0];
s.parentNode.insertBefore(ga, s);
})();
</script>
Note: I maintain a Google Analytics plug-in containing a comprehensive list of more than 250 search engines at www.advanced-web-metrics.com/plugins.
Adding New Search Engines for SEO
Suppose visitors from the BBC search engine and the Russian search engine Rambler are important to your website’s marketing success. Because neither is part of the default search engine list, such visitors will show as referrals in your reports from bbc.co.uk and rambler.ru respectively, and the visitor’s search keywords will be lost. The method to have these recognized as search engines and keywords captured is similar to the two-step process described in the previous section:
1. Conduct a search on the bbc.co.uk and ramabler.ru websites and view the resultant URLs. For example, searching for “brian clifton” produces the following search results:
http://www.bbc.co.uk/search/?q=brian%20clifton
http://nova.rambler.ru/search?btnG=%D0%9D%D0%B0%D0%B9%D1%82%D0%B8%21&query=brian+Clifton
2. To capture these URLs and keywords as search engines, add the following code to your page GATC, just prior to your _trackPageview call:
_gaq.push(['_addOrganic', 'rambler.ru', 'query', true]);
_gaq.push(['_addOrganic', 'bbc.co.uk', 'q', true]);
I tend to always set opt_prepend = true to account for any future changes Google may apply to its list of default search engines. In this way, your own list is always processed first.
The important step is to view the URL of a query on the search engine itself and extract the name of the variable containing your keywords. You can continue to add other search engines as needed by creating additional _addOrganic lines.
Note: The SEO plug-in located at www.advanced-web-metrics.com/plugins contains the BBC, Rambler, and many other niche engines from around the world.
Labeling Visitors, Sessions, and Pages
Labeling is way of grouping visitors of similar types, or behavior, together using a common label. A frequent example is to label your customers to segregate them from noncustomers; that is, people visiting your site who have purchased from you before versus those who have never purchased from you, regardless of their intent for their current visit. This is achieved using a visitor label (it is a persistent cookie) that remains with the visitor for each subsequent visit.
The power of the Custom Variables feature is that in addition to the visitor level, you can also label sessions (with the label lasting for the duration of the current visit) and pages and even define multiple instances of all three. To help understand this, consider the following example: A publisher, a newspaper website, wishes to know which section of its site is most popular: Sports, Music, or Current Affairs. In addition, the publisher wants to know how visitors interact with various types of calls to action during their visit—do they click an ad, rate an article, or comment on an article, for example? And is the visitor a paying subscriber or an anonymous visitor?
This example demonstrates all three levels of interaction (hierarchies) for using custom variables: page, session, and visitor labels. These are known as the variable scope and are illustrated schematically in Figure 9-13.
Understanding scope is important because each custom variable is restricted to one particular scope level. From Figure 9-13, you can see that the custom variable set at the visitor level has only one value for that visitor. Set at the session level, it can have three values because there are three sessions in this example. At the page level, each page can have its own associated custom variable—nine in total in this case. Table 9-1 illustrates how custom variables work, dependent on their scope.
Figure 9-13: The use of scope when defining multiple custom variables

Note: I use the terms custom variable and custom label interchangeably. The correct terminology from Google Analytics is custom variable. However, I find that the term custom label is easier to understand and convey to a stakeholder audience, especially when lots of other variables are being discussed.
Table 9-1: Custom variables by scope

Note: The combined length of the strings used for the name/value parameters must not exceed 128 bytes each. For Latin character sets. this limit corresponds to 128 characters but is reduced for double-byte character sets, that is, Chinese, Japanese, and Korean. The length is checked before URL encoding.
If you define your labels and scopes appropriately, all of these metrics can be viewed at a glance within your Visitors Demographics Custom Variables report. An example is shown in Figure 9-14, which is taken from this book’s website. In this case, a page-level custom variable is used to differentiate the two types of pages on the website—blog articles and regular content pages. Every page on the site has a page-level custom variable defined. As you can see, blog articles are much more popular in terms of visits than other content pages.
Of course, if the entire website content was nicely grouped in directories such as /pages and /blog, then it would be straightforward to view this information in your Content Site Content Pages report. However, that is rarely the case for any website. In this example, pages are hosted in the root directory and various other subdirectories (and even sub-subdirectories), making it impossible to group content by its directory hierarchy. The use of page-level custom variables enables this.
Figure 9-14: Example Custom Variables report

Implementing Custom Variables
You can add a custom label by using the function _setCustomVar() within the page where the label is applied, as shown in the following example:
_gaq.push(['_setCustomVar', index, name, value, optional_scope ]);
The parameters are defined as follows:
index The slot for the custom variable. This is a number whose value can range from 1 to 5, inclusive. A custom variable should be placed in one slot only and not be reused across different slots. The purpose is to allow multiple variables for the same scope.
name The name for the custom variable. This is a string that identifies the custom variable and appears in your top-level Custom Variables report—for example, "Section name", "Membership type", "Gender", and so on.
value The value for the custom variable. This is a string that is paired with a name. You can pair a number of values with a custom variable name. For example, for name=Section, values could be "Sports", "Music", and "Current Affairs".
optional_scope The scope defines the level of user engagement with your site. Available values are 1 (visitor level), 2 (session level), and 3 (page level). When left undefined, the custom variable scope defaults to page-level interaction.
Note: The current limit on the number of custom variable slots (index value) is five. Therefore, if you define three page-level custom variables on a page and then wish to add session- and visitor-level custom variables for the same page, you are limited to two, that is, using slots 4 and 5.
It’s important that you place _setCustomVar before the _trackPageview call of your GATC so that it gets delivered in the GIF request sent by _trackPageview. The following defines a page-level custom variable with the name Section and a value of Sports Pages and assigned to index=1:
<script type="text/javascript">
  var _gaq = _gaq || [];
  _gaq.push(['_setAccount', 'UA-12345-1']);
  _gaq.push(['_setCustomVar', 1, 'Section', 'Sports Pages', 3]);
_gaq.push(['_trackPageview']);

(function() {
var ga = document.createElement('script'),
ga.type = 'text/javascript'; ga.async = true;
ga.src = ('https:' == document.location.protocol ? 'https://ssl' : ↵
'http://www') + '.google-analytics.com/ga.js';
var s = document.getElementsByTagName('script')[0];
s.parentNode.insertBefore(ga, s);
})();
</script>
This works when you know the value of the custom variable in advance. That is, it does not depend on a visitor’s action such as onClick or onSubmit. As stated at the beginning of this chapter, placement of GATC modification is important. Therefore, if visitor action is required to set your custom variable, you must separate your GATC so that _setCustomVar is called within your HTML before _trackPageview (or _trackEvent), as in this example:
<head>
<script type="text/javascript">
  var _gaq = _gaq || [];
  _gaq.push(['_setAccount', 'UA-12345-1']);
  _gaq.push(['_trackPageview']);

(function() {
var ga = document.createElement('script'),
ga.type = 'text/javascript'; ga.async = true;
ga.src = ('https:' == document.location.protocol ? 'https://ssl' : ↵
'http://www') + '.google-analytics.com/ga.js';
var s = document.getElementsByTagName('script')[0];
s.parentNode.insertBefore(ga, s);
})();
</script>
</head>

<body>
   .
   .
<a href="rate_product.php;" onclick="_gaq.push(['_setCustomVar', 3,↵
'Engagement', 'Contributor', 2]);_gaq.push(['_trackEvent','dummy-ignore',↵
'ignore']);">Rate this product</a>
   .
   .
</body>
In this example, a session-level custom variable is defined with the name Engagement and a value of Contributor and is assigned to index=3. This is set only when a visitor clicks the Rate This Product link. A dummy event (or pageview) must also be set after the click; otherwise the custom variable is not captured by Google Analytics. Moving the _trackPageview call to the bottom of the page would not work because it would execute when the page has finished loading—yet the visitor will still be reading the content, deciding on their actions.
For any single page, you can track up to five custom variables, each with a separate slot. This means that you could assign four additional custom variables on this same page. The content placed in the name or value parameter can be any label you wish, though you should use only alphanumeric characters (as well as the space character) to avoid any potential encoding issues. The content you set will be displayed in the Visitors Custom Variables report and can be cross-segmented as per other metrics.
Note: Once you have set up a custom variable, you can use the _gaq.push(['_deleteCustomVar', index]); method to remove it should you no longer require it (where index is the index of the custom variable to delete). For example, you might use it if a visitor label is a temporary label that requires confirmation by a visitor’s further action and the visitor does not complete the action.
Tracking Error Pages and Broken Links
With an out-of-the-box install of Google Analytics, you will not be tracking error pages or broken links on your website. This is because by default you probably have not added the GATC to your error pages. After all, how can you track a page that does not exist? To enable this, you need to add the GATC to the error-page templates that are delivered by your web server. A webmaster will typically do this. The GATC will then track your error-page URLs as if they were any other pageview request. That is the caveat: Without modification, error pages are reported as regular pages, not as errors, making them difficult to detect in your reports! You can highlight and separate error pages by modifying the GATC on your error page templates as follows.
Typically, a web server allows you to define a template for each error status code. For example, to track missing pages on your site, modify the standard GATC on your 404 template page as shown here:
<script type="text/javascript">
  var _gaq = _gaq || [];
  _gaq.push(['_setAccount', 'UA-12345-1']);
_gaq.push(['_trackPageview','/error 404/' +document.location.pathname↵
+document.location.search']);

(function() {
var ga = document.createElement('script'),
ga.type = 'text/javascript'; ga.async = true;
ga.src = ('https:' == document.location.protocol ? 'https://ssl' : ↵
'http://www') + '.google-analytics.com/ga.js';
var s = document.getElementsByTagName('script')[0];
s.parentNode.insertBefore(ga, s);
})();
</script>
This is an example of the virtual pageview technique as discussed in Chapter 7. It allows you to create the virtual directory /error 404/ and the full path to the error page filename (URI), plus any query terms used. You modify other error templates in a similar way:
_gaq.push(['_trackPageview','/error 500/' +document.location.pathname↵
+document.location.search]);
Using this technique enables you to differentiate error pages from other pageviews within your Google Analytics reports. Resultant entries for error pages will show in your Content Site Content Pages report as, for example, /error 404/noexisting-page.htm. This provides you with two very important pieces of information: the type of error (error code) and the URL of the page that produced it.
Web Server Status Codes
These are the status codes, defined in the HTTP 1.0 specification, returned by your web server in its headers (see www.w3.org/Protocols/Overview.html).
2xx Success
The requested action was successfully received and understood:
- 200 OK
- 201 Created
- 202 Accepted
- 203 Provisional Information
- 204 No Response
- 205 Deleted
- 206 Modified
3xx Redirection
Further action must be taken in order to complete the request:
- 301 Moved Permanently
- 302 Moved Temporarily
- 303 Method
- 304 Not Modified
4xx Client Error
The request contains bad syntax or is inherently impossible to fulfill:
- 400 Bad Request
- 401 Unauthorized
- 402 Payment Required
- 403 Forbidden
- 404 Not Found
- 405 Method Not Allowed
- 406 None Acceptable
- 407 Proxy Authentication Required
- 408 Request Timeout
5xx Server Error
The server could not fulfill the request:
- 500 Internal Server Error
- 501 Not Implemented
- 502 Bad Gateway
- 503 Service Unavailable
- 504 Gateway Timeout
Figure 9-15 shows an example Pages report for the error pages. Note that the report uses the table filter to highlight the errors, that is, bubble them up to the top of the report table. This is important because error pages are usually buried at the bottom of your pageview listings—assuming they are a small fraction of the total!
Figure 9-15: Viewing error pages

Tip: Knowing your error page URLs is clearly important, yet they typically appear at the bottom of your Top Content report—possibly hundreds of pages deep. To ensure that your web design and development team follows up on errors, set the table filter to error (as shown in Figure 9-15) and schedule this report to be emailed to them on a daily or weekly basis. Emailing reports is discussed in the section “Email Reports,” in Chapter 4, “Using the Google Analytics Interface.”
Of course, once you have identified error pages, you will want to know which links within your website point to them; that is, you will want to identify broken links. From the report shown in Figure 9-15, click any of the listed error pages to get the detail for that specific page, and then select the Navigational Summary menu tab. The result is a list of pages that your visitors were on just prior to clicking through and receiving the error page, as well as where they went after seeing the error page, as shown in Figure 9-16.
Figure 9-16: Pages leading to and from an error page

What if you cannot use a different GATC in your error templates? Some host providers and even large corporations can be stuck in a one-size-fits-all control panel or content management system where it is not possible (or too difficult) to have a different GATC on their error templates. If this describes your scenario, it may still be possible to track your error pages, so long as the error page title contains a hint that it is actually an error page being displayed. Most Apache configurations do this by default, as shown in Figure 9-17.
Figure 9-17: Typical 404 “not found” error page returned from the Apache web server

Because the error page template displays its error code in the HTML <title> tag, you can apply a filter to differentiate errors from other pageviews in your reports, as shown in Figure 9-18.
Figure 9-18: Filter to highlight error pages

In plain English, the filter is described as follows:
- Check whether the page title contains the phrase “Error page.” If so, extract the page title and the page URI entries.
- Combine the page title and page URI entries, and overwrite the original page URI field.
Differentiating Pay-Per-Click Network Partners
As well as displaying ads on their own search properties, pay-per-click networks often partner with other websites to display their advertisements, sharing revenue from resultant ad click-throughs with the partner. An example is the relationship between Google and Ask.com. Ask.com is an independent search engine with its own search technology for displaying organic search results (formally known as Teoma). However, for paid search, Ask.com partners with Google AdWords. If you advertise on AdWords, then your advertisement will also appear on the Ask.com website. In this way, pay-per-click partner networks are a great additional distribution channel for your advertisement, enabling you to reach a wider audience.
Note: AdWords has a search network opt-out feature that enables you to advertise only on Google web properties if desired.
By default, reports in Google Analytics group all pay-per-click partner click-throughs for AdWords as google / cpc. For example, you will not see pay-per-click visitors who originate from Ask.com labeled as such—just google / cpc, as shown in Figure 9-19. The same is also true for other pay-per-click networks such as Bing and Yahoo!, which distribute their ads to AltaVista, Lycos, HotBot, A9, and others.
Figure 9-19: Different paid networks
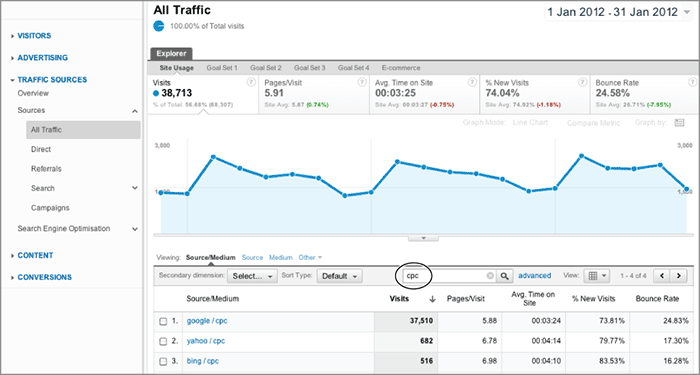
In addition, if your AdWords strategy spans more than one geography, for example, google.se and google.com, Google Analytics groups all such click-throughs as google / cpc.
Being able to view which partner site, or which specific Google domain, your AdWords visitors come from can help you optimize your advertising approach. If this level of detail is important to you, use two cascading filters (one applied after the other) to show more fully where your pay-per-click visitors are originating from, as shown in Figure 9-20.
In plain English, Figure 9-20 reads as follows:
1. For every pageview, where the medium is defined as cpc or ppc, extract the Referral domain, omitting the http:// text and anything after the next slash (/). Copy the contents of this match to Custom Field 1.
2. Append the referring domain to the Campaign Source variable and overwrite it.
Figure 9-20: Filters to include the original referrer from different pay-per-click networks

Combining Pageview Fields with Session Fields
There is a slight caveat when working with the filters described in Figure 9-20: They combine a per-pageview field (Referral) with a per-session field (Campaign Source). A pageview field is populated with every pageview recorded by Google Analytics, whereas a session field is set, usually at the start of the session, and then maintained throughout a visitor’s time on the site.
For example, each time a pageview is viewed, the page title, URL, and referral are updated to match the current page, but the session fields (returning visitor versus new visitor indicator, or campaign name, for example) are the same regardless of the page currently being viewed. Referral is a pageview field, in that each pageview will have its own unique referral, whereas Campaign Source will have the same value across the entire session.
Because cookies can be altered during a session—for example, visitors can remove them or firewalls can restrict them—it is possible that applying an additional profile filter may alter a session field within a visitor’s session. This can cause a data misalignment, potentially resulting in an unpredicted data value showing in the reports. This is rare, but it occasionally happens.
Notice that both filters A and B must be executed in order for the filter to work. The result is a report that lists both the original referral and the Google Analytics–defined campaign source, as shown in Figure 9-21.
Search Engine Relationships
The relationships among search engines (paid and nonpaid), directories, and portals are quite complex—as the chart illustrates. To understand the relationship chart, try viewing only Google’s relationships; Google provides organic search results for AOL and Netscape. AdWords results are displayed on AOL, Netscape, Ask.com, and many portal sites (via AdSense); Google receives directory results from DMOZ. The other search engines have similar multiple relationships.
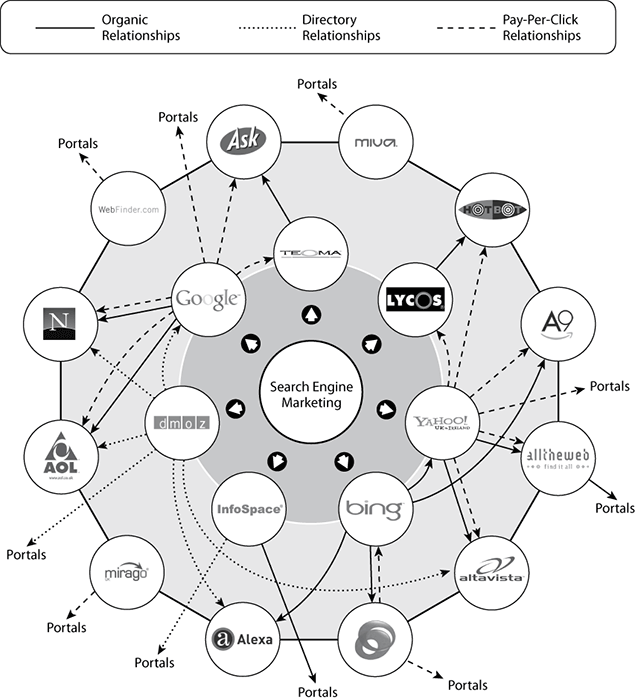
A color-coded, interactive version is available at
www.advanced-web-metrics.com/search-relationship-chart.
Figure 9-21: Showing the referral URLs from pay-per-click networks

As you can see, the structure of the report in Figure 9-21 is a referral source list of the form ppc network source, (via referring website). The report shows visitors from the Google AdWords partner network, including ask.com, images.google.com, conduit.com, visadropbox.co.uk, and mywebsearch.com. Without these filters in place, the level of detail is limited to a single aggregate entry of google.
In-Page Analytics: Differentiating Identical Links
The In-Page Analytics report is an excellent way to visualize what links your visitors are clicking and which ones have the most value; that is, drive conversions. However, by default, if you have numerous links on a page all pointing to the same destination URL, the same metrics are shown for each link in the In-Page Analytics report. You are unable to differentiate multiple links to the same URL. This can happen, for example, if you have an image link, a menu link, and a content link on a category page, all pointing to productA.html.
An example of this is shown in Figure 9-22, which shows this book’s website with three pairs of links highlighted. Each pair points to the same URL—Home, Site Blog, and About Brian Clifton, respectively. Because these are pairs of identical URLs, the site overlay report for these links shows identical metrics. However, by modifying each URL slightly with a different query parameter, we can differentiate these links:
http://www.mysite.com/?linkid=topLogo
http://www.mysite.com/?linkid=topMenu
http://www.mysite.com/blog/?linkid=topMenu
http://www.mysite.com/blog/?linkid=contentText
http://www.mysite.com/brian-clifton.htm?linkid=topMenu
http://www.mysite.com/brian-clifton.htm?linkid=contentText
Figure 9-22: Book website with three pairs of identical links

If the links you wish to differentiate already contain query parameters, simply append your differentiator as follows, for example:
http://www.mysite.com/blog/?cat=plugins&linkid=topMenu
With this method, your In-Page Analytics report will be able to clarify whether a content text link has more of an impact than an image logo link or menu link to the same page. However, bear in mind that when applying this method and viewing other reports, such as the Content Site Content Pages report, you will need to sum the pageview data for these links to determine the page total. To overcome this limitation, use a separate profile for these reports. That is, one profile with all your links to the same page differentiated, as described previously, and another profile that strips out the differentiators. The Exclude URL Query Parameters setting in your profile settings can do this for you. See the section “Initial Configuration” in Chapter 8.
Matching Transactions to Specific Referral Data
As discussed in Chapter 1, “Why Understanding Your Web Traffic Is Important to Your Business,”and Chapter 2, “Available Methodologies and Their Accuracy,” web analytics is about identifying trends, so you shouldn’t get hung up on precise numbers. Understand the strength and accuracy limitations of your data and get comfortable with it. For Google Analytics, Google’s strong stance on privacy means that individuals are not tracked and all data is reported at the aggregate level.
However, for e-commerce transactions, e-commerce and marketing managers usually desire a little more detail. Without identifying individuals, the following customization enables you to view your transaction list and identify which referrer source, medium, and keywords were used by the purchaser to find your website in the first place; that is, it combines four dimensions together in one report. By default, Google Analytics allows only two dimensions to be combined.
Note: This technique was originally discussed in an article by Shawn Purtell from ROI Revolution
www.roirevolution.com/blog/2007/05/matching_specific_transactions_to_specific_keyword.html
and is reproduced here with permission.
The customization works by cascading three advanced filters as follows:
Filter 1 Figure 9-23 shows the first filter, which grabs the campaign source and medium of a visit and places them in a custom field.
Figure 9-23: Capturing the campaign source and medium and storing them in a custom field

Filter 2 Figure 9-24 shows the second filter, which adds the keyword to the custom field. The custom field then contains the referrer source, medium, and keyword.
Filter 3 Figure 9-25 shows the third and final filter, which takes the custom field created and appends it to the transaction order ID. This matches sources with specific transactions.
Figure 9-24: Appending the referral keyword to the custom field

Figure 9-25: Appending the custom field information to the transaction ID

Of course, the order of the filters is important, and this should be maintained as described. When done correctly, the cumulative result is a Conversions Ecommerce Transactions report that is transformed from just showing the list of transaction IDs to including details of the referring source, medium, and keyword, as shown in Figure 9-26. The format is as follows:
Transaction-ID referral source - medium (keywords)
Figure 9-26: Matching specific transactions to specific keywords

Tracking Campaign Links to File Downloads
What if your campaigns send visitors directly to a file that does not accept the GATC JavaScript page tag? This can be the case with email marketing or other specialized types of campaigns whereby visitors are referred directly to a PDF, EXE, ZIP, DOC, XLS, or PPT download—or any other file type that is not a website landing page. Without the GATC in place, Google Analytics will not detect a visitor from such a campaign. However, you can address this challenge by creating an intermediate landing page to capture the campaign variables before forwarding the visitor to the actual file download.
Figure 9-27 shows an example intermediate landing page generated by a link from an email message that points to the following URL:
www.mysite.com/forwarder.php?file=catalogue.pdf&utm_source=sales&
utm_campaign=first-followup&utm_medium=email
As you can see, the URL contains a list of parameters that includes the filename to be downloaded (catalogue.pdf) and Google Analytics campaign parameters, as discussed in Chapter 7. Table 9-2 describes the individual elements.
Figure 9-27: Example use of an intermediate landing page for file downloads

Table 9-2: URL breakdown for Figure 9-27
| Element | Description |
| forwarder.php | Name of the web page that will redirect the visitor to the correct file |
| catalogue.pdf | Name of the file requested by the visitor |
| utm_source | Campaign source identifier |
| utm_medium | Campaign medium identifier |
| utm_campaign | Campaign name identifier |
In this example, the forwarding page, forwarder.php, contains your GATC with the following code in the HTML <head> section tag:
<script type="text/javascript">
   var filename=("<? echo $_GET['file']; ?>") ? ↵
    "<? echo $_GET['file']; ?>" : "";
   var source=("<? echo $_GET['utm_source']; ?>") ? ↵
    "<? echo $_GET['utm_source']; ?>" : "";
   var medium=("<? echo $_GET['utm_medium']; ?>") ? ↵
    "<? echo $_GET['utm_medium']; ?>" : "";
   var campaign=("<? echo $_GET['utm_campaign']; ?>") ? ↵
    "<? echo $_GET['utm_campaign']; ?>" : "";
   window.onload = trackFile();

   function trackFile(){
      if (filename) {
         fullPath = "/downloads/direct/" +filename+ "?utm_source="↵
          +source+ "&utm_medium="+medium+ "&utm_campaign=" +campaign;
         _gaq.push(['_trackPageview', fullPath]);
         window.location = "http://" +document.domain +"/"+ filename
      }else{
         alert('No download file specified'),
      }
   }
</script>
The purpose of the script is to immediately redirect the visitor to the specified download file using window.location. However, before doing so, it sets a virtual pageview for Google Analytics to track and report on and also appends campaign variables, captured from the landing page URL. No other content is required for this page, although as Figure 9-27 shows, also providing the option of a download link is good practice in case the redirect fails for some reason.
The beauty of this method is that you can view each file download as a pageview in your Google Analytics reports with the referral campaign, medium, and source correctly attributed to the referring campaign. See Figure 9-28.
Figure 9-28: File download report from direct campaign links

In addition, forwarder.php will be listed with all the aggregate referral information; however, you might want to remove this page from your reports with an exclude filter to prevent double counting because it is effectively a nonpage.
Tracking Campaign Links to Third-Party Websites
You can use the same technique (Tracking Campaign Links to File Downloads) for tracking email marketing where links within the email point to third-party websites. That may sound counterintuitive—why conduct email marketing that takes the reader elsewhere? However, for highly decentralized organizations, it is sometimes necessary to send people to other websites within the organization that aren’t tracked by the marketing department sending the email.
Using Events Instead
Although PHP is used in the example, the technique is equally applicable for any server-side web-scripting language you might use, such as ASP, .NET, CGI-Perl, Python, and so on. It is also easy to modify for tracking file downloads as events. Essentially, you modify the line
_gaq.push(['_trackPageview', fullPath]);
to something similar to the following example:
_gaq.push(['_trackEvent', 'File downloads', source, filename]);
See Chapter 7 for details on event tracking.
Changing the Referrer Credited for a Goal Conversion
Defining goals for your website is discussed in Chapter 7. By default, Google Analytics gives credit for a conversion to the last referrer a visitor used. For example, consider the following search scenario for a user who visits your website by way of a different referrer each time:
- Google organic search—visitor leaves your website (referrer 1).
- Google paid search—visitor leaves your website (referrer 2).
- Facebook referrer—visitor converts (referrer 3).
All visit referrals are tracked, with credit for the conversion given to referrer 3. This is the case except when the last referrer is direct—that is, the visitor uses their bookmark or types your URL directly into their browser address bar, for example:
- Google organic search—visitor leaves your website (referrer 1).
- Google paid search—visitor leaves your website (referrer 2).
- Facebook referrer—visitor leaves your website (referrer 3).
- Direct (bookmark)—visitor converts (referrer 4).
Credit for the conversion is still given to referrer 3. That makes sense because it is most likely referrer 3 that led to the bookmarking (or remembering) of your website address. In Chapter 5, “Reports Explained,” I discuss the Multi-Channel Funnels reports. Multi-channel funnels show the referral path of conversions, that is, connecting referral sources when multiple visits occur prior to conversion (referrer 1 referrer 2 referrer 3 referrer 4). But what if you wish to ignore one of those referrers? In the next section, you’ll see why this can be important and how to do it.
Ignoring a Referrer for a Conversion
Why ignore a referrer? Consider, for example, an online marketing campaign using AdWords to drive visitors to your site. The call to action is a newsletter subscription. Before the subscription can be accepted, you require the visitor to confirm their email address by clicking a link in a confirmation email triggered by their sign-up. This is standard best practice to ensure that subscribers are real people who intended to subscribe.
If you were to use a standard link for confirmation within your email—that is, without any campaign tracking parameters—and the visitor is using a webmail client such a Gmail, Yahoo! Mail, or Hotmail, the confirming visitor will have a new referral source/medium combination set, such as, for example, mail.google.com/referrer, mail.yahoo.com/referrer, mail.live.com/referrer and so forth. These overwrite the AdWords campaign information that originally drove the visitor to your site. Even with campaign parameters appended to your email link URL, the situation is the same. Clearly, such click-throughs are not part of the visitor’s referral journey, and you will wish to ignore this in your reports.
How Many People Use Webmail?
According to information collated by Mark Brownlow of Email Marketing Reports, webmail is used by some 800 million people world-wide:
www.email-marketing-reports.com/metrics/email-statistics.htm
The vast majority of these are personal accounts. However, business products such as Google Apps provide Gmail access to some 40 million business users according to Google’s Chairman, Eric Schmidt:
You can ignore the last referrer of a visitor by appending your landing page URLs with the utm_nooveride=1 parameter. When Google Analytics detects the utm_nooverride=1 parameter, it retains the previous referrer campaign information. That is, only if there are no existing campaign variables will new ones be written. The key here is to be consistent; that is, all “system” emails, such as those for confirming subscriptions and password resets, should have landing page URLs with utm_nooveride=1. That way, referral and campaign details that are driving visitors to your website are maintained while the email referrer details are ignored. For example, within your emails use links such as these:
http://www.mysite.com/confirm_account.php?id=1098746453svxg&utm_nooverride=1
http://www.mysite.com/reset_passwd.php?id=9887ndhcg765430&utm_nooverride=1
Note that if all your visitors used a standard mail application (that is, not webmail), this technique would not be needed. However, increasingly, webmail cloud services are being used by people, so this is an important step to implement.
Although email follow-ups are the most common use of this technique, there may be other scenarios where you wish to use this method. If so, simply append the utm_nooverride=1 parameter to the landing page URL.
Roll-up reporting was initially discussed in Chapter 6. In summary, roll-up reporting answers the requirements of a very specific type of enterprise client; that is, autonomous offices or departments that wish to manage their own reporting needs (typically for region-specific domains—the United States, Europe, Asia, and so on) separately from HQ, which requires a bigger picture of all activity.
The principle to achieving this is to add multiple GATCs to your pages—more accurately described as adding a second tracker object. In this way, each autonomous office logs into its own stand-alone Google Analytics account while HQ logs into a “catchall” Google Analytics roll-up account. Each manages its own reporting needs without impacting the other. However, there are a number of caveats to this method, and these more-advanced issues are highlighted here. First, though, review the initial details of the section “Roll-up Reporting” in Chapter 6 before proceeding.
Tracking Roll-up Transactions
If yours is a transactional site, special consideration is required for e-commerce because you will need to call the e-commerce tracking code for each account—once for your stand-alone account and once for your roll-up account. So _addTrans, _addItem, and _trackTrans are required for both your default and second tracker objects. Schematically you need to add the following to your transaction receipt or confirmation page (see Chapter 7 for help with e-commerce tracking):
_gaq.push(['_addTrans', enter transaction values as an array ]);
_gaq.push(['_addItem', enter item values as an array ]);
_gaq.push(['_trackTrans']);

_gaq.push(['t2._addTrans', copy of transaction values from above]);
_gaq.push(['t2._addItem', copy of item values from above]);
_gaq.push(['t2._trackTrans']);
And that’s it except for the following implications.
Implications of the Roll-up Technique
The following implications sound daunting at first, but in many cases they are not. Apart from unifying your e-commerce data (the second item that follows), you probably will not drill down deep enough in a roll-up report for these implications to be noticed. However, you should be aware of them.
Pageview aggregation Pageviews on your different websites that have the same page title or name (for example, index.htm, contact.htm) will be aggregated. That is, you will see only one entry in your roll-up report for index.htm and contact.htm, with the sum of their pageviews. Generally for roll-up reporting, this is not a problem because the account is used to get the bigger picture, or aggregate overview. However, if you still need the page name detail, apply the filter shown in Figure 7-15 of Chapter 7. This is the same filter for differentiating pageviews from subdomains.
Transactions in different currencies Similar to pageview aggregation, e-commerce data will be aggregated. That is, if you have transactions in different currencies, the revenue totals become meaningless at the aggregate roll-up level. Thus, dollars, pounds, euros, and so on are all combined regardless of exchange rates. Therefore, for your roll-up account, unify your transaction data into a single base currency. This base currency should remain fixed so that long-term comparisons can be made. Don’t change this to reflect currency exchange rates.
Time zone alignment If your stand-alone accounts operate in different time zones, ignore time-of-day reports in the roll-up account. They won’t make sense!
AdWords ROI in different currencies If you run AdWords accounts in different currencies for your stand-alone Google Analytics account, ignore the ROI and margin metrics from the Traffic Sources AdWords reports. They won’t make sense!
Cookie manipulation The roll-up reporting method results in cookies being shared between both your stand-alone and roll-up Google Analytics accounts. Therefore, any cookie manipulation on one—changing time-out values or expiry date, for example—results in changes impacting both sets of reports. This issue can arise, for example, if you have an agency collecting data for its own internal purposes (stand-alone account). They may wish to experiment, not realizing the wider impact. If this happens, a great deal of time and money can be wasted trying to troubleshoot data anomalies. Therefore, ensure that such changes are managed centrally. One option is to use the Custom tab of the GATC setup wizard, as discussed in the section “Customizing the GATC” in Chapter 7.
Improvement Tip: Simplify with Pageview Roll-up
If you have dozens or even hundreds of product micro sites, you may wish to simplify your roll-up pageview reports even further. Rather than collecting detail of every page URL on each micro site into the roll-up account, “concertina” this into a per-site view. That is, roll up your pageviews.
In this way, instead of having page A = 300 views, page B = 200 views, page C = 100 views, and so on, you would have pageview for www.mysite.com = 600, www.mysite2.com = 130, and so on. This simplifies the Top Content report so that you see overall pageview volumes on a per-site basis. You can use the following GATC modification for simplifying pageview reports:
<script type="text/javascript">
  var _gaq = _gaq || [];
  _gaq.push(['_setAccount', 'UA-12345-1']);
  _gaq.push(['t2._setAccount', 'UA-98765-1']);
  _gaq.push(['_trackPageview']);                // maintain pageview detail
  _gaq.push(['t2._trackPageview', location.host]);   // roll-up pageviews

(function() {
var ga = document.createElement('script'),
ga.type = 'text/javascript'; ga.async = true;
ga.src = ('https:' == document.location.protocol ? 'https://ssl' : ↵
'http://www') + '.google-analytics.com/ga.js';
var s = document.getElementsByTagName('script')[0];
s.parentNode.insertBefore(ga, s);
})();
</script>
In Chapter 9, you have learned the following:
Customizing the list of recognized search engines You have learned to add new and regional variations to the default search engine list so that you can differentiate visitors from, for example, google.com and google.co.uk, among others.
Labeling You know how to apply labels via the use of custom variables to visitors, sessions, and pages, allowing you to group these for better segmentation and analysis.
Tracking error pages and broken links You can now identify and highlight things that don’t work on your site so they can be fixed quickly.
Tracking referral URLs from pay-per-click networks You understand which niche pay-per-click sites are driving traffic and conversions for you when they are part of a greater network.
Differentiating links to the same page (site overlay) I discussed how the performance of a link differs by its format and placement on a page.
Matching transactions to specific keywords You learned how to determine which source, medium, and keywords are driving revenue at the specific transaction level.
Tracking campaign links to file downloads You saw how to ensure that a link in an email leading directly to a file download is tracked.
Changing which referrer is given credit for a conversion You can now manipulate the referrer attribution model to credit the first referrer or the last referrer or capture both.
Using roll-up reports You learned how to use roll-up reports for catchall overviews of multiple websites.