
Calling Web Service Methods from a BizTalk Orchestration Schedule
Calling a Web Service from a BizTalk Orchestration schedule is similar to calling a managed component from a schedule. For example, in Chapter 14, we demonstrated how you can call a managed Visual Basic .NET object from a BizTalk Orchestration schedule by wrapping the object in a COM callable wrapper (CCW). Earlier in this chapter, the BankVBWebClient managed ASP.NET application was modified to call the Web Services version of the business logic. To accomplish this, we added a Web reference to the project, which automatically created two Visual Basic .NET proxy classes allowing us to call the Web Service methods as if they were local objects. Now in this chapter, we are going to discuss how to call a Web Service from an unmanaged client, the BizTalk Orchestration COM+ engine.
As mentioned earlier, ASP.NET Web Services support three protocols: HTTP GET, HTTP POST, and SOAP, each capable of remoting a call over the wire to a desired Web Service. By default, a proxy class uses the SOAP protocol to access a Web Service method.
Note
If for some reason a Web Service can be called only using the HTTP-GET or HTTP-POST protocols, the command-line utility Wsdl.exe is capable of generating the proxy classes for them manually.
We also discussed how easy it was to test a Web Service using HTTP GET or POST from a Web browser. In theory, we could use either a proxy class or a simple HTTP request to invoke a Web method from a BizTalk Orchestration schedule or unmanaged client application. To keep things simple, in this example, we are going to reuse the proxy Visual Basic .NET code generated by Visual Studio .NET in the BankVBWebClient ASP.NET application and expose it as a CCW.
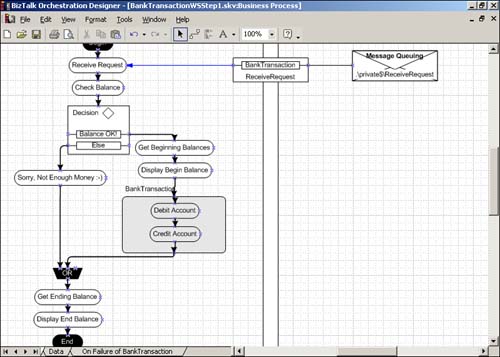
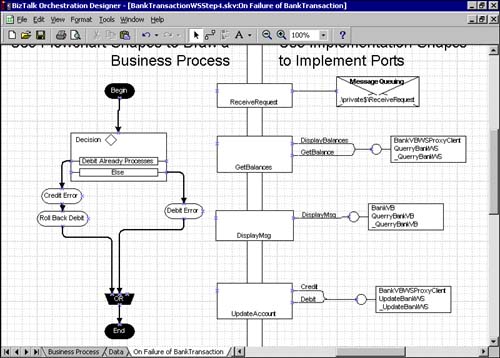
In Chapter 14, we created a BizTalk Orchestration schedule named BankTransaction. skv. In this section, we are going to modify that schedule to call the Web method proxies. The Orchestration COM+ engine requires that all bound objects be COM based. To call the .NET proxies, they must first be wrapped in a CCW. Figure 15.13 displays the BankTransaction.skv schedule as it exists in Chapter 14.
Figure 15.13. BankTransaction.skv BizTalk Orchestration schedule.

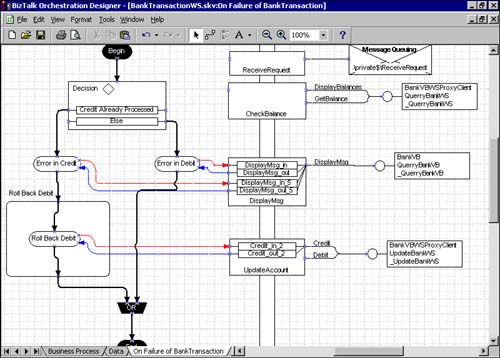
Figure 15.14 displays the BankTransactionWS.skv schedule with the modifications that are going to be made in this chapter.
Figure 15.14. BankTransactionWS.skv BizTalk Orchestration schedule.
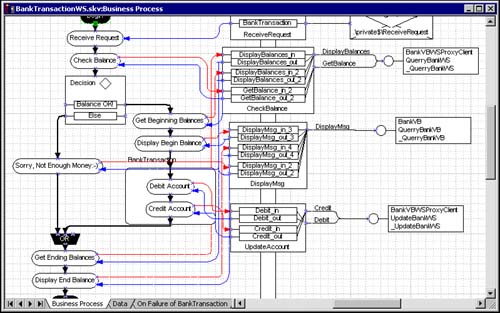
If you look closely at both schedules, you will notice that although they both produce similar technical results they differ slightly in how they process their underlying business logic. First, both schedules begin with the receipt of an XML request from a private MSMQ message queue named ReceiveRequest. The XML document named BankTransaction.xml contains the bank names, account numbers, and amount of money to transfer. After the XML document is received, it is parsed by the BizTalk orchestration Scheduler Engine and then passed to the next action, Check Balance. Check Balance calls the GetBalance method called the Visual Basic .NET QueryBankVB class created in Chapter 14. In the BankTransactionWS.skv file, we will call a proxy class named BankVBWSProxyClient QueryBankWS soon to be created in this chapter. Also note that the Get Beginning Balance and Get Ending Balance actions are also bound to that proxy object. The Debit and Credit actions are bound to a second new proxy object named BankVBWSProxyClient UpdateBankWS that will also be created in this chapter.
As also mentioned earlier, Web Services are nonvisual objects. In the new BankTransactionWS.skv schedule you will notice that there are two new actions, Display Begin Balance and Display End Balance, that call the DisplayMsg method of the BankVB QueryBankVB managed Visual Basic .NET class created in Chapter 14. The message boxes that appeared during the execution of the BankTransaction.skv schedule in Chapter 14 were originally called from within the GetBalance method of the Visual Basic .NET method. Remember, that when we created the Web Services version of this object, we commented out the line of code that instantiated the DisplayMsg method. So, to display a message box, these actions needed to be added and bound to the DisplayMsg method created in Chapter 14's object. This allows the schedule to continue to visually display the current account balances at runtime.
In the following section, we will expose the proxy methods created by Visual Studio .NET as COM objects and then modify the Transaction.skv file to call the proxy methods rather than the Visual Basic .NET BankVB methods created in Chapter 14. In the next section, we will walk through the following steps:
1. |
Set up the development environment. |
2. |
Create a new Visual Basic .NET project to house the proxy objects and expose the objects and their methods using a CCW. |
3. |
Create a new BizTalk Orchestration schedule named BankTransactionWS.skv from the BankTransaction.skv file and modify it to call the new proxy methods. |
4. |
Run the BankTransactionWS.skv file and follow its progress using the XLANG Schedule monitor. |
Setting Up the Development Environment
The schedule in this example starts with a modified version of the BankTransaction.skv schedule in Chapter 14. This schedule can be created by modifying a downloaded version of the completed Chapter 14 schedule from the publisher's Web site or by manually adding the actions as shown in Figure 15.15.
Figure 15.15. BankTransactionWS.skv starting schedule.
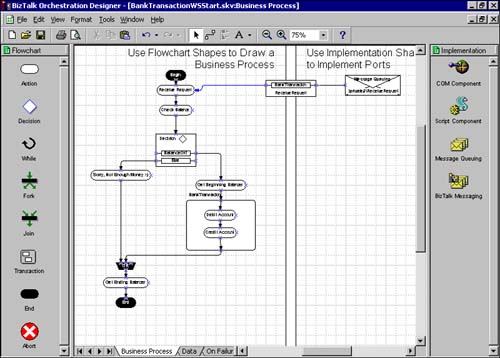
To modify the BankTransaction.skv schedule in Chapter 14, delete the component bindings not displayed in Figure 15.15 (all bindings except the MSMQ binding) and then choose Tools, Delete Unused Ports and Messages from the menu to clear the information associated with the old bindings in the Data page of the schedule. Then save the file as BankTransactionWS.skv.
Note
The BizTalk Orchestration piece of this chapter's example builds on the Web Service example in the first part of this chapter. If you have not yet created the MSMQ queue or SQL Server databases specified in Step 1 of the Web Services example, you must do so now.
Exposing the Web Service Proxies as COM Objects
In the BankVBWebClient ASP.NET project, we added a Web reference to access the Web Service methods. When the Web reference was added, it automatically generated two proxy objects named Reference.vb. These objects are located in the Web References folder of the BankVBWebClient project under the server names, localhost and localhost1, as displayed in Figure 15.16.
Figure 15.16. The Web Proxy Visual Basic .NET files for BankWS and UpdateBankWS Web Services.
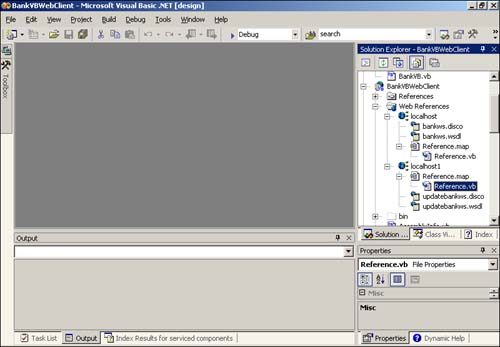
To reference the proxy object methods from a BizTalk Orchestration schedule, you need to wrap them in a CCW. To accomplish this, we will create a new Visual Basic .NET project that includes the two proxy Visual Basic .NET files and then exposes them in a CCW. In this example, the new project is added to the BTSDotNet solution used in both Chapter 14 and this chapter.
To create the new project, select the BTSDotNet solution in Visual Studio .NET and right-click. In the pop-up menu that appears, select Add, New Project from the menu. In the dialog that appears, select the Visual Basic, Class Library option and name the project BankVBWSProxyClient as displayed in Figure 15.17.
Figure 15.17. Adding a new Visual Basic .NET class project to the BTSDotNet solution.

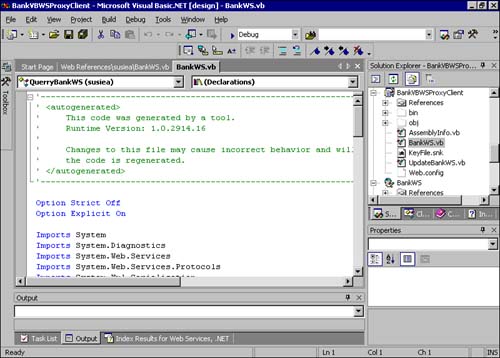
Next, add the two proxy Visual Basic .NET class files to the new project by highlighting the proxy .vb objects one at a time in the Solution Explorer under the Web References, Reference folder in the BankVBWebClient project and then right-click to select the Copy menu option. Then navigate to the new BankVBWSProxyClient project in the Solution Explorer, right-click on the project, and select the Paste menu option. Because the files are both named reference.vb, we will need to rename them in the new project. Rename the UpdateBankWS proxy reference.vb file UpdateBankWS.vb and the QueryBankWS proxy reference.vb file BankWS.vb. The two proxy .vb files should now be located in the new Visual Basic .NET project as displayed in Figure 15.18.
Figure 15.18. Adding the proxy Visual Basic .NET objects to the BankVBWSProxy Client Visual Basic .NET project.
Next, two attributes need to be added to each class: the <Assembly (ComVisible=True)> attribute and the ComClass<("your GUID")> attribute to the class. The "your GUID" value needs to be replaced by a unique GUID that can be generated using the Visual Studio .NET Tools, Create GUID menu option. The GUID should be generated using the Registry format option displayed in the dialog. Finally, you need to import the System.Runtime.InteropServices namespace to resolve the ComClass property just added. Listings 15.5 and 15.6 show code for both the BankWS.vb and UpdateBankWS.vb proxy files that show the addition of these attributes.
Listing 15.5. The BankWS.vb Proxy File Code
Imports System
Imports System.ComponentModel
Imports System.Diagnostics
Imports System.Web.Services
Imports System.Web.Services.Protocols
Imports System.Xml.Serialization
Imports System.Runtime.InteropServices
'
'This source code was auto-generated by Microsoft.VSDesigner, Version 1.0.3324.0.
'
<Assembly: ComVisible(True)>
Namespace localhost
'<remarks/>
<ComClass("54D193FA-C73C-4ba0-B972-506266673197"), _
System.Diagnostics.DebuggerStepThroughAttribute(), _
System.ComponentModel.DesignerCategoryAttribute("code"), _
System.Web.Services.WebServiceBindingAttribute(Name:="QueryBankWSSoap", [Namespace]
|
Listing 15.6. The UpdateBankWS.vb Proxy File Code
Imports System
Imports System.ComponentModel
Imports System.Diagnostics
Imports System.Web.Services
Imports System.Web.Services.Protocols
Imports System.Xml.Serialization
Imports System.Runtime.InteropServices
'
'This source code was auto-generated by Microsoft.VSDesigner, Version 1.0.3324.0.
'
<Assembly: ComVisible(True)>
Namespace localhost1
'<remarks/>
<ComClass("69F8E0A2-8EC4-4685-857C-93A1066D604A"), _
System.Diagnostics.DebuggerStepThroughAttribute(), _
System.ComponentModel.DesignerCategoryAttribute("code"), _
System.Web.Services.WebServiceBindingAttribute(Name:="UpdateBankWSSoap", [Namespace]
|
Next, the project properties need to be modified to enable COM interoperability with the BizTalk Orchestration engine. To modify the project properties complete the following steps:
1. |
Select the BankVBWSProxyClient in the Solution Explorer and right-click. |
2. |
In the pop-up menu that appears, select the Properties menu option. |
3. |
In the dialog that appears, select the Configuration Properties folder and highlight the Build option. |
4. |
Check the Register for COM Interop option. When the component is built, a COM interop wrapper will automatically be generated and registered in the Windows Registry. |
5. |
Compile the project by selecting Build, Build BankVBWSProxyClient from the menu. |
In the next section, we will bind the CCW just created in the BankVBWSProxyClient project to actions in a new schedule named TransactionWS.skv.
Modifying the BankTransactionWS.skv Orchestration Schedule
In the “Setting Up the Development Environment” subsection earlier in this section we discussed how to create a schedule that would serve as a starting point for the BankTransactionWS.skv Web Services BizTalk Orchestration example. The schedule is named BankTransactionWSStart.skv and was created by opening the Chapter 14 Transaction.skv schedule and deleting all bindings to the BankVB Visual Basic .NET COM implementation objects including the object itself. In this section, we will rebind the actions in the BankTransactionWSStart.skv schedule to the proxy classes in the BankVBWSProxyClient project just created.
The steps required to build the new BankTransactionWS.skv schedule are presented in the following list and will be addressed in detail in the following sections. The publisher's Web site has a series of schedules that you can download that follows along with each of these steps. The first schedule is named TransactionWSStart.skv.
1. |
Create two new actions named Display Begin Balance and Display End Balance and bind them to the BankVB
DisplayMsg method in the schedule. |
2. |
Bind the Check Balance, Get Beginning Balance, and Get Ending Balance actions to the BankVBWSProxyClient
QueryBankWS classes DisplayBalances and GetBalances methods. |
3. |
Bind the Credit and Debit actions to the BankVBWSProxyClient
UpdateBankWS class methods Credit and Debit. |
4. |
Modify the On Failure of Bank Transaction compensating transaction to roll back the Debit action on failure of the Credit action. |
Creating Two New Actions to Display the Account Balances
As discussed earlier, Web Services by nature are nonvisual objects and as such do not have the capability to display a GUI message box. In Chapter 14's BankTransaction.skv file, we used the DisplayBalances method to retrieve the current account balance and then call the DisplayMsg method to display a GUI message box containing the account balances. During the creation of the Web Service implementation of this business logic, we commented out the call to the DisplayMsg method. To display a message box during the execution of the BankTransactionWS.skv schedule, we need to add two actions, Display Begin Balance and Display End Balance, to the schedule. These actions will be bound to the Visual Basic .NET DisplayMsg method in the BankVB.vb .NET object created in Chapter 14. The BankVB.vb object was compiled with the Register for COM Interop option checked and is, therefore, accessible via a CCW in the schedule.
Note
The name of the method DiplayBalances in the Bank Web Service implementation is a little deceiving given that it no longer displays the balances. We kept the name the same to minimize the number of modifications to the BankVB.vb managed code.
To accomplish this, open the BankTransactionWSStart.skv file created in the “Setting Up the Development Environment” section earlier in this chapter. Select File, Save As from the menu and name the schedule BankTransactionWS.skv. Next, add two new actions to the schedule named Display Begin Balance and Display End Balance. The actions should be integrated into the schedule as displayed in Figure 15.19.
Figure 15.19. Adding the Display Begin Balance and Display End Balance actions,
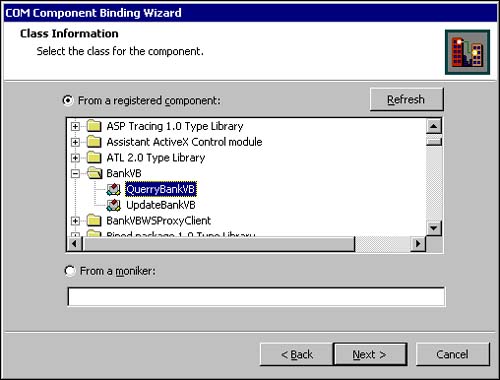
Now, we need to bind the actions to their implementation object, which in this case will be the BankVB managed object created in Chapter 14. To bind the Display Begin Balance to its implementation object, drag a COM object onto the implementation area. In the COM Component Binding Wizard dialog that appears, name the port DisplayMsg and select Next. In the Static or Dynamic Communication Wizard dialog, select Static and then click Next. In the Class Information step, navigate to the BankVB QueryBankVB object and select it as displayed in Figure 15.20.
Figure 15.20. The Class Information step in the COM Component Binding Wizard.
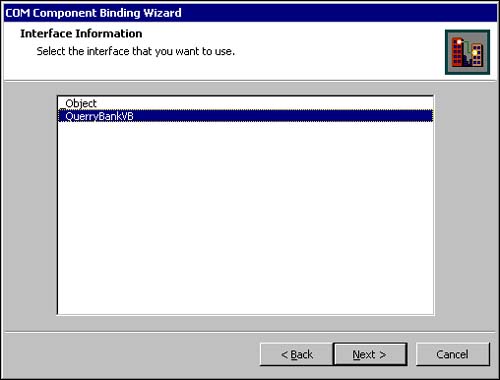
Click Next and then in the Interface Information dialog that appears, select the _QueryBankVB option as displayed in Figure 15.21. The QueryBankVB interface contains the methods we are going to call from the schedule.
Figure 15.21. The Interface Information step in the COM Component Binding Wizard.
Click Next and then select the DisplayMsg check box in the Method Information dialog of the COM Component Binding Wizard and click Next (see Figure 15.22). In this case, we only need to use the DisplayMsg method.
Figure 15.22. The Method Information step in the COM Component Binding Wizard.

In the Advanced Properties dialog that appears, keep the defaults and select Finish.
Next, we need to bind the display actions to the methods in the BankVB implementation shape. To accomplish this, connect each action to the DisplayMsg port that's connected to the BankVB implementation object. A Communication Wizard appears when you attach each action. In the initial Communication Wizard step, select the Initiate Synchronous Method Call option and click Next. In the Message Information dialog that appears, select the Create a New Message option and then select Next. In the Message Specification Information dialog that appears, select the DisplayMsg method and then select Finish. Repeat the same steps for both the Display End Balance and Display Begin Balance actions. The BankTransactionWS.skv file appears as displayed in Figure 15.23.
Figure 15.23. BankTransactionWS.skv schedule after Step 1.

Binding the Check Balance, Get Beginning Balance, and Get Ending Balance Actions
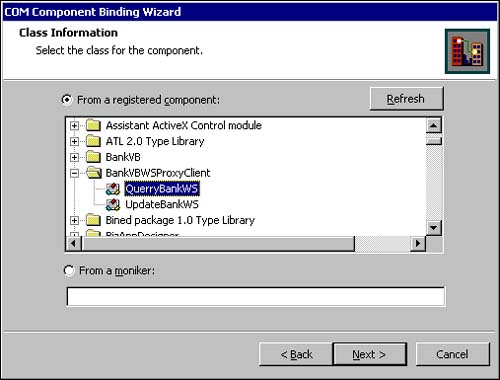
We are now ready to bind the Web Services to their appropriate actions. The first action to bind is the Check Balance action. This action calls the DisplayBalances method of the BankVBWSProxyClient proxy object QueryBankWS class. To begin, drag the COM implementation object onto the implementation area. In the COM Component Binding Wizard that appears, enter the name GetBalances as the port name and click Next. In the Static or Dynamic Communication wizard step, select Static and click Next. In the Class Information wizard step that appears, navigate to the BankVBWSProxyClient object and select the QueryBankWS class as displayed in Figure 15.24.
Figure 15.24. The Class Information dialog for the QueryBankWS class.
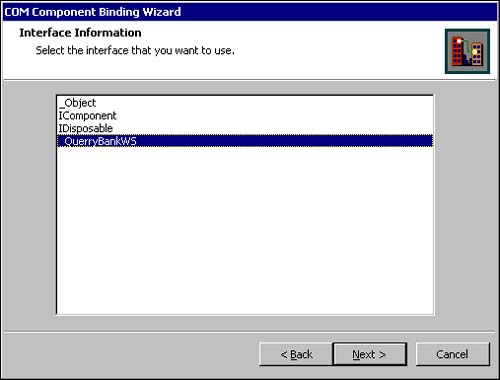
In the Interface Information dialog that appears, select the _QueryBankWS interface as shown in Figure 15.25 and then click Next.
Figure 15.25. The Interface Information dialog for the QueryBankWS class.
In the Method Information dialog that appears, select the DisplayBalances and GetBalance methods as displayed in Figure 15.26.
Figure 15.26. The Method Information dialog for the QueryBankWS class.

Note
Remember, you do not need to check the DisplayMsg method in the Web Service. In this example, we are using the DisplayMsg method from the BankVB object created in Chapter 14.
In the Advanced Port dialog that appears, keep the default values for all properties and click Finish.
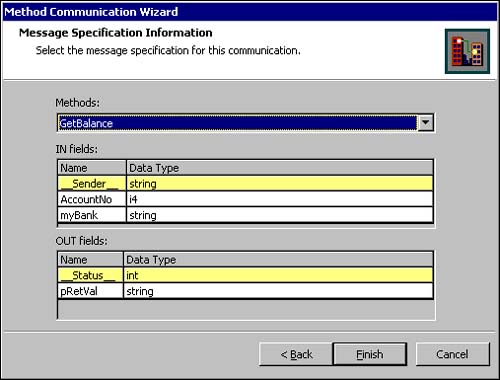
Next, we need to bind the Check Balance, Get End Balance, and Get Beginning Balance actions to the appropriate methods in the QueryBankWS class. The Check Balance action calls the GetBalance method. To accomplish this, bind the action to the GetBalances port connected to the QueryBankWS class implementation object. In the Communication Wizard that appears, select Initiate a Synchronous Method Call option and click Next. In the Messaging Information dialog, select the Create a New Message Option and then click Next. In the Message Specification Information dialog that appears, select the GetBalance method as displayed in Figure 15.27 and then click Finish.
Figure 15.27. The Message Specification Information dialog for the Check Balance action.
Next, we want to bind the Get Beginning Balances action to the same implementation object. Begin by connecting the action to the GetBalances port. In the Communication Wizard that appears, select the Initiate a Synchronous Method Call option and click Next. In the Message Information dialog that appears, select the Create a New Message option and click Next. In the Message Specification Information dialog that appears, select the DisplayBalances method as displayed in Figure 15.28 and click Finish.
Figure 15.28. The Message Specification Information dialog for the Get Beginning Balances action.

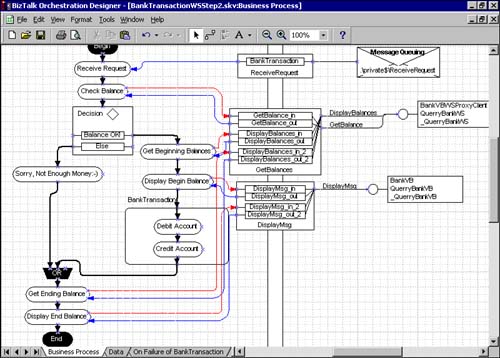
The final action to bind is the Get Ending Balances action. To begin, connect the action to the GetBalances port as we did in the previous step. In the Communication Wizard that appears, select the Initiate a Synchronous Method Call option and click Next. In the Message Information dialog that appears, select the Create a New Message option and click Next. In the Message Specification Information dialog that appears, select the DisplayBalances method as we did in the Get Beginning Balance action and click Finish. At this point, all actions except the Debit and Credit actions in the BankTransactionWS.skv schedule should be connected to an implementation object as displayed in Figure 15.29.
Figure 15.29. The completed Step 2 TransactionWS.skv schedule.
Next, we need to address the data flow within the schedule. To begin, navigate to the Data page in the BizTalk Orchestration Designer. The schedule begins with the receipt of an XML file named BankTransaction. This file contains the names of the debit and credit banks, their account numbers, and the amount of money to transfer. The BankTransaction message is parsed by the BizTalk Orchestration COM+ engine and is available in the Data page.
The first action that requires data input is the Check Balance action. The Check Balance action accepts the name of a bank and an account number and returns the current balance of the account. In this schedule, the input values are the debit bank name and the debit account number from the BankTransaction message. The return value is evaluated by the decision shape later in the schedule to determine whether the account has enough money to process the transaction. To set up the data flow, you need to connect the BankTransaction message's DebitBank and DebitAccount fields to the GetBalance_in message's myBank and AccountNo fields as shown in Figure 15.30.
Figure 15.30. Binding the BankTransaction message's DebitBank and AccountNo fields for Check Balance.

Next, we need to set the data flow for the Get Beginning Balance and Get Ending Balance actions. The first action, Get Beginning Balance, calls the DisplayBalances method, which accepts the bank name and account number of both accounts and returns a string containing the balance of each. The DisplayBalances return value is then passed to the DisplayMsg method. To begin, connect the BankTransaction message's DebitBank and DebitAccount string fields to the DisplayBalances_in and Display_Balances_in_2 Bank1 and Bank1Account fields. Then repeat the same connections for the CreditBank and CreditAccount BankTransaction message strings, but this time connect them to the Bank2 and Bank2Account fields as displayed in Figure 15.31. Next, connect the return value pRetVal of the Display_Balances_in message to the DisplayMsg_in sMessage field and the return value pRetVal of the Display_Balances_ in_2 message to the DisplayMsg_in_2 sMessage fields as shown in Figure 15.31.
Figure 15.31. Binding the fields to display the begin and end balances.

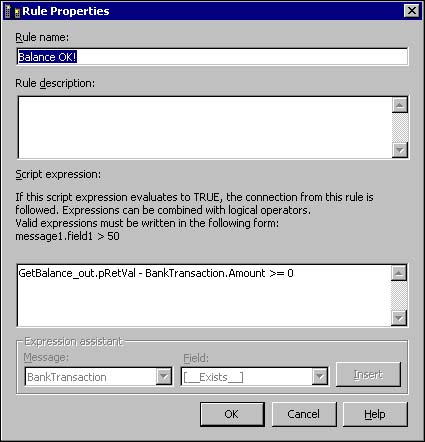
The return value from the Check Balance action is evaluated in the Balance OK! decision shape. If the account has enough money, the transaction will continue; otherwise, a message box appears displaying an insufficient funds message. Figure 15.32 shows the properties for the decision shape.
Figure 15.32. The Balance OK! decision properties dialog.
We are now ready to bind the Credit and Debit actions.
Binding the Credit and Debit Actions
To begin, navigate back to the Business Process tab in the BankTransactionWS.skv file. The Credit and Debit actions call methods on a new implementation object bound to the UpdateBankWS class of the BankVBWSProxyClient object. To create the object, drag the COM implementation shape onto the implementation area. In the COM Component Binding Wizard that appears, name the port UpdateAccount and click Next. In the Static or Dynamic Communication Wizard that appears, select Static and click Next. In the Class Information dialog that appears, select the BankVBWSProxyClient UpdateBankWS class as shown in Figure 15.33 and then click Next.
Figure 15.33. The Class Information dialog for Debit and Credit actions.

In the Interface Information dialog that appears, select the _UpdateBankWS interface as displayed in Figure 15.34 and then click Next. In the Method Information dialog that appears, select the Credit and Debit methods and then click Next.
Figure 15.34. The Interface Information dialog for Debit and Credit actions.

In the Advanced Port Properties dialog, set the Transaction Support to Supported and check the Abort Transaction if Method Returns a Failure HRESULT as shown in Figure 15.35 and then click Finish.
Figure 15.35. The Advanced Port Properties dialog for Debit and Credit actions.

The transaction settings for this implementation shape must be set to Supports Trans-actions to be bound to an action that is included inside a BizTalk Orchestration transaction; for example, both the Debit and Credit actions are enclosed in a transaction named BankTransaction.
Next, we need to bind the Debit and Credit actions to the Debit and Credit methods in the UpdateBankWS class implementation shape. To begin, connect the Credit Account action to the UpdateAccount port shape. In the Communication Wizard that appears, select the Initiate a Synchronous Method Call option and click Next. In the Message Information dialog that appears, select the Create a New Message option and click Next. In the Message Specification Information dialog, select the Credit method and click Finish. Repeat the same steps for the Debit action, setting the Message Specification Information dialog method to the Debit Account method.
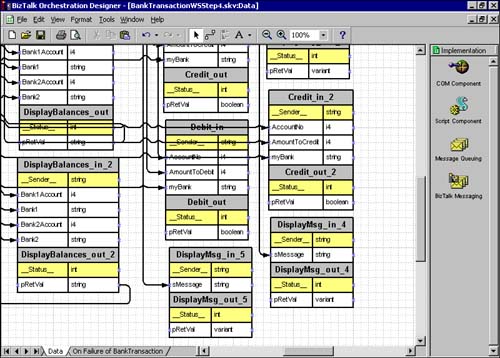
Next, we need to set the data flow for the actions we just bound. To begin, navigate to the Data page of the BankTransactionWS.skv schedule. The Debit and Credit methods expect three input parameters: account number, bank name, and amount to debit or credit. The values for these parameters are located in the input BankTransaction message. To set the data flow for these actions, connect the BankTransaction message's DebitBank, DebitAccount, and Amount fields to the Debit_in message's myBank, AccountNo, and AmountToDebit fields. Then connect the BankTransaction message's CreditBank, CreditAccount, and Amount fields to the Credit_in message's myBank, AccountNo, and AmountToCredit fields as displayed in Figure 15.36.
Figure 15.36. The data page at the completion of Step 3.

Modify the On Failure Processing
So what happens if the Debit or Credit action fails, or there is not enough money to debit? The easiest issue to address is a lack of sufficient funds in the debit account. If the Debit account's balance is less than the amount in the debit transaction, the transaction will not be processed, and an event will be triggered notifying us of this information. In this example, we check the current balance and then verify its value in the decision shape. If the balance is insufficient, a message box is triggered notifying us.
The decision shape and associated actions are already defined in the BankTransactionWS.skv schedule to accommodate this; however, we do need to complete the workflow by binding an action to a port and then modifying the Data page to accommodate the change. To complete the workflow, we need to bind the Sorry, Not Enough Money! action to the DisplayMsg port and set its input field values in the Data page. To begin, connect the Sorry, Not Enough Money! action to the DisplayMsg port. In the Communication Wizard that appears, select the Instantiate a Synchronous Method Call option and click Next. In the Message Information dialog, select the Create a New Message option and click Next. In the Message Specification Information dialog, select the DisplayMsg method and click Finish. Next, navigate to the Data tab. The new message is named DisplayMsg_in_3, and it accepts a constant from the Data tab as its only input. Connect the NotEnoughMoney string constant in the Constants message to the sMessage in field in the DisplayMsg_in_3 message as displayed in Figure 15.37.
Figure 15.37. Connecting the Data page for the Sorry Not Enough Money! action.

Constants can be defined by selecting the Constants message in the Data tab and then right-clicking. In this example, we will use three constants: NotEnoughMoney, DebitFailed, and CreditFailed. The BankTransaction.skv schedule from Chapter 14 used a constant named TransactionFailed. In this example, we will use two distinct messages to notify us of the failure of the Debit or Credit action. To create the new constant, right-click on the Constants message and select the Properties pop-up menu option. In the Constants Message Properties dialog that appears, delete the TransactionFailed string and add two new constants named DebitFailed and CreditFailed as displayed in Figure 15.38. The messages can say anything you want.
Figure 15.38. The Constants message in the Data tab.

Next, we need to configure the actions that will occur when either the Debit or Credit action fails. As mentioned earlier, the transactional capabilities of a Web Service are limited to its participation in the root level of a transaction. In this example, we are instantiating a Web method from within the context of an already existing transaction. This means that regardless of whether the BizTalk Orchestration transaction exists, a new transaction is going to be automatically generated for each Web Service call, in this case Debit and Credit. If the Debit succeeds and Credit fails, the Debit will not be rolled back unless it's done so programmatically because the business logic for each exists in the context of a separate transaction and does not affect the other's outcome. If an action in a BizTalk Orchestration transaction fails, all actions are retried the number of times specified in the transaction's retry count property. So, in the scenario just mentioned where the debit succeeds and the credit fails, both actions would be retried an equal amount of times—in essence, debiting the account X times and crediting an account 0 times. To eliminate this problem, we need to add compensation transaction logic to the On Failure of BankTransaction tab and set the transaction retry property value to 0.
To begin, we want to make sure that the Bank Transaction does not retry on failure. To accomplish this, right-click on the BankTransaction shape in the BizTalk Orchestration Designer and set the retry count to 0. Next, we need to modify the compensating transaction's workflow by adding some workflow actions to the On Failure of BankTransaction tab. To begin, navigate to the On Failure of BankTransaction tab and add five shapes to the designer: three action shapes, a decision shape, and a join shape. Next, configure them and name them as shown in Figure 15.39.
Figure 15.39. The On Failure of BankTransaction tab.
The three action shapes are named Credit Failed, Debit Failed, and Roll Back Debit. The decision shapes properties are configured as displayed in Figure 15.40.
Figure 15.40. The decision properties in the On Failure of BankTransaction tab.

To configure the decision shape, right-click on the decision shape in the BizTalk Orchestration Designer and select the Add New Rule pop-up menu option. Next, add a new rule named Debit Already Processed to the criteria and set the script expression equal to the Credit_out.[__Exists__] value as displayed in Figure 15.40.
The join shape's properties also need to be configured. To configure the join shape, right-click on the join shape and select the Properties pop-up menu option. In the dialog that appears, select the OR option.
If the Debit succeeds and the Credit fails, the Debit action's business logic needs to be programmatically rolled back. The decision shape tests to see whether the Credit_out value exists. If it exists, the Credit action has failed; otherwise, the Debit action has failed and no additional processing is needed. If the Credit action fails, the account that was debited needs to be credited with the original debited account.
To accomplish this, you need to bind the actions you just added to their implementation objects. First, bind the Credit Error and Debit Error actions to the DisplayMsg port to enable the display a GUI message box notifying us of the error. Begin by selecting the Credit Error action and connecting it to the DisplayMsg port. In the Communication Wizard that appears, select the Initiate a Synchronous Method Call option and click Next. In the Message Information dialog that appears, select the Create a New Message Option and click Next. In the Message Information Specification dialog that appears, select the DisplayMsg method and click Finish. Repeat the same steps for the Debit Error action.
Next, we need to connect the Roll Back Debit action to the UpdateAccount ports Credit method. To begin, select the Roll Back Debit action and connect it to the UpdateAccount port. In the Communication Wizard that appears, select the Initiate Synchronous Method Call option and click Next. In the Message Information dialog that appears, select the Create a New Message Option and click Next. In the Message Specification Information dialog that appears, select the Credit method and click Finish. Next, we need to update the Data page to accommodate the data flow for the new actions.
The Roll Back Debit action is bound to an implementation object that supports transactions. To bind an action to an object with this property setting, the action must be enclosed within a transaction. To keep things simple, we are going to add a transaction shape to the designer that includes just the Roll Back Debit action. To accomplish this, drag the transaction shape onto the design pane over the top of the Roll Back Debit action as displayed in Figure 15.41.
Figure 15.41. The On Failure of BankTransaction tab at the completion of Step 4.
The transaction shape requires that both the inbound and outbound connections be made to the shape itself as opposed to the first and last action in the shape. In this example, the Error in Credit action is directly connected to the Roll Back Debit action. To accommodate the transaction shape, connect the Error in Credit action directly to the transaction shape, the transaction shape to the Roll Back Debit action, the Roll Back Debit action back to the exit of the transaction shape, and then the exit of the transaction shape to the OR join shape as displayed in Figure 15.41.
To update the Data page, navigate to the Data tab in the BizTalk Orchestration Designer. As a result of our modification to the compensating transaction, there are three new messages in the Data page: Display_msg_in_4, Display_msg_in_5, and Credit_in_2. The display messages need to be bound to the Constants message's DebitFailed and CreditFailed fields. To accomplish this, select the CreditFailed Constants message and connect it to the Display_msg_in_4 sMessage field. Then select the DebitFailed Constants message and connect it to the Display_msg_in_5 sMessage field.
Next, we need to connect the BankTransaction message fields to the Credit_in_2 to roll back the debit. To accomplish this, connect the BankTransaction message's DebitBank, DebitAccount, and Amount fields to the Credit_in_2 message's myBank, AccountNo, and AmountToCredit fields as displayed in Figure 15.42.
Figure 15.42. The Data tab at completion of Step 4.
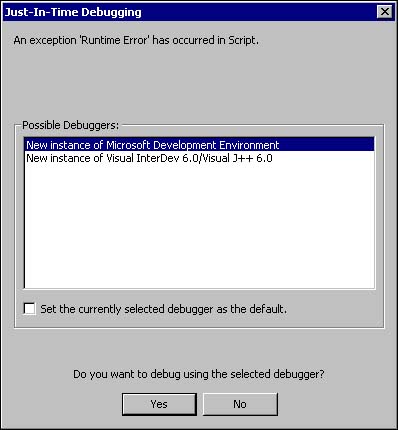
The schedule is now complete and ready to compile. To compile the schedule, select File, Make XLANG BankTransactionWS.skx from the menu. A dialog appears telling you the status of the compile. When the compile is complete, an .skx file appears in the same directory as the .skv schedule file with which you've been working. In some installations, you may encounter a system error as displayed in Figure 15.43. If you receive this error, which may occur twice during a compile, select No each time.
Figure 15.43. Just-in-time debugging error encountered while compiling.
Running the New TransactionWS Schedule
To run the schedule, you must place a BankTransaction XML file on the MSMQ private queue named ReceiveRequest and then start an instance of the BankTransactionWS.skx schedule. There are two .vbs script files to assist with this task. The first copies the contents of an XML file named BankTransInstance.xml to the private MSMQ queue named ReceiveRequest. The script file is named File2Queue.vbs and contains the code displayed in Listing 15.7.
Listing 15.7. The File2Queue.vbs Script File
'*************************************************************
'MSMQ constants
'Access modes
const MQ_RECEIVE_ACCESS = 1
const MQ_SEND_ACCESS = 2
const MQ_PEEK_ACCESS = 32
'Sharing modes
const MQ_DENY_NONE = 0
const MQ_DENY_RECEIVE_SHARE = 1
'Transaction Options
const MQ_NO_TRANSACTION = 0
const MQ_MTS_TRANSACTION= 1
const MQ_XA_TRANSACTION = 2
const MQ_SINGLE_MESSAGE = 3
'*************************************************************
'Queue Path
const QUEUE_PATH = ".private$ReceiveRequest"
'*************************************************************
dim qinfo, qSend, mSend, xmlDoc
dim sPath, sFile, sMesg, sInFileName
'Input file name
'sInFileName = WScript.Arguments(0)
sInFileName = "BankTransInstance.xml"
'*************************************************************
' Create the queue
'*************************************************************
set qinfo = CreateObject("MSMQ.MSMQQueueInfo")
qinfo.PathName = QUEUE_PATH
'*************************************************************
' Open queue with SEND access.
'*************************************************************
Set qSend = qinfo.Open(MQ_SEND_ACCESS, MQ_DENY_NONE)
'*************************************************************
' Put file into message.
'*************************************************************
sPath = WScript.ScriptFullName
sPath = Mid(sPath, 1, InStrRev(sPath, ""))
sFile = sPath & sInFileName
set xmlDoc = CreateObject("MSXML.DOMDocument")
xmlDoc.load sFile
set mSend = CreateObject("MSMQ.MSMQMessage")
mSend.Body = xmlDoc.xml
mSend.Label = "BankTransaction"
'*************************************************************
' Send message to queue.
'*************************************************************
mSend.Send qSend, MQ_SINGLE_MESSAGE
msgbox "File """ & sInFileName & """ sent to queue """ & QUEUE_PATH & """", vbOKOnly,
|
The second file is named ProcessTransWS.vbs. This script file calls the File2Queue.vbs file and then instantiates an instance of the BankTransactionWS.skx file using the BizTalk Orchestration Moniker syntax. The code for the ProcessTransWS.vbs file is displayed in Listing 15.8.
Listing 15.8. The ProcessTransWS.vbs Script File
dim objSked, strPath, WshShell

strPath = WScript.ScriptFullName
strPath = Mid(strPath, 1, InStrRev(strPath, ""))

Set WshShell = WScript.CreateObject("WScript.Shell")
call WshShell.Run ("""" & strPath & "File2Queue.vbs" &

""" BankTransInstance.xml")
set objSked = GetObject("sked:///" & strPath &

"BankTransactionWS.skx")
|