
Software Requirements
Now that the hardware has been put together, it's time to add some software. Because most software packages start with the operating system, that's where we will start. This section covers what is necessary to support BizTalk Server. It is not within the scope of this book to go into detail regarding the installation of Windows 2000 Server, SQL Server 2000, or Visio 2000 (SR-1A); however, all configuration parameters needed to successfully install BizTalk Server are outlined in this chapter.
Note
BizTalk Server also requires the installation of MSXML Version 3.0. If this is not already installed, BizTalk will install it for you.
Preparing Windows 2000 Server for BizTalk Server
Assuming that you have Windows 2000 Server or Advanced Server installed and your network and any necessary devices configured, the following describes the additional Windows components necessary to install BizTalk Server.
Note
Remember that these components, as well as all supporting software, need to be installed prior to installing BizTalk Server.
Installing Service Pack 1
At the time of this writing, BizTalk Server requires that Windows 2000 Service Pack 1 be installed prior to attempting to install BizTalk Server.
To install Windows 2000 Service Pack 1, either download the service pack from http://www.microsoft.com/windows2000 or order the CD. After you have the distribution media (download or CD), follow the appropriate instructions to install the service pack.
Note
The default version of the service pack does not use 128-bit encryption. To upgrade your service pack installation to use 128-bit encryption, you must download an additional file from Microsoft.
Installing Message Queuing
Message Queuing is an essential part of how BizTalk Server exchanges information with other machines. This component of Windows can be found on the Windows 2000 Server installation CD. The following steps outline how to add Message Queuing components to your Windows 2000 Server installation:
1. |
Click the Start button, point to Settings, and click Control Panel. |
2. |
Double-click Add/Remove Programs. |
3. |
The Add/Remove Programs dialog box appears. |
4. |
Click the Add/Remove Windows Components icon. |
5. |
The Windows Components Wizard opens. |
6. |
In the Components list, select the Message Queuing Services check box and click Next. |
7. |
On the Message Queuing Type page, accept all defaults and click Next. |
8. |
Click the Finish button to close the wizard. |
Installing Internet Information Services (IIS)
Because all these transactions are occurring over the Internet or an intranet, you need to install a Web server. Windows 2000 Server and Advanced Server provide one out-of-the-box named Internet Information Services 5.0.
IIS installs by default on Windows 2000; however, should you discover that it has not been installed, the following steps outline how to install IIS on your Windows 2000 Server:
1. |
Click the Start button, point to Settings, and click Control Panel. |
2. |
Double-click Add/Remove Programs. |
3. |
The Add/Remove Programs dialog box appears. |
4. |
Click the Add/Remove Windows Components icon. |
5. |
The Windows Components Wizard opens. |
6. |
In the Components list, select the Internet Information Services (IIS) check box and click Next. |
7. |
Click the Finish button to close the wizard. |
Caution
After completing the installation of IIS on your server, you must disable authoring on the default Web site the BizTalk Server will use. To do this, go into the properties page for the default Web site and clear the Enable Authoring check box on the Server Extensions tab.
Creating a Service Account
Ideally, BizTalk Server should be installed to run under a Service Account—that is, an account that has specific rights and does not require a specific user to be logged in to allow services to start. This is similar to the “system” user, with limited rights. The following steps list how to create a service account for BizTalk Server to execute under:
1. |
Log on as Administrator or an account with Administrator rights. |
2. |
On the Start menu, point to Settings, click Control Panel, double-click Administrative Tools, and then double-click Computer Management. Or, right-click My Computer and select Manage. |
3. |
The Computer Management dialog box appears as shown in Figure 20.1 Figure 20.1. Computer Management dialog.
|
4. |
In the console tree, click the expand indicator (+) for System Tools and click Local Users and Groups. |
5. |
Click Users, right-click anywhere in the details pane, and then click New User. |
6. | |
7. |
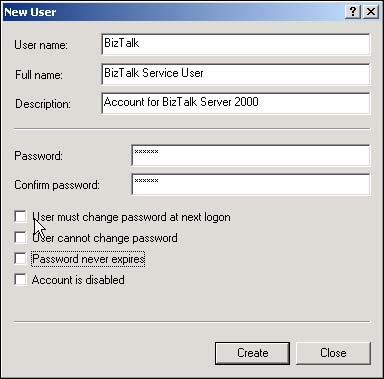
In the User Name box, type a name for the service account. In the Password box, type a password and then type the same password in the Confirm Password box. |
8. |
Clear the User Must Change Password at Next Logon check box as shown in Figure 20.2, click Create, and then click Close. |
9. |
Close the Computer Management window. |
10. |
On the Start menu, point to Settings, click Control Panel, double-click Administrative Tools, and then double-click Local Security Policy. |
11. |
The Local Security Settings dialog box appears. |
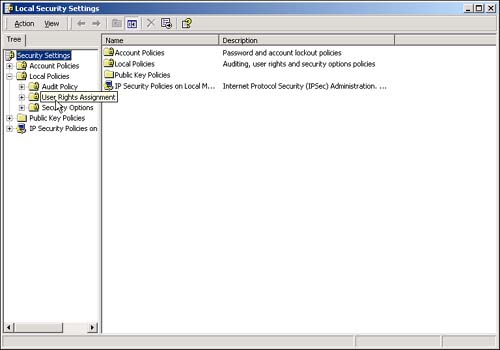
12. |
In the console tree, click the expand indicator (+) for Local Policies and click User Rights Assignment, as shown in Figure 20.3. Figure 20.3. Local Security Settings dialog.
|
13. |
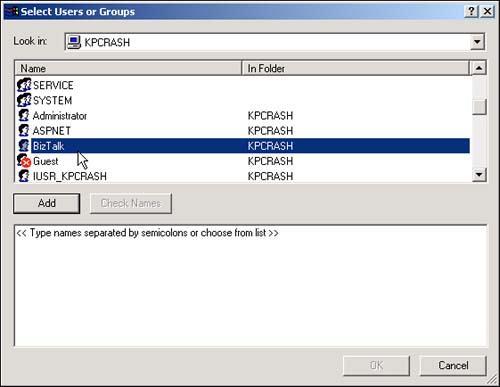
In the details pane, double-click Act as Part of the Operating System and click Add. Click the account name you just created from the list box, click Add, and then click OK. See Figure 20.4. Figure 20.4. Select Users or Groups dialog.
|
14. |
In the details pane, double-click Log on as Service, as shown in Figure 20.5, and click Add. Click the account name you just created from the list box, click Add, and then click OK twice. Figure 20.5. Selecting Log on as Service.
|


Installing Microsoft SQL Server 2000
When you install BizTalk Server, the installation creates the databases that BizTalk needs. For this to be successful, two things must be in place. SQL Server 7.0 with Service Pack 2 or SQL Server 2000 must be installed and running at the time of install.
When installing SQL Server to accommodate BizTalk Server, keep the following in mind:
The SQL Server installation must be at least Typical.
If you are using SQL Server 7.0, Service Pack 2 for SQL Server 7.0 must be installed. To check this, open SQL Query Analyzer and connect to your database. In the query window, type SELECT @@VERSION. If you have Service Pack 2 installed, you should get 7.00.842 as the result.
Make sure that the default network library is set to TCP/IP. To do this, in SQL Server 7.0, click Start, click Programs, click Microsoft SQL Server, and click Client Network Utility. If you have SQL Server 7.0, on the General tab, in the Default Network Library list, click TCP/IP. If you have SQL Server 2000, on the Network Libraries tab, in the Network Library list, click TCP/IP.
In SQL Server 2000, mixed-mode authentication must be enabled.
Caution
Mixed-mode authentication must be enabled for BizTalk to work successfully. The authentication mode property is available through the properties window of a selected server in SQL Enterprise Manager.
Installing Microsoft Visio 2000 (SR-1A), Enterprise Edition
The final piece to install prior to launching the BizTalk Server installation program is Visio. To do this, insert the CD into the CD-ROM drive. Run the setup program and follow the onscreen directions.