
To create a collectible item, we first want to start a new Blueprint that will determine the properties of each instance of that object that appears in the world. To do so, navigate to the Content Browser and open the Blueprints folder. Add a new Blueprint class, choose the Actor class type, and name it AmmoPickup. Once the Blueprint is made, double-click on AmmoPickup to open the Blueprint Editor.
In the Viewport window that appears, we will see a simple white sphere. This is the default appearance given to empty Actor objects before a Mesh has been applied. To give the object a visible shape in the game, we first need to add a Static Mesh Component to the Blueprint. Find the Components panel, click Add Component, and choose the Static Mesh option.
In the Details panel that appears, find the Static Mesh category with the field that currently hosts the word None as no Static Mesh has been attached yet. In addition to attaching the Static Mesh Component to the Blueprint, which allows a Mesh to be associated with this Blueprint, we also need to designate which Mesh will be displayed for that Static Mesh Component.
Click on the drop-down menu for Static Mesh, and then click on the bottom-right button labeled View Options. In the pop-up menu that appears, ensure that you have checked the checkboxes next to both Show Plugin Content and Show Engine Content. This ensures that the assets included from plugins you installed in the engine, and the default assets Epic included in the engine, are seen in the asset search results:

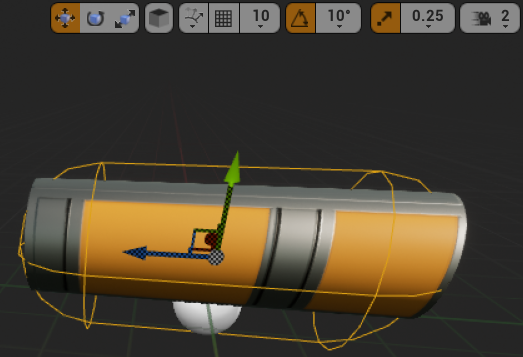
With the drop-down menu now properly searching for engine assets, search for Shape_Pipe and choose it. This Mesh was not made for ammo pickups explicitly, but this item will be small enough that we can make it serve our purpose. Right below the Static Mesh category, find the Materials field and attach the Material called M_Door. Finally, edit the Transform category's Scale values to be half their default size, 0.5, across the x, y, and z axes. You can click the lock icon on the right of the Scale fields so that all axes scale proportionally when you change the value of one of the fields.
After adding the Mesh, we need to add a collider of some kind so that other objects, such as the player character, can physically interact with our pickup. In the Components panel, with the Static Mesh Component already selected, click on Add Component and add a Capsule Collision Component. A thin orange line will appear in the Viewport panel, representing the boundaries of the capsule shape collision. Minor adjustments to the position, rotation, and scale of the collision will be necessary in order to ensure that the entire Mesh is contained inside of the collision that should surround it. This can be done using the transform controls at the top of the Viewport panel or by using the following shortcut keys: W (for moving), E (for rotating), and R (for scaling):
With the Mesh and collider added, click on the Event Graph tab to begin adding Blueprint logic to our collectible. In the Event Graph tab, start by adding the Event ActorBeginOverlap trigger. This trigger will activate subsequent Blueprint nodes when the object attached to this Blueprint collides with any other object. In this case, we want our ammo collectible to be picked up when the player walks into the object:

To ensure that the ammo collectible only activates when the player walks over it and that collecting an ammo pickup can impact the player's ammo counter, we first need to ensure that we are casting as the player. Attach a Cast To FirstPersonCharacter node to the Event ActorBeginOverlap trigger. Finally, connect the Other Actor output pin to the input Object pin of the casting node.
Now, we have a triggered Event that happens when the player character moves over our collectible object. When this happens, we want to add ammo to the player's ammo count. To do so, drag out a wire from the As First Person Character output pin and attach it to a new SET Player Current Ammo node. Next, drag a second wire from the As First Person Character output pin and attach it to a GET Player Current Ammo node. Drag the output pin from this new node and attach it to an Integer + Integer node. Next, drag the output pin from the Integer + Integer node back to the Player Current Ammo input pin of the SET Player Current Ammo node.
The final step is to determine how much ammo to add when ammo collectibles are picked up. To allow this number to be flexible, let's create a new editable variable called Ammo Pickup Count. Add this variable from the My Blueprint panel and set it to an Integer type variable. Ensure that the Instance Editable checkbox is checked, compile the Blueprint, and then set the variable's default value to 15. Finally, drag a GET Ammo Pickup Count node and attach it to the bottom input pin of the Integer + Integer node.
Next, let's trigger a sound and destroy the object when the collectible is picked up, as shown in the following diagram:
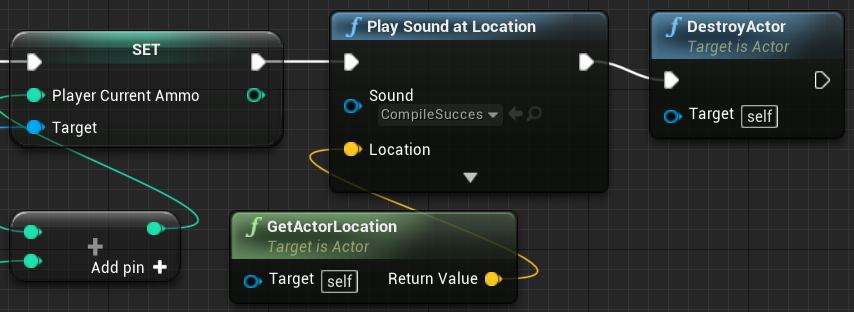
Drag a Play Sound at Location node and connect it to the output pin of the SET Player Current Ammo node. Using only the sounds provided in the engine, I found the CompileSuccess sound wave to work for our needs, so ensure that View Engine Content is checked under View Options, and then select that file from the Sound drop-down menu.
We want to trigger that sound at the location of the ammo pickup, so attach a GetActorLocation node to the Location pin of the Sound node. Finally, add a DestroyActor node at the end of the chain to ensure that each collectible can only be grabbed once. Compile and save the Blueprint.
Now, return to the Level and drag the AmmoPickup Blueprint into the Level. Do this two or three times in different locations around the Level in order to seed the area with ammo pickups. When you are satisfied, save and click Play to test the game. You should see your ammo counter increase every time you step onto one of the ammo pickups.