
Now, we need to create a series of task nodes underneath the Attack Player sequence that will make up the enemy's chasing behavior. Because we already have Blackboard Key that stores the player Actor, including its location data, moving the enemy character to the player is easy. Drag a wire from the Attack Player sequence node and attach it to a Move To task node. Click on this node, and in the Details panel, change Blackboard Key to PlayerActor.
That's all that is necessary to get the enemy chasing the player! You can compile, save, and press Play to test-run this behavior. When you run in front of the enemy on its patrol path, it will break out of its path and begin pursuing you around the Level. However, you will notice that no matter what you do, the enemy will never relent in its pursuit. As our end goal is to have the enemy reach the player and then return to its patrol, we'll need to create some way for the enemy to break out of the chase behavior.
To create a pause to allow an attack to happen, first, create a Wait node and place it to the right of the Move To node. Change the Wait Time on this node to 2 seconds, which is roughly the time we might expect an attack to take. Combined with the Move To node, this will cause the enemy to chase the player until they are in range, and then wait 2 seconds before taking another Action.
Now, we need to create a way for the PlayerActor key to be reset so that the Can see Player? decorator can fail after the pause happens, thus ending the chase behavior. There is no built-in task to cover this functionality, so we'll need to create a custom task to handle this. Click on the New Task button, which is along the top menu of the Behavior Tree, and select the BTTask_BlueprintBase option if the dropdown appears. This creates a new task using the basic Blueprint class as its base class.
You'll be instantly taken to a new tab where you can begin editing the behavior of this task, but first, let's return to Content Browser to rename this task to something useful. Find the new task object called BTTask_BlueprintBase_New in the Enemy folder and rename the object to ResetValueTask. Double-click on ResetValueTask to return to the task's tab. If the Blueprint opens as a data-only Blueprint, then click on Open Full Blueprint Editor at the top.
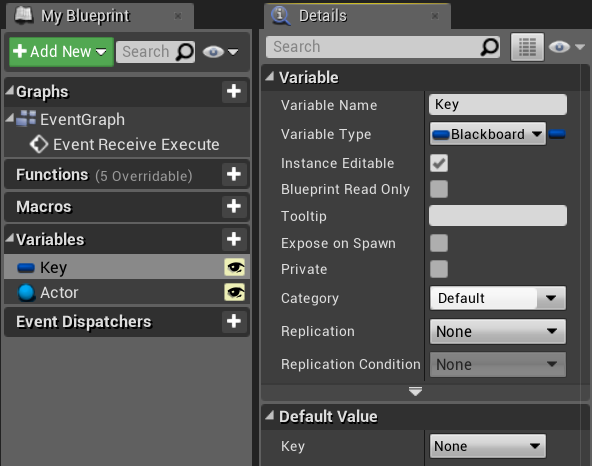
Before adding any nodes, change the Node Name field in the Details panel to Reset Value. Now, go to the My Blueprint panel and add two variables. Rename the first variable Key, and change its type to BlackboardKeySelector. Rename the second variable Actor, and change its type to Actor. Finally, ensure that both of the variables have the Instance Editable checkbox checked, as shown in the following screenshot:
With our variables created and our nodes named, we can start creating the behavior of our task. Add an Event Receive Execute trigger node to the Event Graph. This node simply triggers the attached behaviors when the task is activated within the Behavior Tree. Next, drag a wire from the execution pin and attach a Set Blackboard Value as Object node. Drag the Key variable onto the Key input pin. Then, drag the Actor variable to the Value input pin. Finally, drag a wire from the output execution pin of the Set Blackboard Value as Object node and attach it to the Finish Execute node. Check the checkbox next to the Success input of this node. After giving the block of nodes a descriptive comment container, the final result should look like this:

This task will allow us to designate Blackboard Key from the Details panel of the task in the Behavior Tree and set that key to an Actor of our choosing. We could have replaced the generic public variables we created with the specific values we want to set with this node, namely changing the PlayerActor key to null or empty. However, when making new tasks, it is good practice to make them generically useful with reusable behavior that changes depending on the inputs given in the Behavior Tree. With the task made to fit our needs, compile the Blueprint, save, and return to the EnemyBehavior Behavior Tree.
Back in the Behavior Tree, drag a wire down from Attack Player and add our new ResetValueTask task node to the right of both the Move To and Wait nodes. In the Details panel, change the Key to PlayerActor and leave the Actor dropdown with a None value. Finally, change Node Name to Reset Player Seen:

This completes our work in the Behavior Tree to establish a chasing behavior. Save and press Play to test the behavior. As you navigate the player character in front of the patrolling enemy, the enemy will stop its patrol and chase the player. When the enemy reaches the player, it'll stop for 2 seconds before returning to its patrol path. If it re-establishes the line of sight with the player, then it will interrupt its patrol and begin chasing the player again.