
Unless you make a living counting cards at Vegas (and even if you do), you probably can't remember all the email addresses, phone numbers, and addresses in your social and business circles. Fortunately, Outlook Express comes with an Address Book that can store just about every bit of information about a person.
The easiest way to open the Address Book is to click the "To:" or "Cc:" button while composing a message. Doing so opens the Select Recipients dialog box, a streamlined window, onto your Address Book.
The Select Recipients dialog box is useful when sending an email message; but to create new contacts, organize contacts, or look up information other than email addresses, you should use the full Address Book window. To open it, click the Addresses toolbar button in the main Outlook Express window, as shown in Figure 12-7, or choose Tools→Address Book, or press Ctrl+Shift+B.
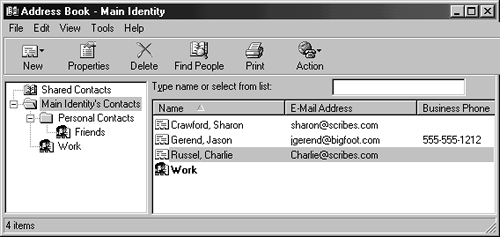
Figure 12-7. On the left is the Folders and Groups pane, which shows your contacts (located in the Main Identity's Contacts folder), along with any groups or subfolders you've created. The right pane lists the contacts in the currently selected folder. Double-click a contact to view or edit the contact's information.
Unfortunately, this feature doesn't always work as well as advertised; it often displays a map showing only the city of your contact. There's hope, however: Outlook 2000 exhibited this problem when it was first released, and Microsoft later fixed it, so the problem may disappear in subsequent revisions of Expedia Maps or Outlook Express.
You can sort the list either by clicking the appropriate list heading (such as Name or E-mail Address) or by using the View→Sort By submenu. (This submenu is where you'll find the much sought-after Sort By First Name and Sort By Last Name options.) The View menu also lets you change the contact display from detailed list form to a simple list, large icon, or small icon view.
Tip
You can make the Business Phone and Home Phone columns display other information, such as Company, Job Title, or Pager. Just right-click the heading itself (Business Phone or Home Phone) and choose the field you'd rather see from the shortcut menu.
By far the easiest way to create a contact is by receiving an electronic business card from the contact. All you have to do is click the address card icon in the upper right corner of the message window, choose Open from the pop-up menu, review the contact, and then close it.
The next easiest way to create a new contact is to grab the sender's email address from a message you've received, as shown in Figure 12-8.
Tip
You can right-click on any message in your mail folders and choose Add To Address book to create a new contact for the sender without opening the message.
Of course, you can always create a contact from scratch, too. To do this, click the Addresses toolbar button in the main Outlook Express window, click the New toolbar button in the Address Book window, and choose New Contact from the menu that appears. On the Name tab of the new contact (Figure 12-9), enter the contact's name as you want it to appear in your Address Book.
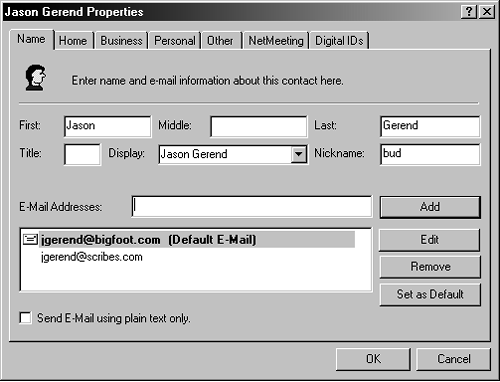
Figure 12-9. In the E-Mail Addresses box, enter the email addresses for the contact, making sure to click the Add button after entering each address. Use the Edit and Remove buttons to modify or delete addresses you've already entered. Don't forget to indicate which one is the main email address by clicking it and then clicking the Set As Default button.
Use the Display box to control how the contact's name appears in the Address Book contact list; you can use one of Outlook Express's proposed variants (first/last, last/first, and so on), or you can type in whatever form you like. (The Display format you choose here overrides the Sort By First Name or Last Name setting of your master Address Book list.)
Tip
The Nickname box is a handy little feature that isn't included in Outlook 2000 (take that, Outlook!). Whenever you address a new message to the contact, you can simply type her nickname in the "To:" field; Outlook Express will fill in the rest.
The other tabs of this massive Contact Properties dialog box are straightforward. They include:
Home and Business. Among other things, these tabs contain Web Page fields that you can use to enter the contact's personal and business Web site addresses.
NetMeeting. On this tab, you can enter the person's online conferencing address, if they use Microsoft NetMeeting for Internet phone calls and video teleconferencing (see Section 9.2.3). (You'll probably have to ask your contact for this information, or search for it using NetMeeting.)
The Digital IDs tab is where you could associate a digital ID with the contact. Digital IDs let a sender place a digital signature on a message, to help you confirm that it wasn't sent by an imposter. However, you can only associate a digital ID with a contact if the contact already sent you an exported version of her digital ID. You could then highlight the associated email address, click Import, and select the digital ID file that the contact sent you and that you saved to your hard drive.
But why bother with this kind of hassle? To share her digital ID, all your colleague has to do is send you a signed message—much simpler. Her ID is then automatically added to her contact information when you open the message.
If you find yourself often sending to a certain group of people—your family or your friends, for example—you can create a group. Thereafter, you can send a message to all members of the group by choosing the group's name from the Address Book.
To create a group, open the Address Book, click the New toolbar button, and choose New Group from the menu that appears. Type a name for the group in the Group Name box, and then click Select Members to add existing contacts to the Group.
In most respects, groups work just like a single contact. To send an email to a group, simply enter the group's name in the "To:" box of an outgoing message, or choose it from the Select Recipients dialog box. To view a group's properties, double-click its name in the Address Book. Groups differentiate themselves visually, however: In the Address Book, you don't see an email address for a group, and its name appears in bold with a slightly different contact icon.
Sometimes you can't find the contacts you're looking for. Maybe you have a giant Address Book; maybe they just aren't in your Address Book. In any case, Outlook Express provides a Find People tool designed explicitly for this situation.
To open the Find People tool, use the Find drop-down menu on the toolbar in the main Outlook Express window, then choose People from the menu that appears (or click the Find People button on the toolbar in the Address Book window). For details on using these dialog box to find an email address or other contact information, see Section 3.6.3.2.
Your Address Book may eventually get cluttered, especially if you don't turn off the slightly-to-extremely annoying Outlook Express feature that adds everyone you write to your Address Book. (To learn how to disable this feature, see Section 12.8.4.4.) There are two ways to deal with this clutter: delete contacts, or organize them into folders.
To delete a contact, group, or folder from the Address Book, click its name and click the Delete toolbar button; click Yes in the confirmation box. (It doesn't go to the Deleted Items folder; it's gone for good.)
If you have a lot of contacts, or if you'd like to maintain separate groups of contacts (such as work contacts and personal contacts), consider creating folders inside the Address Book. To do so, open the Address Book, choose New→Folder, type a name for the folder, click OK, and then drag names from the main Address Book list onto the newly created folder icon.
Be aware, however, that each folder appears to Outlook Express as a separate Address Book. For example, when using the Select Recipients dialog box to look in the Address Book for someone, you may not find the name of someone you know you've entered; in that case, you probably need to select a different folder from the drop-down list box at the top of the dialog box.