Example 2: HTTP-Based Correlation Using Two BizTalk Servers
The process of schedule correlation differs based on the type of transport (HTTP or non-HTTP) selected to exchange messages between schedules. The BizTalk Messaging implementation shape in the BizTalk Orchestration Designer has built-in support for HTTP-based correlation.
Before we go into the specific scenario, let's see what is involved in HTTP-based correlation in general. Say that the two business processes are the AcctMngSys and the ERP system. The three keys steps are as follows:
1. |
Send the UserAcctInfo message out from the AcctMngSys business process. |
2. |
Receive the UserAcctInfo in the ERP system process and send a response message. |
3. |
Receive the response message back on the AcctMngSys business process and correlate the response back to the existing AcctMngSys process. |
The following sections look at the details of each of these three steps. You need to understand what is involved without getting bogged down in the specifics of the example presented.
How HTTP Correlation Works Using Two BizTalk Servers
For schedule correlation to work correctly, two things must happen. First, there must be a unique identifier for each instance of the schedule, and, second, this unique identifier somehow needs to be sent to the destination application so that when the destination application is ready to send a response back, it can associate the unique identifier of the schedule instance with the response. Having said that, let's see how BizTalk achieves this. The XLANG Engine creates a GUID for each instance of the schedule. This is the unique identifier used. To send the unique identifier to the destination application, the GUID is included in one of the fields of the outgoing message itself. Of course, the source and the destination applications must agree and have the knowledge as to what field in the message is being used for this purpose.
For HTTP-based schedule correlation, three pieces of distinct information are sent to the destination application. The URL of the ASP page where the response message is to be posted, the name of the BizTalk Messaging channel that processes the response in the originating application, and, finally, the GUID or the unique identifier that identifies the schedule instance that originally sent the request. BizTalk Orchestration at runtime strings these three pieces of information and flows it into the designated field in the outgoing message agreed on both by the source and destination applications. In our examples, we are using the field ReturnPort in the HEADER section of the message for this purpose. This is shown in Figure 16.5. Let's look at the three pieces of information that are sent in the outgoing message. HTTP-based correlation is natively supported by BizTalk. All you need to do is on the data page of the orchestration flow the Response Port to the designated field in the message. In our case, it is the ReturnPort.
First let's look at the URL of the ASP page. This is the ASP page by the destination application to post the response. BizTalk provides a generic ASP page for this purpose. The ASP page is located in the ..Chp16AcctMngSysWebAppdirectory. Listing 16.4 shows the content of the page.
Listing 16.4. Source Code for the ReceiveResponse.asp Page
<%
' ReceiveResponse.asp
'
' Microsoft Biztalk Server 2000
' Copyright Microsoft Corporation, 1998-2000. All rights reserved.
'
' Description:
' Sample Biztalk Server Receive Response page
'
On Error Resume Next
Dim interchange
Dim SubmissionHandle
Dim PostedDocument
Dim ContentType
Dim CharSet
Dim EntityBody
Dim Stream
Dim StartPos
Dim EndPos
Dim queuepath
dim channelname
L_HTTPReqFailed_Text = "400 Request failed"
queuepath = Request.QueryString("qpath")
queuepath = "queue://Direct=OS:" & queuepath
channelname = Request.QueryString("channel")
Set interchange = Server.CreateObject( "BizTalk.Interchange" )
ContentType = Request.ServerVariables( "CONTENT_TYPE" )
'
' Determine request entity body character set (default to us-ascii)
'
CharSet = "us-ascii"
StartPos = InStr( 1, ContentType, "CharSet=""", 1)
If (StartPos > 0 ) then
StartPos = StartPos + Len("CharSet=""")
EndPos = InStr( StartPos, ContentType, """",1 )
CharSet = Mid (ContentType, StartPos, EndPos - StartPos )
End if
'
' Check for multipart MIME message
'
PostedDocument = ""
if ( ContentType = "" or Request.TotalBytes = 0) then
'
' Content-Type is required as well as an entity body
'
Response.Status = "406 Not Acceptable"
Response.Write "Content-type or Entity body is missing" & VbCrlf
Response.Write "Message headers follow below:" & VbCrlf
Response.Write Request.ServerVariables("ALL_RAW") & VbCrlf
Response.End
else
if ( InStr( 1,ContentType,"multipart/" ) > 0 ) then
'
' MIME multipart message. Build MIME header
'
PostedDocument = "MIME-Version: 1.0" & vbCrLf & "Content-Type: " & ContentType
|
In Listing 16.4, the thing to note carefully is how the script extracts the queue path and the channel name from the query string. The channel name is self-explanatory; the queue path name contains the name of the XLANG port of the source application and the GUID of the XLANG instance. The XLANG port name combined with the XLANG GUID instance forms the name of the per-instance queue. Toward the middle of the script these two variables are used in the call to IInterchange::Submit(). IInterchange::Submit() is one of the ways to submit a document to BizTalk Messaging. The file receive function, the MSMQ receive function, and the HTTP receive function are other ways to submit a document to BizTalk.
So far you have learned how to send the correlation information from the source XLANG application to the destination XLANG application. Next we will consider the way to send the response message back from the destination XLANG application to the correct XLANG schedule instance of the source application. To do this, in the destination XLANG schedule, in the data page of the orchestration, we simply flow the designated field in the message (ReturnPort in our case) to the XLANG port that delivers the message to a BizTalk Messaging. In the BizTalk Messaging in the destination application, we need to create an Open Destination Port. We will see this in more detail in the following examples.
In the next section, we will apply the general outline described here to the specifics of our example.
Pick Up UserAcctInfo Message and Deliver to a New AcctMngSys Business Process
You will find all the source code for this section in ..Chp16AcctMngSys. The first two steps take the UserAcctInfo sample message AcctMngSys_NewHire.xml from the private MSMQ queue (ReceiveNewHire) and deliver the message via BizTalk Messaging to the AcctMngSys orchestration schedule, AcctMngSys_16_2.skx.
Table 16.4 specifies the BizTalk Messaging objects required in this step. Notice the private messaging queue in the receive function in the table. It is the same private queue earlier in Example 1.
| Objects | Options and Settings Chosen | Note |
|---|---|---|
| Organization/Application | Name: Home Organization Application: NewHireApp | Use the default Home Organization |
| Port | Name: AcctMngSys_ ReceiveNewHireInfoPort (To an application)
Destination Application: New XLANG Schedule Schedule Moniker: AcctMngSys_16_2.skx Schedule Port: UserAcctInfo | You must type the schedule port name exactly as it is in the orchestration. |
| Channel | Name: AcctMngSys_ReceiveNewHireInfoChannel (from application)
Application Name: NewHireApp InBoundDocument: NewHireAccountInfo OutBoundDocument: NewHireAccountInfo Mapping: No Document Logging: Check only, In Native Format Advanced Configuration: Take the Defaults | No mapping is required because the inbound doc spec is the same as outbound document spec. The Document Definition NewHireInfo was created earlier, we are simply using here |
| Receive function | Name: AcctMngSys_ReceiveNewHireInfo
Type: MSMQ Receive Function PollingLoc: Direct=OS:.private$ReceiveNewHire Advanced Tab: Openness: Not Open Channel Name: AcctMngSys_ReceiveNewHireInfoChannel | The Not Open in the Openness indicates to BizTalk Server that the destination and source are explicitly specified. The Private Messaging Queue was created in Table 16.2. |
We now have the plumbing set up to receive a message into the AcctMngSys orchestration schedule, AcctMngSys_16_2.skx. Let's take a look at the file AcctMngSys_16_2.skx in the BizTalk Orchestration Designer.
Receiving UserAcctInfo into BizTalk Orchestration, Sending UserAcctInfo, and Receiving Response Message
Load the schedule source file AcctMngSys_16_2.skv into the BizTalk Orchestration Designer. Figure 16.19 shows the schedule.
Figure 16.19. Orchestration schedule AcctMngSys_16_2.skv. This represents the business process of the AcctMngSys application.

We will look at each action in the schedule. BizTalk Messaging delivers the AcctMngSys_NewHire.xml to the XLANG schedule orchestration implementation binding port, UserAcctInfo, which is bound to the action Receive Request. In the BizTalk Messaging Binding Wizard for this action, the Schedule Activation is set to yes. This means that every time a message arrives, a new instance of the schedule is created and started. When this value is set to yes, the text “Activate” is added to the BizTalk Messaging implementation shape.
The second action, WelcomeNewHire, is bound to a Windows scripting host component, WelcomeNewHireMsg.wsc. The script component takes the FirstName, LastName, and the Msg as a whole as the three parameters. The script displays a message box, showing the message content in the body, and the title shows the new hire name.
Function WelcomeNewHire(sMsg, sFirstName, sLastName)
       MsgBox CStr(sMsg), vbOKOnly, CStr(sFirstName & " " & sLastName)
       WelcomeNewHire = ""
End function
In the third action, SendToERPSystem, the message is sent out to a BizTalk Messaging implementation shape. This is where the correlation action begins. Double-click on the BizTalk Messaging shape connected to the SendToERPSystem orchestration port. The BizTalk Messaging Binding Wizard pops up. Next traverse to the Static or Dynamic Channel Information page. You specify the name of a static channel through which the message will be sent out. The channel name is AcctMngSys_SendNewHireInfoChannel. We will define this channel in the next section. Figure 16.20 shows the wizard page, Static or Dynamic Channel Information.
Figure 16.20. BizTalk Messaging Binding Wizard, Static or Dynamic Channel Information page.

After sending out the message to the ERPSystem business schedule, the AcctMngSys business process waits to receive the ERPSystem response message. At this point, BizTalk Server hydrates the schedule into the XLANG persistence database.
The response is received in the fourth action, ReceiveERPResponse. Double-click on the BizTalk Messaging shape connected to the ReceiveResponse orchestration port. The BizTalk Messaging Binding Wizard pops up. Click Next to move to the Communication Direction page shown in Figure 16.21. Note that the direction is set to receive. Click Next to go to the XLANG Schedule Activation Information page as shown in Figure 16.22. For this action, the value of the Schedule Activation is set to No. This means that when a response arrives at this port, no new schedule instance is created. Instead, the response message is correlated back to the existing and waiting schedule instance that originally sent out the UserAcctInfo message.
Figure 16.21. BizTalk Messaging Binding Wizard, Communication Direction page.

Figure 16.22. BizTalk Messaging Binding Wizard, XLANG Schedule Activation Information. Note that it is set to No.

Again click Next to go to the Channel Information page as shown in Figure 16.23. You need to specify two things: the name of the BizTalk Messaging Channel (AcctMngSys_ReceiveERPResponseChannel) through which the response message from the ERPSystem will re-enter the schedule and the URL http://localhost/AcctMngSys/ReceiveResponse.asp) of the ASP page that will be used by the ERPSystem to send the response. The file ReceiveResponse.asp can be found in installation in ..Chp16AcctMngSysWebAppdirectory.
Figure 16.23. BizTalk Messaging Binding Wizard, Channel Information page. Note the ASP page URL and the channel name.

Note
Because we have configured both the AcctMngSys and the ERPSystem in the same computer, we are using localhost in the receive response URL path. To extend the example across machines or across an organization, you will need to substitute the localhost with appropriate machine name or domain name of the server.
The next action in the schedule, DisplayERPResponse, is bound to the same Windows scripting host component, DisplayERPResponseMsg.wsc. The component displays the ERPResponse in the body and the name of the new hire in the title.
Let's now examine what is going on in the data page of the schedule as shown in Figure 16.24.
Figure 16.24. Data page of the orchestration schedule as in the AcctMngSys_16_2.skv.

The summary of the pieces in the data page are as follows:
Messages:
UserAcctInfo— Incoming new hire account message to the AcctMngSys business process
UserAcctInfoToERPSystem— Message that is sent to the ERPSystem
ERPResponse— Message from the ERPSystem, as a result of the update made to the ERPSystem
Components:
WelcomeNewHireMsg.wsc— Displays the new hire info that is going to be sent to the ERPSystem
DisplayERPResponseMsg.wsc— Displays the response message, received from the ERPSystem
The inbound document in the UserAcctInfo port is passed to the UserAcctInfoToERPSystem port so that the contents of the document are sent to the ERPSystem. Next, the address of the schedule port, ReceiveResponse, is passed into the ReturnPort element of the outgoing message in the UserAcctInfoToERPSystem Port. This information in the ReturnPort is used to return a response message to the original instance of the AcctMngSys schedule. The ReceiveResponse port string contains the MSMQ private queue name of the queue that's created dynamically by the messaging engine on instantiation of the schedule as well as the channel name. The instance reference appears as follows:
http://localhost/acctmngsys/receiveresponse.asp?channel=acctmngsys_receiveerpresponsechannel& qpath=ComputerName.DomainName\private$
Three pieces of information are in the string: the URL to the ReceiveResponse.asp page, the channel name, and the queue path for the per-instance message queue:
>Queue path— MachineName.DomainName.comprivate$acctmngsys_receiveresponsechannel{c03f79c0-fad4-4843-af73-84dfb3e35ac0}
In your machine, the GUID appended to the queue path will be different. When a message is returned to this per-instance message queue, it will correlate to the schedule. When the ERPSystem returns the response message back to this specific instance of the orchestration schedule, the system must use this ReturnPort information.
Finally, in the fifth action in the orchestration, DisplayERPResponse is bound to another Windows scripting host component. The component simply displays the response message received from the ERPSystem.
Function DisplayERPResponse(sMsg, sFirstName, sLastName)
      MsgBox CStr(sMsg), vbOKOnly, CStr(sFirstName & " " & sLastName)
      DisplayERPResponse = ""
End function
Sending the UserAcctInfo Message to the ERP System Using BizTalk Messaging Via HTTP
The action SendToERPSystem of the XLANG schedule delivers the outgoing message UserAcctInfo to the BizTalk Messaging channel, AcctMngSys_SendNewHireInfoChannel. The channel delivers the message to the BizTalk Messaging port that sends the message over the Internet using HTTP to the ERPSystem business process.
On the ERPSystem side of the exchange, the ASP page ReceiveUserAccountInfo.asp receives the message and delivers the message using BizTalk Messaging to the new orchestration schedule. We will cover the details of the ReceiveUserAccountInfo.asp page a little later when we talk about the ERPSystem. The following section sets up the required BizTalk Messaging objects to deliver the NewHireInfomessage to the ERPSystem.
In this section, you will configure BizTalk Messaging to set up a port for sending the message out via HTTP and then configure a channel to this port. Table 16.5 describes the steps required to accomplish this.
| Objects | Options and Settings Chosen | Note |
|---|---|---|
| Port | Name: AcctMngSys_ToERPSystemPort (To an Organization)
Destination Organization: ERP System Primary Transport: HTTP Address: http://LOCALHOST/ERPSystem/ReceiveUserAcctInfo.asp | The port uses HTTP to send the UserAccountInfo message to the ERPSystem. |
| Channel | Name: AcctMngSys_SendNewHireInfoChannel (From an Application)
Source Application: XLANG schedule InBoundDocument: NewHireAccountInfo OutBoundDocument: NewHireAccountInfo Mapping: No Document Logging: Check only, In Native Format Advanced Configuration: Take the defaults | No mapping is required because the Inbound doc spec is the same as Outbound document spec. |
Receiving UserAcctInfo in the ERPSystem
Before we go into the ERPSystem business process, let's define the ERPSystem. This example simulates a real-world ERP system. You will need to create a virtual directory using the Internet Services Manger MMC. Name this directory as ERPSystem and map this to the physical directory ..Chp16ERPSystemWebApp. In our example, the ERPSystem consists of the following:
ReceiveUserAcctInfo.asp— To receive the UserAccountInfo message. The file is located in the ..Chp16ERPSystemWebApp directory.
Orchestration schedule— ERPSystem_16_2.skv, representing the business process of the ERPSystem. The file is located in the ..Chp16ERPSystemdirectory.
COM component— ERPSystem.ERPSystemUpdate. The component simulates an ERPSystem by updating a table in the SQL Server. This is a good time to register the component in your machine, if you have not already done so. One way to do this is to host the component in a COM+ application. Create a new COM+ application called ERPSystem using the Component Services MMC; add the component into the COM+ application just created.
BizTalk Messaging— A set of channel-port configurations to deliver the incoming message to the ERPSystem XLANG schedule and another set of channel-port configurations to send the response message back.
ReceiveUserAcctInfo.asp receives the incoming message and submits it to BizTalk Messaging, using the IInterchange object model's Submit() function. A section of the code is shown here:
channelname = "ERPSystem_ReceiveNewHireInfoChannel"
SubmissionHandle = interchange.submit (1,PostedDocument,,,,,,channelname)
The first parameter in the Submit() function is the BIZTALK_OPENNESS_TYPE. It is set to 1 to indicate BIZTALK_OPENNESS_TYPE_NOTOPEN. This means that the source and destination are completely defined. When you provide the ChannelName parameter, BizTalk explicitly knows which channel to send this document to. The second parameter is the document itself.
Let's take a look at the XLANG schedule for the ERPSystem business process. Open the file ERPSystem_16_2.skv. Figure 16.25 shows the schedule.
Figure 16.25. XLANG schedule ERPSystem_16_2. skv. The schedule represents the ERPSystem business process.

The schedule receives the UserAcctInfo message through the BizTalk Messaging port from the ERPSystem_ReceiveNewHireInfoChannel. This process is exactly the same as the previous the BizTalk Messaging implementation shape that activated the AcctMngSys business process. Note that the XLANG schedule activation is set to Yes for the BizTalk Messaging binding shape because a new instance of the schedule is activated every time a message arrives at the port.
The message is then displayed using the ERPSystem_DisplayNewHireInfo.wsc scripting component.
The next action is bound to a COM component ERPSystem.ERPSystemUpdate. The component simulates an ERP system by inserting new hire information into a SQL Server table. To create the SQL database objects, use the scripts provided in Chp16ERPSystemSQLScript. The component uses a DSN (Data Source Name), "ERPSystem", to access this database. You will need to create a System DSN on your machine. Note to access the database the component code uses “sa” as the userid and a blank password. The component then formats a response message based on the schema ERPResponse.xml that contains the status of the insert operation into the SQL table.
An ERPSystem response message for a successful update may look like this:
<?xml version = "1.0"?>
<ERPResponse>
       <Employee Name="Ken Archer" Alias="ken_archer"/>
       <Response ResponseCode="0" strDescription="Successfully Created New Hire Ken Archer."/>
</ERPResponse>
A response message for a failure to update may look like this:
<?xml version = "1.0"?>
<ERPResponse>
        <Employee Name="Ken Archer" Alias="ken_archer"/>
       <Response ResponseCode="0" strDescription="[Microsoft][ODBC SQL Server Driver][SQL
Server]Violation of PRIMARY KEY constraint 'PK_UserAccountInfo'. Cannot insert duplicate
 key in object
'UserAccountInfo'."/>
</ERPResponse>
Note
Source code for the ERPSystem component is located in Chp16ERPSystemSourceERPSystem.
The next action simply displays the ERPSystem response message using the ERPSystem_DisplayERPResponse.wsc scripting component.
Finally, the ERPSystem response message is sent out from the schedule through a dynamic BizTalk Messaging orchestration port. The use of the dynamic port ensures that the response message is correlated to the same instance of the AcctMngSys schedule that originally sent the UserAcctInfo message. In Figure 16.26, note that we do not explicitly supply the channel name; instead, we use a dynamic channel, and we will set this information in the data page of the schedule.
Figure 16.26. BizTalk Messaging Binding Wizard, Static or Dynamic Channel Information for sending the response from the ERPSystem.
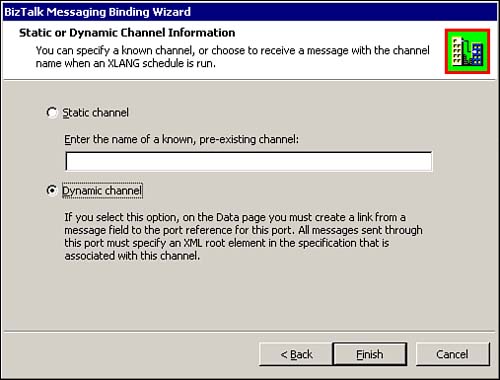
Figure 16.27 shows the data page for the schedule ERPSystem_16_2.skv. The data page of the schedule is complex. The pieces in the data page are as follows:

The two messages that you should take note of in the Figure 16.27 are
UserAcctInfo— The incoming message from the AcctMngSys business process
UpdateERPSystem_out— The ERPSystem response message returned by the ERPSystem COM component
Messages sent to the two scripting components are
DisplayNewHireInfo_in— The scripting component, ERPSystem_DisplayNewHireInfo.wsc receives this message.
DisplayERPResponse_in— The scripting component, ERPSystem_DisplayERPResponse.wsc receives this message.
The most important part of the data flow is the flow of HEADER@ReturnPort from the UserAcctInfo message to the dynamic port SendERPResponse. This transfers the HTTP URL stored in the UserAcctInfo message to the dynamic port so that BizTalk knows which particular instance of the AcctMngSys business process to return the message.
The response message content returned by the ERPSystem component (UpdateERPSystem_out) is passed to the ERPResponse message.
Next, we will look at the BizTalk configuration needed for this section. Table 16.6 outlines the ports, channels, and document definition.
| Objects | Options and Settings Chosen | Note |
|---|---|---|
| Organization/Application | Name: ERP_System | |
| Document definition | Name: ERPResponse | The doc specification was created in the Editor. First copy this file to your WebDAV repository and then create the document definition. |
| Port | Name: ERPSystem_ReceiveNewHireInfoPort (To an Application)
Destination Application: New XLANG schedule Schedule Moniker: ERPSystem_16_2.skx Schedule Port: UserAcctInfo | You must type the schedule port name exactly as it is in the orchestration. |
| Channel | Name: ERPSystem_ReceiveNewHireInfoChannel (from Organization)
Organization: Hacker's Den InBoundDocument: NewHireAccountInfo OutBoundDocument: NewHireAccountInfo Mapping: No Document Logging: Check only, In Native Format Advanced Configuration: Take the defaults | No mapping is required because the Inbound doc spec is the same as Outbound document spec. The document definition NewHireAccountInfo was created in the first example; we are simply reusing here. |
| Port | Name: ERPSystem_SendResponsePort (To an Organization) Destination Organization: Open Destination | This is an open destination port. Primary Transport does need to be set in open destination port. In the data page of the orchestration, we will flow the destination address from the incoming message. |
| Channel | Name: ERPResponse (from Application)
Source Application: XLANG Schedule InBoundDocument: ERPResponse OutBoundDocument: ERPResponse Mapping: No Document Logging: Check only, In Native Format Advanced Configuration: Take the Defaults | No mapping is required because the Inbound doc spec is the same as the Outbound document spec. The ERPResponse document definition uses the schema in file ERPResponseXML_HTTP.xml. |
Table 16.7 provides a list of SQL scripts to create the ERPSystem database in the SQL Server. Use the scripts to create the database, tables, and the stored procedure used in the example. You will also need to create a System DSN named ERPSystem.
| Objects | Options and Settings Chosen | Note |
|---|---|---|
| Database | Name: ERPSystem
Table Name: UserAccountInfo SQL Script : create_table.sql Stored Procedure: erpsys_CreateUser SQL Script: create_sp.sql | Database scripts are in Chp16ERPSystemSQLScript. |
| DSN | DSN Name: ERPSystem | DSN is used by the COM component to access the database. Note the component uses a userid “sa” and a blank password to access the database. |
Note
The SendERPResponsePort in the orchestration schedule ERPSystem_16_2.skv as shown in Figure 16.26 delivers the ERP response message to a dynamic channel. The dynamic channel in BizTalk Messaging is always associated with open destination BizTalk Messaging ports. The open destination port sends the document to the URL as shown in the Listing 16.5. In our example, the ASP page is ReceiveResponse.asp.
We will now see what happens in the AcctMngSys system when the ASP page receives the response document.
Returning the ERPSystem Response Message to the Original Instance of the AcctMngSys Schedule
The response message is submitted to the standard ReceiveResponse.asp on the Accounting side, with the query string containing values for the channel name and the queue path sent by BizTalk messaging server on the ERP system. Once again the URL is shown here in Listing 16.5.
Listing 16.5. Syntax for the URL Path for the Return Address
http://localhost/acctmngsys/receiveresponse.asp? |
The first thing that the ReceiveResponse.asp does is parse the document, channel name, and queue path from the query string. The script then takes the queue pathname from the query string, which is an MSMQ pathname syntax, and postfixes it with the string "queue://Direct=OS:." to translate it to MSMQ queue pathname syntax. The script then calls the IInterchange::Submit() function with the PostedDocument, channel name, and queue path, to submit the document to BizTalk Messaging. In our case, the channel name is AcctMngSys_ReceiveResponseChannel, as can be seen from the URL. Open ReceiveResponse.asp and examine the following code from the ASP file:
'Parse the query string for channel name and queue path
queuepath = Request.QueryString("qpath")
queuepath = "queue://Direct=OS:" & queuepath
channelname = Request.QueryString("channel")

'Create a BizTalk Interchange Object
Set interchange = Server.CreateObject( "BizTalk.Interchange" )

'Conde to convert the Posted Document to BSTR string
'
'Submit document asynchronously to Biztalk Server
'
 Call interchange.submit (4, PostedDocument,,,,, queuepath,channelname)
We will now configure BizTalk Messaging for the port-channel combination to receive this PostedDocument and deliver the document to the original schedule instance waiting for the response.
Table 16.8 shows you how to configure Messaging to return the ERPSystem response message to the original instance of the AcctMngSys schedule.
We are now ready to run the example and see how the response message is correlated to the running schedule.
Running the HTTP-Based Correlation with BizTalk on both Endpoints Example 2
To start the example, copy the File2Queue.vbs script and test Test_NewHire.xml to the .Chp16AcctMngSysSource directory. Also make sure that all receive functions except the ones used in this example (AcctMngSys_ReceiveNewHireInfo) are disabled. Then type the following at the command prompt:
File2Queue.vbs AcctMngSys_NewHire.xml
The following steps list the sequence in which the message moves and the appropriate message boxes that appear.
Note
Steps 1 through 5 illustrate running the HTTP-based scenario, where BizTalk is at both ends of the business process.
1. |
On Submission of the AcctMngSys_NewHire.xml to the queue ReceiveNewHire, the pop-up message box is as shown in Figure 16.28. Figure 16.28. The message box that appears after submitting the AcctMngSys_NewHire.xml to the queue ReceiveNewHire.
|
2. |
On receipt of the UserAccountInfo into the AcctMngSys_16_2.skx, the pop-up message box is as shown in Figure 16.29. Figure 16.29. The message box on receipt of the NewHireInfo in the AcctMngSys_16_2.skx business process.
Note that the XLANG schedule name in the message box title is AcctMngSys_16_2.skx. In Figure 16.30, note the XLANG Monitor showing the schedule instance running. The Monitor displays the running instance of the schedule AcctMngSys_16_2.skx. Each instance of the schedule is identified by a GUID appended to the name of the schedule. |
3. |
On receipt of the UserAccountInfo into the ERPSystem_16_2.skx, the pop-up message box is as shown in Figure 16.31. Figure 16.31. Note the message box title as ERPSystem_16_2.skx.
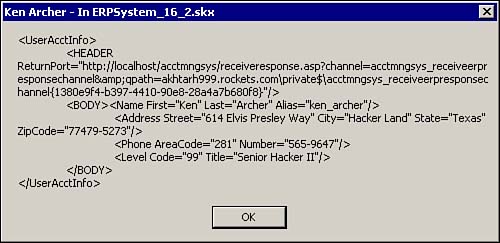
We are now in the ERPSystem business process. Figure 16.31 shows the message box showing the content of the UserAccountInfo message as received in the ERPSystem business process. Note that the ReturnPort attribute in the HEADER element is populated. |
4. |
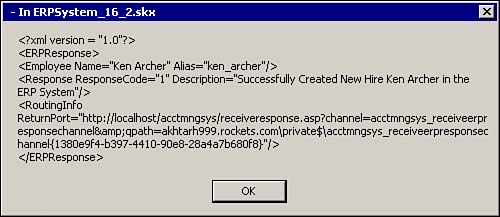
On completion of the ERPSystem update, the response message is displayed in the message box in Figure 16.32. Figure 16.32. Content of the response message as returned by the ERPSystem.
Figure 16.32 displays the message box, showing the ERPSystem response message after the database update is completed. Note the attributes ResponseCode and Description in the response element of the message. We are still in the ERPSystem. The message box title again displays the schedule name. Figure 16.33 shows the update to the ERPSystem database. Figure 16.33. The ERPSystem database after the new user is added to the system.
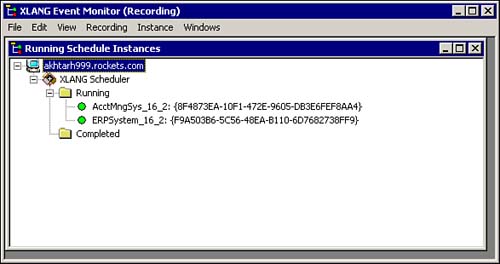
Figure 16.34 shows the XLANG Monitor. The monitor displays two XLANG instances, one for the running and now waiting instance of the AcctMngSys_16_2.skx schedule and one instance of the ERPSystem_16_2.skx schedule. Figure 16.34. XLANG Monitor shows the running instances of AcctMngSys_16_2.skv and ERPSystem_16_2. skv. Note that the instance of AcctMngSys_16_2.skv is waiting on the response.
The final Step in the ERPSystem business process is to return the ERPSystem update response back to the source system. |
5. |
Finally, on receipt of the ERPSystem response message back to the running AcctMngSys_16_2.skv, the pop-up message box is as shown in Figure 16.35. Figure 16.35. The message box displaying the content of the ERPSystem response as received in the AcctMngSys business process.
This completes the schedule correlation that began by sending out the NewHireInfo message to the ERPSystem. Note the title on the message box. We are back on the running instance of the AcctMngSys_16_2.skx schedule that originally sent the UserAcctInfo message to the ERPSystem. The XLANG Monitor in Figure 16.36 now shows that only AcctMngSys_16_2.skx is running. The execution of the ERPSystem_16_2.skx schedule is now complete. Figure 16.36. The XLANG Monitor displays the same instance of the schedule AcctMngSys_16_2.skx that originally sent the message.
|