
Parser Implementation
In this section, we implement the parser design from the preceding section using C++ and ATL. Unlike the functoid implementation earlier, there is not a method for implementing the parser using Visual Basic. The COM interface uses types, such as IStream, not accessible from Visual Basic.
The parser implementation comprises the following items:
BizTalk channel configuration
A COM coclass implementing IBizTalkParserComponent
The COM coclass provides the following:
Identification— Given a data stream, test whether it is the input format for the parser.
Properties— Get organization identifiers, codepages, and other properties.
We will use an HTML application for a test harness.
Configuring a Channel for a Custom Parser
Adapting the diagram in Figure 18.4, Figure 18.10 shows the channel we will configure.
Figure 18.10. Channel configuration for our custom parser.

Start the BizTalk Messaging Manager.
Create an organization to represent the broker that submits the data. xSelect File, New, Organization from the menu and name it organizationBroker_ch18. In the comment field, use This organization submits batch data in a non-XML format via an http form post monitored by a BizTalk http receive function. Click OK.
Create a second organization named organizationBroker2_ch18 with the comments This organization receives items posted by the original broker.
Create a document definition for the XML we will generate in the parser. Select File, New, Document Definition and name it definitionBrokerItem_ch18. Check the Document Specification check box and select the file BrokerItemSchema.xml from this chapter's sample files. You will need to copy this file to the BizTalk's WebDAV Repository first. This Repository is typically at C:Program FilesMicrosoft BizTalk ServerBizTalkServerRepositoryDocSpecs.
Next, create an e-mail port to the second organization. First we have to identify the SMTP host. Start BizTalk Server Administration. Open the node Microsoft BizTalk Server 2002, right-click BizTalk Server Group node, and select Properties. On the General tab, enter the name of a machine on your network that will be the SMTP host for sending e-mail. Any machine with IIS installed can be the SMTP host using the Virtual SMTP Server feature, even if the machine is not connected to a network. Click OK.
To create the e-mail port, or file port, select File, New, Messaging Port, To An Organization from the menu in the Messaging Manager, and name it portBroker2_ch18 with the comments This port delivers by e-mail or file to the second broker. Click Next. Browse for the organization named organizationBroker2_ch18 created previously. Browse for the Primary Transport and select SMTP or File. For SMTP, enter mailto:[email protected] in both the Address and Return e-mail address boxes. For File, enter an output filename with %tracking_id% embedded in it to guarantee a unique file. Click OK. Click Next. Click Next again accepting all defaults for Envelope Information. Check the Create a Channel for This Messaging Port check box and select From an Organization for the channel type. Click Finish.
The New Channel Wizard will now auto-launch. Name the new channel channelBroker_ch18 with comments This channel accepts an inbound batch of documents from a broker organization via an HTTP Receive Function. Click Next. Select the Open Source radio button. Click Next. Browse for the inbound document definition definitionBrokerItem_ch18 created previously. Click Next. Browse for the same output document definition definitionBrokerItem_ch18. Click Next. Click Next again, accepting all defaults for the Document Logging page. Click Finish, accepting all defaults for the Advanced Configuration page.
If you selected an e-mail port in the preceding steps, you must also enable e-mail relaying. By default, the Virtual SMTP Server will not allow e-mail to relay to external domains such as yahoo.com. Start Internet Services Manager from Administrative Tools. Open the node for the machine selected as the SMTP host earlier. Right-click Default SMTP Virtual Server and select Properties. On the Access tab, click the Relay button. Make sure that the domain for your e-mail address is included. A simple way is to select the All Except the List Below radio button and use an empty list. Click OK and then click OK again.
Caution
A caveat about the e-mail port is worth mentioning. During debugging, the system became unstable with exceptions in MSCIS.EXE before the first method in the parser component was invoked. Switching to the file port during debugging resolved the issue. Outside the debugger, using the e-mail port worked reliably.
Configuring a Test Harness for the Custom Parser
For a test harness, we need an HTML application and an HTTP receive function. The HTML application performs an HTTP Post, and the HTTP receive function routes the posted data to the channel with our custom parser.
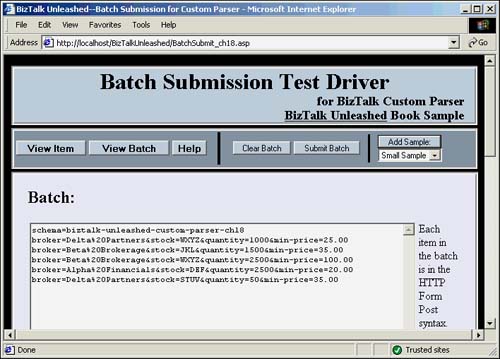
Figure 18.11 shows the test harness supplied with this chapter. It allows us to queue items and submit them in one batch.
Figure 18.11. Sample test harness.

To install this test harness, first create a virtual directory in IIS or select an existing one for testing purposes. To create one, launch Internet Services Manager. Open the node for your computer, right-click Default Web Site, and select New, Virtual Directory from the menu. Follow the wizard's instructions. When the wizard asks for an alias, use BizTalkUnleashed. The virtual directory must include Execute permissions. After the directory is created, right-click its node and select Properties. On the Virtual Directory tab, select High (Isolated) from the Application Protection combo box. Click OK. This protection setting is only necessary to match the rest of the following steps. The following steps assume http://localhost/BizTalkUnleashed/ as the virtual directory.
Copy two files into the virtual directory. From the chapter samples, copy batchsubmit_ch18.asp. From the BizTalk install, copy BizTalkHTTPReceive.dll, typically found in C:Program FilesMicrosoft BizTalk ServerHTTP Receive.
To configure the HTTP receive function, start BizTalk Server Administration. Open the node Microsoft BizTalk Server 2002, open the BizTalk Server Group node, and select Receive Functions. Select Action, New, HTTP Receive Function from the menu. In the dialog that opens, set the name to receiveBatchSubmit_ch18 and the comment to This HTTP Receive Function accepts a batch submission of non-XML data and forwards it to a channel with a custom parser. Set the Server and Virtual Directory to match the virtual directory we created previously. For example, the virtual directory entry might read /BizTalkUnleashed/BizTalkHTTPReceive.dll. Check the check box for returning a correlation token. Select an asynchronous submission to BizTalk. Click the Advanced button. Choose Open Source in the Openness combo box. Specify the inbound channel as channelBroker_ch18 that we created previously. Click OK. Then click OK again.
The final step is to grant the HTTP receive function permission to access BizTalk in the context of IIS. Launch Component Services in Administrative Tools (on the Control Panel). Open the path Component ServicesComputersMy ComputerCOM+ Applications, right-click the node for your virtual directory, and select Properties. For example, the name might be IIS-{Default Web Site//Root/BizTalkUnleashed}. We created this COM+ application implicitly when we selected High (Isolated) for the Application Protection setting for our virtual directory. On the Identity tab, fill in the user ID and password for the BizTalk Service account created during installation and click OK. Click Yes when a warning dialog pops up double-checking that you know what you are doing. To discover the user ID for the BizTalk Service account, launch Services from Administrative Tools. Open the Services (local) node and select the entry for BizTalk Messaging Service. The user ID needed here is in the column Log On As.
To confirm that the test harness is configured properly, launch http://localhost/BizTalkUnleashed/batchsubmit_ch18.asp. Click the View Batch button. Click the Add Sample button. Notice that each item in the batch is in the HTTP Form Post syntax per the format in the Parser Design section earlier in this chapter. Figure 18.12 shows the results.
Figure 18.12. Test driver before submit.
Click the Submit Batch button to post over HTTP the entire batch to the HTTP receive function we configured previously. Our configuration is ready if we get a message box showing a correlation identifier for the submission. The message will have an XML format as in Figure 18.13.
Figure 18.13. Message indicating successful batch submit.

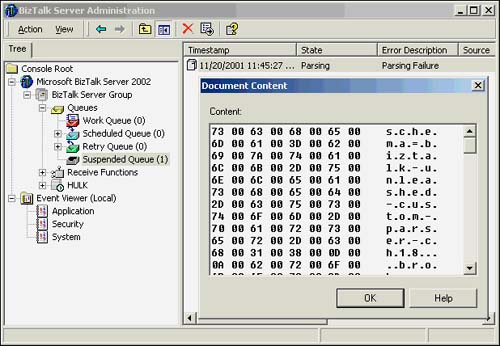
No parser is installed yet so the submission should fail inside BizTalk. To confirm, launch BizTalk Server Administration, and open the paths Event Viewer (local)Application and MicrosoftBizTalk Server 2002BizTalk Server GroupQueuesSuspended Queue. The document state shows as Parsing, and the error description shows as Parsing Failure. To see the document data, right-click the item in the Suspended Queue and select View Interchange. Figure 18.14 shows the results.
Figure 18.14. Parsing failure is expected at this point.
In the event log, there is an error entry. Double-click it to see a description that no parser could recognize the data.
To test the e-mail port or file port for the channel's outbound data, we need to post a valid XML document to the channel. To do so, return to the test driver. Replace the contents of the text box for the batch data with XML satisfying the schema assigned to this channel, such as in Listing 18.5 previously in this chapter in the section “Format of XML Data Output by the Parser.” The XML from Listing 18.5 is repeated here for reference:
<broker-item>
   <broker>Alpha Financials</broker>
   <stock>ABC</stock>
   <quantity>10</quantity>
   <min-price>5.00</min-price>
</broker-item>
Click Submit Batch again. The document should pass the validation test for the schema and pass through the channel arriving by e-mail or file depending on the port selection earlier. If you selected an e-mail port, an e-mail with the XML submitted should appear in your inbox. If your network connection is down, you can still confirm by checking the directory that holds queued e-mail messages. Typically, this directory is C:InetpubMailrootQueue. Other directories under Mailroot could also contain the message if there is an SMTP configuration problem. If no message is found, then check BizTalk Server Administration for an item in the Suspend or Retry queue.
ATL Shell Implementation
The first step in the COM implementation of the parser is making an ATL shell. The shell will contain a fully compilable C++ project with a sample implementation for IBizTalkParserComponent. We assume the latest release of Visual Studio 6, which is SP5.
Note
A custom ATL Object Wizard should be available at this point. If you skipped ahead, then briefly return to the section “ATL Shell Implementation” for custom functoids. Follow the instructions for installing the ATL Object Wizards and return here.
Create an empty ATL project in Visual Studio 6 as follows. Select File, New from the menu and select ATL COM App Wizard from the Projects tab. Enter FormPostBatchParser in the Project Name edit box and fill in the Location edit box to some suitable directory. Click OK. Click Finish on the next screen and then click OK on the next.
Next, run the ATL Object Wizard as follows. Select Insert, New ATL Object from the menu. Select BizTalk Unleashed in the Category list box and Custom Parser in the Objects list box as shown in Figure 18.15. Click Next. Enter FormPostParser in the Short Name list box. Change the ProgID to BizTalkUnleashed.FormPostBatchParser. Click OK.
Figure 18.15. ATL Object Wizard for a custom parser.

Note
If there are no choices for BizTalk Unleashed and Custom Parser, then the install of the ATL Object Wizards did not complete. Please retry and confirm each step.
Table 18.6 shows the actions the ATL Object Wizard took on our project. Note that the sample files with this chapter match the names of the files in this table. The description of each file varies somewhat because the sample files are the complete implementation rather than the starter files generated by the wizard.
The ATL Object Wizard forces ThreadingModel=Both regardless of the threading model selection in the wizard. Although this setting is not documented in BizTalk, the stock parsers shipped by BizTalk all have ThreadingModel=Both.
A shell implementation in ATL for the custom parser is complete. We will examine and extend the implementation later in the section “Adding Custom Functionality.”
Before compiling, confirm that the include directory for the BizTalk SDK is available to your project. Select Tools, Options from the menu. On the Directories tab, select Include Files in the Show Directories For list box. Add the BizTalk SDK include path, typically found at C:Program FilesMicrosoft BizTalk ServerSDKInclude. Click OK.
Also, confirm that C++ Exception Handling is enabled for your project. Select Project, Settings from the menu. Select All Configurations in the Settings For list box. Select C++ Language in the Category combo box on the C++ tab. Check Enable Exception Handling and click OK.
Build the project by selecting Build, Rebuild All from the menu. The build should complete with no errors, and the COM registration of the new parser should succeed.
To see that BizTalk recognizes the new parser, start BizTalk Server Administration. Open the node Microsoft BizTalk Server 2002. Right-click BizTalk Server Group and select Properties. On the Parsers tab, there is the list of standard parsers provided by BizTalk. Click the Refresh button, and our new parser should appear, similar to Figure 18.16. Move our parser to the top of the list using the up arrow button. BizTalk will now call our parser first when it needs to identify and parse a data stream.
Figure 18.16. Parsers recognized by BizTalk.

Tip
If the parser did not appear in the Parsers tab, then double-check that the registration succeeded during the build. BizTalk locates our component by checking the registration of all COM components. It looks for components with a specific COM category. Our ATL implementation provides that category using ATL's category map in FormPostParser.h.
Adding Custom Functionality
We are ready to add the specifics of the form post batch parser to the implementation. The completed parser is in the sample files. Unlike the custom functoid section, we will not incrementally change the ATL Object Wizard output. Rather, we will examine each function in the implementation in detail.
Interface Overview
The IBizTalkParserComponent interface has seven functions, as shown in Table 18.7.
| Interchange Level | ProbeInterchangeFormat() | Test whether an interchange can be handled by the parser. |
| GetInterchangeDetails() | Accept interchange information from BizTalk. | |
| Group Level | GroupsExist() | Test whether groups are in the interchange. |
| GetGroupDetails() | Identify pre-group parsing information. | |
| GetGroupSize() | Identify post-group parsing information. | |
| Document Level | GetNextDocument() | Parse one document. |
| GetNativeDocumentOffsets() | Identify post-document parsing information. |
BizTalk calls ProbeInterchangeFormat() to test whether a stream of bytes is an interchange supported by the parser. If so, BizTalk calls GetInterchangeDetails() to pass information to the parser and calls GroupsExist() to learn whether there are groups in the interchange.
If no groups are present, BizTalk parses the document sequence in the interchange by repeatedly calling the two document level functions. Specifically, for each document, BizTalk calls GetNextDocument() and GetNativeDocumentOffsets() in succession.
If groups are present, BizTalk repeats the document parsing sequence for each group. To start a group, BizTalk calls GetGroupDetails(). After the last document in a group, BizTalk calls GetGroupSize().
IBizTalkParserComponent::ProbeInterchangeFormat()
ProbeInterchangeFormat() tests the format of a stream of data. The function returns S_OK if the data is an interchange the parser can handle and S_FALSE otherwise.
Listing 18.7 is a concise form of our sample parser's implementation. The sample source code with this chapter has a full version with documentation, tracking, and error checking.
Listing 18.7. Concise Implementation of ProbeInterchangeFormat() (FormPostParser.cpp)
HRESULT CFormPostParser::ProbeInterchangeFormat ([in] IStream * pstm, [in] BOOL bFromFile, |
The first three parameters are derived from IInterchange::Submit() and IInterchange:: SubmitSync(), which are the only two means for an interchange to enter BizTalk.
IInterchange accepts data as a BSTR or a file reference. BizTalk builds an IStream interface to the data to pass as pstm to our parser. This IStream is read-only and only has members Read(), Stat(), and Seek() implemented. If a BSTR was passed to IInterchange, then bFromFile is FALSE, and pstm is a stream of Unicode data from the string. If a file was passed to IInterchange, then bFromFile is TRUE, and pstm is a stream from the file that the parser must know how to interpret. In the sample code in Listing 18.7, we assume wchar_t data for clarity.
The custom parser must retain a reference-counted copy of the given IStream if it returns S_OK. In the sample code in Listing 18.7, we retain it in a data member of type CComPtr<IStream> whose assignment operator does an implicit addref. Subsequent method calls on this interface will need access to the stream.
The parameter bstrEnvName is the optional envelope parameter passed to IInterchange::Submit() or IInterchange::SubmitSync(). Acquire IBizTalkEnvelope from the IBizTalkConfig interface to access envelopes by name. In our sample parser, we do not use envelopes.
The parameter pstmReceipt is a stream “that contains the receipt document” according to the BizTalk documentation. Little else is described. This parameter is not used in this sample.
The output parameter pbstrFormat is set to the document format, if S_OK is returned, and set to null otherwise. This value needs to match the value allowed for IBizTalkEnvelope::Format and IBizTalkDocument::Type. Valid values are x12, edifact, custom xml, custom, flatfile, and reliable. Case sensitivity is not specified in the documentation. We use custom in our example.
IBizTalkParserComponent::GetInterchangeDetails()
GetInterchangeDetails() receives information from BizTalk about the source and destination organizations for the interchange being parsed.
Listing 18.8 is the vacuous implementation used in our sample parser.
Listing 18.8. Concise Implementation of GetInterchangeDetails() (FormPostParser.cpp)
HRESULT CFormPostParser::GetInterchangeDetails ([in] IDictionary * pdict)
{
   return S_OK;
}
/*  This function simply returns S_OK.  The sample parser does not need to
    extract information about this interchange from the given dictionary.
*/
|
The single parameter is a dictionary, a set of name-value pairs. Names are not case sensitive for IDictionary. BizTalk specifies that the minimum set of name-value pairs at this point for the dictionary is per Table 18.8.
| Name | Value |
|---|---|
| src_id_type | Source organization qualifier (a number) |
| src_id_value | Source organization value |
| dest_id_type | Destination organization qualifier (a number) |
| dest_id_value | Destination organization value |
Recall that an organization has one or more identifiers. Each identifier has a name, such as “telephone number”, a qualifier, and a value, such as “800-555-1212”. The qualifier is a number and is used to refer to an organization identifier by number rather than by string. For example, in BizTalk, the number 12 is the qualifier corresponding to the name “telephone number”. The qualifier number is also known as type for the organization identifier. At runtime, BizTalk tracks just the type and value, per Table 18.8.
In practice, however, testing our parser with a file receive function yielded the dictionary settings in Table 18.9. Note that we used a file receive function instead of an HTTP receive function for debugging purposes. The section “Debugging the Parser” later in this chapter describes this switch.
| Name | Value |
|---|---|
| Src_ID_Type | OrganizationName |
| Tracking_ID | {316D42A9-769F-404C-9F52-8D6BFE7049C8} |
| Src_filepath | e: empCustomParserBatchReceive |
| Document_Name | definitionBrokerItem_ch18 |
| submission_id | {C87F22B6-703C-414A-A762-4C95F7FC05A3} |
| Src_filename | batch.txt |
| Dest_ID_Type | OrganizationName |
Our use of a file receive function is indicated by the entries for src_filepath and src_filename. Note that entry for Document_Name is the name of the inbound document definition for our channel configured earlier in the chapter.
IBizTalkParserComponent::GroupsExist()
GroupsExist() flags whether the interchange contains document groups. If so, the functions GetGroupDetails() and GetGroupSize() will be called. BizTalk calls GroupsExist() after calling ProbeInterchangeFormat() and before parsing begins.
Recall that an interchange can be a single document, a sequence of documents, or a sequence of groups. A group itself contains a sequence of documents.
Listing 18.9 is a concise form of our sample parser's implementation. The sample source code with this chapter has a full version with documentation, tracking, and error checking.
Listing 18.9. Concise Implementation of GroupsExist() (FormPostParser.cpp)
HRESULT CFormPostParser::GroupsExist ([out] BOOL * pbGroupsExist)
{
   *pbGroupsExist = TRUE;
   return S_OK;
}
/*	This function flags that groups exist and returns S_OK.
*/
|
The parser with this chapter always has groups. To conditionally support groups, the stream passed into ProbeInterchangeFormat() must be inspected.
IBizTalkParserComponent::GetGroupDetails()
GetGroupDetails() specifies for the next group in the interchange details to add to the BizTalk Tracking Database. BizTalk calls this function only if GroupsExist() flags that groups exist. If no groups exist, this function can return E_NOTIMPL. BizTalk calls this function once before each group is processed by the parser. As such, this function can also perform any internal pre-group handling.
Listing 18.10 is a concise form of our sample parser's implementation. The sample source code with this chapter has a full version with documentation, tracking, and error checking.
Listing 18.10. Concise Implementation of GetGroupDetails() (FormPostParser.cpp)
HRESULT CFormPostParser::GetGroupDetails ([in] IDictionary *pdict)
{
if (! m_pwchStream)
{
m_pwchStream = (wchar_t*)loadStream(m_spstmData);
for ( wchar_t * s = wcstok(m_pwchStream, L"
"); s; s = wcstok(0, L"
") )
{
wchar_t * x = wcschr(s, L'&'), // find first '&' delimiter in line
if (! x) continue; // skip non-document lines like the schema line
*x = '�'; // null-terminate at the '&'
m_docs.push_back(s); // add to an std::vector<wchar_t*>
}
std::sort(m_docs.begin(), m_docs.end(), lesspwsz()); // sort w/ wcscmp()
m_docpos = m_docs.begin();
}
return S_OK;
}
/* This function skips recording information for the BizTalk Tracking
Database. It performs first time initialization by loading the
interchange stream into class member m_pwchStream, a wchar_t buffer.
The main loop separates newline-delimited documents. Each document is a
single line and is &-delimited. The first & in each line is replaced with
an embedded null character. The modified document line is then added to
an std::vector<wchar_t*> class member, m_docs. After the loop, m_docs is
sorted using wcscmp() and STL via the STL comparator lesspwsz: struct
lesspwsz { bool operator() (const wchar_t * x, const wchar_t * y) const {
return wcscmp(x, y) < 0; } }; Sorting is on everything to the left of the
embedded null in each line. After the embedded null is more document data
that itself is null terminated. That data is parsed in GetNextDocument().
The first document in the vector is recorded in class member m_docpos.
This function returns S_OK.
*/
|
Our custom parser uses this function for first time initialization. It is called before each group is parsed, which also means that it is called before any parsing takes place.
The comments with the code in Listing 18.10 describe the mechanics. Here is an image of what takes place. It first loads the entire stream, such as the following, into a character buffer:
schema=biztalk-unleashed-custom-parser-ch18

broker=Delta&stock=ABC&quantity=1000&min-price=25.00

broker=Beta&stock=JKL&quantity=1500&min-price=35.00

broker=Alpha&stock=DEF&quantity=2500&min-price=20.00

broker=Beta&stock=WXYZ&quantity=2500&min-price=100.00

broker=Delta&stock=STUV&quantity=50&min-price=35.00
Next, it inserts each newline-delimited document into an array of type std::vector<wchar_t*>. The one-line document has an embedded null where the first “&” symbol appeared:
broker=Delta�stock=ABC&quantity=1000&min-price=25.00� broker=Beta�stock=JKL&quantity=1500&min-price=35.00� broker=Alpha�stock=DEF&quantity=2500&min-price=20.00� broker=Beta�stock=WXYZ&quantity=2500&min-price=100.00� broker=Delta�stock=STUV&quantity=50&min-price=35.00�
This technique isolates the broker field. Sorting the lines in the array using wcscmp() effectively groups the documents by the broker field.
broker=Alpha�stock=DEF&quantity=2500&min-price=20.00� broker=Beta�stock=JKL&quantity=1500&min-price=35.00� broker=Beta�stock=WXYZ&quantity=2500&min-price=100.00� broker=Delta�stock=ABC&quantity=1000&min-price=25.00� broker=Delta�stock=STUV&quantity=50&min-price=35.00�
The GetNextDocument() function will be able to progress through the sorted array, detecting group boundaries as it goes.
Note that, in our parser, we chose to organize the data into groups. In a simpler scenario, a group would be contiguous in the interchange data stream. In the case where groups are contiguous, there might be explicit group delimiters and group-level attributes available to parse.
Our sample parser elected not to set values for the BizTalk Tracking Database. To do so, set the IDictionary parameter according to the article “Supporting the Tracking Database with Parser and Serializer Components” in the BizTalk help file. This article enumerates dozens of name-value pairs that BizTalk will transfer from an IDictionary into the tracking database.
IBizTalkParserComponent::GetGroupSize()
GetGroupSize() specifies the size of the last group parsed and whether there are any more groups to parse. BizTalk calls this function only if GroupsExist() flags that groups exist. If no groups exist, this function can return E_NOTIMPL. BizTalk calls this function once after each group is processed by the parser. As such, this function can also perform any internal post-group handling.
Listing 18.11 is a concise form of our sample parser's implementation. The sample source code with this chapter has a full version with documentation, tracking, and error checking.
Listing 18.11. Concise Implementation of GetGroupSize() (FormPostParser.cpp)
HRESULT CFormPostParser::GetGroupSize ([out] long * pnGroupSize, [out] BOOL * pbLastGroup)
{
*pbLastGroup = (m_docpos == m_docs.end()) ? TRUE : FALSE;
*pnGroupSize = 0;
for ( int i0 = m_docpos - m_docs.begin() - 1, i = i0; (i >= 0) && (0 == wcscmp
|
The value stored in output parameter pnGroupSize will appear in the BizTalk Server Tracking Database.
The comments with the code in Listing 18.11 describe the mechanics. Table 18.10 has an image of what takes place. On entry to the function, class member m_docpos points to one position beyond the last document parsed. That last document was also the last document of a group. Here is a sample with three groups showing the possible values for m_docpos.
| m_docpos | m_docs array |
|---|---|
| [0] = broker=Alpha�stock=DEF&quantity=2500& min-price=20.00� | |
| [1] = broker=Beta�stock=JKL&quantity=1500& min-price=35.00� | |
| [2] = broker=Beta�stock=WXYZ&quantity=2500& min-price=100.00� | |
| [3] = broker=Delta�stock=ABC&quantity=1000& min-price=25.00� | |
| [4] = broker=Delta�stock=STUV&quantity=50& min-price=35.00� | |
| (end position) |
The first position for m_docpos is just after the Alpha group. The second position is just after the Beta group. The final position is just after the Delta group.
IBizTalkParserComponent::GetNextDocument()
GetNextDocument() parses the next document in the interchange and converts it to XML. It handles the case where the document is actually a receipt, and it provides for the proper correlation of receipts. This function also flags whether this document is the last one in the entire interchange or the last one in the current group.
Listing 18.12 is a concise form of our sample parser's implementation. The sample source code with this chapter has a full version with documentation, tracking, and error checking.
Listing 18.12. Concise Implementation of GetNextDocument() (FormPostParser.cpp)
HRESULT CFormPostParser:: GetNextDocument ([in] IDictionary * pdict, [in] BSTR bstrName, |
Input parameter pdict is the dictionary for the document. In our custom parser, the fields in Table 18.11 were in the dictionary. Note that these fields are the same ones in the dictionary passed to GetInterchangeDetails() except for the syntax field.
| Name | Value |
|---|---|
| Src_ID_Type | OrganizationName |
| Tracking_ID | {316D42A9-769F-404C-9F52-8D6BFE7049C8} |
| src_filepath | e: empCustomParserBatchReceive |
| Document_Name | definitionBrokerItem_ch18 |
| submission_id | {C87F22B6-703C-414A-A762-4C95F7FC05A3} |
| src_filename | batch.txt syntax custom |
| Dest_ID_Type | OrganizationName |
On output, the dictionary field working_data is to hold the XML form of the document as a string.
Input parameter bstrName is the name of the document definition for data in the channel. In our custom parser, the value was set to definitionBrokerItem_ch18, which is also the field Document_Name in the dictionary. Acquire IBizTalkDocument from the IBizTalkConfig interface to access document definitions by name if schema information is needed.
Error handling is done with output parameter pbValid rather than the HRESULT return value. Returning a negative HRESULT such as E_FAIL aborts the rest of the documents in the interchange. Set *pbValid=TRUE if a valid document was parsed. Otherwise, set *pbValid=FALSE, advance the stream position to the start of the next document, set working_data in the dictionary to the invalid content for the administrator to review, and return S_OK.
Output parameter pbLast flags whether this document is the last one in the interchange or the last one in the current group.
The comments with the code in Listing 18.12 describe the mechanics. Here is an image of what takes place. On entry to the function, class member m_docpos points to the next document to parse. There is a simple mapping of the tag=value syntax to the <tag>value</tag> syntax.
*m_docpos = broker=Beta�stock=JKL&quantity=1500&min-price=35.00� "working_data" field for IDictionary: <broker-item> <broker>Beta</broker> <stock>JKL</stock> <quantity>1500</quantity> <min-price>35.00</min-price> </broker-item>
The last three output parameters, pnReceipt, pbReceipt, and pbstrCorr, are for handling receipts. Our sample parser does not support receipts. In the event that a receipt enters the channel instead of a document, the parser must detect the receipt. A detected receipt is converted to XML and placed in the dictionary. Output parameter *pbReceipt is set to TRUE to flag that the document is really a receipt. Output parameter *pbstrCorr is set to the ProgID of a custom COM component that implements IBizTalkCorrelation. For details on correlating receipts, see the article “Creating Receipt Correlator Components” in the BizTalk documentation.
IBizTalkParserComponent::GetNativeDocumentOffsets()
GetNativeDocumentOffsets() calculates size and position information for the native, unparsed form of the document in the interchange stream. BizTalk Tracking uses this information to log the unparsed data.
Listing 18.13 is a concise form of our sample parser's implementation. The sample source code with this chapter has a full version with documentation, tracking, and error checking.
Listing 18.13. Concise Implementation of GetNativeDocumentOffsets() (FormPostParser.cpp)
HRESULT CFormPostParser:: GetNativeDocumentOffsets ([out] BOOL * pbSizeFromXMLDoc, [out] |
Set output parameter *pbSizeFromXMLDoc=TRUE and BizTalk will calculate size and offset information. In this case, the other two parameters are not used.
To calculate the size and offset, set *pbSizeFromXMLDoc=FALSE. Set *pnOffset to the offset within the interchange data to the first byte of the document. This offset can be passed to IStream::Seek(). Set *pnSize to the total number of bytes the document occupies in the stream.
In our custom parser, we calculate the offset using class member m_pwchStream. Remember that m_pwchStream is a copy of stream contents. We get the pointer to the last document and subtract m_pwchStream using pointer arithmetic to get the stream offset. The size of the document is handled by the helper function docSize(), which is given in Listing 18.14.
Listing 18.14. Implementation of Helper Function docSize() (FormPostParser.cpp)
size_t docSize ( const wchar_t * d ) // return size in bytes
{ // d has the form: broker=xxx�field1=val1&...&fieldn=valn�
// There is an embedded null so wcslen() must be called twice.
size_t n = wcslen + 1; // tally 1st field + embedded null following it
n += wcslen(d+n); // tally remaining fields after embedded null
return n * (sizeof wchar_t);
}
|
Debugging the Parser
To simplify debugging, we use a file receive function. Our HTTP receive function runs inside DLLHOST.EXE, which is more difficult to debug.
To configure the file receive function, start BizTalk Server Administration. Open the node Microsoft BizTalk Server 2002, open the BizTalk Server Group node, and select Receive Functions. Select Action, New, File Receive Function from the menu. In the dialog that opens, set the name to receiveFileSubmit_ch18 and the comment to This File Receive Function is used to debug the custom parser. Enter *.txt in the File Types to Poll For edit box. Enter a path in the Polling Location edit box such as C:TempCustomParserBatchReceive. Make sure that the directory exists. Click the Advanced button. Choose Open Source in the Openness combo box. Specify the inbound channel as channelBroker_ch18. Click OK. Then click OK again.
Return to the Visual C++ IDE that has the project for the custom parser. Select Project, Settings from the menu and select the Debug tab on the property page that opens. Select a debug configuration in the Settings For combo box. Enter the full path to MSCIS.EXE in the Executable for Debug Session edit box. The full path is typically C:Program FilesMicrosoft BizTalk ServerMSCIS.EXE. Click OK.
MSCIS.EXE is the service for BizTalk Messaging Services. Stop this service as follows. Start BizTalk Server Administration. Open Microsoft BizTalk Server 2002 and then BizTalk Server Group. Select the node that is the name of your computer. Right-click and select Stop.
Start the Visual Studio debugger for the parser project, and the service now restarts in the context of the debugger. Breakpoints will fire inside the parser component when data enters the channel.
To place data in the channel, copy a file ending in .txt into the directory monitored by the file receive function. Be sure that the file is stored in a Unicode format. The parser only understands Unicode for simplicity. There is a chapter sample file, SampleBatchSubmit.txt, for this purpose.
Tip
NOTEPAD.EXE has an option for saving in Unicode.
During the debugging process, BizTalk automatically disables the file receive function if there are any failures. Be sure to re-enable by monitoring the properties for the file receive function in BizTalk Server Administration.
Tip
Interchanges that are not completely handled can remain queued for handling. The result is that after debugging for a while there may be many interchanges that immediately get replayed against your component. To avoid interference, manually empty the Work Queue as follows. In BizTalk Server Administration, open Microsoft BizTalk Server 2002BizTalk Server GroupQueuesWork Queue. Right-click any queue items and select All Tasks, Move to Suspended Queue from the menu. Items in the Suspended Queue can be deleted by right-clicking them and selecting Delete.
Be advised that the MSCIS.EXE process will keep our parser's DLL loaded, thereby locking it. To rebuild the DLL, MSCIS.EXE must not be running. By default, this process auto-starts at boot time and has options to restart a fixed number of times. You can either modify these settings or forcibly end the process. If you accept the risks for forcibly ending, right-click the entry for MSCIS.EXE in the Task Manager and select Debug. When the debugger attaches to the process, use the debugger to end the process. Using Task Manager directly to end the process will not work.
To shut down MSCIS.EXE cleanly, launch Services from Administrative Tools found in the Control Panel. Under the node Services (local), double-click the entry for the BizTalk Messaging Service. On the General tab, change the Startup Type to Manual. On the Recovery tab, select Take No Action for all three combo boxes. Restart the computer.
DLLHOST.EXE also keeps our parser's DLL loaded if you use the HTTP receive function. To shut down the DLLHOST.EXE cleanly, open Internet Information Services from Administrative Tools. Open the node with the machine with the HTTP receive function, right-click the virtual directory for the HTTP receive function and select Properties. On the Virtual Directory tab, click the Unload button. Click OK.
Tip
Remember to restart the MSCIS.EXE service when debugging is done. To restart, just reverse the steps given previously for stopping the service including any modifications to the options for auto-starting and auto-restarting.