Selection Transformations
Resizing and reorientation, as you've seen, can be applied either to the whole canvas or to any selected object. The transformation methods that follow can be applied only to selections, not to the whole image (unless you start by selecting the entire image).
Skewing Selections
Skew, according to my trusty Webster's, means “…to place at an angle.” When you skew an object in Photoshop, you can do more than just slant it. You can twist, stretch, and distort it as if the object were on a sheet of rubber instead of a computer screen. The Skew command, found under Edit→Transform→Skew, enables you to twist your selection in all possible directions. Just click the handles and drag the selection. Click the toolbox to apply the setting, or double-click inside the selection, or press Enter/Return.
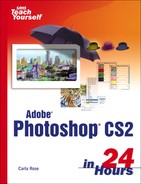
Skewing is related to the Perspective crop function and can be used to serve the same purpose: restoring warped perspectives. The big difference is that, because it's used on a selection instead of the whole canvas, you can straighten individual objects. Figure 4.15 shows a wedding with organ pipes about to fall on the bride's head. Because the photo was shot with a wide-angle lens, the walls and furniture appear to be slanting. In Figure 4.15, I've selected the organ cabinet with the Polygonal Lasso.
Figure 4.15. Selections can be made with any of the Selection tools, not just the Rectangular Marquee.

Now I can apply the Skew function (Edit→Transform→Skew) to the selected chest to straighten it. Figure 4.16 shows this step.
Figure 4.16. It usually doesn't take much to straighten a tilting line.

Now, all I have to do is fill in the space where the pipes moved away from the bride, and I'm done. Because my selection is still active, I can slide it to the right a little, and move it to where it fits best. A brush full of paint fills in any remaining gaps, and the result can be seen in Figure 4.17.

Distorting Selections
All the transformation tools operate very similarly. They possess subtle differences in how they can move the selection. The Distort command (Edit→Transform→Distort) moves the selection something like the Scale command and Skew command do, but, instead of changing the size of the image, Distort crushes or stretches the image. Figure 4.18 shows one of those fashion model dolls, and the way she'd probably look if she were a real person.
Figure 4.18. Of course, you could also do the reverse, making somebody normal into a fashion model.

Select an object from one of your pictures and practice with skewing and distorting it. Remember that these commands are available to you only when the marquee is blinking, indicating that there's an active selection.
Changing the Perspective of a Selection
The Perspective command is one of the most useful functions in the Photoshop arsenal. When you want to create an image that appears to diminish in the distance, the Perspective tool can't be beat. Its movement is completely intuitive. When you drag a corner handle, the opposite corner becomes a mirror image—when you click an anchor and drag the mouse away from the selection, the mirror image moves away. When you click and drag the anchor in, it, too, follows suit.
The difference between Perspective and Distortion is that when you apply Distortion, you can do it to only one corner of the selection. Perspective automatically adjusts both corners when you drag one.
In Figure 4.19, I'm applying perspective to a shot of a gatepost. In this case, I want to make it look as though the post and the ram are about 10 feet tall instead of 5.
Figure 4.19. Apply the Perspective command to a selection to apply false perspective.
