Jumping into ImageReady
One of the best features of Photoshop CS2 is the program that comes along with it, ImageReady CS2. This is the latest and greatest version of this web graphics program. You can move an image back and forth between Photoshop and ImageReady just by clicking the button at the bottom of the toolbox.
ImageReady is Adobe's web graphics program. ImageReady includes many of the basic color correction, painting, and selection tools that you've already learned in Photoshop, plus a powerful set of web tools for optimizing and previewing images and creating GIF animations and rollovers.
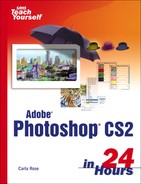
Figure 24.1 shows the ImageReady toolbox. As you can see, many of the icons are familiar. A few of the new ones let you create and view image maps, rollovers, and slices. (You'll learn about these interesting terms later on this hour.) The button with the browser icon opens your browser, displaying the image you're working on, so you can check to see that the actions you're inserting will work as expected.
Figure 24.1. Click the button at the bottom of the toolbox or press Command+Shift+M (Mac) or Ctrl+Shift+M (Windows) to switch between ImageReady and Photoshop.

Which, When?
|