Blending Modes
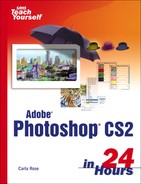
In the real world, when you place a second brush full of paint over paint that's already there, different things happen, depending on the color of the paint you're applying—how opaque it is, whether the first layer is wet or dry, and so on. In Photoshop, you can control all these factors by applying what's called blending modes. You'll find them on a pop-up menu in the Tool Options bar, as shown in Figure 8.12. Blending modes apply to all tools that can draw or paint, including the Pencil, Clone Stamp, and Gradient tools, as well as the more obvious ones. As you can see, there are quite a few modes. Take a quick look at the blending modes and how they work.
Figure 8.12. This list shows the Brush blending modes. Other tools have similar choices.

Suppose that you're working with only two colors. One is the base color, the one that's already in place. The second is the blend color, the one that you apply with each blending mode enabled. You get a third color, a result that varies according to how you blend the first two.
Figures 8.13–8.35 display what happens when you choose each of the options. (The examples were painted with a firm brush in hot pink on a limegreen background, except for those with the letter R, which have the colors reversed.)

Figure 8.35. Luminosity—Gives a result color with the hue and saturation of the base color and the luminance of the blend color. Opposite effect of Color Blend mode.

Figure 8.14. Dissolve—A random number of pixels become the blend color. This gives a splattered or “dry brush” effect.

Figure 8.15. Darken—Evaluates the color information in each channel and assigns either the base color or the blend color, whichever is darker, as the result color. Lighter pixels are replaced, but darker ones don't change.

Figure 8.16. Multiply—Multiplies the base color by the blend color, giving you a darker result color. The effect is like drawing over the picture with a Magic Marker. Where the background is light, you see the original blend color.


Figure 8.18. Linear Burn—Darkens the base color to reflect the blend color by decreasing the brightness. Blending with white produces no change.

Figure 8.19. Lighten—Evaluates the color information in each channel and assigns either the base color or the blend color, whichever is lighter, as the result color. Darker pixels are replaced, but lighter ones don't change. This is the exact opposite of Darken.

Figure 8.20. Screen—Multiplies the base color by the inverse of the blend color, giving you a lighter result color. The effect is like painting with bleach. The symbol was drawn with the brush set to Wet Edges.


Figure 8.22. Linear Dodge—Brightens the base color to reflect the blend color by increasing the brightness. Blending with black produces no change.

Figure 8.23. Overlay—Evaluates the color information in each channel and assigns either the base color or the blend color, whichever is darker, as the result color. Lighter pixels are replaced, but darker ones don't change.

Figure 8.24. Soft Light—Darkens or lightens depending on the blend color. The effect is said to be similar to shining a diffused spotlight on the image. With a light blend color, it has very little effect.

Figure 8.25. Hard Light—Multiplies or screens the colors, depending on the blend color. The effect is similar to shining a harsh spotlight on the image.

Figure 8.26. Vivid Light—Burns or dodges the colors by increasing or decreasing the contrast, depending on the blend color. If the blend color (light source) is lighter than 50% gray, the image is lightened by decreasing the contrast. If the blend color is darker than 50% gray, the image is darkened by increasing the contrast.

Figure 8.27. Linear Light—Burns or dodges the colors by decreasing or increasing the brightness, depending on the blend color. If the blend color (light source) is lighter than 50% gray, the image is lightened by increasing the brightness. If the blend color is darker than 50% gray, the image is darkened by decreasing the brightness.

Figure 8.28. Pin Light—Replaces the colors, depending on the blend color. If the blend color (light source) is lighter than 50% gray, pixels darker than the blend color are replaced, and pixels lighter than the blend color do not change. If the blend color is darker than 50% gray, pixels lighter than the blend color are replaced, and pixels darker than the blend color do not change. This is useful for adding special effects to an image.


Figure 8.30. Difference—Compares brightness values in the base and blend colors, and subtracts the lighter. Overlaps are interesting in this mode. They cancel the previous action.


Figure 8.32. Hue—Gives you a result combining the luminance and saturation of the base color and the hue of the blend color.

Figure 8.33. Saturation—Gives you a color with the luminance and hue of the base color and the saturation of the blend color. Unless you reduce the saturation of the blend color significantly, nothing shows in Grayscale mode.

Figure 8.34. Color—Combines the luminance of the base color with the hue and saturation of the blend color. Useful for coloring monochrome images because Color mode retains the gray levels.
