Printing the Page
Okay, now you're finally getting around to printing the image. I told you there were a lot of printing variables, didn't I?
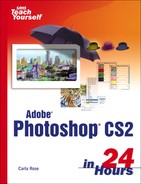
Pull up the Print dialog box by choosing File→Print (see Figure 23.5). The first thing you should notice is that this dialog box also looks different depending on what printer you have, what platform you're running on, and the mode of the image. However, they all ask for the same information.
Figure 23.5. The ultimate dialog box: Print.

Let's look at some of the Print fields and options you might see:
Copies— How many copies of the document do you want to print? Enter a number here.
Pages— This area specifies the range of pages to be printed. This setting is irrelevant in Photoshop because its documents consist of only one page.
Media Type— Here you enter what kind of paper or transparency film you're printing on. This setting actually determines how much ink is applied because different kinds of paper are more or less absorbent.
Print Quality (also called Mode)— You can often specify a printer resolution here, such as 300 or 600 dpi. Some printers enable you to specify Best, Normal, Econofast, or some variation on this theme, as well as a specific dpi setting. In this case, it's done by choosing Custom and then the quality.
Destination— You can print to the printer, obviously, but you can also print to a file. This means saving the printed output as a PostScript or EPS file or an Adobe Acrobat PDF. (This option works only if you've selected a PostScript-compatible printer or are using Mac OS X.)
When you choose File, the Print button says Save. Click it to bring up the Save dialog box, where you can name the file and select the file format you want (see Figure 23.6).
Figure 23.6. Printing to a file.

Print Selected Area— When this box (simply called Selection in Windows) is checked and you have a rectangular area currently selected in your Photoshop image, you can print just that area. This works only with rectangular selections created with the Marquee tool. Also, it doesn't work for feathered selections.
Encoding (can also be simply a check box for ASCII format)— Here you tell Photoshop which encoding method to use when it sends the image data to the printer. ASCII is understood by all PostScript printers, so it's a safe bet. Binary encoding is more compressed and thus can be faster, but it doesn't work on all printers. JPEG encoding is even faster, but it results in some loss of data because it's a lossy compression scheme. JPEG encoding works only with PostScript Level 2 printers.
Print In— Here you can decide how to print the image: in grayscale, in RGB colors, or in CMYK colors. For some desktop printers, RGB gives better results. (If you're unsure, try both and see which looks better to you.)
Print Separations— This option appears in place of the Print In option, but only if the image is currently in CMYK or Duotone mode and the composite color channel is active. When you check this option, Photoshop prints each channel as a separate color plate. For example, a CMYK document would print as four separate pages, one for all the cyan data in the image, one for magenta, one for yellow, and one for black.
Options— Strangely enough, Options isn't always one of your options. On a non-PostScript printer, such as the HP DeskJet series, you'll see the Options button as one of your choices in the Print dialog box. Options lets you choose Intensity, Halftoning, and Color Matching. Leave all three at Auto unless you're printing a photograph. If you are, choose Photographic from the Color Matching menu to get the best possible color reproduction.
At long last, when everything's set to your satisfaction, click Print to print it!
Your Mileage May Vary…
|
So, that's how to print from Photoshop. But as you'll probably discover, printing directly from Photoshop doesn't happen as often as you might expect. Most of the time, images created in Photoshop are brought into another application for final placement and output. Most often these are page layout applications, such as InDesign and QuarkXPress. Photoshop images can even be brought into other image-editing or drawing applications, such as Painter and Illustrator, and printed from there.
The main thing to watch for when you're printing Photoshop images from other applications is the format of your file. Make sure that it's compatible with the program you're bringing it into. If it's not, believe me, you'll know! Other than that, any settings related to the image, such as custom colors or halftone screens, are brought with the image automatically.