Creating Paths
There are three paths you can take when creating paths (sorry, I couldn't resist):
Create a path directly from a selection you've already made.
Create a path from scratch by using the Pen tools and drawing the path by hand.
Create a path using the Shape tools.
Paths via Selections
Depending on the image at hand, simply making a selection and converting it to a path can be the easiest and quickest way to create a path.
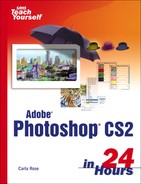
Let's look at an example. Figure 13.1 shows the test image, a tire gauge. We'll select the object, and make what's called a clipping path, clipping it out of the background. Without Photoshop, you would achieve the same effect with a photographic print and a pair of scissors.
Figure 13.1. The test image. The goal is a clipping path that outlines the gauge.

As you remember, selection can be accomplished by using a number of tools. For this image, I selected the background with the Magic Wand and then cleaned up the selection using the Quick Mask. Other objects might be selected more easily by using a combination of the Elliptical Marquee and the Polygonal Lasso. You might even need to combine the results of several selection tools to get it all. Just keep the Shift key pressed to merge the selections. Figure 13.2 shows the selection.
Figure 13.2. The tire gauge is now selected.

Try it YourselfConvert a Selection to a Path Now that you have a selection, follow these steps to convert it to a path:
|


Although renaming the work path isn't required, it's a good idea, especially if you might need the path again. If the path is left as a work path and you start a second path, one of two things will happen. First, if the work path is still active in the Paths palette, the new path will be added to it as a subpath. Second, if the original work path is no longer active in the Paths palette, the new path will replace it. (Undo and the History palette give you opportunities to recover the original path, but it's easier to simply rename it and transform it into a regular path at the time of creation.)
Another Path to Travel
|
Paths via the Pen Tools
Sometimes, making a selection is too difficult or requires too much work on a particular image. In that case, consider using the Pen tools and drawing the path by hand.
If you've used vector-based illustration programs, such as Adobe Illustrator or Macromedia FreeHand, you already know about Bézier-based drawing tools such as Photoshop's Pen tools. If you haven't used these kinds of tools before, you should know right up front that it takes a little practice, but the payoff is worth the effort. In addition to the standard Pen tools that draw a line and add or remove points on the line, Photoshop provides two additional Pen tools. The Freeform Pen tool gives you the power to draw any kind of line you want—straight, curved, or squiggly—and turn it into a path. And, when used with the Magnetic option, the Freeform Pen tool makes drawing around a complicated object much easier.
A Bézier curve is defined by three points: one on the curve and two outside the curve at the ends of handles that you can use to change the angle and direction of the curve. If this sounds like gibberish, don't worry; you'll see some examples.
Try it YourselfUsing the Pen Tool The best way to learn how to use the Pen tool is simply to play around with it in a new Photoshop document.
|


Okay, those are the basic ideas: straight lines via corner points and curved lines via smooth points. But there's more that you have to know about each one to use them effectively.
Corner Points
Corner points are easy. No matter what kind of line is coming into a corner point, the result is always an angle, not a curve. If a curved line comes into a corner point, it's the smooth point at the other end of that line that affects the line's angle (see Figure 13.11).
Figure 13.11. Corner points surround smooth points.

Restraining Order
|
Smooth Points
As you saw in the first Pen tool example, the behavior of smooth points is a bit more complicated and takes some getting used to. A smooth point always tries to create as smooth a curve as it can between two meeting lines (see Figure 13.12).
Figure 13.12. Smooth points do their utmost to create curves out of any situation.

Try it YourselfCreating a Sharp Curve There is a less smooth kind of curve you can create when you need it. It's called a sharp curve. It looks like a pair of arches, or the top half of a heart, or a stick seagull, and the following steps show you how to create one:
|


Previewing the Path
When you're creating all these points and lines, there's a preview feature that can be very helpful. Look at the Tool Options bar. There's an option called Rubber Band, which you can access by selecting the Pen and clicking the down-pointing arrow next to the strip of tool icons. Activating this feature enables you to preview both straight lines and curves before you click to create them. Experiment to see this feature at work. Take a look at the other options, too. Each tool and shape on the strip has different settings accessible via this arrow.
Completing the Path
To complete a path, you have two choices: close the path by connecting the final point to the initial point, or leave the path open.
A closed path means you have created a loop, so the final path has no beginning or end. To close a path, use the following steps:
1. | Create a path by using whatever points you need. |
2. | After the last point, move your cursor so that it appears on top of your initial point. You'll see a small circle next to the Pen pointer. |
3. | Click to create a final corner point, or click and drag to create a final curve (see Figure 13.15). Figure 13.15. The start and stop point is the gray one.
|

An open path means the path has a beginning and an end. Figures 13.8 through 13.14 have all been open paths. To end a path that you want to keep open, use the following steps:
1. | Create a path by using whatever points you need. |
2. | After the last point, simply click the Pen tool icon in the toolbar. The path now has an end. The next time you click in the image, you'll be starting a new path instead of continuing your previous path. |
Paths Are Composed of Subpaths
|