
Chapter 33. Building ASP.NET MVC Applications
In This Chapter
• Introducing the ASP.NET MVC Framework
• Creating Your First ASP.NET MVC Application
• Summary
ASP.NET Web Forms was originally created to give Windows Forms developers a familiar paradigm when developing web applications. Web Forms creates abstractions and provides the underlying plumbing to enable developers to create event handlers for things such as click-and-selection changed events. Some developers felt that this abstraction incurred too much overhead and complicated the act of building web applications.
Many of those who felt that way were fans of a Model View Controller (MVC) pattern. This pattern goes by several other names, but most commonly is referred to as MVC or MVP (Model-View-Presenter). This chapter provides you with an introduction to ASP.NET MVC Framework, a new alternative to Web Forms development that comes built into Visual Studio 2010. If you are intrigued by MVC development after reading this chapter, SAMS Publishing offers several books that give you all the detail you need for this new framework.
Introducing the ASP.NET MVC Framework
MVC is all about giving developers the ability to create web applications in a quick, lean, and agile fashion. This means that the core tenets of this MVC Framework are testability, rapid development, and extensibility. Anything that you want the MVC Framework to do that it doesn’t do now, you can extend on your own through any number of extension points.
Key to making an MVC application testable and extensible is a clear separation of concerns. In other words, all the functional parts of an MVC application have clear responsibilities that are hard and fast rules, not conventions or guidelines. For example, with a Web Forms application it is up to the developers to decide whether they’re going to put code in a code-behind file or in the ASPx page, or if they’ve been around the block a few times, in a separate class library. With the MVC Framework, there are no code-behind files, only Models, Views, and Controllers.
Models
In short, models are data. The model is the abstraction of your application’s business logic, rules, and the information stored and retrieved by your application. Models basically define the entities with which your users interact, the rules for those interactions, and information about the data type and constraints. You need to know that the models here refer to the models supplying information to the views, and these models do not necessarily need to be the same as the objects pulled directly from your database. For example, the Order model rendered by a view in your application might not look exactly like the Order table in your database.
Views
The view is the markup sent to the browser. Some code can be inside the view to dynamically pull information from the model, but the view is never anything more than dynamically rendered HTML. There should never be any business logic embedded in a view. The view displays the results of executed business logic by referring to the model but should never execute the business logic itself. When you think about the ultimate goal of separation of concerns—keeping duties and responsibilities clear and separate—the idea of keeping business logic out of the view makes sense.
Controllers
The responsibility of the controller is to handle an incoming request, interact with the data sources as needed (web services, cloud services, or raw database access), decide which view is appropriate based on the request, and finally render the view. The controller makes sure that the view has access to the model and then tells the MVC framework to render it. In the next few sections you see how controllers interact with models and views in a sample application.
Creating Your First ASP.NET MVC Application
To start learning about what an MVC application looks like, the easiest thing to do is just create one. Open Visual Studio 2010 and open the Create Project dialog. Select Web from the installed templates panel on the left, and you should then see a ASP.NET MVC 2 Web Application template, as shown in Figure 33.1. Give the project a name and a directory and then click OK.
Figure 33.1. Visual Studio 2010 New Project dialog.

After you click OK, you are asked if you want to create a unit test project (shown in Figure 33.2). As previously mentioned, one of the key tenets of ASP.NET MVC Framework is testability. If you answer yes, a project will be added to the solution that provides a test framework for unit testing your controllers. If you are interested in learning more about unit testing and how it applies to the ASP.NET MVC Framework, see the end of the chapter for additional learning resources.
Figure 33.2. New MVC Project dialog, prompting for unit test project creation.

The MVC template is going to create the core pieces of your application and some basic scaffolding such as a controller and set of views for enabling users to create accounts and log in using the ASP.NET Membership Provider.
Note
One of the great things about ASP.NET MVC Framework is that it can utilize virtually any ASP.NET facility, including the entire provider model. This enables you to create MVC applications with session state, roles, membership, forms authentication, and much more.
The stock project structure includes some prepopulated folders:
• Content—Starting point for your site’s content. By default, the Site.css file starts here, and you can add subdirectories for images and other media types.
• Controllers—Where all your controllers reside. All controller classes must have a Controller postfix, as shown in Figure 33.3.
Figure 33.3. Stock ASP.NET MVC 2 project structure in Solution Explorer.
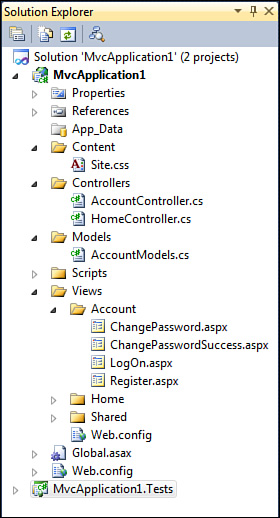
• Models—A handy starting point for all your web application models. Many enterprise applications start by deleting this folder and placing the models in a reusable class library.
• Scripts—Where all your JavaScript resides. This folder comes prepopulated with a version of jQuery and all the scripts required to support ASP.NET Ajax.
• Views—The root of the view folder hierarchy. Below this folder, you can find a folder for each controller, named exactly the same as that controller. For example, a Views/Account folder contains all the views used by the AccountController class.
Figure 33.3 shows a screenshot of the stock project structure after creating a new ASP.NET MVC project.
At this point, because the default project template contains enough scaffolding for you to start, you can press F5 and watch the application run. Note that the application supports forms authentication, new user creation, and user login out-of-the-box.
Figure 33.4 shows what it looks like when you run the default ASP.NET MVC project.
Figure 33.4. Default ASP.NET MVC 2 application.

In the next section you create your own MVC page that shows you how MVC’s internal plumbing works.
Building an MVC Page
This section walks you through the basics of creating a new ASP.NET MVC page. By going through this process you can hopefully get a good feel for how the MVC framework works at a high level.
The first thing we to need is a controller. To create a new controller, right-click the Controllers folder in the project created in the previous section, and choose Add and Controller. This brings up a dialog asking you for the controller name and also asks if you want to create stub methods for Create, Update, Delete, and Details. Leave that check box unchecked so we can create our methods manually; call the controller DemoController. When you’re ready, click the Add button.
What you are presented with is an empty MVC controller that looks like the following code:
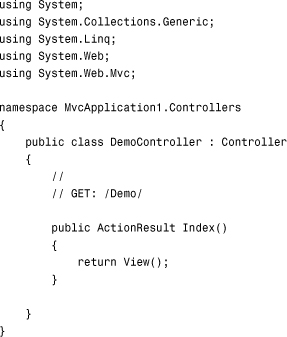
Right now, we have a controller called DemoController and a method on that controller called Index. This means that the URLs /demo and /demo/index both work and both execute that method. This is due to the default URL routing configuration. To see the routing configuration in action, open the Global.asax.cs file.
If we try to press these URLs, we get an error because no view corresponds to the Index method. The error message that you get from trying to access this URL is so informative to a new MVC developer that we included it as Figure 33.5.
Figure 33.5. Accessing a controller without a corresponding view.

In this message you can see how the MVC Framework is attempting to automatically locate a view based on the name of the method invoked and the name of the controller.
Now let’s create a view. To do that, create a new folder called Demo under the Views folder. Then, right-click the Demo folder and choose Add; then select View. Here you see several options, including creating a strongly typed view, choosing which type of stock view content should be provided, and the view name. For now, leave all the defaults and name the view Index.
This brings up an HTML editing surface for the new view. Note that there is no code-behind for this view—this is by design. If you remember in previous section, separation of concerns tells us that putting a code-behind below a view is a dangerous temptation to start embedding business logic in the view, so code-behinds are left out entirely. If there’s work to be done, it should be done in the controller (fetch and update) or in the model (business logic and data representation).
Now when you run the application and navigate to the /demo or /demo/index URLs, you should see the default content.
As a brief taste of the kind of incredibly powerful functionality you can get from MVC views, add the following line of code somewhere below the word Index in the second content placeholder:
<%= Html.ActionLink("Click here to go home", "Index", "Home") %>
This HTML extender actually renders an HTML anchor element. The huge benefit here is that it renders a link to the Index method on the Home controller; the developer doesn’t need to (and shouldn’t!) know about the specific URL. This is just one of dozens of HTML extenders that make creating dynamic views in MVC both powerful and easy.
Accepting Form Input
Invariably, after seeing a little bit of what MVC is and how it works, developers immediately begin wondering how to invoke server-side events or how to manipulate data and accept input from users. First, you need to remember that in the MVC framework, there is no concept of server-side events. There are no server controls and no concept of postback and invoking server-side events.
So if you don’t have postbacks and server-side events, how do you provide interactivity for your users? To answer this, we have to dust off the corner of our brains that remembers what HTML actually is and unlearn the abstraction layer placed over HTTP by Web Forms.
To demonstrate both MVC’s simplicity and power, let’s create a simple form and write a controller method that responds to that form.
To start, open the Index.aspx page in the Demo folder and add the following block of code below the Index text:

Here we use another HTML extender, the BeginForm method to tell the MVC Framework that we plan to POST the contents of the user-submitted form to whatever URL is mapped to the Demo controller’s DoSomething method.
Because we post to the DoSomething method, we should probably create that method in the DemoController class:

There is an incredibly powerful model binding subsystem that is part of ASP.NET MVC that can take form values and either turn them into method parameters as shown here or even convert them into model classes. For example, if all the form values in a form belong to a Customer class, you can actually pass an instance of the Customer class to the method to which your form posts, and the MVC model binder takes care of mapping everything accordingly. It is a huge timesaver and creates incredibly readable code.
Now let’s just create the view. Repeat the process we used last time by right-clicking the Demo folder in the Views folder and add a new view called DoSomething. Put the following markup in the file:
<%= ViewData["color"] %>
Now when you request the page at the /demo URL, you are prompted to enter your favorite color. When you do so and click the Submit button, your browser makes an HTTP POST request to /demo/DoSomething, which invokes the code you just added to the DoSomething() method. This sets a variable in the ViewData dictionary. (A facility for providing information from the controller to the view; more can be found on this by checking out the resources at the end of the chapter.) This variable is then accessed from the DoSomething.aspx view, displaying your favorite color, as shown in Figure 33.6.
Figure 33.6. Results of posting a form to a Controller method.

Summary
This chapter provided you with a small taste of what it’s like to build web applications using ASP.NET MVC Framework, which strives for simplicity, ease of maintenance, high testability and reliability, and scalability. If these things interest you and you aren’t a big fan of postback-based development, perhaps you should look into MVC development.
This chapter barely scratches the surface of what you can do with ASP.NET MVC Framework but showed you some of the things possible while still being completely compatible with existing ASP.NET functionality such as the provider models, session state, forms authentication, and more.
Note
This chapter barely scratches the surface of ASP.NET MVC Framework and all of the advanced functionality you can leverage from it. For a detailed approach to ASP.NET MVC, read ASP.NET MVC Framework Unleashed from Sams Publishing or check out the official ASP.NET MVC Framework website at http://www.asp.net/mvc. The MVC Framework has historically released new versions faster than Visual Studio, so keep an eye on the official website for the latest version and the publicly available source code if you’re into that sort of thing.